
25443-EDAMZ
![]()

Bluetooth® Water Timer
With Moisture Sensor Feature
A smart, efficient and convenient method to manage garden watering and irrigation.
This manual is a universal manual for all of our 1,2 and 4 zone Bluetooth® timers.
By using our free app on your Android or iOS smart device (minimum required iOS 9 or Android V7.0), this water timer can be programmed wirelessly, allowing you to use your smart phone or tablet to control all the programming and interface functions on your water timers or irrigation controllers. The app has easy-to-follow cues that are displayed on your smart device to guide you through the process. The timer can be set to water on any or all days of the week, from 10 times or more per day, with a duration ranging from one minute to 12 hours.
The water-delay setting lets you postpone your irrigation cycle without losing your preset program. You can also manually control the settings right at the faucet, without using the app. You can even manage multiple timers from the same app. These water timers will automatically water sequentially once they are programmed via your smartphone or tablet. No need to open the user’s guide to determine which buttons to push. The App is highly intuitive and programming is simple.
Features:
- The smart Bluetooth® Water Timer allows you to change the method of watering your garden from a range of up to 10 m (30 ft). Control your garden’s watering schedule from your smart phone or tablet remotely.
- The easy to install application is simple to operate.
- Daily, weekly and cyclical programming. A four-zone timer allows you to water four different areas from the same faucet. Each zone can be programmed with a different start time.(single and two-zone timers follow this same guide).
- Manage one or more controllers from a single app with the ability to name each controller, and add an image. You can replace the valve’s photo and name to easily distinguish where you want to water.
- Works with water pressure from 10 to 120 psi
- Easily change the manual settings from the App to water on demand (Manual watering available in 1 minute increments up to 360 minutes).
- No need to open the user guide to determine which buttons to push. The App is highly intuitive and programming is simple.
- Review scheduling by viewing the “Next Watering” feature on the App.
For use in North America only.
Pairing your Smart Phone with EDEN® Bluetooth® Controller:
Compatible with Bluetooth® 4.0 devices (minimum required iOS 9 and Android V7.0). Pairing is required only once. On subsequent operations of the app, the app will sync automatically with the controller and will display the paired controller status screen.
1. Download and install the EDEN® Water Timer App :


Please visit the Google Play Store or App Store, search for “EDEN Water Timer” to download the app. The EDEN® Water Timer App is free.
2. Remove the battery tray and install 4 AA Alkaline batteries (batteries are not included). Firmly reinstall the battery tray.
Replace batteries when the timer flashes a red light or when the app light notifies you that batteries need replacing. Please use only Alkaline batteries.

3. Your Bluetooth® timer is now in pairing mode and will flash a green light every 2 seconds. You will also hear two clicks about 2 seconds apart. This is normal and ensures the valve is closed before you turn on the water.
4. After the app is installed, tap to launch the app. The app prompts you to set up the Bluetooth® controller. The app displays the various Bluetooth® controllers. Don’t forget to activate Bluetooth® on your smartphone or tablet. If you have forgotten to activate your smartphone or tablet, the app will suggest you activate it.
5. Install the Bluetooth® timer:Connect the timer to an outdoor hose faucet. Make sure the timer is securely fastened. Your timer is now ready to be used with any product that can be attached to a standard hose adapter. You can attach up to 4 hose devices per timer.
6. Turn on Your Water :The water supply must remain on for the timer to work properly.
Stop Watering :You can stop watering at any time whether it is during manual watering, or during a programmed time.
Timer Spec:
Model: 25443-EDAMZRange: 30 ft (10 m) without interferencePressure Operating: 10 – 120 PSITemperature Operating: 32 – 110°F (0 – 45°C) T45Frequency Band: 2402 – 2480 MHzOperating Frequency: 915 MHz (N. Amer.)Max Power: < 20 dbm IC: 24967-254B1FCC ID: 2ASWP – 254B1 Power: 3V DC 4x AA LR6 / 1.5V
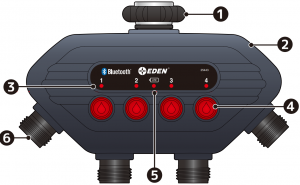
1 Water Source (Female thread ¾” in) 4 Manual Water Button2 Bluetooth® Timer Control System 5 Battery Indicator3 Function Indicator 6 Water Outlet (Male thread)
For outdoor use with cold water only!Not for use with household appliancesDo not mix Alkaline, carbon-zinc, or rechargeable batteriesUsed or dead batteries must be removed from the timer and disposed properly


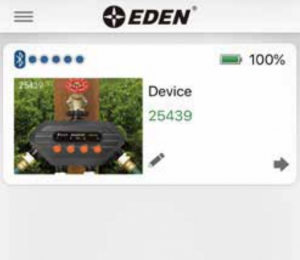
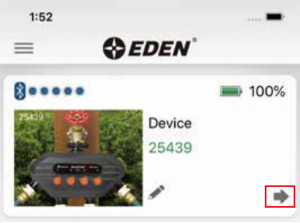
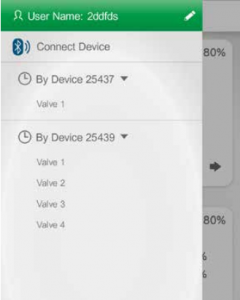
Edit Device Profile:
Tap ![]() or the “Device” name on the screen to setup.You can change the Device profile for device icon, name and password.
or the “Device” name on the screen to setup.You can change the Device profile for device icon, name and password.
You can name your Bluetooth® timer if you have more than one. This helps you identify your timers.
Any programming changes can be overridden by any auhorized user. You can add more Bluetooth® timers. If you are using more than one timer controller unit, you can also replace the unit’s photo and the name to easily distinguish between them.
Caution: Two people can not connect simultaneously!Only one user at a time can be connected to the device.


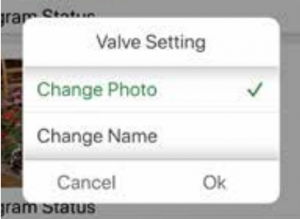
Tap “Change Photo” to replace it with a new one from the phone camera or gallery. Then Tap “OK” to save or “Cancel” to discard changes.
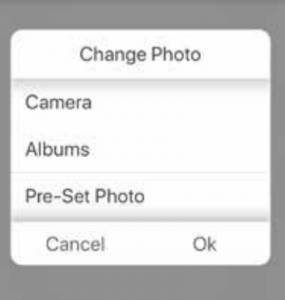
Select photos from Camera, Albums or Pre-set Photo.
Noted: If you select Camera, you can take a photo from the camera.
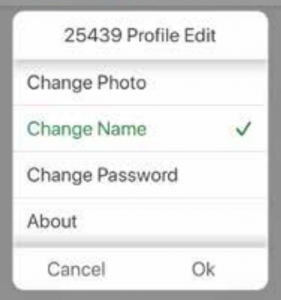
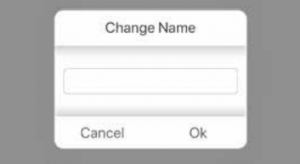
To change the device name (max. 12 characters), tap “Change Name” and “OK”
Tap “OK” once the desired name is entered for your device. (max. 12 characters)
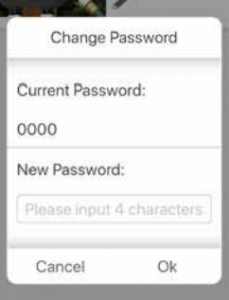
Tap “Change Password” if you wish to enter a new password. There is no default password. If you forgot the password, you will need to reset the unit. To reset, remove the battery case and while you re-insert the battery case, hold the #1 button until you see the battery indicator turn red, release the #1 button. The unit has been reset.
If you set up a password, other users will need to enter the password to access the device.
Setting up a password allows you to protect your Bluetooth® timer from”Unauthorized users”.

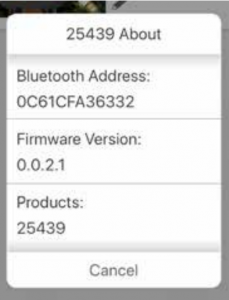
Tap “About” to find out more about the device information such as Firmware version, Bluetooth® address, etc.

Setup Zone Valves:
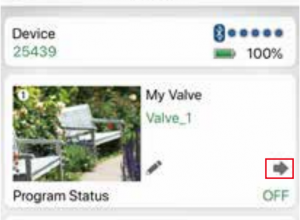
Tap ![]() or valve photo to view “Valve Setting” and set up
or valve photo to view “Valve Setting” and set up
Tap “valve 1” or ![]() to change the valve name (max. 12 characters) and icon. Repeat the step for the rest of the valves.
to change the valve name (max. 12 characters) and icon. Repeat the step for the rest of the valves.
Tap Valve 1, 2, 3 or 4 to rename.
If you are using more than one valve on your controller unit, you can also replace the valve’s photo and the name to easily distinguish between them where you want to water.

Program Your Watering Schedule:
Tap ![]() to view “Valve Setting” and adjust the watering schedule
to view “Valve Setting” and adjust the watering schedule
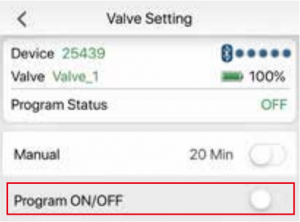
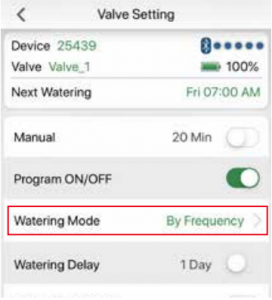
Swipe the “Program” bar to turn on the programming mode and select your watering preferences

Tap the Watering Mode to > change watering mode to “By Frequency” or “By Week Day”

Select “By Frequency”, then tap the “Setting” key.By selecting Frequency, you can have the device run multiple times in one day
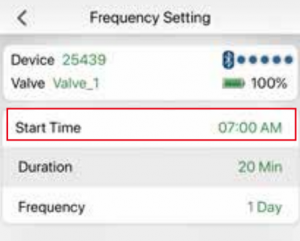
Tap “Start Time” to select desired watering time
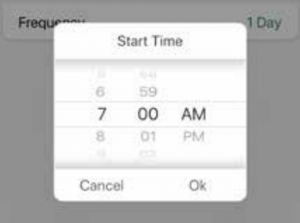
Scroll up or down to select the desired watering time, then press the “OK” key
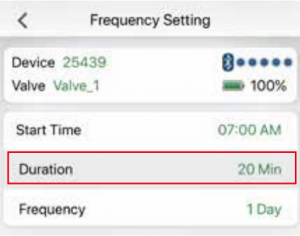
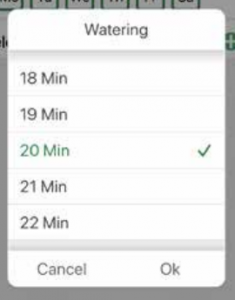
Tap “Duration” and scroll up or down to select your desired watering time. Then press the “OK” key

Move up and down to select the duration, then “OK”
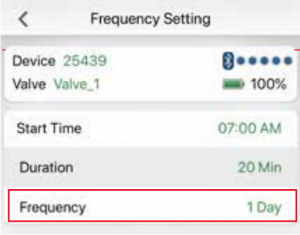
Tap “Frequency”. You can select how many times per hour, or day your want to water
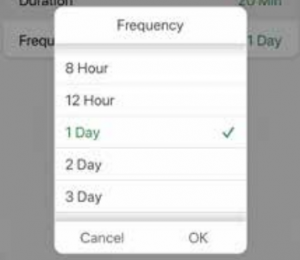
Select the desired Frequency then “OK” or tap “Cancel” to go to previous setting
Tap Watering Mode to change the watering mode to “By Week Day”By week day allows you to have the valve run once every day or every other day
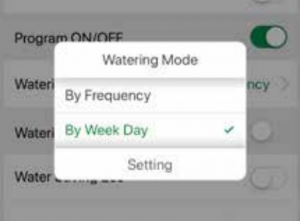
Change the watering mode to “By Week Day”, then tap Setting
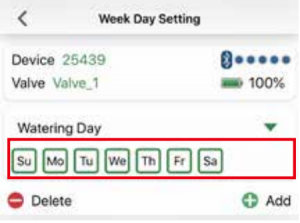
Tap any place in “Watering Day” or ![]() to select the day you wish to watering
to select the day you wish to watering
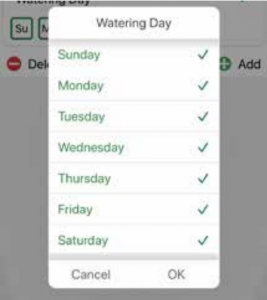
Select or Deselect the day, then “OK”. The selected day will be enclosed by a square box
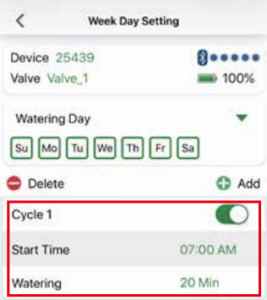
Add cycle (up to 30 watering cycles), select desired start time and watering duration.

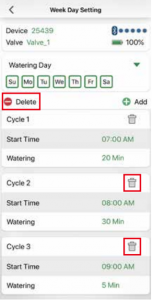
Delete cycle if needed by tapping the Delete Key, then select the trash bin of the cycle you want to remove.
Caution, once it is deleted, it will be removed permanently. You will need to reprogram it again.
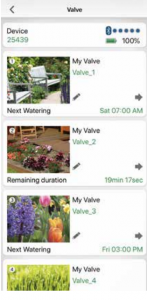
Once programming is completed, review the main valve dashboard which shows all the valve statuses. Your scheduling should show the next watering schedule and other info.
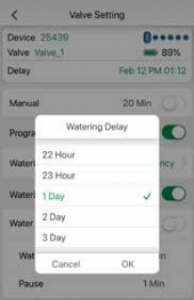
Watering Delay Function:
If there is rain in the forecast and you wish to temporarily stop watering, set the “Watering Delay” by swiping the bar to the right then tap the “Watering Delay” key.
Watering Delay mode will stop all watering for up to 7 days.
After the delay period, the watering program will begin to run automatically.
You can turn off the rain delay function at anytime by swiping the bar to the left.

Set Eco Water Saving:
Set Eco Function by sliding the bar to the right.
The Eco Function creates a pause in the watering cycle, which provides absorption time for the soil. It can also prevent water run-off.
Set the water duration and pause duration according to your watering needs.
“Water Min” and “Pause Min” can be customizedaccording to different watering applications (ie: irrigation or lawn & garden), landforms (ie: at or mountain slope) and soil density (ie: high as soil or low as sand). 3. Examples and suggestions as below:
A. Irrigation: Water 5 MIN PAUSE 2 MINB. Lawn: Water 4 MIN PAUSE 1 MINC. Lawn slope: Water 2 MIN PAUSE 2 MIN
Note: you can skip this setting if not needed.Note: once the Eco Function is activated, the set intervals are applied on all the set water cycles


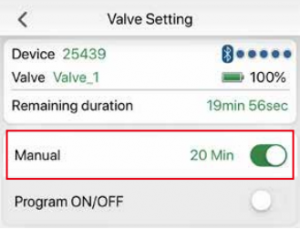
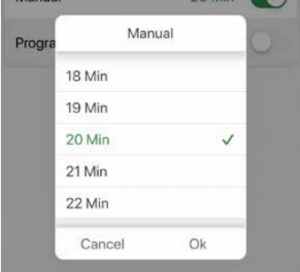
Manual Watering:
This Bluetooth® timer allows you to manually water without interrupting the programming schedule. There are 2 ways of activating this function.
1) You can activate the manual function by swiping the “Manual” bar to turn on:
or 2 ) any of the four red buttons on the timer can be pushed to allow for manual watering use. Push the corresponding water circuit you want to activate manual watering for 1 or 2 seconds then release. You will hear the circuit valve open. Water will start to flow according to the time setup in the manual programming settings.
When you want to stop the manual cycle, press the circuit button once more or swipe the “Manual” bar to the right in the App to deactivate manual watering.
Once the manual function is turned on, the App will show Manual Remaining Duration of how many minutes are left.

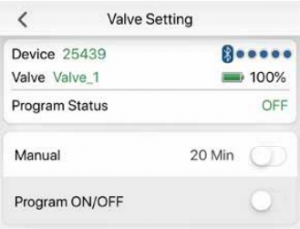
Off Mode:
If you wish to stop watering for an extended period, swipe the bar to the left of “Program” . The timer will not water automatically while in this mode. The program status will display the word “Off”.
To start watering automatically again, simply turn the program on.
Quick Access:
You can access your device or valve settings more rapidly by tapping the top left corner ![]() to change their settings or the individual device settings
to change their settings or the individual device settings
Useful Tips:
Seasonal storage :Freezing temperatures can cause timers to freeze and expand, damaging the timer. At the end of the season or when there is frost in the forecast, remove your timer from the faucet, remove the batteries and be sure to store the timer indoors, away from freezing temperatures.
Tips for Battery :– Always use fresh Alkaline batteries– Do not use rechargeable or any other type of batteries– Remove the batteries at the end of the season before storing– Batteries should last about one season. A schedule with more frequent watering times can cause the batteries to drain faster
Understanding Zones :– This is a timer allowing you to water four different areas from the same faucet. Each zone can be programmed with different start time.– Do not run two zones at the same time as this will reduce your water pressure.– When using additional external sensors, it is recommended to check the battery levels on a monthly basis.
Maintenance:
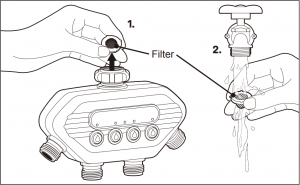
Cleaning Your TimerYour timer should be cleaned periodically. From time-to-time, you may get sediment or dirt build-up in your timer. Follow the information below.
1. Turn off your water faucet. Remove the timer from the faucet connection and your hose connections. Look at the filter washer at the faucet connection input. Check that the filter washer is clear of any built-up sediment.2. If the filter is dirty, remove the filter washer from the timer. Clean out the filter washer by placing it under running water.
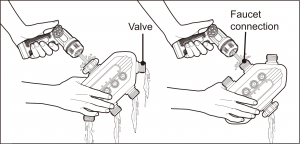
3. Turn the timer upside down and activate the MANUAL mode. This will open up the valves and allow you to run water into the output connectors. By doing this, you can see if there are any clogs in the water flow. Once you see the water flow is correct, deactivate the MANUAL mode.
FCC Statement:
This device complies with part 15 of the FCC Rules.Operation is subject to the following two conditions:
( 1 ) This device may not cause harmful interference, and ( 2 ) this device must accept any interference received, including interference that may cause undesired operation.
Caution: Any changes or modifications not expressly approved by our Yuan Mei Corp. could void the user’s authority to operate the equipment.
Note: This equipment has been tested and found to comply with the limits for a Class B digital device, pursuant to part 15 of the FCC Rules. These limits are designed to provide reasonable protection against harmful interference in a residential installation. This equipment generates, uses and can radiate radio frequency energy and, if not installed and used in accordance with the instructions, may cause harmful interference to radio communications. However, there is no guarantee that interference will not occur in a particular installation. If this equipment does cause harmful interference to radio or television reception, which can be determined by turning the equipment off and on, the user is encouraged to try to correct the interference by one or more of the following measures:
– Reorient or relocate the receiving antenna.– Increase the separation between the equipment and receiver.– Connect the equipment into an outlet on a circuit different from that to which the receiver is connected.– Consult the dealer or an experienced radio/TV technician for help.
To comply with FCC RF exposure requirements, the device and the antenna for this device must be installed to ensure a minimum separation of 20cm or more from a person’s body. Other operating configurations should be avoided.
CAN ICES-3 (B)/NMB-3(B) Canada Statement :
This device complies with Industry Canada’s licence-exempt RSSs.Operation is subject to the following two conditions:
( 1 ) This device may not cause interference; and ( 2 ) This device must accept any interference, including interference that may cause undesired operation of the device.
The device meets the exemption from the routine evaluation limits in section 2.5 of RSS 102 and compliance with RSS-102 RF exposure, users can obtain Canadian information on RF exposure and compliance.
Disposal:
Should your unit need replacement after extended use, do not dispose of it with the household waste, but in an environmentally safe way.

Waste produced by electrical machine items should not be handled like normal household garbage. Please recycle where recycle facilities exist. Check with your local authority or retailer for recycling advice.
![]() CAUTION
CAUTION ![]()
– For outdoor use with cold water only– Do not spray near electrical connections– When not in use, rinse the tool with water to remove most of the dirt, dry your tool, and store indoors
![]()
WARNING: This product can expose you to chemicals including lead, which is known to the State of California to cause cancer and birth defects reproductive harm, and styrene which is known to the State of California to cause cancer. For more information go to www.P65Warnings.ca.gov
References
[xyz-ips snippet=”download-snippet”]