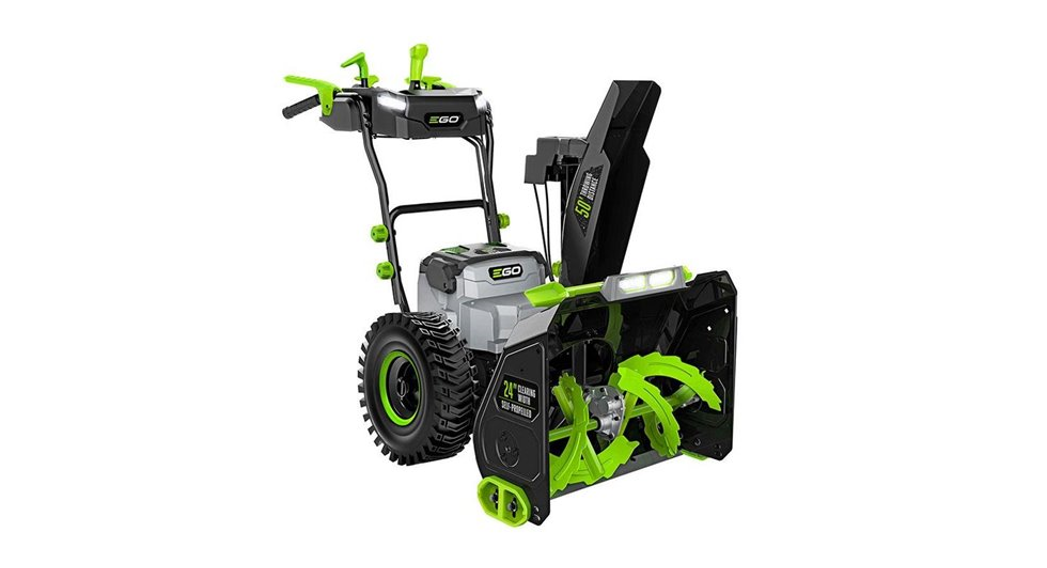
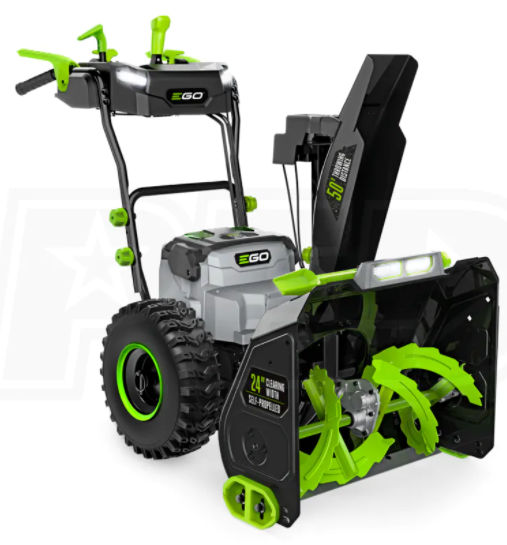
EGO SNT2400 56-Volt Lithium-Ion Cordless Snow Blower
READ ALL INSTRUCTIONS!
WARNING: Some dust created by power sanding, sawing, grinding, drilling and other construction activities contains chemicals known to the state of California to cause cancer, birth defects or other reproductive harm. Some examples of these chemicals are:
- Lead from lead-based paints
- Crystalline silica from bricks and cement and other masonry products, and
- Arsenic and chromium from chemically-treated lumber. Your risk from these exposures varies, depending on how often you do this type of work. To reduce your exposure to these chemicals: work in a well ventilated area, and work with approved safety equipment, such as those dust masks that are specially designed to filter out microscopic particles.
SAFETY SYMBOLSThe purpose of safety symbols is to attract your attention to possible dangers. The safety symbols and the explanations with them deserve your careful attention and understanding. The symbol warnings do not, by themselves, eliminate any danger. The instructions and warnings they give are no substitutes for proper accident prevention measures.
WARNING: Be sure to read and understand all safety instructions in this Operator’s Manual, including all safety alert symbols such as “DANGER,” “WARNING,” and “CAUTION” before using this tool. Failure to follow all instructions listed below may result in electric shock, fire, and/or serious personal injury.
SYMBOL MEANINGSAFETY ALERT SYMBOL: Indicates DANGER, WARNING, or CAUTION. May be used in conjunction with other symbols or pictographs.
WARNING: The operation of any power tools can result in foreign objects being thrown into your eyes, which can result in severe eye damage. Before beginning power tool operation, always wear safety goggles or safety glasses with side shields and a full face shield when needed. We recommend a Wide Vision Safety Mask for use over eyeglasses or standard safety glasses with side shields. Always use eye protection which is marked to comply with ANSI Z87.1.
SAFETY INSTRUCTIONS
This page depicts and describes safety symbols that may appear on this product. Read, understand, and follow all instructions on the machine before attempting to assemble and operate.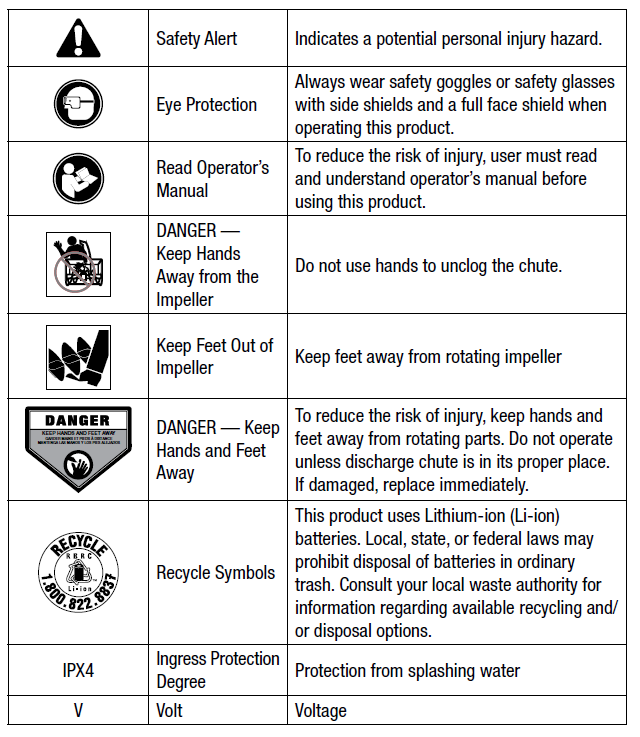
| Direct Current | Type or a characteristic of current | |
| cm | centimeter | Length or size |
| in. | Inch | Length or size |
| Ft. | Feet | Length or size |
| kg | Kilogram | Weight |
| lb | Pound | Weight |
WARNING: To ensure safety and reliability, all repairs should be performed by a qualified service technician.
SAFE OPERATION PRACTICES FOR WALK-BEHIND SNOW BLOWER
DANGER: This snow blower is capable of amputating hands and feet and throwing objects. Failure to observe the following safety instructions could result in serious injury.
FOR ALL SNOW BLOWERS
- Do not use on graveled surface unless the snow blower is adjusted for such a surface in accordance with the operator’s manual.
- Keep Children Away – All visitors should be kept a safe distance from work area.
- Dress Properly – Do not wear loose clothing or jewelry. They can be caught in moving parts.
- Wear rubber boots when operating the snow blower.
- Keep hands away from moving parts.
- Keep guards in place and in working order.
- Don’t Force Snow Blower – It will perform better and safer at the rate for which it was designed.
- Don’t Overreach – Keep proper footing and balance at all times.
- If the snow blower strikes a foreign object follow these steps:
- Stop snow blower. Release the switch.
- Remove the battery pack(s).
- Inspect for damage.
- Repair any damage before restarting and operating the snow blower.
- Store Idle Snow Blowers Indoors-When not in use, snow blowers should be stored indoors in dry, locked-up place – out of reach of children.
- Maintain Snow Blowers with Care – Following instructions for lubricating and changing accessories.
TRAINING
- Read, understand and follow all instructions on the machine and in the manual(s) before operating this unit. Be thoroughly familiar with the controls and the proper use of the equipment. Know how to stop the unit and disengage the controls quickly.
- Never allow children to operate the equipment. Never allow adults to operate the equipment without proper instruction.
- Keep the area of operation clear of all persons, particularly small children.
- Exercise caution to avoid slipping or falling, especially when operating the snow blower in reverse.
PREPARATION
- Thoroughly inspect the area where the equipment is to be used and remove all doormats, sleds, boards, wires, and other foreign objects.
- Do not operate the equipment without wearing adequate winter garments. Avoid loose-fitting clothing that can get caught in moving parts. Wear footwear that will improve footing on slippery surfaces.
- Never attempt to make any adjustments while the motor is running (except when specifically recommended by manufacturer).
- Always wear safety glasses or eye shields during operation or while performing an adjustment or repair to protect eyes from foreign objects that may be thrown from the machine.
OPERATION
- Prevent unintentional starting. Ensure the switch is in the off-position before connecting to battery pack, picking up or carrying the appliance. Carrying the appliance with your finger on the switch or energizing appliance that have the switch on invites accidents.
- Do not put hands or feet near or under rotating parts. Keep clear of the discharger opening at all times.
- Exercise extreme caution when operating on or crossing gravel drives, walks, or roads. Stay alert for hidden hazards or traffic.
- After striking a foreign object, stop the motor, remove the battery pack(s), thoroughly inspect the snow blower for any damage, and repair the damage before restarting and operating the snow blower.
- If the unit should start to vibrate abnormally, stop the motor and check immediately for the cause. Vibration is generally a warning of trouble.
- Stop the motor whenever you leave the operating position, before unclogging the auger assembly housing or discharge chute, and when making any repairs, adjustments or inspections.
- When clearing, repairing or inspecting the snow blower, stop the motor and make certain the auger assembly and all moving parts have stopped. Remove the battery pack(s) to prevent someone from accidentally starting the motor.
- Exercise extreme caution when operating on slopes.
- Never operate the snow blower without proper guards and other safety protective devices in place and working.
- Never direct the discharge toward people or areas where property damage can occur. Keep children and others away.
- Do not overload the machine capacity by attempting to clear snow at too fast a rate.
- Disengage power to the auger assembly when snow blower is transported or not in use.
- Use only attachments and accessories approved by the manufacturer of the snow blower (such as scraper bar).
- Never operate the snow blower without good visibility or light. Always be sure of your footing, and keep a firm hold on the handles. Walk; never run.
- Do not expose a battery pack or tool to fire or excessive temperature. Exposure to fire or temperature above 212 °F (100°C) may cause explosion.
- Use only with the battery packs and chargers listed below:
BATTERY PACK CHARGER BA1120, BA1120-FC, BA1400, BA1400-FC, CH2100, CH2100-FC, BA2240, BA2240-FC, BA2800, BA2800-FC, CH5500, CH5500-FC, BA4200, BA4200-FC, BA1400T, BA1400T-FC, CH2800D, CH2800D-FC BA2800T, BA2800T-FC, BA4200T, BA4200T-FC, BA5600T, BA5600T-FC
NOTICE: For best performance, recommend for use with 2pcs 5.0Ah or higher Ah batteries.
CLEARING A CLOGGING CHUTEHand contact with the rotating auger assembly inside the discharge chute is the most common cause of injury associated with snow blowers. Never use your hand to clean out the discharge chute.To clear the chute:
- SHUT THE MOTOR OFF!
- Remove the battery pack(s) from the snow blower.
- Wait 10 seconds to be sure the auger has stopping rotating.
- Always use the chute clean tool which is attached to the machine as an accessory, do not use your hand.
MAINTENANCE AND STORAGE
- Check all bolts or fasteners at frequent intervals for proper tightness to be sure the equipment is in safe working condition.
- Always refer to operator’s manual for important details if the snow blower is to be stored for an extended period.
- Maintain or replace safety and instruction labels, as necessary.
- Run the machine a few minutes after blowing snow to prevent freeze-up of the auger assembly.
SAVE THESE INSTRUCTIONS. Refer to them frequently and use them to instruct others who may use this tool. If you lend this tool to someone else, also lend these instructions to them to prevent misuse of the product and possibly injury.
INTRODUCTIONCongratulations on your selection of a new generation of 56V Lithium-Ion powered snow blower. It has been designed, engineered and manufactured to give you the best possible dependability and performance. Should you experience any problem you cannot easily remedy, please contact EGO customer service center 1-855-EGO-5656. This manual contains important information on to the safe assembly, operation and maintenance of your snow blower. Read it carefully before using the tool. Keep this manual handy so you can refer to it at any time.
SERIAL NUMBER______________________ DATE OF PURCHASE_ _________________ THE MODEL AND SERIAL NUMBERS WILL BE FOUND ON A LABEL ATTACHED ON AUGERASSEMBLY HOUSING. YOU SHOULD RECORD BOTH SERIAL NUMBER AND DATE OF PURCHASE AND KEEP IN A SAFE PLACE FOR FUTURE REFERENCE. SAVE YOUR SALES RECEIPT.
SPECIFICATIONS
| Voltage | 56V |
| Clearing Width | 24 in |
| Intake Height | 20 in |
| Throwing Distance | Up to 50 ft. |
| Wheel Size | 15 in |
| Operating Temperature | -4°F-50°F(-20°C-10°C) |
| Storage Temperature | -4°F-158°F(-20°C-70°C) |
| Snow Blower Weight (Without battery pack) | 143.3 lbs (65 kg) |
DESCRIPTION
WARNING: The safe use of this product requires an understanding of the information on the tool and in this operator’s manual, as well as knowledge of the project you are attempting. Before use of this product, familiarize yourself with all operating features and safety rules.Safety ButtonThe safety button must be pressed down before the motor can be started.WARNING: The safety button is safety device. Never attempt to bypass its operation.Auger-Switch Trigger: Engages and disengages the motor. It can be working after pressing the safety button.Auger-Speed-Control Lever: Adjusts the auger speed in order to adjust the throwing distance.Self-Propel Trigger: Turns the self-propel function ON and OFF.Self-Propel Speed-Control Lever: Increases or decrease the self-propel speed.Chute-Rotation Handle: Rotates the chute so that the user may direct the discharged snow as desired. The handle allows the chute to rotate from left 100° to right 100°.Chute-Deflector Handle: Adjusts the angle of the chute deflector and the height of the discharge stream.LED Headlights/Sidelights: This feature provides extra light for increased visibility.LED Light Button: Turns on/off the LED headlights and sidelights.LED Indicator: Indicates the status of the snow blower and battery pack.Scraper Bar: Removes the last bit of snow from the surface you are clearing.Skid Shoe: Increases the ability to maneuver the snow blower on the snow and adjusts the distance between snow scraper and ground.Battery-Release Button: Press to release the battery quickly.
ASSEMBLY
WARNING: To prevent accidental starting that could cause serious personal injury, always remove the battery pack(s) from the tool when assembling parts.WARNING: If any parts are damaged or missing, do not operate this product until the parts are replaced. Use of this product with damaged or missing parts could result in serious personal injury.WARNING: Do not attempt to modify this tool or create accessories not recommended for use with this product. Any such alteration or modification is misuse and could result in a hazardous condition leading to serious injury.
UNPACKING
- Use two people to grasp the rear handle and the front part of the product at the same time and carefully lift the tool up and out of the carton. Remove any other accessories from the carton. Make sure that all items listed in the packing list are included.CAUTION: Heavy object. Team lift required. At least two persons are required to be lift this snow blower out of the package.WARNING: Do not use this product if any parts on the packing list are already assembled to your product when you unpack it. Parts on this list are not assembled to the product by the manufacturer and require customer installation. Use of a product that may have been improperly assembled could result in serious personal injury.
- Inspect the product carefully to make sure that no breakage or damage occurred during shipping.
- Do not discard the packing material until you have carefully inspected and satisfactorily operated the tool.
- If any parts are damaged or missing, please return the product to the place of purchase.
LIST OF CONTENTS
| PART NAME | QUANTITY |
| Snow Blower | 1 |
| Snow-Discharge Chute Assembly | 1 |
| Handle Assembly | 1 |
| Operator’s Manual | 1 |
| Chute Clean Tool | 1 |
| Shear Pin | 2 |
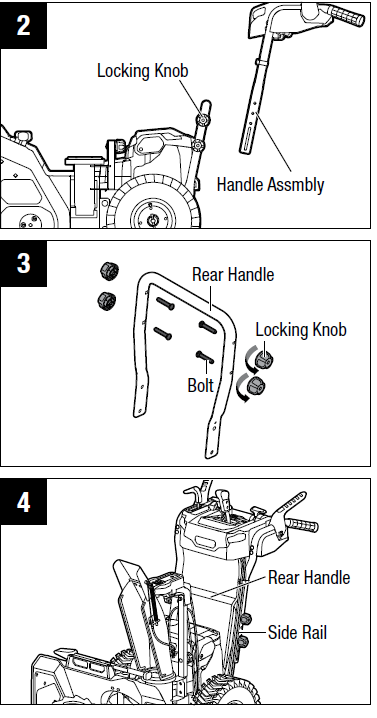
TO INSTALL THE HANDLE ASSEMBLY
NOTICE: The handle assembly requires assembly before operating the snow blower (Fig.2).
- Loosen the four locking knobs and remove the four bolts from the rear handle (Fig.3).
- Lift the handle assembly, align the holes in the side rails with the holes in the rear handle, select the preferred handle height, then secure the handle assembly with the bolts and locking knobs (Fig.4).Please see section “HANDLE HEIGHT ADJUSTMENT” for detailed adjustment instructions.

TO INSTALL THE SNOWDISCHARGE CHUTE ASSEMBLY
WARNING: Never operate the snow blower without the complete discharge chute in place.
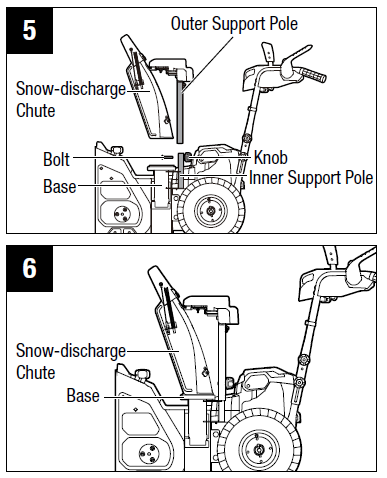
- Loosen the knob on the inner support pole and remove the bolt (Fig.5). Save the knob and bolt for reassembly.
- Lift the snow-discharge chute assembly, align the outer support pole with the inner support pole, and then slide the outer support pole into place (Fig. 5). Make sure that the snow-discharge chute is correctly seated on the base (Fig.6).
- Secure the snow discharge chute assembly with the reserved knob and bolt.WARNING: Use the chute rotation handle to make sure that the chute rotates properly and that the discharge opening never crosses the operator controls.
OPERATION
WARNING: Do not allow familiarity with this product to make you careless. Remember that a careless fraction of a second is sufficient to inflict serious injury.WARNING: Always wear eye protection with side shields marked to comply with ANSI Z87.1. Failure to do so could result in objects being thrown into your eyes and other possible serious injuries.WARNING: Do not use any attachments or accessories not recommended by the manufacturer of this product. The use of attachments or accessories not recommended can result in serious personal injury.APPLICATIONYou may use this product for purpose listed below: Removing snow from areas such as driveways and sidewalks.
HANDLE-HEIGHT ADJUSTMENT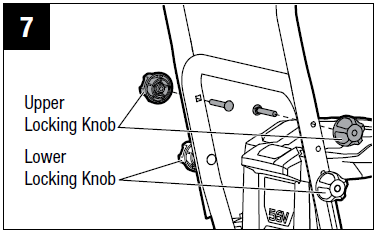
The handle assembly can be set to three different heights. Choose a comfortable operating position according to your height.
- Loosen the two upper locking knobs and pull out the two bolts (Fig.7). Save them for reassembly.
- Loosen the two lower locking knobs. It is not necessary to remove the two lower locking knobs and bolts from the side rails during handle height adjustment.
- Raise or lower the handle and select the appropriate height relative to the positions of the holes in the rear handle.
- Once arriving at the appropriate holes, tighten the handle with the reserved knobs and bolts; then tighten the two lower locking knobs to secure the rear handle.The illustration shows the upper operating position (Fig.8), the middle operating position (Fig.9) and the lower operating position (Fig.10).

TO ATTACH/DETACH THEBATTERY PACK
CHARGE BEFORE FIRST USE.
NOTE: For best performance, we recommend use with two 5.0 Ah EGO 56V Arc-Lithium batteries or with two EGO 56V Arc-Lithium batteries of greater capacity. When not in use, 56V battery packs should be stored in an enclosed area where the temperature will not drop below -4°F (-20°C). Optimal charging temperatures are between 41°F (5°C) and 104°F (40°C).
WARNING: If any parts are broken or missing, do not attempt to attach the battery packs to the snow blower or operate the snow blower until the broken or missing parts are replaced. Failure to do so could result in serious injury.
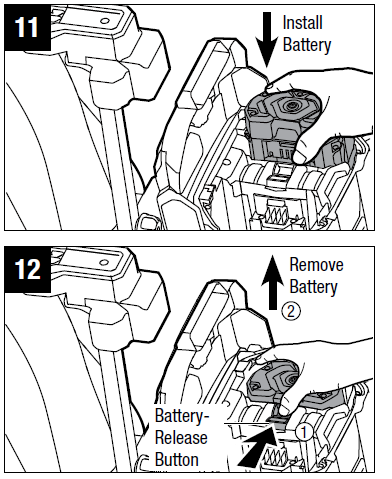
- The battery cover is hinged. Raise the battery cover by lifting the front of the cover.
- The snow blower is equipped with two battery compartments, which accommodate two battery packs at the same time.
- Align the grooves in the battery pack with the raised ribs in one of the battery compartments, and then insert the battery pack into the compartment (Fig.11).
- Push the battery pack until you hear a “click”. The battery-release button will spring up when the battery pack is securely attached.
- Attach the other battery pack into the other battery compartment in the same way.
- To detach the battery pack, depress the battery-release button to release the battery pack, and then lift it out of the compartment (Fig. 12).
- Close the battery cover.NOTICE: Make sure that the latch on the snow blower snaps into place and that the battery pack(s) are secured to the unit before starting operation.
STARTING/STOPPING THE SNOW BLOWER
CAUTION: Do not attempt to override the operation of the safety button. Do not rapidly turn the snow blower off and on.WARNING: The operation of a snow blower can result in foreign objects being thrown into your or others’ eyes, which can damage eyes severely. Always wear safety glasses while operating the snow blower or while performing any adjustments or repairs on the snow blower.WARNING: Ensure that other people and pets remain at least 100’ (30m) away from the snow blower when it is in use.WARNING: The auger will continue to rotate for a few seconds after the snow blower is turned off. Allow the auger to stop rotating before starting it again.
To Start the Snow Blower
- Ensure that the handle assembly is securely adjusted to appropriate height, the side-discharge chute assembly is mounted properly, and the chute and chute deflector are adjusted to an appropriate position.
- Attach the battery pack(s) to the snow blower and close the battery cover.NOTICE: Make sure that the latch on the snow blower snaps into place and that the battery pack(s) are secured to the snow blower before operation.
- Press the safety button and hold for 1 second, and the LED indicator will blink green. Press the auger-switch trigger to turn on the snow blower while the LED indicator blinks (Fig.13).NOTICE: The snow blower can be turned on by the auger-switch-trigger only when the LED indicator blinks.NOTICE: The snow blower may not properly start if its battery temperature is -4°F (-20°C) or less. If the snow blower doesn’t start, remove the battery from the snow blower and allow it to warm indoors for 10 minutes or longer. Reinstall the battery and try again.

To Stop the Snow Blower
- Fully release the auger-switch trigger.
- The electric brake in the Automatic Braking Mechanism will stop the auger rotation within 3 seconds of the auger-switch release.
Variable-Auger-Speed System (Fig. 13)The speed of the auger can be adjusted to control the throwing distance.
- To increase the speed, push the auger-speed-control lever forwards.
- To decrease the speed, pull the auger-speed-control lever backwards.
Variable-Speed Self-Propel System (Fig.14)This snow blower is equipped with variable-speed self-propel capability. This system is independent of the auger On-Off switch; it is not dependent on auger rotation. For example, when you have completed cleaning of the driveway, you can use the self-propel function to propel the snow blower to your storage location without auger rotation.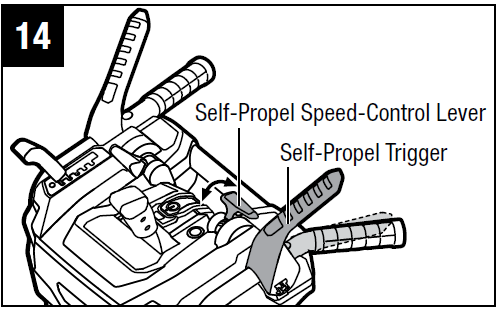
To operate the self-propel system without auger rotation, press the self-propel trigger to the handle. To turn the self-propel function off, release the self-propel trigger. The system has variable speed. To increase the speed, move the self-propel speed control lever forwards. To decrease the speed, move the self-propel speed control lever backwards. To move the snow blower backward, first stop the self-propel function; pull the selfpropel speed-control lever all the way toward the back of the snow blower, then press the self-propel trigger.NOTICE: The speed is fixed when operating the snow blower in reverse with self propel; the self-propel speed-control lever cannot change the speed in reverse.NOTICE: The snow blower cannot be switched to move backward while the self propel function is moving it forward.
AUIGER-SWITCH TRIGGER AND SELF-PROPEL TRIGGER LINKAGE (Fig. 15)When you activate the self-propel trigger and the auger-switch trigger at the same time, the auger-switch trigger will be temporarily locked. Release the auger switch trigger (right hand) and the auger switch trigger will remain engaged. This feature allows you to adjust the auger speed, self-propelling speed, and discharging direction of the snow while the auger rotates. To stop the auger, release the self-propel trigger and both the auger and the self-propel function will stop.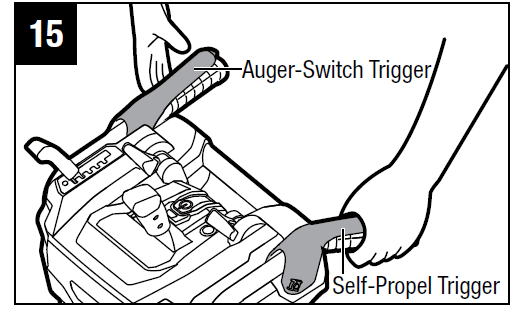
CHUTE AND DEFLECTOR ADJUSTMENTThe chute can be adjusted to change both the direction and the distance of the discharged snow to assist you in moving snow away from one area and placing it in another. The direction of snow removal can be adjusted up to left 100° and right 100° (Fig.16).
- Pull the chute-rotation handle to the left to rotate the chute to the left.
- Pull the chute-rotation handle to the right to rotate the chute to the right. The throwing distance of the snow blower is adjusted by moving the chute deflector up or down.

To increase or decrease the distance that the snow is thrown, pull the chute deflector handle backward or forward to raise or lower the chute deflector(Fig.17). Once arriving at the desired chute deflector position, engage the chute deflector handle back into the locking slot.
LED SIDELIGHTS AND HEADLIGHTS OPERATION (Fig.18)The LED sidelights are located on both left and right of the handle assembly. The LED headlights are located on the front of the deck. Press the LED light button once to turn on both the sidelights and headlights. Press the LED light button twice to turn off the sidelights. Press the LED light button three times to turn off all the lights.NOTICE: All the LED lights will turn off automatically if the snow blower is not being operated within 5 minutes.
LED INDICATOR ON THE SNOW BLOWER (Fig. 19)The snow blower is equipped with a LED indicator to indicate the charge level of the battery pack(s) and the working status of the snow blower.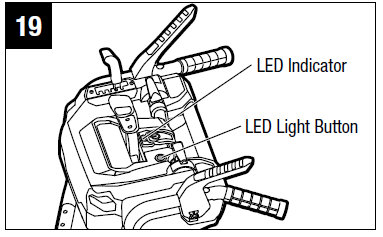
| LED INDICATOR | MEANING | ACTION |
|
Shinning Green |
Snow blower is working properly; each battery has at least 15% of its charge. |
n/a. |
| Flashing Red | The battery is nearly depleted. | Stop the snow blower and charge the battery pack(s). |
| Flashing Green and Red alternately | Error | Contact EGO customer service center |
|
Shinning Orange |
The snow blower stops due to overheating. |
Remove the batteries from the snow blower, move them to the shade and cool them at least 15 minutes. |
|
Flashing Orange |
The snow blower is overloaded. |
First remove the battery pack, then check and clean if snow has collected beneath the deck.
Slow down your pace when snow moving. If this does not work, please contact EGO customer service center. |
|
Dark & LED on battery flashing |
Battery overheat (See section “BATTERY HIGH-TEMPERATURE
PROTECTION” in this manual). |
Remove the battery from the snow blower and wait until the battery pack cools down to approximately 152°F (67°C), then reinstall the battery and restart the snow blower. |
SNOW BLOWER OVERLOAD PROTECTIONTo prevent overload conditions, do not try to remove too much snow at one time. Slow down your pace or decrease the width of the snow-clearing swath. Your snow blower has built-in overload-sensing elements. When the snow blower is overloaded, the motor will decrease the speed automatically and you will hear the volume of the motor decrease. Slow down your pace or narrow the clearing width, after which the motor speed will automatically resume its normal setting. If this remedy does not solve the overload situation, the sensor will shut off the motor automatically and the LED indicator on the snow blower will flash orange. Remove the battery pack(s) from the snow blower, wait 10 seconds, and check to see if there is snow or ice stuck in the auger and deck. If necessary, follow instructions for “CLEARING A CLOGGED CHUTE”. Reinstall the batteries and restart the snow blower.
CLEARING A CLOGGED CHUTE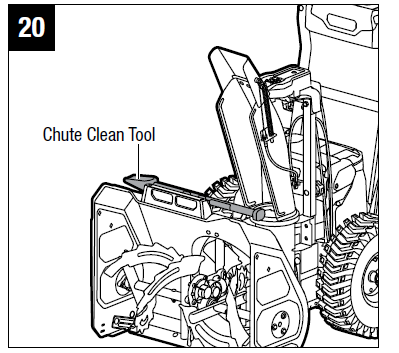
WARNING: Hands coming in contact with the rotating auger inside the chute is the most common cause of injury associated with snow blowers. Never use your hand to clean out the chute.WARNING: Never reach into the discharge chute or place any body part in front of the snow blower when the unit is operating or when the battery pack(s) are installed. Always ensure all moving parts have stopped and the battery pack(s) have been removed before clearing any obstructions. Failure to follow these instructions can result in serious personal injury.
To Clear the Chute:
- Shut the motor off!
- Remove the battery pack(s) from the snow blower.
- Wait 10 seconds to be sure the auger has stopped rotating.
- Always use the chute clean tool which is attached to the machine as an accessory. DO NOT USE YOUR HAND (Fig.20).
BATTERY HIGH-TEMPERATURE PROTECTIONThe battery pack will generate heat during operation. If the battery temperature exceeds 158°F (70°C) during operation, the protection circuit will immediately turn off the snow blower to protect the battery pack from heat damage. The snow blower LED indicator will turn off and the LED on the battery will flash orange or shine red.NOTICE: The LED on following battery packs will flash orange lights when overheated: BA1120, BA1120-FC, BA1400, BA1400-FC, BA2240, BA2240-FC, BA2800, BA2800-FC, BA4200 and BA4200-FC; the LEDs on following battery packs will shine red lights when overheated: BA1400T, BA1400T-FC, BA2800T, BA2800T-FC, BA4200T, BA4200T-FC, BA5600T and BA5600T-FC.
If the snow blower is over-heating itself, the LED indicator on the snow blower will flash orange and the battery indicator will be OFF. When batteries are overheating, release all the triggers, wait until the overheated battery pack(s) cool down or change the new battery pack(s), then restart the snow blower. To prevent shut off due to battery high-temperature protection, don’t try to use a single battery to power the snow blower when the depth of the accumulated snow exceeds 8 inches or when the snow is very wet or icy. We recommend the use of two batteries working simultaneously. This is helpful in attaining the peak power of the snow blower. After high-temperature protection has occurred, slow down your pace and narrow width of the clearing swath to reduce the load on the battery.
OPERATING TIPS
DANGER: Never use a snow blower on frozen lakes, rivers, or similar surfaces. Death or serious injury could occur if the ice breaks.DANGER: Never use the snow blower on a rooftop or other unstable surface, which can result in death or serious personal injury.WARNING: Do not use snow blower on ice, which can cause the operator to slip and fall, resulting in possibly serious personal injury.WARNING: Do not wear loose clothing, scarves, or jewelry. They can be caught in moving parts and cause death or serious personal injury.WARNING: Keep all snow discharge pointed away from all electrical devices to reduce the risk of electrocution or electric shock.WARNING: Never point the snow blower or discharge chute in the direction of people or pets. Thrown snow or other objects can cause serious personal injuries.WARNING: Make sure that the area to be cleared is free of stones, sticks, wires, gravel, and other objects that could be accidentally thrown by the snow blower in any direction and cause serious personal injury to the operator and others.If the unit comes in contact with any type of obstruction or debris during use, stop the snow blower, remove the battery pack(s), remove the obstruction, and inspect the unit carefully for damage before proceeding.
WARNING: Never reach into the discharge chute or place any body part in front of the snow blower when the unit is operating or when the battery pack(s) are installed. Always ensure all moving parts have stopped and the battery pack(s) have been removed before clearing any obstructions. Failure to follow these instructions can result in serious personal injury.
- Take notice of the direction of the wind before beginning. When possible, discharge snow in the same direction as the wind to prevent snow from being thrown back into your face.
- Some parts of the snow blower can freeze under extreme weather conditions. Do not attempt to operate the unit with frozen parts.
- When finished, allow the motor to run for an additional few minutes to prevent moving parts from freezing, then turn the chute rotation handle back and forth several times to free it from any ice buildup. Make sure to clean off any snow and ice from the base of the chute.
- In snowy and cold conditions, some controls and moving parts may freeze. Do not use excessive force when trying to operate frozen controls. If you have difficulty operating any control or part, start the machine as “STARTING/STOPING THE SNOW BLOWER” section shown and let it run for a few minutes.
MAINTENANCE
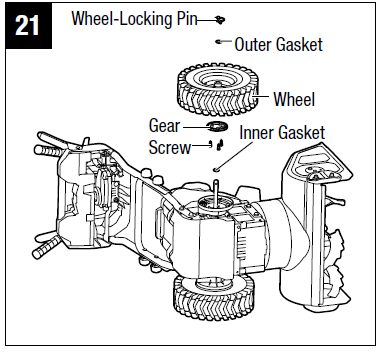
WARNING: To avoid serious personal injury, always remove the battery pack(s) from the snow blower before cleaning or performing any maintenance.WARNING: When servicing, use only identical replacement parts. Use of any other parts may create a hazard or cause product damage. To ensure safety and reliability, all repairs should be performed by a qualified service technician.NOTICE: Periodically inspect the entire product for damaged, missing, or loose parts such as screws, nuts, bolts, caps, etc. Tighten securely all fasteners and caps and do not operate this product until all missing or damaged parts are replaced.GENERAL MAINTENANCEAvoid using solvents when cleaning plastic parts. Most plastics are susceptible to damage from various types of commercial solvents and may be damaged by their use. Use clean cloths to remove dirt, dust, oil, grease, etc.WARNING: Do not at any time let brake fluids, gasoline, petroleum-based products, penetrating oils, etc. come in contact with plastic parts. Chemicals can damage, weaken, or destroy plastic which can result in serious personal injury.LUBRICATING THE MACHINEAll of the bearings in this product are lubricated with a sufficient amount of high grade lubricant for the life of the unit under normal operating conditions. Therefore, no further bearing lubrication is required.MOUNTING AND DETACHING WHEEL
- Remove the battery packs.
- Lay the snow blower on its side, pull out the wheel-locking pin to remove the outer gasket and the wheel. Save the inner gasket on the wheel shaft.
- Loosen and remove the 3 screws to separate the gear from the wheel. Save the gear for reassembly (Fig.21).
- Replace the wheel with a new one.
- Reassemble the gear, new wheel and outer gasket in reverse order. Lock them with the wheel-locking pin.
MOUNTING AND DETACHING THE SCRAPER BAR (Fig.22)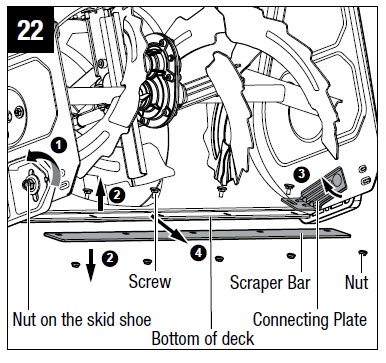
- Remove the batteries from the snow blower.
- Lay the snow blower on its side or any other convenient position for scraper bar service.
- Loosen the outer nut on the skid shoe just enough to allow the inner connecting plate to freely rotate around the corresponding screw inside (step 1 shown).
- Loosen the connecting plate on theother side in the same way.
- Loosen and remove the five nuts on the bottom of the deck, as well as the five screws inside (step 2 shown) and rotate the connecting plate towards the auger chamber direction (step 3 shown) to thoroughly remove the scraper bar away from the deck (step 4 shown).
- Replace the worn scraper bar with a new one.
- To reassemble, first insert the new scraper, bar between the connecting plate and the bottom of the deck. Rotate the connecting plate until the holes in the connecting plate, the bottom of the deck, and the scraper bar are aligned. With the five holes aligned, insert the five screws into the holes and secure them with the five nuts on the back.
- Securely tighten the outer nut on the skid shoe.
REPLACING AND ADJUSTING THE SKID SHOES
- Remove the batteries.
- Loosen and remove the nuts, gaskets, and the skid shoe from the screws (Fig.23).
- Replace the skid shoe with a new one, if necessary.
- The height of the skid shoes can be adjusted according to the actual snow conditions without removing the nuts. Just loosen the nuts, adjust the skid-shoe position, and then retighten (Fig.24).
REPLACING THE SHEAR PIN
The shear pins are located in the auger shaft. They aids in absorbing the instant stall torque when the auger strikes obstacles during working and protect the gearbox and motor from damage. To replace the shear pins, remove the batteries, remove the broken shear pin from the auger shaft and replace it with new.NOTICE: Two additional shear pins are stored onto the snow-discharge chute assembly, replace with the new one if the original one is broken (Fig.26).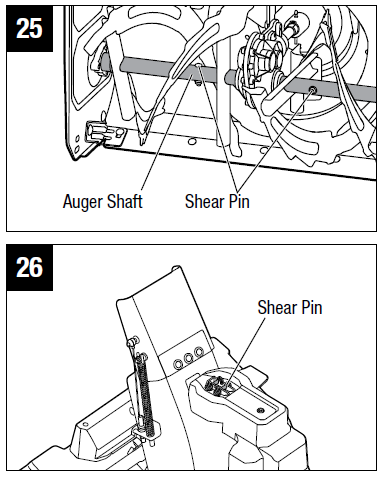
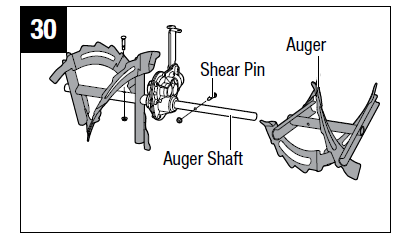
REPLACING THE AUGER
- Remove the batteries.
- Remove the two locking screws on the top of the deck (Fig.27).
- Remove the three flange screws on both left and right of the deck (Fig.28).
- Remove the auger, together with the gearbox as a whole set from the deck. Then remove the flange, bushing and gasket from the auger shaft (Fig.29).
- Remove the left and right shear pin and separate the augers from the auger shaft (Fig.30).
- Replace the worn auger and reassemble them in reverse order.

MOUNTING AND DETACHING DRIFT CUTTERS (AVAILABLE AND SOLD SEPARATELY)
- Remove the batteries.
- Insert the two bolts into the deck and mount the drift cutter and wing nuts onto the bolts. Pre-tighten the wing nuts and keep the drift cutter a little loose for adjustment (Fig. 31).
- Move the drift cutters to the desired position (Fig. 32).
- Tighten the wing nuts to secure the drift cutters.

STORING THE SNOW BLOWERCAUTION: Ensure that all melted snow that may drip from the snow blower is properly wiped up to prevent a slip and fall hazard.
- Remove the battery pack(s) and store in a secure location out of the reach of children.NOTE: When not in use, a 56V battery should be stored in an enclosed area where the temperature will not drop below -4°F (-20°C). Optimal charging temperatures are 41°F – 104°F (5°C – 40°C). Before storage, wipe any moisture, dirt, or debris from the battery area.
- Wipe the snow blower with a clean dry cloth.
- Check all nuts, bolts, knobs, screws, etc., for tightness.
- Inspect moving parts for damage, breakage, and wear. Have repairs made on any damaged or missing parts.
- Store the snow blower in a clean, dry, enclosed place out of the reach of children.
- Do not store near corrosive materials such as fertilizer or rock salt.
TROUBLESHOOTING
WARNING: Always remove the battery pack(s) when servicing or transporting the snow blower. Always protect your hands by wearing gloves when performing any maintenance on the snow blower auger or scraper.
| PROBLEM | CAUSE | SOLUTION |
|
Snow blower is not starting. |
▪ Battery charge is low.
▪ The auger-switch trigger is not depressed at the moment of the LED indicator flashing green.
▪ The auger is frozen by snow or ice.
▪ The battery is overteated. The LED indicator on the battery flashes orange or shines red (see the section “BATTERY HIGH-TEMPERATURE PROTECTION” in this manual). |
▪ Charge the battery.
▪ Press the auger switch trigger when the LED indicator blinks. If the LED indicator stops blinking, the snow blower will not be response to the pressing of auger-switch trigger. ▪ Remove the battery pack(s) firstly, use the supplied chute clean tool to clear the snow or ice that obstructs on the auger. Restart the snow blower. ▪ Remove the overheated battery from the snow blower and wait until the battery pack cools down to approximately 152°F (67°C), then reinstall the battery and restart the snow blower. |
| The motor is on but the auger does not turn on. | ▪ The shear pin is broken. | ▪ Replace the shear pin following
the section “REPLACING THE SHEAR PIN” in this manual. |
| The LED light button is insensitive to the first pressing. | ▪ The internal self-checking
process causes a slight delay in the first keystroke response. |
▪ Press the LED light button and
hold for 1 second. |
| The LED indicator on the battery keeps on after the snow blower auger stops working or self-propel system turns off. | ▪ The electric circuit is in
standby for next restart. The LED will shut off automatically if the snow blower is not operated in 5 to 10 mintues. |
▪ Just leave it or remove the
batteries from the battery compartment. |
ACCESSORIES
WARNING: The following parts are subjected to be worn out from normal use. Use only identical replacement parts listed below. Use of parts that do not meet the original equipment specifications may lead to improper performance and compromised safety.
| PART NAME | MODEL NUMBER |
| Shear Pin | ASP2400 |
| Shear Pin Set | ASP2400D |
| Snow Blower Auger(left) | ASG2400L |
| Snow Blower Auger(right) | ASG2400R |
| Snow Blower Wheel(left) | AW2400L |
| Snow Blower Wheel(right) | AW2400R |
| Skid Shoes(pair) | AKS2400D |
| Chute Clean Tool | ACT2400 |
| Snow Blower Drift Cutters | ADC2400 |
WARRANTY
EGO WARRANTY POLICY5-year limited warranty on EGO POWER+ outdoor power equipment and portable power for personal, household use.3-year limited warranty on EGO POWER+ System battery packs and chargers for personal, household use.2 year/1year limited warranty on EGO outdoor power equipment, portable power, battery packs, and chargers for professional and commercial use.The detailed warranty periods by products can be found online at http://egopowerplus.com/pages/warranty-policy. Please contact EGO Customer Service Toll-Free at 1-855-EGO-5656 any time you have questions or warranty claims.LIMITED SERVICE WARRANTYEGO products are warranted against defects in material or workmanship from the date of original retail purchase for the applicable warranty period. Defective product will receive free repair.a) This warranty applies only to the original purchaser from an authorized EGO retailer and may not be transferred. Authorized EGO retailers are identified online at http://egopowerplus.com/pages/warranty-policy.b) The warranty period for reconditioned or factory certified products used for residential purpose is 1 year, for industrial, professional or commercial purpose is 90 days.c) The warranty period for routine maintenance parts, such as, but not limited to, blades, trimmer heads, chain bars, saw chains, belts, scraper bars, blower nozzles, and all other EGO accessories is 90 days for residential purpose, 30 days for industrial, professional or commercial purpose. These parts are covered for 90/30 days from manufacture defects in normal working conditions.d) This warranty is void if the product has been used for rental purpose.e) This warranty does not cover the damage resulting from modification, alteration or unauthorized repairf) This warranty only covers defects arising under normal usage and does not cover any malfunction, failure or defect resulting from misuse, abuse (including overloading of the product beyond capacity and immersion in water or other liquid), accidents, neglect or lack of proper installation, and improper maintenance or storage.g) This warranty does not cover normal deterioration of the exterior finish, including but not limited to scratches, dents, paint chips, or to any corrosion or discoloring by heat, abrasive and chemical cleaners.
HOW TO OBTAIN SERVICEFor warranty service, please contact EGO customer service toll-free at 1‑855‑EGO‑5656. When requesting warranty service, you must present the original dated sales receipt. An authorized service center will be selected to repair the product according to the stated warranty terms. When bringing your product to the authorized service center, there may be a small deposit that will be required when dropping off your tool. This deposit is refundable when the repair service is deemed to be covered under warranty.ADDITIONAL LIMITATIONSTo the extent permitted by applicable law, all implied warranties, including warranties of MERCHANTABILITY or FITNESS FOR A PARTICULAR PURPOSE, are disclaimed. Any implied warranties, including warranties of merchantability or fitness for a particular purpose, that cannot be disclaimed under state law are limited to the applicable warranty period defined at the beginning of this article. Chervon North America is not responsible for direct, indirect, incidental or consequential damages. Some states do not allow limitations on how long an implied warranty lasts and/or do not allow the exclusion or limitation of incidental or consequential damages, so theabove limitations may not apply to you. This warranty gives you specific legal rights, and you may also have other rights which vary from state to state.For customer service contact us toll-free at: 1-855-EGO-5656 or EGOPOWERPLUS.COM. EGO Customer Service, 769 SEWARD AVE NW / Suite 102 Grand Rapids, MI 49504![]()
References
[xyz-ips snippet=”download-snippet”]