
![]()
USER MANUALEKASN C900 DLP Smart ProjectorV1.0
Thank you for your trust and support for our products sincerely.
Please read this instruction carefully before using the productThanks for purchasing and using our company product, in order to make sure your personal safety and rights, please read our product manual and operating instructions carefully, our company would not take the responsibility of which caused by any non-standard operations, please understand.About the product manual (described as “manual” for short below)All Trademarks, Font sizes in the manual belong to the owner of their respective rights.If the contents in the manual is different with the actual product. please be based on the actual Product.If there are any questions about the manual, please contact our company in 7 days from the day you bought the device, otherwise, we’ll think you are agreed with all the manual contents.

“The Adopted Trademarks HDMI, HDMI High-Definition Multimedia Interface, and the HDMI Logo are trademarks or registered trademarks of HDMI Licensing Administrator, Inc. in the United States and other countries.”Support address: [email protected]
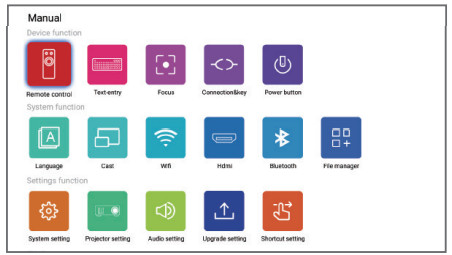
There is an electronic directions app in the product system
Select how to turn on the projector
- Plug projector into power supply by provided power adapter, please ensure that the machine has been powered correctly.Step 1: Turn the ON/OFF switch on the device body to the ON position (if it is not turned on, it cannot be operated),Note: This product has a built-in battery. After sliding the switch to ON, the indicator light will be displayed as a red-light source, and it will be displayed as a blue light source when working.
- Low battery →Red light flashes
- Charge → green light flashes
- A fully charged →green light is always on
- Normal working battery status →blue light is always on
- Standby state → Blue light flashes
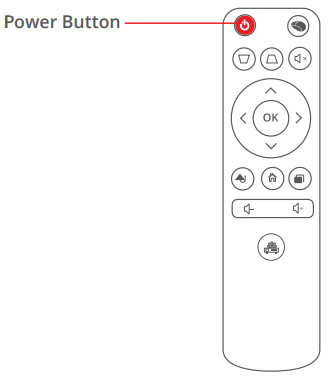
Step 2: Press the power switch on the device body to turn on/off the machine or press the power button on the remote control to turn it on/off.Step 3: if you don’t use it for a long time, please slide the toggle switch to OFF.Note: Avoid the machine be turned on by mis-touch when the product is placed in the storage bag, thus please be sure to turn the Power Switch to OFF state and the indicator light goes out before putting it into the bag.
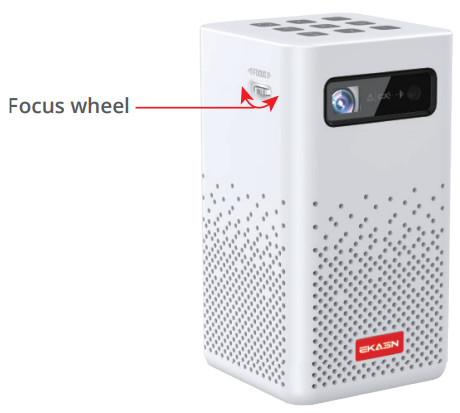
Projection focusing methodRotate the focusing wheel on the right side to adjust the focus manually.
 Remote key description
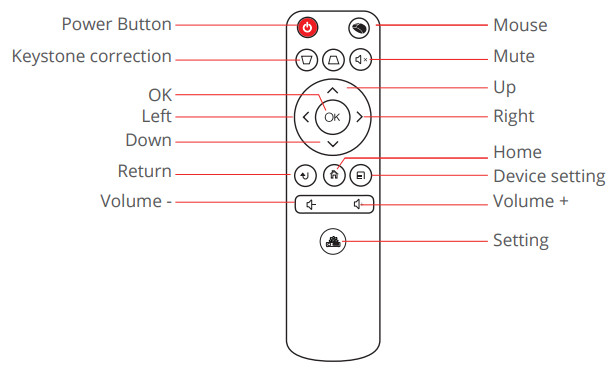
Notice:Please aim at the projection screen when you use the remote control to adjust.Please pull out the battery of the remote control if you did not use it for a long time.Lens maintenance:Please wipe it with a soft dust-free cloth or with some alcohol if the lens gets dirty.The glass lens will be easily scratched if normal care doesn’t do properly, which will affect the visual effectNotice:Before maintaining the lens, please disconnect the projector from the power supply, wait for the projector lens to be cooled down. Do not touch the lens with your hands. Do not use benzene, thinners, chemical sprayers, and other chemicals.(Please maintain projector lens in accordance with our instructions strictly.)
Click the ‘Manual’ app, and you can scan the product manual.
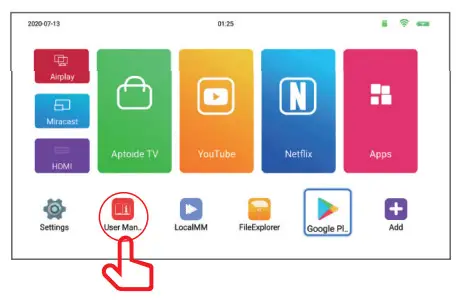
Enter app and browse electronic instructions
After-sales warranty service
1-year warranty service
Promise: For product performance failure caused by non-human damage, free repairing and parts replacement will be provided within 1 year from the day you received the product.
Not covered by Warranty (but not limited to the following)As responsible sellers, we’ll take full responsibility for everything we sell, but in some avoidable situations, the device will not be covered by our warranty.We strongly recommend you follow our instruction and read the following information carefully before using.
- Any repair carried out without prior authorization, misusage, impact, carelessness, abuse, fluid intake, accident; product quality problems because of the improper installation software system; tear up or alter the product table, product series number, false proof mark, and the seals.
- No effective ‘warranty card’ or has out of the warranty time.(Except the situation that you can prove the product is still in warranty period.)
- Alter warranty card without authorization.
- Product function damage is caused by man-made reasons.
- Damages are caused by using non-original parts or using the device’s parts improperly.
- Damages caused by incorrect usage, maintenance, safekeeping which is not following our product manual.
Please read this manual before operating your smart projector, and keep it for future reference.
[xyz-ips snippet=”download-snippet”]