Elechomes HM1112B Hand Mixer Electric User Manual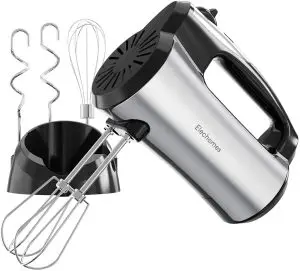
IMPORTANT SAFEGUARDS
WHEN USING ELECTRICAL APPLIANCES, BASIC SAFETY PRECAUTIONS SHOULD ALWAYS BE FOLLOWED, INCLUDING THE FOLLOWING:
- READ ALL INSTRUCTIONS.
- To prevent the risk of electric shock, DO NOT put the handheld mixer in water or other liquids.
- Keep it away from other working appliances or children.
- When not In use and before cleaning, please unplug the handheld mixer from the socket.
- NEVER touch the working parts. Keep your hands, hair, clothing, spatula and move away from all appliance accessories to avoid injury during operation.
- NEVER use the damaged power cord or plug to avoid electric shock
- NEVER use accessories not recommended or sold by Elechomes to avoid fire, electric shock, or injury.
- DO NOT use the handheld mixer outdoors.
- DO NOT hang the power cord on the edge of the table or counter.
- Keep the power cord away from hot surfaces, including stoves.
- Before cleaning, take out all accessories from the hand mixer.
- This device complies with Part 15 of the FCC Rules. Operation is subject to the following two T is device complies with Pan 15 of the FCC Rules. Operation is subject to the following two conditions: (I)This is device may not cause harmful interference: (2)This device must accept any interference received, including interference that may cause undesired operation.
- SPECIAL CORD SET INSTRUCTIONS: This hand mixer is equipped with a polarized plug (one blade is wider than the other one). To reduce the risk of electric shock, this plug will fit in a polarized outlet only one way. If the plug does not fully fit in the outlet, reverse the plug. If it still does not fit, contact a qualified electrician. DO NOT modify the plug by yourself in any way.
PACKAGE CONTENTS
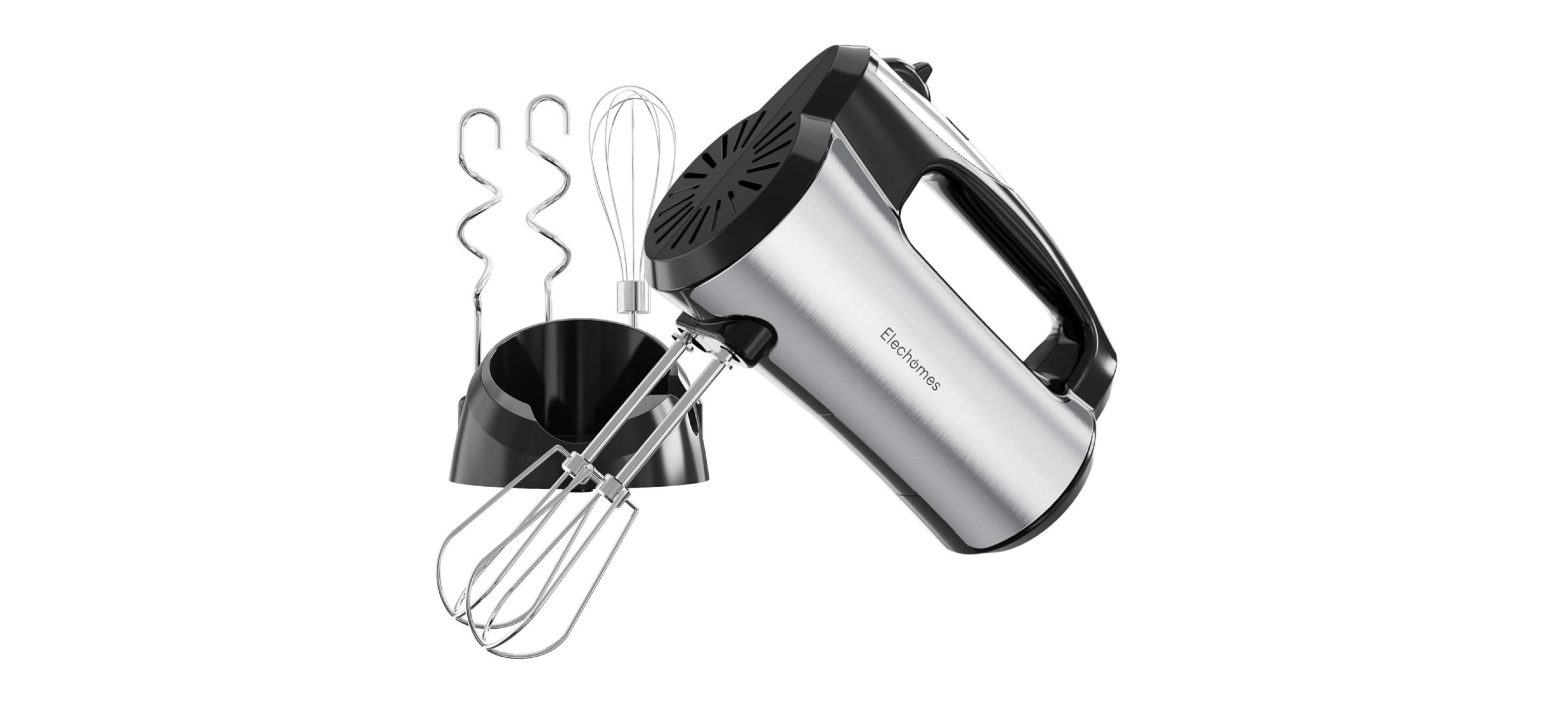
- 1 x Hand Mixer
- 2x Dough Hooks
- 2x Beaters
- 1x Whisk
- 1 x Storage Base
- 1 x Warranty Card
- 1 x User Manual
PRODUCT ILLUSTRATION
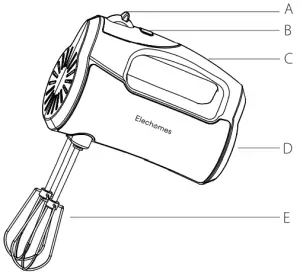
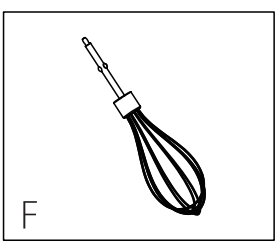
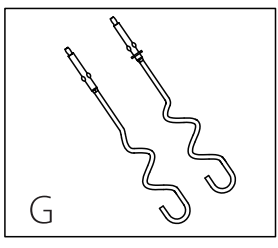
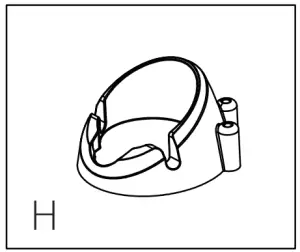
A. Speed Control Switch & Beater Eject ButtonB. HandleC. Heel RestD. whiskE. Dough Hooks Before The First UseF. Turbo ButtonG. BeatersH. Storage Base
Before The First Use
- Remove all packaging and all promotional labels or stickers from the mixer. Be sure to keep all included parks- Packaging materials can be kept for later use.
- Wash the metal beaters, dough hooks and whiskers according to the Cleaning and Maintenance in this user manual.
OPERATIONAL INSTRUCTION
Before inserting or removing accessories, make sure the speed control switch is in the 0 (off) position and the power is disconnected.
ATTACHING THE ACCESSORIES
- Insert Dough Hooks.

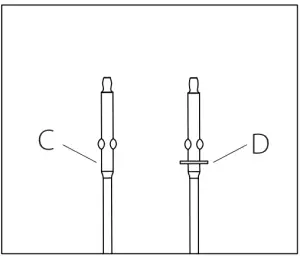
- The dough hook C doesn’t have a collar, while dough hook D has one.

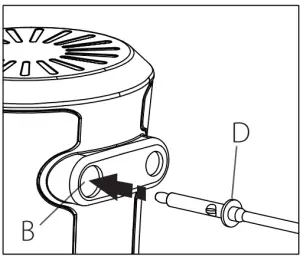
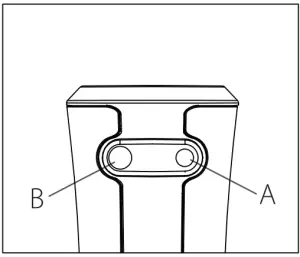
- Insert the dough hook D into the large opening B of the hand mixer. Align the flange on the shaft with the slot in the opening and push to lock the dough hook D into place. If necessary, you can rotate it until It is locked into place.

Insert dough hook C into the smaller opening A. Align the flange on the shaft with the slot in the opening and push to lock the dough hook C into place. If necessary, rotate it until it is locked into place.![]() The dough hook C without a collar fits opening A or B. and the dough hook D with a collar only fits the larger opening (6).
The dough hook C without a collar fits opening A or B. and the dough hook D with a collar only fits the larger opening (6).
- Insert Whisk and Beaters The whisk and beaters can be inserted into any hole of the mixer. Align the flange on the shaft with the slot In the opening and push to lock them Into place.If necessary, you can rotate them until they are locked into place.
REMOVING THE ACCESSORIES
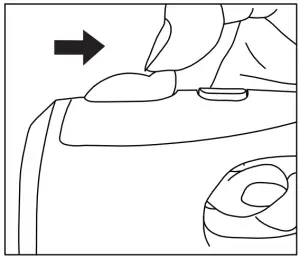 Let the mixer speed control switch in the 0 (off) position to ensure that the mixer has completely stopped and pulled out the power plug.
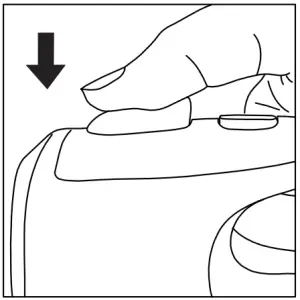
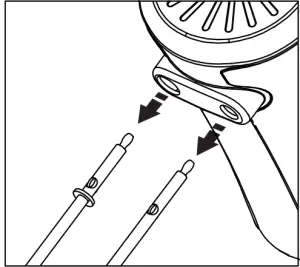 Firmly press down the speed control switch to release the accessory, and then remove it.
HOW TO USE YOUR HAND MIXER
- Plug the power cord into an outlet.
- Put the ingredients to be mixed in a bowl. Hold the handle of the mixer, and insert beaters. dough hooks or whisk.
- Immerse the beater in the food and push the speed control switch to select the correct mixing speed. In general, it is best to start at the slowest speed and then slowly increase the speed.
 To prevent splashing during the mixing process, soak the beater in the food and start the mixer from low to high speed.
 - Use the whisk/beater to continuously stir in the mixture to make the mixture evenly mixed.
- To remove the beater and dough hook, make sure the speed control switch is in the 0 (off) position. Firmly press down the speed control switch to release the accessories, and then take them away.
 Be careful when releasing the whisk or beater, as they will quickly pop out of the mixer.
- The TURBO button, located below the speed control switch, allows you to increase the mixing speed at the maximum power level in any speed setting. When you feel the mixer is slowing down or when the mixer is handling dough that is difficult to mix (such as mixing cookie dough), press the TURBO button.
 Do not press the TURBO button for more than 2 minutes.
 - Once you release the TURBO button, the mixer will return to the speed you originally selected.
Mixing Guide
Select Speed as follows;
|
SPEED |
FUNCTION |
USE |
| 1 | Stir | To stir the dry materials and liquids together. For example, add nuts and raisins to cookie dough or cake mixture. |
| 2 | Combine | To mix pancakes, waffles, muffins with batter. |
| 3 | Mix | To mix cream and sugar; to beat eggs into cookie dough and batter; to prepare cake mixes. |
| 4 | Beat | To beat whole eggs, frozen desserts; to mix light batters like popovers. |
| 5 | Whisk | To whip cream and egg whites; to mash potatoes. |
| TURBO | To use it at any speed setting and mix at the maximum power level. |
MIXING TIPS
- For best results, use stainless steel, copper or glass bowls instead of aluminum or plastic bowls when playing egg whites and stir at the highest speed.
- When stirring the cream, cool the cream, beater and bowl for the best results. Starting from the lowest speed, as the cream begins to thicken, gradually Increase the speed until the cream has been fully whipped.
- To prevent splashing during the mixing process, soak the beater in the food before starting the mixer, and stir from low to high speed.
CLEANING AND MAINTENANCE
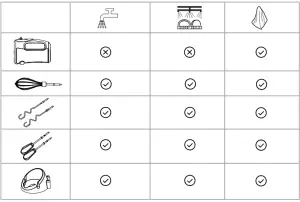
CLEANING
- Before cleaning any part of the mixer, make sure that the speed control switch is in the off (0) position and unplug the power cord. Eject beaters, dough hooks and whisk.
- Use detergent and warm water to clean beaters, dough hooks and whisk or clean these accessories In a dishwasher. Thoroughly dry all parts before storage.
- Clean the mixer or power cord with a damp cloth. To remove stubborn stains, clean the surface with a wet cloth moistened with detergent, or a mild, non-abrasive cleaner.WARNING: Never wash the mixer with water or soak it directly in water.
MAINTENANCE
- To prolong the service life of the mixer, never pull the power cord when the plug is connected.
- Thoroughly dry the mixer and all accessories before storage.
- Put the cleaned mixer and accessories into the Storage Base.
WARRANTY INFORMATION
|
Product Name |
Hand mixer |
|
Model Name |
HM1112B |
| Default Warranty Period |
18-month |
|
For your own reference, we strongly recommend that you record your order number and date of purchase. |
|
|
Date of Purchase |
|
|
Order Number |
TERM AND POLICY
The Elechomes products are premium in material craftsmanship and service. They are effective from the date of purchase.Elechomes will replace defective products based on eligibility. Refunds are available to the original purchasers of our products within the first 30 days of purchase.This warranty extends only to personal use instead of commercial, rental or any other uses in which the product is not intended for. Each product has no other warranties other than the already provided warranties.
This warranty is non-transferable. Elechomes is not responsible for any damages, losses or inconveniences caused by equipment’s failure, user’s negligence, user’s abuse, or improper operation that does not follow the included user manual.
This warranty does not apply to the following situations
- Damage due to abuse, accident, alteration or vandalism.
- Improper or inadequate maintenance.
- Damage in return transit.
- Unsupervised use by children under 18 years old.Elechomes and its subsidiaries are only responsible for damages caused by the intended use or as Instructed in the user manual. Some states do not allow this exclusion or limitation of inc ‘! or consequential losses so the above disclaimer may not apply to you.This warranty gives , legal rights and you may also have other rights which may vary from state to state.
All accessed and Implied warranties, Including the warranty of merchantability, are limited to the period of the limited warranty.
Additional 6-month Warranty:
You can enjoy an additional 6-month warranty. Just log onto www.elechomescom/support/warranty and enter your order number (i.e. Amazon ) within the first 14 days of purchase to register your new product for the extended warranty.
If you are unable to provide the order number for your product, please type a short note in the order number field along with the date you received your product.
Defective Products & ReturnsShould your product prove defective within the specified warranty period, please contact the Customer Support via [email protected] with your invoice and order number. Once our Customer Support team has approved your request, please return the product with a copy of your invoice and order number.
Customer Support
Your satisfaction is our goal! Should you encounter any issues or have any questions about your new product, feel free to contact our Customer Support Team on Monday-Sunday at 9:00 am-S:00 pm PST via [email protected].
*Please have your order Invoke and order number ready before contacting Customer Support
Connecting with @Elechomes![]()
![]()
![]()
THANK YOU FOR PURCHASING THE HAND MIXER BY ELECHOMES
Should you have any questions or concerns about your new product, feel free to contact us on Monday-Sunday at 9:00 am-S:00 pm PST via supportoelechornes.com. We hope you enjoy your new product!
 Website: https://www.elechomes.com
[xyz-ips snippet=”download-snippet”]

