Model: M-XGL10BB/M-XGM10BB/M-XGx10BB
Manual Wireless Mouse
![]()
elecomus.com/web/mouse-assistant/
Download “ELECOM Mouse Assistant” from the ELECOM website to use its button assignment and high-speed scrolling functions.
Name and function of each part

1 Left button2 Right button3 Wheel4 “Back” buttonYou can perform the “Back” operation in a web browser.5 “Forward” buttonYou can perform the “Forward” operation in a web browser.6 Pairing light/Power indicator lightThe light underneath the wheel flashes in red when the mouse is in a pairing standby state.When the power is turned ON, the light underneath the wheel becomes illuminated in red for a fixed period of time. If flashes red when the battery level gets low.7 Device selection switchThis product can be used with two Bluetooth devices by switching between them.Slide the device selection switch for changing device from “PC1” to “PC2”.
Change to PC1 Change to PC2


When the device is connected, the pairing lamp is lit for about three seconds.
 When only either “PC1” or “PC2” is paired, and if you turn the device selection switch to the device that is not paired, the current connection is disconnected. In this case, reconnect by turning the device selection switch back to the device that was connected.
8 Optical sensor9 Pairing button10 Power switch11 Battery cover12 Battery storage compartment13 Battery removal sheet
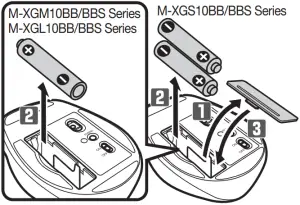
1 Inserting the battery

[1] Remove the battery cover.
[2] Insert the battery as instructed on the battery removal sheet.
 Ensure that the battery is inserted with its positive
 ![]() and negative
and negative ![]() ends oriented correctly.
ends oriented correctly.
[3] Attach the battery cover.
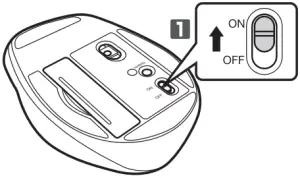
2 Turning the power on

[1] Slide the power switch to the ON position.
The power indicator light will become illuminated in red for a fixed period of time.* Flashes red when the battery level gets low.
 Power-saving modeWhen the mouse is left untouched for a fixed period of time while the power is ON, it automatically shifts to power-saving mode. The mouse is released from the power-saving mode when it is touched.* Mouse operation may be unstable for a few seconds after returning from the power-saving mode.
3 Pairing with a PC
For Windows® 10
[1] Click on the “Start” ![]() button on the lower left of the screen, and click on the “Settings”
button on the lower left of the screen, and click on the “Settings” ![]() icon.The “Windows Settings” window will appear.
icon.The “Windows Settings” window will appear.
[2] Click on “Devices”.The “Devices” page will appear.
[3] Click on “Bluetooth & other devices”.If “Bluetooth” is off, turn it on.
[4] Click on “Add Bluetooth or other devices”.
[5] Select the connected device using the device selection switch.
![]() • For the method used in selecting the device to connect, see “Device selection switch”.• The currently paired Bluetooth device is registered to the device selected here.
• For the method used in selecting the device to connect, see “Device selection switch”.• The currently paired Bluetooth device is registered to the device selected here.
[6] Click on “Bluetooth”.
[7] When the “Add a device” window appears, use a pointed item to press on the pairing button at the bottom of the device for 2 to 3 seconds, and then release.The machine enters into the Pairing mode and the pairing lamp is lit in red.
[8] Click on “ELECOM BlueLED Mouse”.Pairing of this product starts.
[9] When the status changes to “Connected”, click on “Complete”.
[10] Pairing is complete when this product is added to “Mouse, keyboard & pen” and the status is “Connected”.You can now use the mouse.
For macOS Catalina(10.15)
[1] From the Apple menu, click on “System Preferences…”.The System Preferences window will appear.
[2] Click on “Bluetooth”.The “Bluetooth” system setting page will appear.
[3] Select the connected device using the device selection switch.
![]() • For the method used in selecting the device to connect, see “Device selection switch”.• The currently paired Bluetooth device is registered to the device selected here.
• For the method used in selecting the device to connect, see “Device selection switch”.• The currently paired Bluetooth device is registered to the device selected here.
[4] Press the pairing button for 2 or 3 seconds using a pointed object and then release.The machine enters into the Pairing mode and the pairing lamp is lit in red.
[5] Click “ELECOM BlueLED Mouse” and click “Pairing”. Registration of this product starts.
[6] Pairing is complete when the pairing light stops flashing, “Connected” pops up on the screen, and the status of the “ELECOM BlueLED Mouse” is “Connected”.You can now use the mouse.
Specifications
| Compatible standard | Bluetooth® 3.0 Class2 |
| Profile | HID (Human Interface Device) |
| Resolution | 2000 dpi |
| Radio frequency | 2.4 GHz band |
| Radio wave method | FHSS |
| Operation distance | Non-magnetic surface (e.g. wooden desk) approx. 10 mMagnetic surface (e.g. steel desk) approx. 3 m* These values were obtained in ELECOM’s test environment and are not guaranteed. |
| Mouse dimensions (W × D × H) | M-XGM10BB (M-XGM10BBS) series : approx. 2.9” x 4.3” x 1.6”M-XGL10BB (M-XGL10BBS) series : approx. 3.2” x 4.7” x 1.7” |
| Operating temperature/humidity | 41°F to 104°F/90%RH or less (without condensation) |
| Storage temperature/humidity | 14°F to 140°F/90%RH or less (without condensation) |
| Supported battery | AA alkaline battery, AA manganese battery,AA nickel-metal hydride rechargeable battery |
| Operating time | Estimated operating time when using an alkaline batteryContinuous operating time: approx. 222 hoursContinuous standby time: approx. 462 daysEstimated usage time: approx. 402 daysThe above is assuming the computer is used for eight hours a day with 5% of that time spent operating the mouse. |
| Supported OS | Windows® 10, Windows® 8.1, Windows® RT8.1, Windows® 7, macOS Catalina 10.15 (Updating the OS or installing a service pack may be necessary.)* Compatibility information was retrieved during operation confirmation in our verification environment. There is no guarantee of complete compatibility with all devices, OS versions, and applications. |
Safety Precautions
![]() Prohibited action
Prohibited action![]()
![]()
![]()
![]()
![]()
![]()
![]()
![]()
![]()
![]()
![]()
![]()
![]()
![]()
![]()
![]()
![]()
![]()
![]()
![]()
![]()
![]()
![]()
![]()
![]()
![]()
![]()
![]()
![]()
![]()
![]()
![]()
![]()
![]()
![]()
![]()
![]()
![]()
![]()
![]()
![]()
![]()
![]()
![]()
![]()
![]()
![]()
![]()
![]()
![]()
![]()
![]()
![]()
![]()
![]()
![]()
![]()
![]()
![]()
![]()
![]()
![]()
![]()
![]()
![]()
![]()
![]()
![]()
![]()
![]()
![]()
![]()
![]()
![]()
![]()
![]()
![]()
![]()
![]()
![]()
![]()
![]()
![]()
![]()
![]()
![]()
![]()
![]()
![]()
![]()
![]()
![]()
![]()
![]()
![]()
![]()
![]()
![]()
![]()
![]()
![]()
![]()
![]()
![]()
![]()
![]()
![]()
![]()
![]()
![]()
![]()
![]()
![]()
![]()
![]()
![]()
![]()
![]()
![]()
![]()
![]()
![]()
![]()
![]()
![]()
![]()
![]()
![]()
![]()
![]()
![]()
![]()
![]()
![]()
![]()
![]()
![]()
![]()
![]()
![]()
![]()
![]()
![]()
![]()
![]()
![]()
![]()
![]()
![]()
![]()
![]()
Batteries
![]()
![]()
![]()
![]()
![]()
![]()
![]()
![]()
![]()
![]()
![]()
![]()
![]()
![]()
![]()
![]()
Cleaning the Product
If the product body becomes dirty, wipe it with a soft, dry cloth.
![]()
![]()
![]()
![]()
![]()
![]()
![]()
![]()
![]()
Cautions for Wireless Equipment
This product is wireless equipment using the entire range of the 2.4 GHz band and it is possible to avoid the band of mobile object identification systems. FHSS is used for the radio wave method. The interference distance is 10 m. The 2.4 GHz band is also used by medical equipment, Bluetooth, and wireless LAN equipment conforming to the IEEE802.11b/11g /11n standard.
- Before using this product, check that there are no other “radio stations”* operating nearby.
- If electromagnetic interference occurs between this product and other “radio stations”, move this product to another location or stop using this product.
* Other “radio stations” refer to industrial, scientific and medical devices using the 2.4 GHz band, as this product does, other radio stations of this type, licensed radio station premises for a mobile object identification system that is used in factory production lines, certain non-licensed low power radio stations and amateur radio stations.
![]()
![]()
![]()
![]()
![]()
![]()
![]()
![]()
![]()
![]()
![]()
![]()
![]()
Limitation of Liability
- In no event will ELECOM Co., Ltd be liable for any lost profits or special, consequential, indirect, punitive damages arising out of the use of this product.
- ELECOM Co., Ltd will have no liability for any loss of data, damages, or any other problems that may occur to any devices connected to this product.
![]()
![]()
This device complies with Part 15 of the FCC Rules. Operation is subject to the following two conditions: (1) this devicemay not cause harmful interference, and (2) this device must accept any interference received, including interference that may cause undesired operation.
NOTE; This equipment has been tested and found to comply with the limits for a Class B Digital Device, pursuant to part 15 of the FCC Rules. These limits are designed to provide reasonable protection against harmful interference in a residential installation. This equipment generates, uses and can radiated radio frequency energy and, if not installed and used in accordance with the instruction, may cause harmful interference to radio communication. However, there is no grantee that interference will not occur in a particular installation. If this equipment does cause harmful interference to radio or television reception, which can be determined by tuning the equipment off and on, the user is encouraged to try to correct the interference by one or more of the following measures:– Reorient or relocate the receiving antenna– Increase the separation between the equipment and receiver– Connect the equipment into an outlet on a circuit different from that to which the receiver is connected– Consult the dealer or an experienced radio/TV technician for helpNOTICE: The manufacture is not responsible for any radio or TV interference caused by unauthorized modification to this equipment. Such modifications could void the user’s authority to operate the equipment. In order to make improvements to this product, the design and specifications are subject to change without prior notice.
CONTACT US FOLLOW USelecom.net facebook.com/elecomus
- Unauthorised copying and/or reproducing of all or part of this manual is prohibited.
- The specifications and appearance of this product may be changed without prior notice for product improvement purposes.
- When exporting this product, check the export regulations for the country of origin.
- The Bluetooth® word mark and logos are registered trademarks owned by Bluetooth SIG, Inc. and any use of such marks by ELECOM CO., LTD. is under license.
- Windows is a trademark of the Microsoft Corporation.
- macOS Catalina, and Macintosh are trademarks of Apple Inc., registered in the U.S. and other countries.
- Company names, product names, and other names in this manual are either trademarks or registered trademarks.
A customer who purchases outside Japan should contact the local retailer in the country of purchase for enquiries.In “ELECOM CO., LTD. (Japan)”, no customer support is available for enquiries about purchases or usage in/from any countries other than Japan. Also, no foreign language other than Japanese is available. Replacements will be made under stipulation of the Elecom warranty, but are not available from outside of Japan.
Wireless MouseManual, Safety precautions, and Compliance with regulations1st edition, December 2, 2020
![]()
![]()
©2020 ELECOM Co., Ltd. All Rights Reserved.
MSC-M-XG10BB-US ver.111
[xyz-ips snippet=”download-snippet”]


