USER MANUAL
PORTABLE AIR CONDITIONER WITH HEATPUMP AND WIFIAIRFLEX15W
Thank you for choosing electriQ Please read this user manual before using this innovative Air Conditioner and keep it safe for future reference.Visit our page www.electriQ.co.uk for our entire range of Intelligent Electricals
SAFETY INSTRUCTIONS
Important!
- Carefully read the instructions before operating the unit.
- This Air Conditioner has an IP24 rating. It is designed mainly for indoor use but will stand up to outdoor use being protected against light rain and splashing.
- Rating: This unit must be only connected to a 220-240 V / 50 Hz earthed outlet.
- Installation must be in accordance with the regulations of the country where the unit is used.
- If you are in any doubt about the suitability of your electrical supply have it checked and, if necessary, modified by a qualified electrician.
- This air conditioner has been tested and is safe to use. However, as with any electrical appliance – use it with care.
- Disconnect the power from the unit before dismantling, assembling, or cleaning.
- Avoid touching any moving parts of the appliance.
- Never insert fingers, pencils, or any other objects through the guard
- This appliance is not intended for use by persons (including children) with reduced physical, sensory or mental capabilities. It is also not intended for use by those with a lack of experience and knowledge unless they have been given supervision or instruction concerning the use of the appliance by a person responsible for their safety.
- Do not leave children unsupervised with this appliance.
- Do not clean the unit by spraying it or immersing it in water.
- Never connect the unit to an electrical outlet using an extension cord. If an outlet is not available, one should be installed by a qualified electrician.
- Never operate this appliance if the cord or plug is damaged. Ensure the power cord is not stretched or exposed to sharp objects or edges.
- The power cord must not be immersed in water, as this could result in electric shock.
- A damaged supply cord should be replaced by the manufacturer or a qualified electrician in order to avoid a hazard.
- Any service other than regular cleaning or filter replacement should be performed by an authorized service representative. Failure to comply could result in a voided warranty.
- Do not use the appliance for any other purposes than its intended use.
- The air conditioner unit must always be stored and transported upright, otherwise, irreparable damage may be caused to the compressor; if in doubt we suggest waiting at least 24 hours before starting the unit.
- Avoid restarting the air conditioning unit unless 3 minutes have passed since being turned off. This prevents damage to the compressor.
- Never use the mains plug or an external plug-in timer as a switch to start and turn off the air conditioning unit. Use the provided ON/OFF switch located on the control panel.
- Always place the unit on a dry and stable surface.
- The appliance should not be installed in the laundry or wet rooms
- R290 refrigerant gas complies with European environmental directives
- R290 has a low GWP (Global Warming Potential) of 3.
- The air conditioner contains about 235 g of R290 refrigerant gas.
- Do not use or store in an unventilated space with an area smaller than 11.3m per unit. The room must be such as to prevent stagnation of possible leaks of refrigerant gas as there could be a danger of fire or explosion hazard should the refrigerant come into contact with electric heaters, stoves, or other sources of ignition.2
- If the appliance is installed, used, or stored in an unventilated room, the room must be such as to prevent stagnation of possible leaks of refrigerant gas as there could be a danger of fire or explosion should the refrigerant come into contact with electric heaters, stoves or other sources of ignition.
- Do not use the product and contact the retailer for advice, if damage has occurred to the unit which may have compromised the refrigerant system.
- Any repairs or maintenance must only be carried out on the unit by a suitably qualified engineer. Before opening and servicing the unit the authorized engineer must be in possession of a copy of the manufacturer’s service manual and must follow the safety information contained within it to ensure all hazards are minimized.
- The refrigerant system should not be perforated or punctured.
- Do not use means to accelerate the defrosting process or to clean, other than those recommended by the manufacturer.
- The appliance shall be stored in a room without continuously operating ignition sources (For example open flames, an operating gas appliance, or an operating electric heater)
- Do not pierce or burn.
- Be aware that refrigerants may not contain an odor.
Energy Saving and Unit Safety Protection Tips
- Do not cover or restrict the airflow from the outlet or inlet grills.
- For maximum performance, the minimum distance from a wall or objects should be 50cm. The unit is fitted with a thermal cut-off sensor that will prevent overheating.
- Keep the filters clean. Under normal conditions, filters should only need cleaning once every three weeks (approximately). Since the filters remove airborne particles, more frequent cleaning may be necessary, depending on the air quality.
- For the initial startup set the fan speed to maximum and the thermostat to 4-5 degrees lower than the current temperature. After, set the fan switch to low and set the thermostat to your desired setting.
- To protect the unit we recommend not using the cooling function when the ambient temperature is higher than 35°C.
- To protect the unit we recommend not using the heating function when the ambient temperature is lower than 7°C. Use alternative heating to raise the room temperature to 10°C then start the air conditioner in heat mode and set it to the desired temperature. Heating by heat pump will take longer but is much more efficient than any other form of heating and ideal for maintaining a constant room temperature.
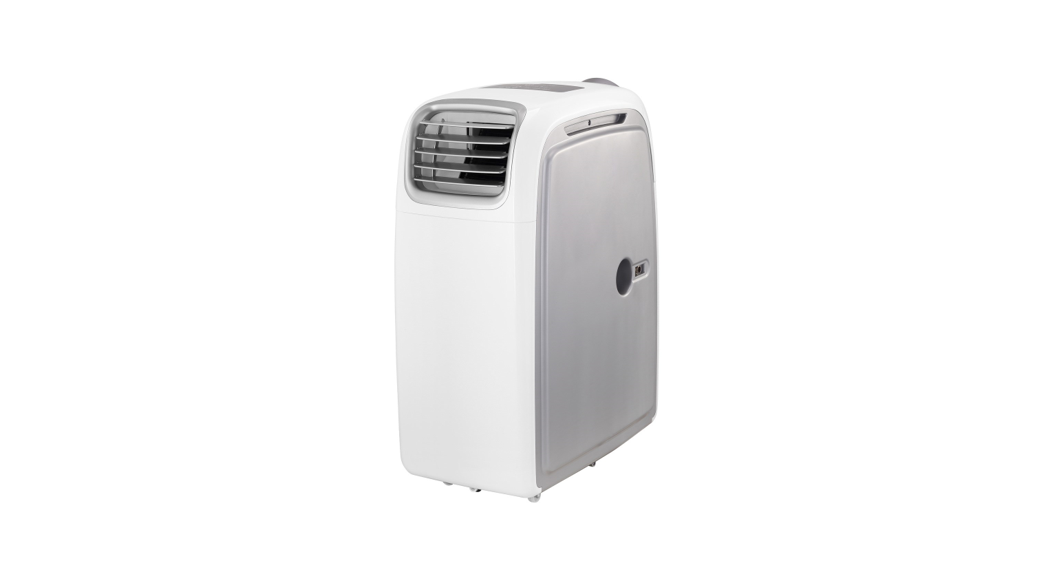
FEATURES AND PARTS LIST
FEATURES
- Part of the electriQ range of Intelligent Air Conditioning products
- Cooling, Heating, and Dehumidifying for use all year round.
- Powerful and Flexible for both Domestic and Commercial use
- Both pipes can be connected to gravity flaps, allowing the unit to be situated outside the room, making it ideal for use in server rooms, offices, military tents or barracks, marquees
- Improves comfort and indoor air quality
- Self-evaporative system – No external water tank is needed
- Compact, robust design
- Digital Control Panel with IP 24 splash-proof protection
- The bright LED screen indicates desired temperature and error codes
- Remote control and 24 hours start/stop timer that can be used both in cooling/heating or dehumidifier mode
- The hot air outlet is positioned high on the unit – This allows for improved performance with the use of a short hose
- On/Off timer function – allows you to choose when the unit operates both in air conditioning or dehumidifying mode
- Advanced compressor protection technology
- On castors for improved portability
PARTS LIST
| 1 | Control Panel | 5 | Filter |
| 2 | Cold Air Outlet | 6 | Cold air inlet |
| 3 | Hot Air Outlet | 7 | Hot air inlet |
| 4 | Drain Hole |
INSTALLATION
Warning: Before using this unit, please keep it upright for at least 3-4 hours.This unit can easily be moved from one room to another. While moving the unit please note that it must always be kept upright and then placed on aneven surface.
UNPACKING YOUR NEW AIR CONDITIONER
Open the box and remove the outer carton by sliding it upwards from the base. Grip the unit by the carry handles located on either side of the unit and carefully lift until it slides out of the foam base Install the exhaust hose on the unit before operating.
CONTENTS
ATTACHING THE HOSE
- Clip the hose connector and front vent to the sides of the unit (after removing the hose from storage)
- Insert the hose and rotate it firmly into the adapter
- To remove the hose twist it in the opposite direction.
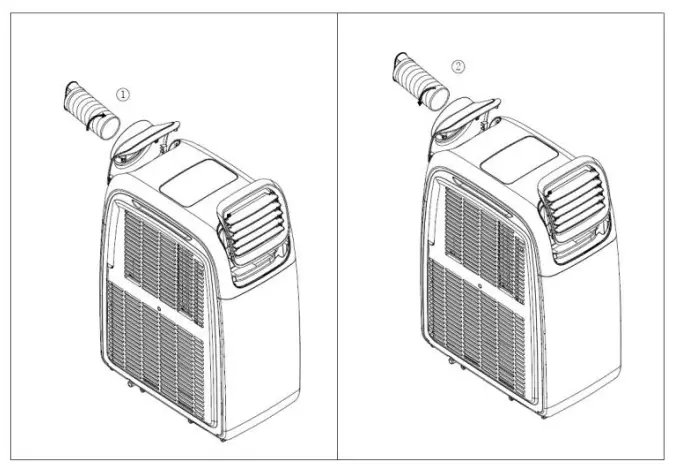
Note: To install the hose for heat mode please remove the hose, the hose connector, and the front vent from the unit and re-fit on the opposite sides. The process should be reversed toput the unit back into cooling mode.
INSTALLATION OF WINDOW KIT
Partially open the window and then fix the window kit to the window horizontally or vertically. Keep at least 50 cm from any objects and the air inlets grills on the side of the unit. Clip the other end of the hose with the fishtail adapter to the air outlet of the window slider. Make sure the unit is upright and there are no obstructions to the air inlet and outlet grills.
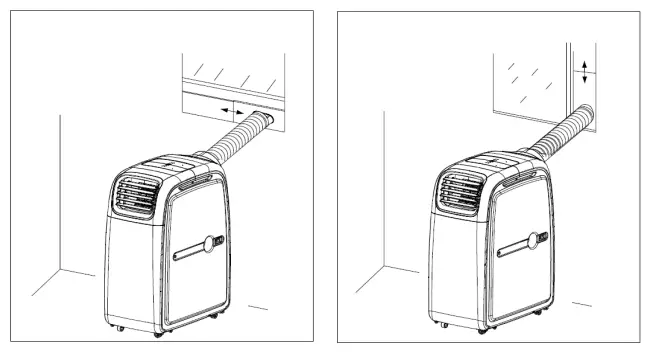
The window kit is only designed to be installed with sliding or sash windows and doors. The window kit is not made to be used with any other style of window. However the fishtail adaptor can be used without the slide bar on most windows and doors, but without sealing the rest of the window opening the efficiency of the unit will be reduced. Ensure that the opening left is as small as possible.
The best form of installation is through a wall duct. Please note that the unit will still need to be vented in heating and cooling modes, ideally through the wall.
Note: Avoid bending the air hose more than 30 degrees!
IMPORTANT SAFEGUARDSThe soft hose will extend from 28 cm to 150 cm, and the unit will support hoses of up to 300cm. If hose is extended above this length the unit may malfunction and this can invalidate the warranty. The shorter the hose the better the results; ideally for best performance, do not extend the hose by more than 40 cm. The outlet vent must be well ventilated and not obstructed as this will cause the unit to overheat.
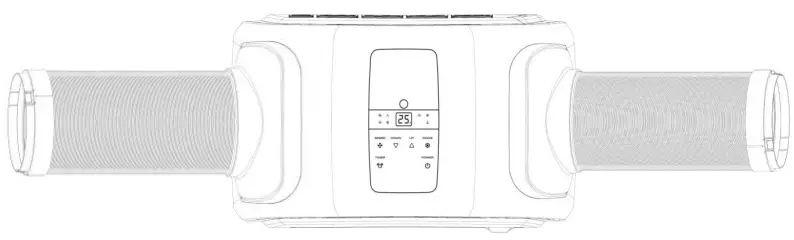
CONTROL PANEL AND SETTINGS
This portable air conditioner boasts the functions: cooling, heating, and dehumidifying. The fan has three speeds: high, medium, and lowTemperature range settings are 16 – 31 C.The LED screen is able to display the temperature set, fault codes, diagnostic and protective codes.
| 1 | Standby Button | 9 | Heating Indicator |
| 2 | Temp + Button | 10 | IR Remote Sensor |
| 3 | Function Button | 11 | High Fan Speed Indicator |
| 4 | Timer Button | 12 | Medium Fan Speed Indicator |
| 5 | Temp – Button | 13 | WIFI Indicator |
| 6 | Fan Speed Button | 14 | Low Fan Speed Indicator |
| 7 | Dehumidify Indicator | 15 | LED Display Panel |
| 8 | Cooling Indicator |
When plugged in the unit will automatically enter standby status
(1) STANDBY ButtonPress this button to turn the unit on and enter cooling mode. Press again and the unit will switch off.
(2) TEMP + ButtonThese are used to increase the desired temperatureIn cooling mode, the temperature can be set between 16 – 31°CIn heating mode, the temperature can be set between 16 – 31°C
(3) FUNCTION ButtonPress this button to choose between the Cooling, Heating, and Dehumidifying modes. Please note when changing between heating and cooling modes, the exhaust hose needs to move onto the appropriate air outlet. In dehumidifying mode, the exhaust hose should not be connected, but the unit should be set up for continuous drainage.
(4) TIMER Button
The inbuilt timer will allow you to set the unit to turn on or turn off after a set period of time, please note only one timer can be used at any time.
ON TIMER – The timer will turn on the unit automatically after the time set has elapsed.
- When on standby, press the TIMER button, then set the number of hours time you desire the unit to start by pressing the TEMP+ and TEMP- buttons.
- Once the set time has elapsed, the unit will turn on automatically.
- Press the POWER button before the time has elapsed and the unit will turn on as normal and the timer will be canceled
- The function and fan speed can be set whilst setting the timer.
OFF TIMER – The timer will turn off the unit automatically after the time set has elapsed.
- While the unit is operating, press the TIMER button then set the number of hours time you desire the unit to stop by pressing TEMP+ and TEMP- buttons.
- Once the set time has elapsed, the unit will turn off automatically.
- Press the POWER button before the time has elapsed, the timer will be canceled and the unit will turn off.
(5) TEMP – ButtonThese are used to reduce the desired temperatureIn cooling mode, the temperature can be set between 16- 31°CIn heating mode, the temperature can be set between 16- 31°C
(6) FAN SPEED Button
Allows the fan speed to be changed between the following options:HIGH→MEDIUM-LOW
- In Dehumidifying mode, the fan is pre-set to low speed
- In HEATING mode, the fan is pre-set to high speed
(7) to (9) FUNCTION INDICATORSAn LED will illuminate to show which mode the unit is currently in. This can be changed between Dehumidify (7), Cooling (8), and Heating (9) using the Function Button (3)
(10) IR REMOTE SENSORReceives infrared signals from the supplied remote control
(11) to (14) FAN SPEED INDICATORSAn LED will illuminate to show which fan speed the unit is currently set to. This can be changed between High (11), Medium (12), and Low(14) using the fan speed button (6).
(15) LED DISPLAYShows the set temperature or timer settings while in normal operation. When the set temperature or the timer is adjusted, the new setting is shown on the display.
- When the TEMP+ or TEMP- buttons are pressed, the display will show the desired temperature currently set.
- When the [TIMER] button is pressed the number of hours remaining will be shown until the function is achieved or deactivated.
- In the dehumidification function, “dH” or “CO” will be shown in the display (dependant on the model)
The LED display is also used to show error codes should a fault occur
| EO | The room temperature sensor is open or of short circuit, but it does not affect the normal use. |
| E2 OR E4 | Water is full, needS manual drainage |
| E3 | The coil sensor is open or short-circuited, but this should not affect the normal operation. |
MULTI PROTECTIVE FUNCTION
ANTI-FREEZE PROTECTION CONTROL:When the ambient temperature is low while in Cooling Mode, the compressor and water pump will stop working if the copper coil temperature is too low. When the copper coil temperature increases, the protection will be stopped automatically. While in this mode “Df” will be displayed on the unit.
WATER-FULL PROTECTION:When the water level in the internal water tank is above the maximum level, the unit will alert automatically and E4 will be displayed on the LED screen. Please discharge the water from the water tank by following the instructions in the “Water Drainage” section.
COMPRESSOR PROTECTIONThe compressor has to overheat protection which may stop the compressor to prevent damage. The compressor also has a 3-minute delay protection function which delays the start of the compressor, to help protect the compressor against repeated loss of power.
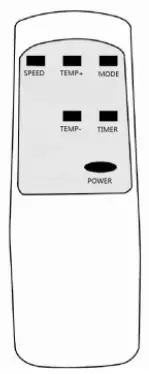
REMOTE CONTROL
| Power | To enter/exit Standby Mode. |
| Speed | Fan speed selection (N/A in dehumidification mode) |
| Temp + | Increase desired temperature in 1-degree increments |
| Temp – | Decrease desired temperature in 1-degree increments |
| Mode | Change between Heating, Cooling, Dehumidifying, fan, and auto modes. |
| Timer | Set the timer. For more information see the Timer section on Page 10. |
 CONNECTING THE AIR CONDITIONER TO WIFI
Ensure whilst setting up the WIFI on your air conditioner, that it is close to your router, as the unit requires a good signal during the setup process. Your air conditioner is designed to be connected to a 2.4ghz network and the connection is set up using the “TUYA SMART” app, which can be downloadedfrom your chosen app store
 Androidhttps://play.google.com/store/apps/details?id=com.tuya.smart&hl=en
IOShttps://itunes.apple.com/gb/app/tuyasmart-smart-life-smart-living/id1034649547?mt=8
Further details on how to connect the device can be found in the separate WIFI Guide.
OPERATION MODES
The electriQ Airflex 15 is the most flexible fully-featured air conditioner on the market. When combined with a gravity flap, the air conditioner can be used in spaces where there is not enough space to fit a standard portable air conditioner, making it the perfect choice for Server Rooms, Small office spaces, etc.
The Airflex 15 can be placed outside the room to cool, on balconies, corridors, mezzanine, etc. The space can then be cooled or heated via the gravity flap, while the unit is controlled by the app.
In addition by moving the unit outside the room the noise of the portable unit is significantly decreased.
COOLING
On very warm days we recommend programming the unit to start early, before direct sunlight hits the room, set it to a comfortable 20-22°C in cooling mode. The electriQ Airflex 15 is a self-evaporating air conditioner, so under normal use, there is usually no need to empty the internal tank. However, if there is a high amount of humidity in the air or if the unit is not vented correctly, water will be collected in the internal tank.
If the unit operates in cooling mode for a longer period and especially at a time of year with higher air humidity, the internal condensation tank may fill and an error E4 will be displayed on the LED panel, which means the unit will require emptying as per the water drainage section. In such instances, it is recommended to use permanent drainage.
COOLING WHEN THE AIR CONDITIONER IS PLACED INDOORS (NORMAL OPERATION)The unit is placed in the room to be cooled.
Connect the hose to the hot air outlet of the air conditioner, after exchanging the grills if necessary. The air hose will expel the hot air from the room outside while the front grills produce cold air, to cool the room.
The hose can be vented via a tilted window, a door, or wall aperture. Make sure that no warm air from outside can enter the room. Set the function to “COOLING”. Set the target temperature using the temperature control. The target temperature range is selectable between 16°C and 31°C. The unit must only be used in an ambient temperature of up to 32°C.
Note: After switching on, the compressor will only start after a 3-minute delay. For full cooling effect please allow a further 10 minutes of operation.
COOLING WHEN THE AIR CONDITIONER IS PLACED OUTDOORS (DUCTING THE COLD AIR INTO THE ROOM)
Connect the hose to the cold air outlet of the air conditioner, after exchanging the grills if necessary. The air hose will send cold air into the room, while the front grills will expel hot air. Place the unit in the shade if possible and in a cool, protected place in order to increase efficiency and to avoid overheating. At an ambient temperature of over 32°C, the unit will stop cooling to protect the compressor. If this becomes recurrent we recommend you use the INDOOR COOLING OPERATION. To prevent interruptions in the operation of the unit a drainage hose for condensation water should be connected.
Set the function to “COOLING”. The temperature range is selectable between 16°C and 31°C. Fresh cooled air is led into the room via the air hose. The hose can be vented via a tilted window, a door, or wall aperture. Make sure that no warm air from outside can enter the room.
The app can be used to allow control of the air conditioner from inside the room to be cooled.
Note: After switching on, the compressor will only start after a 3-minute delay. For full cooling effect please allow a further 10 minutes of operation.
HEATINGBe aware that on very cold days the unit should only be operated indoors. When the outside temperature gets colder, it will take longer to heat the room. We recommend that when you have achieved the desired temperature to leave the unit running on thermostatic control and it will maintain the temperature set very economically.
To improve the heating effect we recommend you set the unit up for continuous drainage. To do this remove the top drain port rubber plug to allow the condensation water to drain from the unit using a drainage hose. Further details of this can be found in the water drainage section. If the unit is not set up for continuous drainage, the water tank will require emptying regularly and the E4 error (Water tank full) will be displayed, when the tank is full.
The operating range of the Heat pump is 7°C-23°C when placed indoors. It will work if the outside temperature is less than 7°C but the indoor temperature should be higher than 7°C. You may want to quickly heat the room to above 10°C with another form of heating and then maintain the temperature achieved using the heat pump air conditioner, as this would be more efficient.
HEATING WHEN THE AIR CONDITIONER IS PLACED INDOORS (NORMAL OPERATION)
Connect the air hose to the cold air outlet of the air conditioner after exchanging the grills if necessary. The air hose will expel the cold air from the room outside while the front grills produce hot air.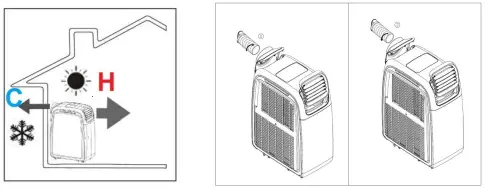
The hose can be vented via a tilted window, a door, or wall aperture. Make sure that no cold air from outside can enter the room. For effective heating, we recommend through wall venting. Set the function to “Heating”. The temperature range is selectable between 16°C and 31°C.
Note: After switching on, the compressor will only start after a 3-minute delay. For full heating effect please allow a further 10 minutes of operation.
HEATING WHEN AC IS PLACED OUTDOORS (DUCTING THE HOT AIR INTO THE ROOM)
Connect the air hose to the hot air outlet of the air conditioner after exchanging the grills if necessary. The air hose will send hot air into the room, while the front grills will expel cold air.
The unit is placed outside the room to be heated. Outdoor operation is ideal for the autumn period in which outside temperatures do not fall below 10°C. (If the outside temperature is likely to fall below 10°C continuously, we would recommend indoor operation).
The hose can be vented via a tilted window, a door, or wall aperture. Make sure that no cold air from outside can enter the room. For effective heating, we recommend through wall venting. Set the function to “Heating”. The desired temperature range is selectable between16°C and 31°C.
Note: After switching on, the compressor will only start after a 3-minute delay. For full heating effect please allow a further 10 minutes of operation.
The app can be used to allow control of the air conditioner from inside the room to be heated.
DEHUMIDIFICATIONThe Airflex 15 is a powerful commercial-grade dehumidifier with an extraction rate of 70 liters per day at 80%RH. Humidity is extracted from the air, collected in the water tank, and discharged via a condensation drainpipe. We recommend using a large bucket or running the condensate drain pipe to an external drain. Please note the condensate drain is gravity fed, and so the pipe must run downhill for drainage to occur. Alternatively, it is possible toconnect an inline pump for sending the condensate longer distances or uphill.
When using the air conditioner in dehumidify mode, the exhaust hose is not required. Set the function to “Dehumidify”. As the unit does not have a humidistat we recommend using the inbuilt timer to control the length of operation.
DUAL DUCTING THE UNITThe Airflex 15 also supports dual ducting in both cooling and heating modes. This means the unit can operate with two hoses connected at the same time.
To do this the unit should be set up with a compatible gravity flap for sending cooled/heated air into the room, with a second pipe connected sending the waste air outside. I.e. in the winter, the unit could duct the hot air into the room while ducting cold air outside, with the unit inside to increase performance.
This is perfect for classroom environments or similar, where during summer the unit can be kept in a storeroom, ducting cold air into the classroom while ducting the hot air outside. This both minimizes the noise in the classroom and keeps the unit safe from tampering.
To set up the unit for dual ducting, a compatible twin duct adaptor and a second 150mm diameter pipe should be purchased from the original retailer or manufacturer. Details can be found below:
| Diagram | Part Name | Stock Code |
 |
Twin Duct Adaptor | AIRFLEX15V2-TWD |
|
Vent Pipe | 1.5 Metre:
1.5M6INHOSE
3 Metre: HOSE3M6IN |
WATER-DRAINAGEThis model is an advanced self-evaporative air conditioner, which reduces the need to empty the water tank in cooling mode. If the unit is vented correctly most of the water is reused to cool the condenser coils and any excess is evaporated. As such for cooling mode, to ensure the unit runs at maximum efficiency, we would advise for continuous drainage not to be used.
MANUAL DRAINAGE:
- When the internal water tank is full the unit will stop working, and the unit will display “E2” or “E4”
- Shut off the unit and unplug. Try not to move the model abruptly as this may cause water to spill out from the internal water tank.
- Place a tray under the water plug.
- Remove the water plug and attach a drain pipe running to the water container – water will drain from the internal container.
- Put the water plug back securely.
CONTINUOUS DRAINAGE:
- Remove the water plug
- Connect a water pipe to the water outlet.
- You can plumb this pipe into your current plumbing system, lead it outside or use a water pump.
NOTE:
- Please make sure that the rubber bung or a drain pipe is in place when the unit is running.
- When operating the heating function, a drain pipe should be installed in order to improve the heating effect.
- When operating the dehumidifying function the unit must be used with a drain hose.
- When the water tank is full,” E2” or “E4” will be displayed on the display panel. Pleaseremove the rubber bung from the drain port and remove the water collected. After the drainage is completed, please restart the unit, and then the unit can operate normally.
MAINTENANCE
CLEANINGPlease shut off the unit and unplug from the mains before cleaning or performing any maintenance
CLEAN THE SURFACE
Clean the plastic housing with a duster or a soft wet cloth. Do not use chemical solvents (such as benzene, alcohol, or gasoline) as they may causeirreversible damage.
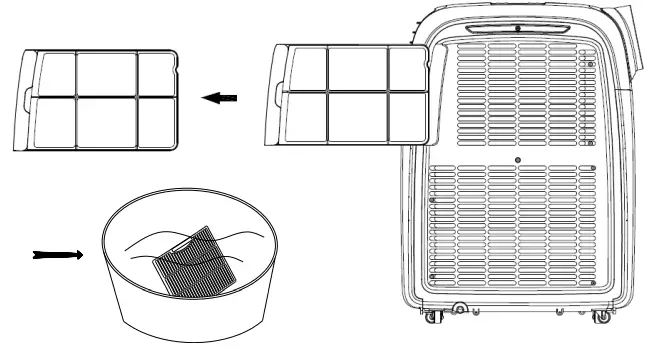
AIR FILTER CLEANING
a) Clean the air filter every 2 weeks. If the air filter is blocked with dust, the unit’s performance will be significantly affected.b) Pull out lightly the filter as shown belowc) Wash the air filter by immersing it in warm (about 40°C) water with a neutral detergent.d) Rinse it and then dry it thoroughly.e) Carefully re-install the air filter
END OF SEASON MAINTENANCE:
- Pull out the plug from the drainage hole and empty the internal tank. You can also drain water by leaning the unit.
- Then switch the unit to low fan mode in cooling mode with the desired room temperatures above the temperature of the room.
- Keep the unit in this mode for half-day – until the conduit is dried. Doing this helps to keep the inside of the unit dry and prevents mold from developing
- Turn off the unit and pull out the plug.
- Separate the vent pipe and store it safely.
- Cover the unit and keep it in a dry place.
- Take the batteries out of remote control and store, or dispose of them safely
TROUBLESHOOTING
Do not repair or disassemble the unit by yourself, unauthorized repair attempts will invalidate the warranty and may cause bodily harm.
| Problem | Reason | Solution |
| The unit does not work | No power supply | Ensure the unit is plugged in and attempt to turn on the unit. |
| Water-full indicator (E4) | Drain the internal water tank | |
| Timer function is active | Cancel the Timer function | |
| Room temperature too low or too high | Use only in ambient temperatures between 7 — 32°C | |
| The unit does not seem to perform. | Indirect sunlight | Draw the curtails. UV affects RC |
| Windows or doors open.
A large number of people or a heat source in the room. |
Close windows and turn on another air conditioner | |
| Filter is very dirty | Clean or change the air filter | |
| Air inlet or air outlet is blocked | Clear out debris | |
| Room temperature is lower than the temperature set | Change the set temperature | |
| The unit is laud | The unit is not on a flat surface. | Put the unit on a flat surface. Carpet is
best for reducing vibrations from the compressor |
| Compressor does not work | Overheating protection is active | Check the vent is straight and unrestricted Restart the unit after 5 minutes when the compressor has cooled |
| Remote
control doesn’t work |
Operating distance is too far. | Move remote control closer to the unit and make sure it is aimed at the IR sensor |
| Control panel has not received the signal from remote control. | ||
| The batteries are flat | Replace the batteries |
Note: The mobile air conditioner is equipped with a 3-minute compressor-delay system to protect the compressor and prolong the life of the unit. This affects the switching on of the unit (POWER) as well as switching over from one function to the next, e.g. dehumidify to cooling or heating.
SELF DIAGNOSTIC CODES
| DISPLAY | AUTOMATIC DIAGNOSTICS |
| E0 | The room temperature sensor is open or short
circuited. This should not affect the normal use. |
| E2/E4 | Water is full, need to be manually drained |
| E3 | The room temperature sensor is open or shortcircuited. This should not affect the normal use. |
If the above solutions do not resolve the problem please contact the service center.
APPENDIX
Disposal: Do not dispose of this product as unsorted municipal waste. Collection of such waste must be handled separately as special treatment is necessary.Recycling facilities are now available for all customers at which you can deposit your old electrical products. Customers will be able to take any old electrical equipment to participate in civic amenity sites run by their local councils. Please remember that this equipment will be further handled during the recycling process, so please be considerate when depositing your equipment. Please contact the local council for details of your local household waste recycling centers.
TECHNICAL DATA
| MODEL | Alrflext5W | |
| Capacity | Cooling | 4000 W |
| Heating | 3200 W | |
| Rated Input (EN 60335) | Cooling | 1538 W |
| Heating | 1391 W | |
| Running Current | Cooling | 7.0 A |
| Heating | 6.3 A | |
| Max Noise Level (Sound Pressure) | 565 dB(A) | |
| Air Flow | 450 m3/hr | |
| Maximum Allowable Pressure | 3.2/1.0 Mpa | |
| Permitted Excessive Operating Pressure | 2.6/1.0 MPa | |
| Power Supply | 220-240V/50Hz | |
| REFRIGERANT | R290/235g | |
| Net Weight | 28 kgs | |
Dimensions
 report this ad report this ad(L*D*H) |
321x580x767 mm |
|
The unit must be vented outside when in Air Cooling and Heating mode. For the purposes of EU regulation EN12102, this is a local air conditioner and produces less than65dB(A) sound energy. |
electriQ UK SUPPORTwww.electriQ.co.uk/support
Please, for your own convenience, make these simple checks before callingthe service line.If the unit still fails to operate call: 0330 390 3061 or complete the onlineform
- Has the unit been standing upright for at least 2 hours?
- Is the unit plugged into the mains?
- Is the fuse OK?
- Switch the unit off and wait three minutes to see if the issue is resolved. Restart the unit.
- Check if the water tank is full.
Office hours: 9 AM – 5 PM Monday to Fridaywww.electriQ.co.ukUnit J6, Lowfields WayElland, West YorkshireHX5 9DAV20190517
References
[xyz-ips snippet=”download-snippet”]