
electriQ eiQ-34SUWD144FSHQ User Manual
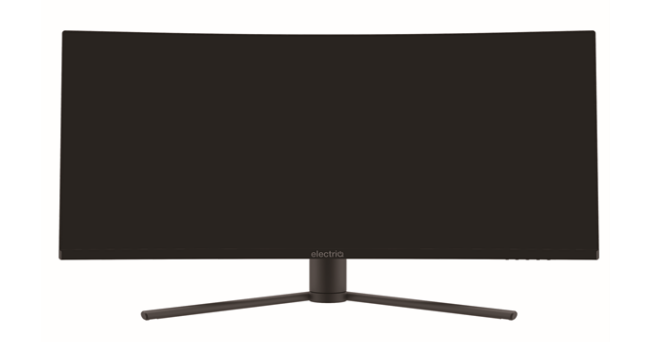
34 INCH CURVED QLED MONITOR
Thank you for choosing electriQ
Please read the user manual before using this monitor and keep it safe for future reference
Visit www.electriQ.co.uk to view our entire range of Intelligent Electricals
SAFETY INFORMATION
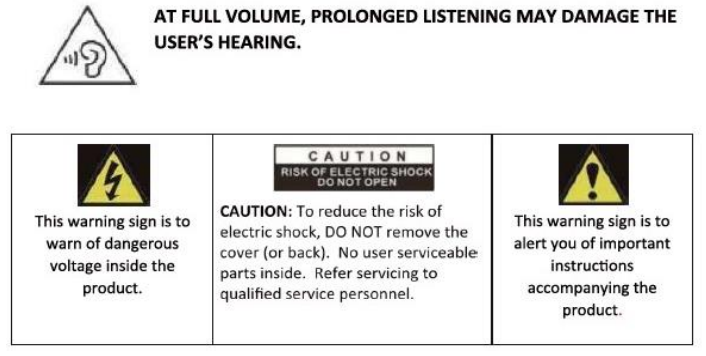
- Read these instructions – All the safety and operating instructions should be read before this product is operated.
- Keep these instructions – The safety and operating instructions should be retained for future reference.
- Heed all warnings – All warnings on the appliance and in the operating instructions should be adhered to.
- Follow all instructions – All operating and usage instructions should be followed.
- Do not use this equipment near water, or in humid environments – The appliance should not be used near water or moisture e.g. in a wet basement or near a swimming pool.
- Clean only with a dry cloth. Do not use solvents or petroleum based fluids.
- Do not install near any heat sources such as radiators, stoves or other apparatus (including amplifiers) that produce heat.
- Do not tamper with the supplied plug. This plug is a BS1363 standard plug.
- Protect the power cord from being walked on or trapped, particularly at the plug and at the point where it exits from the appliance.
- Only use attachments/accessories specified by the manufacturer.
- Use only with a cart, stand, tripod, bracket or table specified by the manufacturer or sold with the apparatus. When a cart or stand is used, proceed with caution when moving it to avoid any injuries or damage from it tipping over.
- Unplug the apparatus during lightning storms or when unused for long periods of time.
- Refer all servicing to qualified personnel. Servicing is required when the apparatus has been damaged in any way, such as if the power supply cord or plug is damaged, liquid has been spilled or objects have fallen into the apparatus or it has been exposed to rain or moisture, it does not operate normally or has been dropped.
- Please keep the unit in a well-ventilated environment.
- The monitor should only be connected to a mains power supply as rated on the back of the equipment.
- To prevent overload, do not share the same power supply socket with too many other electronic components.
- Do not place any connecting wires where they may be stepped on or tripped over.
- Do not place heavy items on the cable as this may cause damage.
- When removing from a socket hold by the plug and not the wires.
- Disconnect the power immediately and seek professional help if the plug or cable is damaged, liquid has spilt onto the set, if accidentally exposed to water or moisture, if anything accidentally penetrates the ventilation slots or if the set does not work normally.
- Do not remove the safety covers. There are no user serviceable parts inside.
- Although every effort is made to maintain the accuracy of the manual, due to continuous product development, some variation from the manual is possible.
- The availability of features and settings may vary depending on the input source and method of connection.
- The available resolutions and refresh rates may be limited by the capabilities and/or settings of the source device.
- Do not block ventilation openings. The monitor can be placed in a cabinet but ensure at least 5cm (2″) clearance all around. Do not tap or shake the screen, this may damage internal components.
WARNING: To reduce the risk of fire or electric shock, do not expose this apparatus to rain or moisture. The apparatus shall not be exposed to dripping or splashing and objects filled with liquids, such as vases, shall not be placed on the apparatus.
WARNING: The wall plug socket is used as a disconnection device and should remain readily accessible.
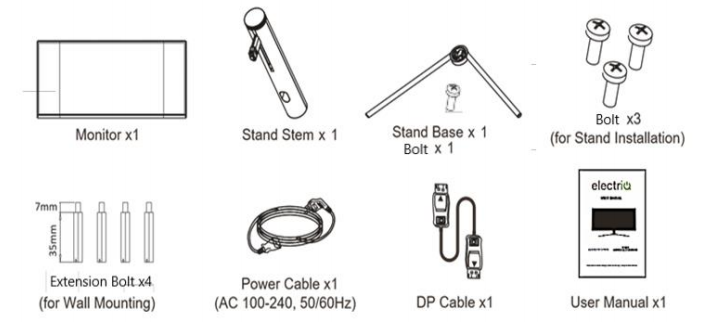
PARTS LIST
STAND INSTALLATION
- Open the package and take out the product with the foam still attached. Gently place it on a desktop or table.
- Remove the polyfoam and the inner package bag, place on a desktop or table, keep the lower foam underneath the monitor.
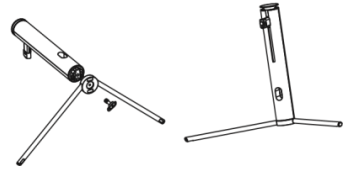
- See picture, fasten the stand stem and base with a screw.

- Press the button to remove the stand plate, Fix the stand plate into the stand stem with the supplied bolts.
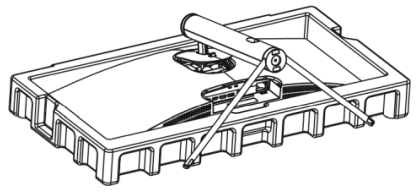
- Fix the whole assembled stand into the monitor, and check carefully to make sure it is fastened.
- Hold onto the stand stem and stand the monitor up on a flat, level desktop or table.
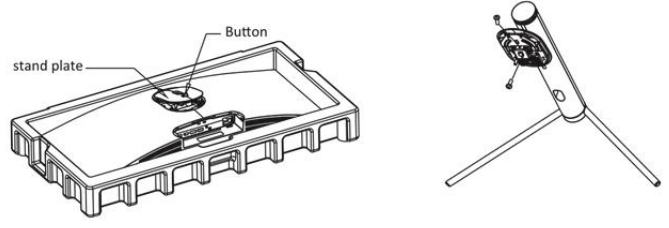
- Due to the heavy weight and dimensions of the LCD screens and their fragile nature, we recommend that they are unpacked and assembled by 2 people.
- The stand can be removed from the rear of the monitor by pressing the quick release button on the rear of the monitor.
MOUNT INSTALLATION
- Open the package and take out the product with foam still attached Gently place it on a desktop or table. Remove the parts and the foam covering the monitor. If the monitor is already attached to the stand, remove the stand.
- Press the button to remove the adapter on back of monitor, then tighten the included four screws onto the mounting holes on back of monitor.
- Install the monitor on the wall, mount, or fixture as desired.

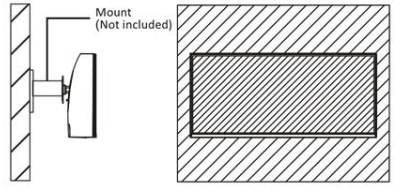
WALL MOUNTING
- The monitor is provided with mounting holes for a VESA approved wall mounting bracket (not supplied).
- When wall mounting, the supplied extension bolts must be fitted to the rear of the monitor to allow the bracket to fix firmly to the rear of the monitor.
- M4 x12 bolts (not supplied) should be used to attach the bracket to the extension bolts.
- Do not use bolts longer than the size specified above for your model or damage will occur to the internal components.
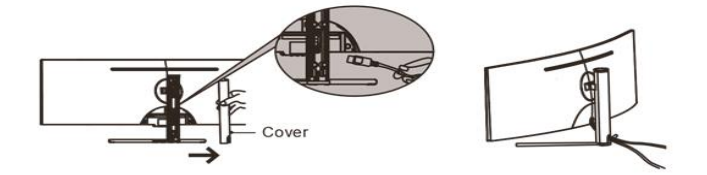
CABLE MANAGEMENT
The cover can be removed from the rear of the stand. Cables can then be threaded through the stand, up to the terminals. Once the cables are in position, replace the cover on the rear of the
DO NOT put pressure on the screen when moving or positioning the monitor.
NOTES:
- Due to the heavy weight and dimensions of the LCD screens and their fragile nature, we recommend that they are unpacked and assembled by 2 people and professional installers are used to wall mount them (Wall mounting is optional). If you do not understand the instructions, or are unsure how to install this product, please contact a professional for assembly advice and assistance.
- Careful consideration should be made regarding the location the monitor is to be wall mounted as some walls are not suitable for installation. If the monitor is to be mounted on drywall, the mount must be anchored into a wooden stud, concrete block or brick behind the drywall. Installing on drywall alone may not support the weight of the display.
- When drilling holes, it is particularly important to take care of electrical cables, water or gas pipes in the wall. Please follow the instructions provided by the wall bracket manufacturer and ensure that all fixing screws supplied are used.
- electriQ and its distributors and dealers are not liable or responsible for damage or injury caused by improper installation, improper use or failure to observe these safety instructions. In such cases any guarantee will expire.
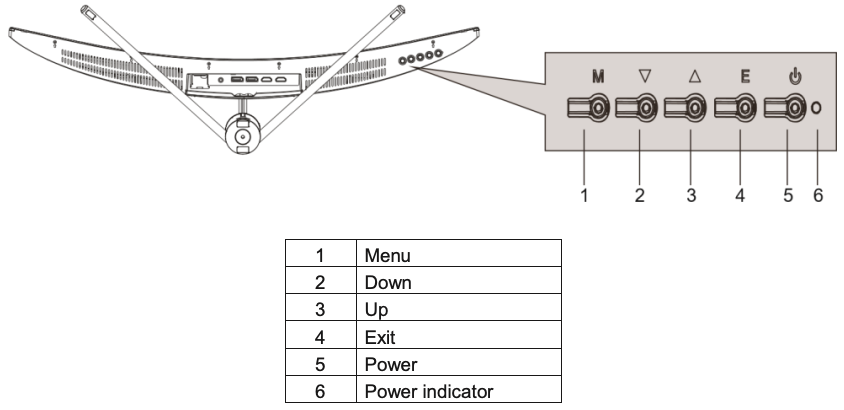
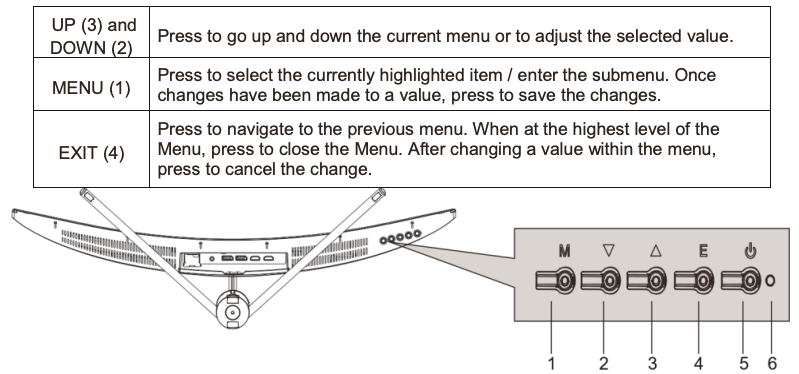
CONTROL PANEL
The controls are located centrally at the base of the monitor. Pressing any button when the OSD (On screen display) is not visible will display the Quick Menu
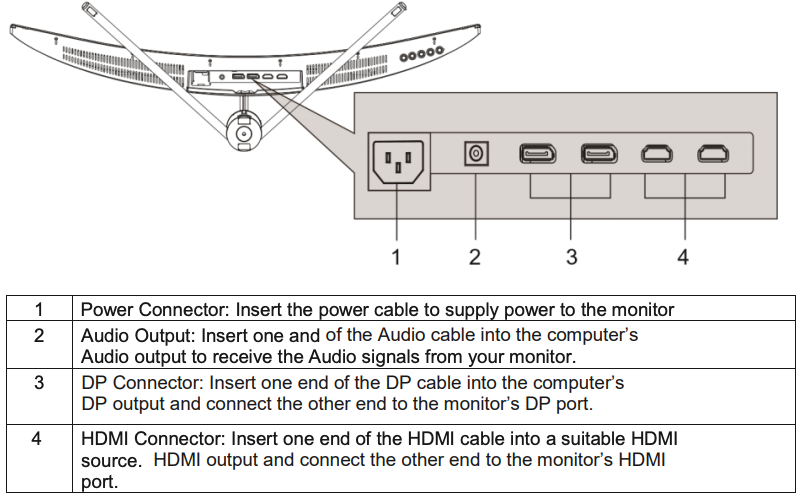
INPUT / OUTPUT TERMINALS
INITIAL SETUP
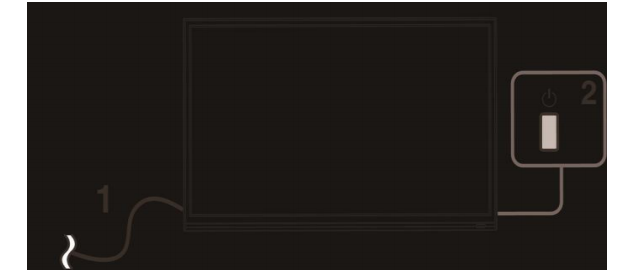
Connect the monitor to a power outlet.
- Press the POWER button on the monitor or to turn it on (The indicator will be blue)
- Connect the relevant cable to the corresponding input on the monitor. The source will be automatically detected.
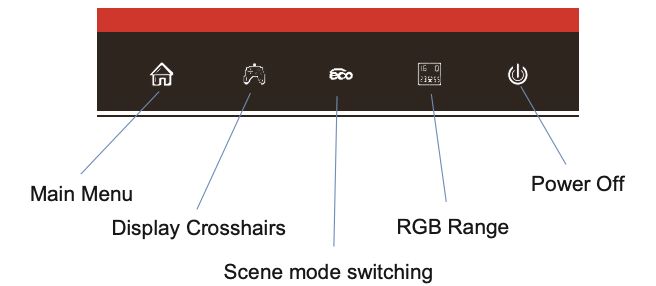
Press any button when the on-screen display is not visible to display the Quick Menu. Then Press the button below the item in the quick menu to select.
The main menu for the monitor can be accessed by selecting it within the Quick menu (See previous page). This menu is separated into the following sub menus: Picture Settings, Image Settings, Colour Temperature, OSD, Reset, and Miscellaneous options, details of each menu can be found in the following sections.
Within the Menu:
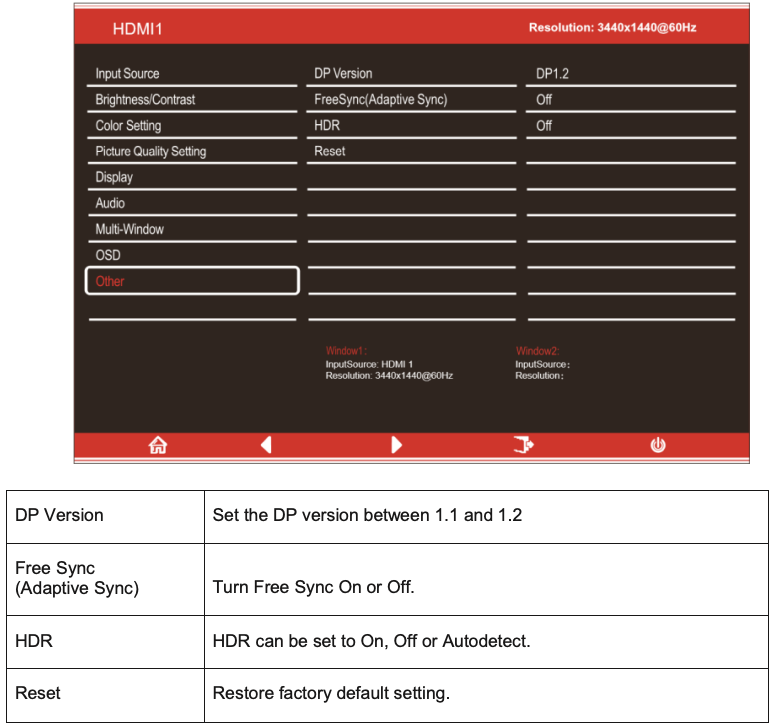
INPUT SOURCE
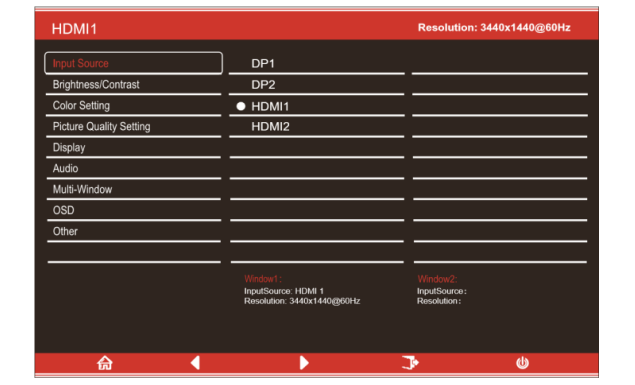
Change the input between DisplayPort 1 and 2 (DP), HDMI 1, HDMI 2.
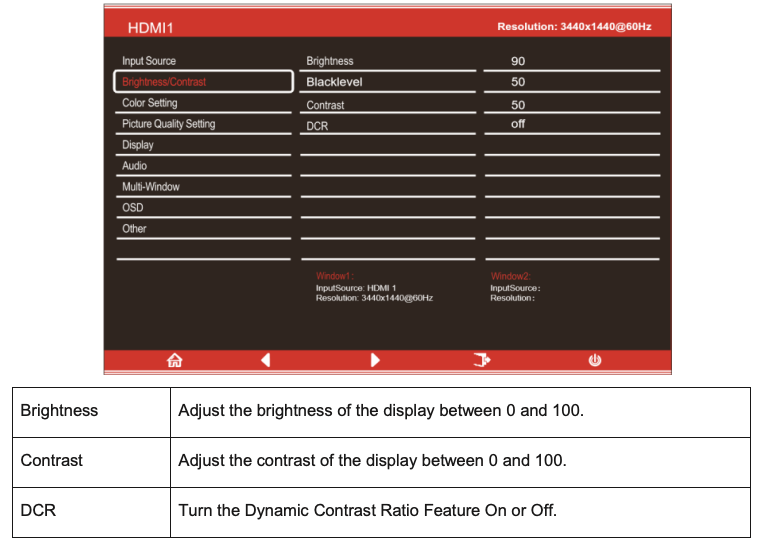
BRIGHTNESS/CONTRAST
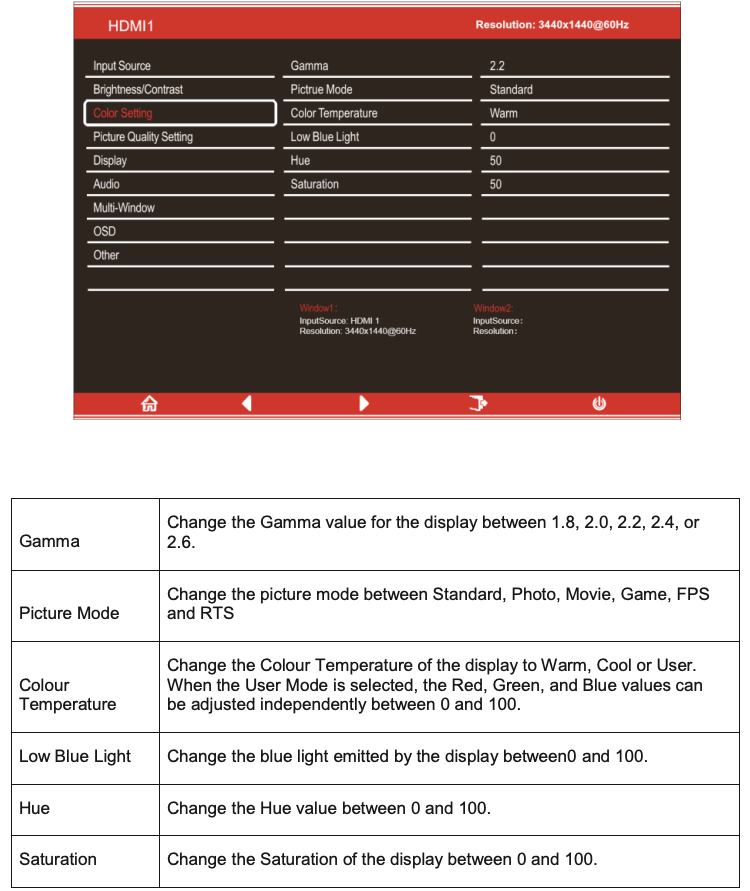
COLOUR SETTINGS
PICTURE QUALITY SETTING

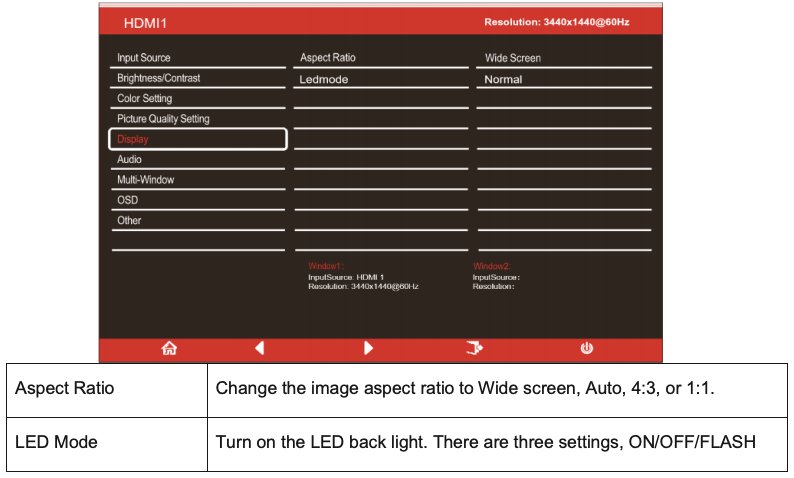
DISPLAY
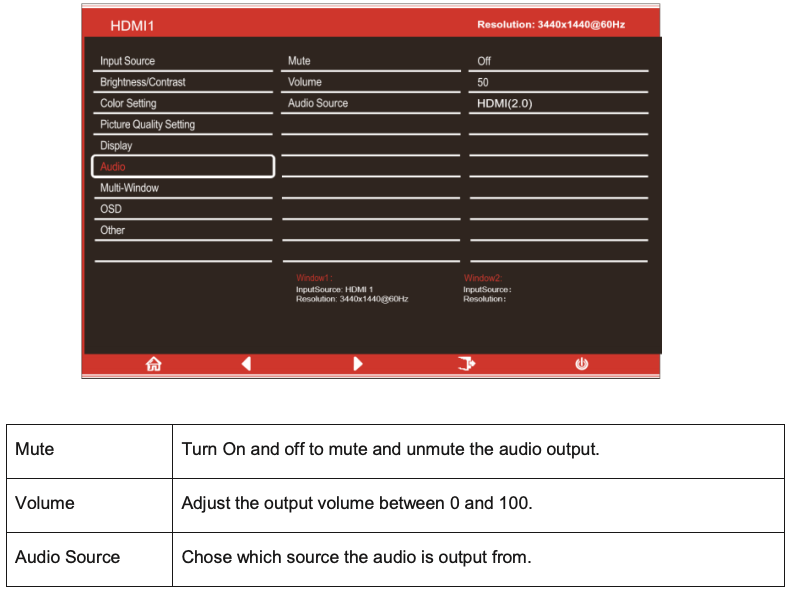
AUDIO
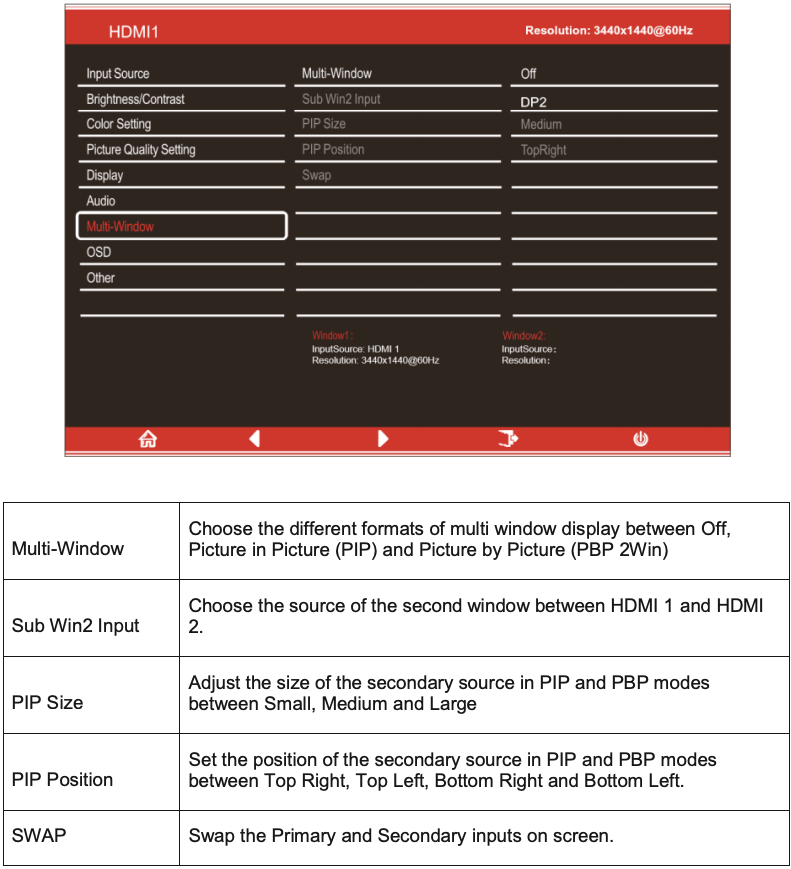
MULTI-WINDOW
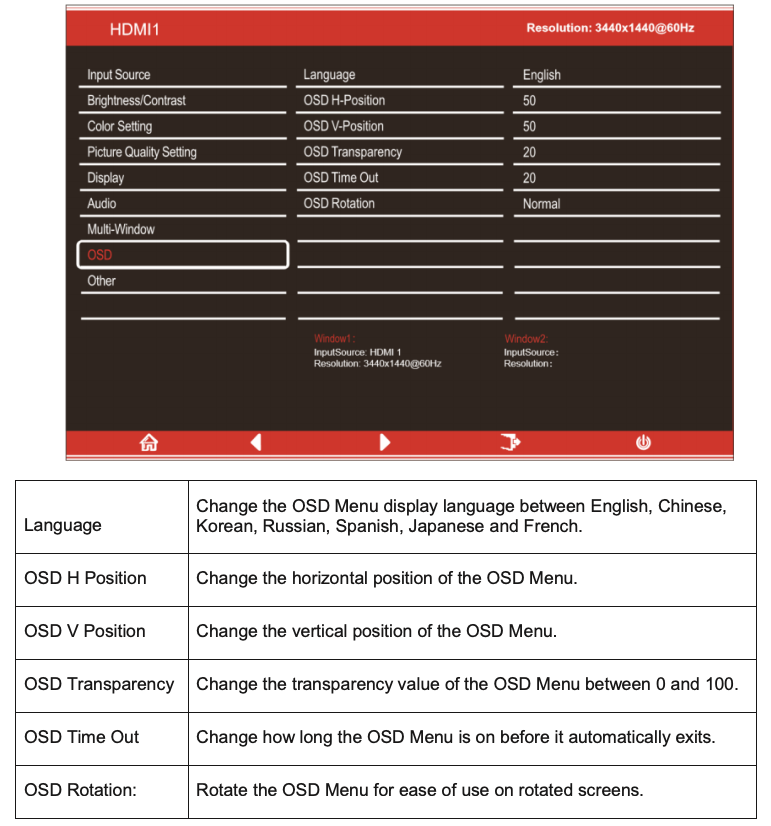
OSD
OTHER
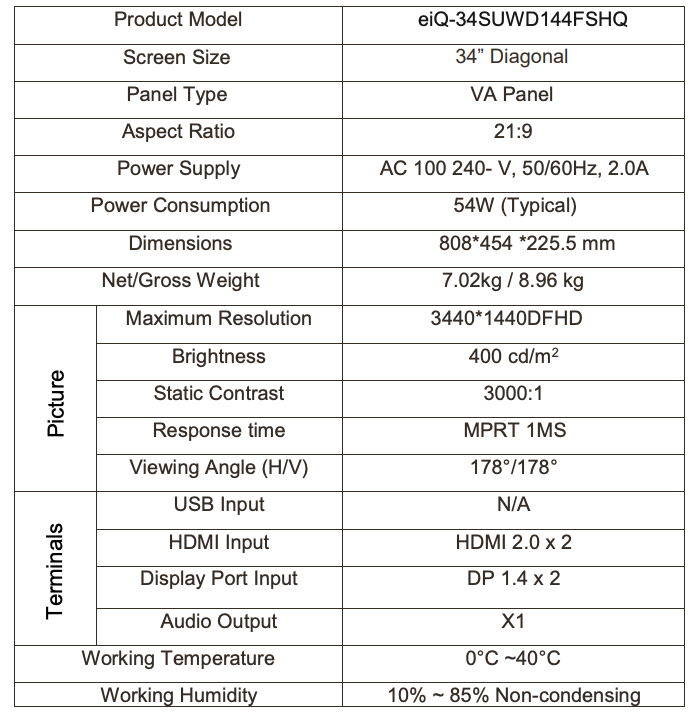
TECHNICAL SPECIFICATION
TROUBLESHOOTING

ENVIRONMENTAL PROTECTION
 Waste electrical products should not be disposed of with household waste. Please recycle where facilities exist. Check with your Local Authority or retailer for recycling advice.
electriQ UK SUPPORT
www.electriQ.co.uk/supportIf the unit fails to operate call: 0871 620 1057 or complete the online formOffice hours: 9AM – 5PM Monday to Fridaywww.electriQ.co.ukUnit J6, Lowfields Business ParkLowfields Way, EllandWest Yorkshire, HX5 9DA
TRYING TO SERVICE THE UNIT YOURSELF IS DANGEROUS AND MAY INVALIDATE THE PRODUCTS WARRANTY. ONLY QUALIFIED PERSONNEL SHOULD SERVICE THIS APPARATUS.
References
[xyz-ips snippet=”download-snippet”]