electriQ SF16CR 16 inch Chrome Pedestal Fan with Adjustable Stand and Oscillation Function
SAFETY INSTRUCTIONS
Important!
- Carefully read the instructions before operating the unit
- This appliance is for indoor use only.
- Rating: This unit must be only connected to a 220-240 V / 50 Hz earthed outlet.
- Installation must be in accordance with regulations of the country where the unit is used.
- If you are in any doubt about the suitability of your electrical supply have it checked and, if necessary, modified by a qualified electrician.
- This fan has been tested and is safe to use. However, as with any electrical appliance – use it with care.
- Disconnect the power from the unit before dismantling, assembling or cleaning the unit
- Avoid touching any moving parts of the appliance.
- Never insert fingers, pencils or any other objects though the guard
- This appliance can be used by Children aged from 8 years and above and persons with reduced physical, sensory or mental capabilities or lack of experience and knowledge if they have been given supervision or instruction concerning use of the appliance in a safe way and understand the hazards involved. Children shall not play with the appliance. Cleaning and user maintenance shall not be made by children without supervision.
- Do not clean the unit by spraying it or immersing it in water.
- Never connect the unit to an electrical outlet using an extension cord. If an outlet is not available, one should be installed by a qualified electrician.
- Never operate this appliance if the cord or plug is damaged. Ensure the power cord is not stretched or exposed to sharp object/edges.
- A damaged supply cord should be replaced by the manufacturer or a qualified electrician in order to avoid a hazard.
- Any service other than regular cleaning should be performed by an authorized service representative. Failure to comply could result in a voided warranty.
- Do not use the appliance for any purpose other than for its intended use.
- Never use the mains plug as a switch to start and turn off the fan. Use the provided ON/OFF switch located on the control panel.
- Always place the unit on a dry and stable surface.
- Fans are designed to create rapid air movement, therefore make sure the fan is not placed near curtains or any objects that may be drawn into the fan inlet.
- The appliance should not be installed in laundry or wet rooms
- Do not use this unit in environments with flammable and explosive gases.
- Avoid keeping the unit in direct sunlight for a long period of time
Energy Saving and Unit Safety Protection Tips
- Do not cover or restrict the airflow. Do not use in dusty environment.
- For maximum performance the minimum distance from a wall or objects should be 50cm.
WARNING: To reduce the risk of fire or electrical shock, DO NOT USE THIS FAN with any SOLID STATE Speed Control Device or any variable speed controllers.
DIAGRAM
INSTALLATION
BASE ASSEMBLY
- Unscrew the RING and BASE LOCKING SCREW from the POLE.
- Insert the POLE through the hole in the center of the BASE, and twist into position.
- Turn the BASE upside down with the POLE facing the floor and place the BASE WEIGHT SUPPORT onto the underside of the BASE.
- Tighten the BASE WEIGHT SUPPORT to the Base using the RING and BASE LOCKING SCREW.
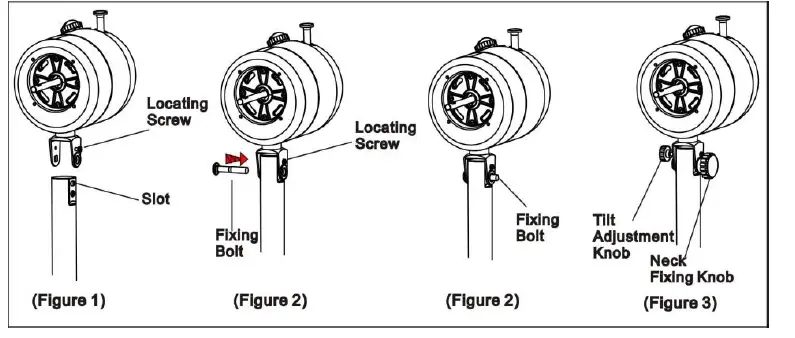
FAN HEAD ASSEMBLY
- Remove the NECK FIXING BOLT and KNOB from the top of the INNER POLE.
- Remove the TILT ADJUSTMENT KNOB from the neck of the MOTOR UNIT; place the NECK of the MOTOR UNIT over the INNER POLE ensuring the LOCATING SCREW is aligned with the slot on the side of the pole. (See Figure 1)
- Push the NECK FIXING BOLT through the NECK of the MOTOR UNIT and the INNER POLE and tighten the LOCATING SCREW leaving a 3mm gap under the screw head. (See Figure 2)
- Fix the NECK FIXING KNOB to the NECK FIXING BOLT and fix the TILT ADJUSTMENT KNOB to the neck of the MOTOR UNIT. Now you can adjust the tilt of the MOTOR UNIT and secure it in position by tightening the TILT ADJUSTMENT KNOB. (See Figure 3)

FAN GRILL ASSEMBLY
- Unscrew the 4 x GRILL SCREWS from the MOTOR UNIT.
- Align the REAR GRILL on the MOTOR UNIT (the handle on the REAR GRILL should be on the top), then fix with the 4x REAR GRILL SCREWS.
- Remove the plastic sleeve from the MOTOR SHAFT and attach the BLADE to the MOTOR SHAFT by tightening the BLADE SCREW. Ensure that the flat surface of the MOTOR SHAFT is aligned with the BLADE SCREW.
- Centre the FRONT GRILL by aligning the central logo so it is horizontal and parallel to the floor. Then, secure the FRONT and REAR GRILLS completely together by snapping 5x GRILL CLIPS into place. Lastly, tighten the GRILL LOCKING SCREW at the bottom of the REAR GRILL.
OPERATION
SPEED CONTROLTwist the SWITCH CONTROL to select the desired speed, between off, low, medium and high,OSCILLATIONPush down the OSCILLATION KNOB to start oscillation. Pull it up to stop oscillation.FAN ANGLELoosen the TILT ADJUSTMENT KNOB slightly to adjust the tilt angle of the fan head, then re-tighten.HEIGHT ADJUSTMENTTo adjust the height, loosen the HEIGHT-ADJUST KNOB, lift or lower Inner Pole to the desired height, and retighten
MAINTENANCE
ATTENTION: Please shut off the unit and unplug from the mains before cleaning or performing any maintenance.
CLEANING THE SURFACE
- Clean the grills with a duster or a soft wet cloth.
- Do not use chemical solvents (such as benzene, alcohol or gasoline) as they may cause irreversible damage. Make sure no water enters the control panel or fan motor
- Do not run the unit until completely dry.
- Place the fan in its original box or cover the fan to protect it from dust.
- Store it in a cool dry place.
TROUBLESHOOTING
Do not repair or disassemble the unit by yourself, unauthorized repair attempts will invalidate the warranty and may cause bodily harm.
| Issue | Possible Reason | Solution |
| No power | 1. Power cord is unconnected
2. The There is no power from socket 3. The power switch is not on. 4. The fuse has blown |
1. Connect the power cord
2. Check socket is turned on 3. Turn the unit on 4. Replace the fuse in the plug |
| Strong vibrations and noise | 1. Fan is not used on a flat surface
2. Fan may be damaged |
1. Place on a flat surface. May put an anti-vibration matt underneath
2. if fan is damaged discontinue use and contact service centre |
TECHNICAL DATA
| Model | DF16CR |
| High Velocity | |
| Fan Speed | 3 |
| Blade size | 400 mm |
| Cable length | 1.5 meters |
| Rated Input | 50W |
| Running Current | 0.213A |
| Air Flow | 3800 m3/hr (2300 CFM) |
| Noise | Max 60db |
| Power Supply | 220-240V/50Hz |
| Net Weight | 6.2 kgs |
| Gross Weight | 7.2 kgs |
| Net Size (assembled) | 430mm x 400mm x 1380mm |
| Gross Size (packed) | 460mm x 160mm x 595mm |
 report this ad
Disposal: Do not dispose this product as unsorted municipal waste. Collection of such waste must be handled separately as special treatment is necessary.Recycling facilities are now available for all customers at which you can deposit your old electrical products. Customers will be able to take any old electrical equipment to participating civic amenity sites run by their local councils. Please remember that this equipment will be further handled during the recycling process, so please be considerate when depositing your equipment. Please contact the local council for details of your local household waste recycling centres.
electriQ UK SUPPORT
www.electriQ.co.uk/supportCall: 0330 390 3061 or complete the online form Office hours: 9AM – 5PM Monday to Friday www.electriQ.co.ukUnit J6, Lowfields Business ParkLowfields Way, EllandWest Yorkshire, HX5 9DA
References
[xyz-ips snippet=”download-snippet”]