
electro-harmonix 1440 Stereo Looper
Congratulations on your purchase of the 1440 Stereo Looper! Enjoy 1440 total seconds (24 minutes) of high-quality, stereo recording time and the ability to store 20 different stereo loops. The 1440 looper is packed with features such as reverse and octave speed effects, variable speed playback and overdub, loop-stop fadeout, 1-shot, footswitch retrigger, the ability to synchronize loops to MIDI clock and a downloadable Mac/Windows application to easily transfer loops back and forth with a supplied USB cable.
Features Include
- 24 minutes of loop recording time.
- 20 selectable, independent stereo loops that remain in memory until you erase them.
- High quality, uncompressed audio: 24-bit A/D/A, 44.1kHz sample rate.
- Undo-Redo function (also available via optional footswitch).
- Reverse and Octave speed effects at the touch of a button or the press of a footswitch.
- Footswitch selectable for STOP or Effects: Reverse, Octave or Loop Retrigger.
- Unlimited overdubbing with adjustable Overdub feedback level.
- Optional external footswitch control for selecting loops and Undo/Redo.
- Programmable looping order: REC/PLAY/DUB or REC/DUB/PLAY.
- Adjustable fadeout time upon stopping a loop.
- Loop synchronization to external MIDI Clock.
- Downloadable Mac or Windows application for making easy loop transfers between 1440 and computer.
- USB connection for loop audio transfers.
- AC adapter included.
| WARNING: Your 1440 comes equipped with an Electro-Harmonix 9.6DC-200 power supply. The 1440 requires 150mA at 9VDC with a center negative plug. Use of the wrong adapter or a plug with the wrong polarity may damage the device and void the warranty.Do not exceed 10.5VDC on the power plug. Power supplies rated for less than 150mA will cause the 1440 to act unreliably |
| Electro-Harmonix 1440 Loop Manager Computer Application
The 1440 app allows you to import your 1440 loops to your computer for back up or to use in other software. The application also allows you to export many types of audio files—including mp3, wav, aiff, and flac, at any sample rate and bit depth—from your computer to the 1440, to use as if you recorded the loop on the 1440 to begin with.To download the application for Windows and Mac, go to www.ehx.com/1440 |
Quick Start Guide
Setting Up The 1440
- Connect the supplied EHX9.6DC AC Adapter into the 9V jack at the top of the 1440. Plug the AC Adapter into your wall.
- Connect your guitar or other instrument into the INPUT jack(s) using a standard 1/4″ instrument cable. Connect the OUTPUT jack(s) to your amp or other audio device with another standard 1/4″ instrument cable.
- Make sure the MEM LED is not lit. If it is, turn the MODE knob to select a bank where the MEM LED turns off, or press and hold the STOP [FX] footswitch for a few seconds to erase loop memory for the currently selected bank.
Creating A Loop And Using The Loop Footswitch (EXT CLK Disabled)
- Ensure the EXT CLK button light is off. If it is lit, press the EXT CLK button once to shut off the light.
- RECORD: To record a loop, simply press the LOOP footswitch. Recording will begin immediately.
- CLOSE THE LOOP: When you are ready to close the loop, and set the loop length, press the LOOP footswitch again. Recording will stop immediately and the loop will immediately begin play back.
- OVERDUB: To record an overdub, press the LOOP footswitch while the loop is playing back. Overdub recording will begin immediately.
- OVERDUB END: Press the LOOP footswitch to end overdub recording and change to playback.Note: If you do not want your initial loop audio to be reduced in volume, turn the OVERDUB knob up to maximum.
- UNDO/REDO: Press and hold the LOOP footswitch for 2 seconds to Undo the last overdub, or Redo an overdub that was just undone.
- STOP: To stop the loop, double tap the LOOP footswitch or press the STOP [FX] footswitch once. Playback will stop immediately.Note: If the STOP [FX] footswitch function has changed, pressing it will not stop the loop. See page 10 for details on the STOP [FX] footswitch functionality.
- PLAY AGAIN: To start playing back a previously recorded loop, tap the LOOP footswitch once. The loop will immediately start playing back.
Creating A Loop with MIDI Clock
- CABLE SETUP: Connect MIDI OUT from your MIDI Clock source device to the MIDI IN jack on the 1440.
- 1440 SETUP: Enable external clock mode on the 1440 by pressing the EXT CLK button so that it illuminates. Ensure the MEM LED is not lit. If it is lit, go to a different loop bank.
- MIDI CLOCK PLAY: Press play on the MIDI Clock source. The 1 SHOT button blinks on beat 1 only while the EXT CLK button blinks on the other beats in each bar.
- RECORD: When you’re ready to record a loop, press the LOOP footswitch. The REC light will flash when engaged/armed. Recording will begin on the next beat 1.
- CLOSE THE LOOP: When you’re ready to close the loop, press the LOOP footswitch. Recording will stop on the next beat 1. Note: When making loops while the 1440 is synchronized to MIDI Clock, the loop lengths are quantized to the next bar. The bars can be either 3 or 4 beats in length.
More on EXT CLK: See page 10 for more information on using MIDI Clock and External Clock mode including setting the number of beats per bar and how the 1440 reacts to receiving the MIDI Start command.Note: We recommend you make all necessary MIDI connections and enable EXT CLK on the 1440 before starting playback on the MIDI Clock source.
Controls, Connections and Indicators
Front Panel Controls
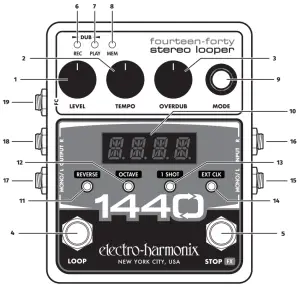
- LEVEL Knob Controls the output level of the loop being played. The loop level is unity at about 3 o’clock on the knob. The dry signal is buffered, always set to unity, and remains analog throughout the 1440.
- TEMPO Knob Controls a loop’s playback and overdub speed. Knob range is normally 60 to 240 beats per minute (BPM). The center setting–120 BPM–is a loop’s original record speed when the loop is recorded with EXT CLK disabled. As the knob is turned up, the loop speed increases all the way to 240 bpm or a maximum 2x speed. As it’s turned down, the speed decreases to 60 bpm or half speed. In FINE mode, see page 11, the speed of the loop shifts in 1 BPM increments. In COARSE mode, the speed shifts in ½ step intervals relative to the original loop. As the TEMPO knob is turned, the loop’s pitch and tempo both change in tandem. Whenever a new loop is recorded using the 1440’s internal tempo, the default tempo for the loop is 120 BPM.
- OVERDUB Knob This knob acts like a feedback control for the looper during overdubs. While overdubbing, older layers of loop audio may lose volume with each cycle based on the setting of the OVERDUB knob. Rotating the knob counter-clockwise progressively lowers the volume of the previously recorded audio layer with each loop cycle. At the maximum OVERDUB knob position, previous loop audio levels remain constant during overdub. At the minimum OVERDUB position, the loop audio plays once before it is erased.
- LOOP Footswitch Use to record, overdub, and playback loops. The LOOP footswitch can also be used to stop and undo/redo loops. See the QUICK START GUIDE on page 3 to learn how to use this footswitch to create loops.
- STOP [FX] Footswitch The STOP [FX] footswitch can be set to either STOP mode or one of a number of FX modes. Press and hold STOP [FX] for over two seconds to erase the current loop. Five options are assignable to this footswitch:STOP stops loop playback with a single press.OCT toggles the Octave function on and off. The OCTAVE button lights when the Octave function has been enabled using the footswitch.REV toggles the Reverse function on and off. The REVERSE button lights when the Reverse function has been turned on with the footswitch.RV.OC enables and disables both the Reverse and Octave functions.TRIG initiates the Retrigger function when pressed. When TRIG is active, each press of the STOP [FX] footswitch immediately starts the loop over from its beginning.
- REC LED Indicates when a loop is being recorded or overdubbed.
- PLAY LED Indicates when a loop is being played or overdubbed. Overdub is occurring when both the REC and PLAY LEDs are lit.
- MEM LED Indicates loop audio is in memory for the current loop bank.
- MODE Knob and Button The MODE knob has two functions: 1) cycling through the available modes and 2) adjusting the value of the selected mode. All modes and values are shown on the 4-digit display. The MODE knob has no pointer because it can be continuously rotated in either direction and can also be pushed like a button.Selecting/Adjusting Modes The selectable modes are toggled by pressing the MODE knob once. When mode-select is active, the 4-digit display will flash the currently selected mode. Turn the MODE knob to cycle through the possible modes:LOOP = Loop SelectSWFX = STOP [FX] Footswitch FunctionEXTC = External MIDI ClockFADE = Fadeout time upon stopping a loopTM.KN = Tempo Knob Fine/CoarseWhen you arrive at the mode you would like to adjust, press the MODE knob once to select the mode. The 4-digit display will stop flashing and it will show the selected mode’s value or option. The selected mode can now be adjusted by turning the MODE knob. See page 10 for more on each Mode.For example, to change loops, ensure LOOP is selected and then turn the MODE knob to the loop number that you want to use. The range is 1-20.
- Digital Display Displays the current mode, value, loop numbers and tempo. A dot in the lower right corner indicates the current tempo setting is a loop’s original tempo.
- REVERSE Button Press the REVERSE button to play the loop in reverse. The REVERSE button glows green when enabled. Reverse can be initiated at any time: during playback, overdub or even before recording a new loop. If REVERSE is enabled upon ending a new loop recording, the loop will immediately playback or overdub in reverse.
- OCTAVE Button Pressing the OCTAVE button causes the speed of the loop to drop by half so that the pitch of the loop goes down one octave and the tempo is halved. If a loop is overdubbed during half-speed mode, returning to normal speed playback causes the pitch of the overdub to go up one octave and the tempo is doubled. The OCTAVE button glows green when enabled. OCTAVE can be used at any time during playback or while overdubbing a loop. If OCTAVE is enabled prior to new loop recording, the loop will immediately playback or overdub at half-speed.
- 1 SHOT Button Pressing the 1 SHOT button enables or disables 1 SHOT mode. When 1 SHOT is enabled and its button is lit, the loop plays back once and then stops. You may overdub in 1 SHOT mode as well.
- EXT CLK Button When this button is lit, the 1440 will operate at a tempo set by external MIDI clock. The number of beats per bar are set in EXTC Mode. connections
- MONO/L INPUT ¼” Left Instrument/Line Input Jack. Plug the output of your instrument or another effects pedal into this jack. If you use just one input we recommend you use the MONO/L input. The input impedance presented at this jack is 1M. The maximum allowable signal level into this jack is +6 dBu. The input is unbalanced.
- R INPUT ¼” Right Instrument/Line Input Jack. Plug the output of your instrument or another effects pedal into this jack. Use this jack for stereo recording. The input impedance presented at this jack is 1M. The maximum allowable signal level into this jack is +6 dBu; it is an unbalanced input.
- MONO/L OUTPUT ¼” Left Output Jack. The Left output signal is sent through this jack. The dry signal present at the Left input will be output on the MONO/L Output jack only. The source impedance of the MONO/L Output is approximately 370.
- R OUTPUT ¼” Right Output Jack. The Right output signal is sent through this jack. The dry signal present at the Right input jack is output to the R Output jack only. The source impedance of the R Output is 370.
- FC Jack ¼” TRS Foot Controller Jack. Use this jack with the Electro-Harmonix Triple Foot Controller to control the 1440 bank up, bank down, and instant undo-redo.T(ip) = Instant Undo-RedoR(ing) = Bank DownT(ip)+R(ing) = Bank Up
Top Panel Connections
- 9V Power Jack Plug the output of the supplied AC adapter into the 9V power jack located at the top of the 1440. The 1440 draws a maximum of 150mA at 9VDC with a center-negative plug.
- MIDI IN Jack The MIDI IN jack allows the 1440 to synchronize its tempo with an external MIDI device. When the EXT CLK button is lit, the 1440 will operate at a tempo set by the MIDI clock received at this jack. The 1440 can also respond to MIDI start and stop messages. See “External Clock Mode” on page 10 for details on MIDI with the 1440.
- USB Port Use this mini USB port to connect the 1440 to your computer. Loop audio can be backed up on a computer, or loops can be restored back to the 1440 using the Electro-Harmonix 1440 Loop Manager app for Mac and Windows. See “USB File Backup” on page 12 for details on how to manage audio files. The 1440 firmware may also be updated through USB.
Looping Guide
Recording A Loop
- To record a Loop, simply select an empty bank and press the LOOP foot- switch once. The REC LED will light solid and recording begins immediately.Note: If nothing is plugged into the input jacks, loop recording will not begin and the 4-digit display will flash “IN-J.” Insert an audio source into one of the input jacks to enable recording.
- To close the loop and set loop length, press the LOOP footswitch again. The REC LED will turn off, the PLAY LED will turn on, and the loop will begin playing immediately. The MEM LED will also light solid, indicating the presence of recorded loop memory.Note: if the function order is REC/DUB/PLAY, the REC LED remains lit when the LOOP footswitch is pressed. The loop length is established and the 1440 will continue immediately into overdub mode.
- All Loops play indefinitely. Each time the loop repeats, the PLAY LED will flash briefly.
- After a loop is recorded, the length is subtracted from the total loop recording time of 1,440 seconds.
Stopping & Starting Loop Playback
- To stop loop playback, press the LOOP footswitch two times quickly. Alterna- tively, press the STOP [FX] footswitch once to immediately stop playback.Note: If using the LOOP footswitch to stop, the REC LED will turn on together with the PLAY LED during the first press. Both LEDs turn off during the second press and playback stops immediately.
- While stopped, press and release the LOOP footswitch once to start playback. The PLAY LED will light to indicate that the loop is playing.
Recording An Overdub
- To record an overdub, make sure a Loop is playing back. If a loop is not playing, press the LOOP footswitch once to begin playback. The PLAY LED will turn on and the loop will begin playing immediately.
- To start recording an overdub, press the LOOP footswitch once. The REC LED will turn on–together with the PLAY LED–and audio will be recorded on top of the original loop. The OVERDUB knob controls how much of the previously recorded audio is preserved when overdubbing. Turn this knob to maximum if you want to preserve the original loop level.
- To stop overdubbing the loop: press the LOOP footswitch again, once. The REC LED will turn off, and the loop continues playing along with the overdubbed audio.
- Overdubbing will never change the length of the loop.
- The 1440 can overdub indefinitely, allowing you to continuously overdub new audio onto your loop.
- After finishing one or more overdubs, the UNDO-REDO function is enabled. You may undo, then redo the last overdub as many times as you like.
Undo-Redo Function
- To undo an overdub (remove the last audio layer) during Loop playback; press and hold the LOOP footswitch for 2-seconds. The display will show “UNDO” and the previous overdub will be removed.
- To redo an overdub (restore the last audio layer) during Loop playback: press and hold the LOOP footswitch for two seconds. The display will show “REDO” and the previous overdub will be restored.
- The Undo-Redo function can only be initiated while a loop is playing back. Undo-Redo cannot be performed during overdub, record or stop modes.
Shortcut! pressing and holding the LOOP footswitch when stopping an overdub will cause an undo. This action gives you a convenient way to quickly undo overdubbing mistakes.
Note: once Undo-Redo has been performed on a loop, the undone layer of audio can be returned through a redo until either a new overdub is initiated on the loop or the loop is erased. The Undo-Redo layer is preserved regardless of bank changes and power cycles. Undo-Redo is not available on loops exported from computer to 1440, even if the loops were originally created on the 1440.
Erasing A Loop
- To erase a loop, play-back must be stopped. If a loop is playing, press the LOOP footswitch two times quickly or press the STOP footswitch once to stop the loop.
- Press and hold the STOP [FX] footswitch for 2 seconds. The MEM LED will blink three times and then remain off, indicating the loop has been erased.
- Only the STOP [FX] footswitch can erase a loop, regardless of the footswitch mode.
Shortcut! if a loop is playing, press the STOP footswitch two times quickly and hold for two seconds on the second press to erase the loop.
Note: the erase function can only be initiated when the current loop bank contains a recording, as indicated by a lit MEM LED.
Loop Memory
- Any recorded audio is stored automatically to the internal memory.
- All recorded loops will remain in memory until they are erased. Power cycling does not erase loops unless power is cut while recording the loop. Any loop or overdub that was being recorded at the time of power loss will not be saved.
- After a loop is recorded, the length is subtracted from the total loop recording time. For example, if a 20-second loop is recorded on Loop 20, there are 1,420 seconds still available for Loops 1-19. Overdubbing on top of any given loop does not subtract from total loop recording time.
- When the full 1,440 seconds of loop recording time is depleted, you will not be able to record a new loop. If an empty Loop is selected and recording is attempted, the MEM LED will blink twice. To free-up recording memory, select a loop with recorded audio and erase it or transfer the loop to your computer and then erase it using the 1440 Loop Manager application.
- If the full 1,440 seconds of Loop Recording time is reached while recording a loop, recording will stop automatically. The REC LED will turn off, the PLAY LED will turn on, and the Loop will begin playing immediately. The MEM LED will also light solid, indicating the presence of recorded loop memory.
Mode Knob Functions
When you reach your desired setting, you can either leave it displayed or press the MODE knob to jump up one level in the display menu.![]() LOOP Loop-Select ModeEnter Loop Select mode by a press/release on the MODE knob when “LOOP” flashes on the display. The 1440 always powers up in Loop Select.When in Loop Select mode, turning the MODE knob selects banks 1-20.If the MODE knob is turned during record, playback, or overdub, the current operation is stopped and the next bank is selected. This same behavior applies to bank select via an external foot controller.
LOOP Loop-Select ModeEnter Loop Select mode by a press/release on the MODE knob when “LOOP” flashes on the display. The 1440 always powers up in Loop Select.When in Loop Select mode, turning the MODE knob selects banks 1-20.If the MODE knob is turned during record, playback, or overdub, the current operation is stopped and the next bank is selected. This same behavior applies to bank select via an external foot controller.![]() SWFX STOP [FX] Footswitch Function ModePress the MODE knob when “SWFX” flashes on the display to change the STOP [FX] Footswitch settings. This mode adjusts the functionality of the STOP [FX] Footswitch. Five options are accessed by turning the MODE knob in this mode:STOP stops loop playback with a single pressOCT toggles the Octave function on and off. The OCTAVE button lights when the Octave function is enabled.REV toggles the Reverse function on and off. The REVERSE button lights when the Reverse function is enabled.RV.OC enables and disables both the Reverse and Octave functions with one press of the footswitch.TRIG initiates the Retrigger function when pressed. When TRIG is selected, each press of the footswitch immediately starts the loop over from its beginning. Note: Retrigger is only available in playback or while stopped.
SWFX STOP [FX] Footswitch Function ModePress the MODE knob when “SWFX” flashes on the display to change the STOP [FX] Footswitch settings. This mode adjusts the functionality of the STOP [FX] Footswitch. Five options are accessed by turning the MODE knob in this mode:STOP stops loop playback with a single pressOCT toggles the Octave function on and off. The OCTAVE button lights when the Octave function is enabled.REV toggles the Reverse function on and off. The REVERSE button lights when the Reverse function is enabled.RV.OC enables and disables both the Reverse and Octave functions with one press of the footswitch.TRIG initiates the Retrigger function when pressed. When TRIG is selected, each press of the footswitch immediately starts the loop over from its beginning. Note: Retrigger is only available in playback or while stopped.![]() EXTC External Clock Mode External Clock Mode controls the 1440’s behavior when receiving MIDI Clock messages at the MIDI jack. Please note: the EXT CLK button must be enabled for the 1440 to synchronize to MIDI Clock. If the EXT CLK button is not lit, the 1440 uses its internal tempo setting. Enter the External Clock menu when “EXTC” flashes on the display. Four sub-modes are available for EXTC:CX4B Beat Clock, 4 beats per bar, does not respond to MIDI Start.XT4B Full External Clock, 4 beats per bar.CX3B Beat Clock, 3 beats per bar, does not respond to MIDI Start.XT3B Full External Clock, 3 beats per bar.
EXTC External Clock Mode External Clock Mode controls the 1440’s behavior when receiving MIDI Clock messages at the MIDI jack. Please note: the EXT CLK button must be enabled for the 1440 to synchronize to MIDI Clock. If the EXT CLK button is not lit, the 1440 uses its internal tempo setting. Enter the External Clock menu when “EXTC” flashes on the display. Four sub-modes are available for EXTC:CX4B Beat Clock, 4 beats per bar, does not respond to MIDI Start.XT4B Full External Clock, 4 beats per bar.CX3B Beat Clock, 3 beats per bar, does not respond to MIDI Start.XT3B Full External Clock, 3 beats per bar.
EXT CLK RecordingFor all EXTC modes, press play on the MIDI Clock master, then press the LOOP footswitch on the 1440. Recording begins on the next beat 1 after the LOOP footswitch is pressed.When set to full external clock sub-mode (XT), you may also arm the 1440 to begin recording at the moment play is enabled on the MIDI Clock master. First press the 1440’s LOOP footswitch, then press play on the MIDI master. Both the 1440 and MIDI Clock master will start at the same time. Note: This is not always advisable since it can take a couple beats before the MIDI Clock tempo is stable.
EXT CLK PlaybackWhen working in XT, the 1440 always starts playback upon receiving a MIDI Start command.When working with the beat clock sub-mode (CX), the 1440 does not start playback upon receiving a MIDI Start command. Instead it waits for the user to press the LOOP footswitch and then begins loop playback on the next beat 1.EXT CLK OverdubbingYou may overdub while the 1440 follows MIDI Clock in all EXTC modes. CX mode allows you to go straight into overdub from idle: press play on the MIDI master, then press the LOOP footswitch twice before the next beat 1 is received by the 1440.
1440 Tempo BlinkWhen the 1440 receives a valid MIDI Clock tempo, and EXT CLK is enabled, the 1 SHOT button blinks on the first beat of each bar and the EXT CLK button blinks on the other beats, in time with the received MIDI Clock tempo. In all modes, the 1440 stops playback upon receiving a MIDI stop command.Note: Ensure your master MIDI Clock’s tempo is a whole number like 120.0 or 98.0 BPM. Fractional BPM tempos (ex. 120.6 BPM), might cause pitch flutter during playback. The maximum MIDI Clock tempo the 1440 can follow is 240.0 BPM.
![]() FADE Fadeout ModeFadeout Mode is entered when “FADE” flashes on the display.Upon stopping a loop, the 1440 can either stop loop playback immediately or fadeout the loop volume over time. This mode allows for setting the fadeout time ranging from “OF” (no fadeout) to 99 seconds.The PLAY LED flashes quickly while a fadeout is in progress. When the fadeout is complete, the PLAY LED remains off and playback is stopped.An active fadeout sequence can be canceled at any time by pressing the LOOP footswitch to resume playback, or by pressing the STOP [FX] footswitch to immediately stop playback–if the footswitch is set for STOP mode
FADE Fadeout ModeFadeout Mode is entered when “FADE” flashes on the display.Upon stopping a loop, the 1440 can either stop loop playback immediately or fadeout the loop volume over time. This mode allows for setting the fadeout time ranging from “OF” (no fadeout) to 99 seconds.The PLAY LED flashes quickly while a fadeout is in progress. When the fadeout is complete, the PLAY LED remains off and playback is stopped.An active fadeout sequence can be canceled at any time by pressing the LOOP footswitch to resume playback, or by pressing the STOP [FX] footswitch to immediately stop playback–if the footswitch is set for STOP mode
![]() TM.KN Tempo Knob Fine/Course ModeThis mode allows you to change the TEMPO knob’s precision. Press the MODE knob when the display flashes “TM.KN”.The following are the two modes available for the TEMPO knob:-
TM.KN Tempo Knob Fine/Course ModeThis mode allows you to change the TEMPO knob’s precision. Press the MODE knob when the display flashes “TM.KN”.The following are the two modes available for the TEMPO knob:-
COAR Coarse mode. The TEMPO knob changes loop speed in 1/2 step interval increments. For example from C to C# to D, Eb, etc. Up to +/- 1 octave.
FINE Fine mode (factory default). The TEMPO knob increments in 1 BPM steps, for example from 120 to 121 to 122, etc. Up to +/- 1 octave.
Note: When EXT CLK is enabled, the TEMPO knob is deactivated. A loop’s default speed is 120 BPM, the TEMPO knob’s 12 o’clock position.
Reference Guide and Special Features
1 Shot Mode
- In 1 SHOT Mode, playback stops when the end of the loop is reached.
- If the 1 SHOT button is turned on during loop playback, the 1440 stops playback when the loop reaches its end (this can be used to “queue up” a loop ending even if looping has already been going for a long time). If the 1 SHOT button is turned off during loop playback the 1440 will continue looping as normal, cycling to the start of the loop when the end of the loop is reached.
- Overdubbing can be done at any time during loop playback in 1 SHOT Mode. Overdubbing will automatically stop at the end of the loop.
- If an initial loop recording is made while the 1 SHOT button is lit, the loop will play back once after the original recording, and then stop.
Looping Function Order: REC/PLAY/DUB or REC/DUB/PLAYUpon closing a new loop recording, the 1440 can either go directly into Play mode or Overdub. Changing between the two modes requires power cycling the 1440, here’s how to toggle between the loop order modes:
- Pull the power plug or cut power to the 1440.
- Press and hold the REVERSE button.
- Apply power to the 1440 while continuing to hold down REVERSE.
- Continue to hold down REVERSE until you see either the REC or PLAY LEDs blink. Now release REVERSE.
Set to REC/PLAY/OVERDUB: Upon power-up, the REC LED first blinks twice, then the PLAY LED blinks twice. This is the factory default setting.Set to REC/OVERDUB/PLAY: Upon power-up, both the REC and PLAY LEDs blink three times simultaneously.
RetriggerWith the RETRIGGER function, each press of the STOP [FX] footswitch immediately starts the loop over from its beginning. The STOP [FX] footswitch must be assigned to TRIG to initiate the RETRIGGER.
- Select SWFX by pressing and then turning the MODE knob.
- Press MODE then turn the MODE knob to TRIG.
- Press STOP [FX] footswitch to immediately restart a loop from its beginning.
- To stop a loop, you must double-tap the LOOP footswitch. To erase a loop, press and hold the STOP [FX] footswitch until the MEM LED blinks. Note: The loop will begin playback prior to initiating the erase function.Note: Retrigger can only be performed while the 1440 is playing or stopped. You cannot initiate retrigger during record or overdub.
USB Import And ExportThe Electro-Harmonix 1440 Loop Manager app for Mac or Windows allows you to easily backup and restore any loops you’ve created on the 1440 as well as to export most audio files already found on your computer into a loop bank on the 1440. Download the app at www.ehx.com/1440.
- Download and install the 1440 Loop Manager app.
- Apply power to the 1440.
- Insert the supplied USB cable into the USB Mini B connector at the top of the 1440. Connect the other end of the USB cable to your computer.
- Open the 1440 Loop Manager app. You are now ready to import or export audio files between your computer and the 1440.
Importing Audio from 1440 to Computer
- Press the Import tab at the top of the app window.
- On the app there are twenty loop slots corresponding to the twenty loops available on your 1440. Select all loops you wish to import by clicking the checkboxes.
- After selecting a loop, click on the loop’s name to rename it.
- Click the Import Selected button at the bottom right of the app window.
- Choose the destination on your computer and the app will import your loop audio there.
Exporting Audio from Computer to the 1440
- Press the Export tab at the top of the app window.
- Add loops to export to the 1440 using the (+) buttons to the left of the loop slots or drag/ drop audio files to the slots.
- Press the “x” button within a loop’s text box if you change your mind and don’t want to export to a particular loop bank.
- Click the Export button at the bottom right of the app window and the audio for all selected loop slots will be placed on the 1440.Note: Record, overdub and play are disabled while transferring files to and from the computer.
Firmware and App UpdatesThe 1440 Loop Manager app allows for updating the firmware on the 1440 and the app software itself. Press the settings button in the upper right corner of the app to reveal the settings menu. Here you can choose to update the application by clicking on “Software Update…” or to update your 1440 unit by choosing “Firmware Update…” For either selection, follow the instructions presented to you on the screen. Factory Restore A factory restore clears out all loop memory and returns all parameters to their factory defaults. To perform a
Factory Restore:
- Unplug the power jack or remove power to the 1440.
- Hold down the LOOP footswitch while applying power to the 1440.
- Continue to hold the LOOP footswitch until the REC, PLAY, and MEM LEDs begin to flash together. This should take approximately 6 seconds.
- Once all three LEDs start blinking you can release the footswitch. All three LEDs will continue to flash for about one second until the Factory Restore is complete.
- After Factory Restore, the display shows loop-select mode with LOOP 1 as the default bank, fadeout disabled, all effects off, and STOP mode enabled.
Note: All Loop audio is erased during Factory Restore, and the process cannot be undone.
Notes and Specifications
1440 Stereo Looper
- Audio input impedance for each input: 1M
- Audio output impedance for each output: 370
- Current draw: 150mA t Maximum input signal level: +6 dBu
- Loop time: 24 minutes
- Audio quality: 24-bit, 44.1kHz Sample rate
- Bypass and dry signal: high quality analog buffered bypass at unity gain; dry signal is analog through the 1440.
1440 Loop Manager Application System Requirements
- MAC: Operating system must be macOS X Sierra (10.12) or higher.
- Windows: Operating system must be Windows 7 or higher.
WARRANTY INFORMATION
Please register online at www.ehx.com/product-registration or complete and return the enclosed warranty card within 10 days of purchase. Electro-Harmonix will repair or replace, at its discretion, a product that fails to operate due to defects in materials or workmanship for a period of one year from date of purchase. This applies only to original purchasers who have bought their product from an authorized Electro-Harmonix retailer. Repaired or replaced units will then be warranted for the unexpired portion of the original warranty term.
If you should need to return your unit for service within the warranty period, please contact the appropriate office listed below. Customers outside the regions listed below, please contact EHX Customer Service for information on warranty repairs at [email protected] or +1-718-937-8300. USA and Canadian customers: please obtain a Return Authorization Number (RA#) from EHX Customer Service before returning your product. With your returned unit, include a written description of the problem as well as your name, address, telephone number, e-mail address, RA# and a copy of your receipt clearly showing the purchase date.
United States & CanadaEHX Customer Service Electro-Harmonix co New Sensor Corp. 47-50 33rd Street Long Island City, NY 11101Tel: 718-937-8300Email: [email protected]
EuropeJohn Williams Electro-Harmonix UK 13 Cwmdonkin Terrace Swansea SA2 0RQ United KingdomTel: +44 179 247 3258Email: [email protected]
COMPLIANCE
Note: This equipment has been tested and found to comply with the limits for a Class B digital device, pursuant to part 15 of the FCC Rules. These limits are designed to provide reasonable protection against harmful interference in a residential installation. This equipment generates, uses and can radiate radio frequency energy and, if not installed and used in accordance with the instructions, may cause harmful interference to radio communications. However, there is no guarantee that interference will not occur in a particular installation. If this equipment does cause harmful interference to radio or television reception, which can be determined by turning the equipment off and on, the user is encouraged to try to correct the interference by one or more of the following measures:
- Reorient or relocate the receiving antenna.
- Increase the separation between the equipment and receiver.
- Connect the equipment into an outlet on a circuit different from that to which the receiver is connected.
- Consult the dealer or an experienced radio/TV technician for help.
Modifications not expressly approved by the manufacturer could void the user’s authority to operate the equipment under FCC rules.
 The CE logo indicates that this product has been tested and shown to conform with all applicable European Conformity directives.
report this ad
References
[xyz-ips snippet=”download-snippet”]