![]()
A Quick Guide to Getting Started

* Please note your model may look slightly different than pictured.
 Before you begin
- Double-check that all shipping materials are removed from your new dryer.
- Read the Use & Care manual to get familiar with your new dryer.
Care and cleaning
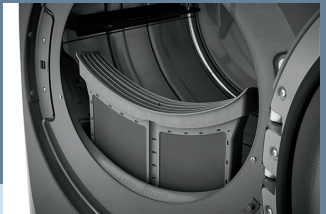
- The dryer is equipped with a clamshell-style LuxCare TM Lint Shield filter which must be opened to remove lint collected during a drying cycle. Press the OPEN button to clean the lint filter after every load. See your Use & Care Manual for complete instructions on how to clean your filter.
- A waxy build-up from fabric softener sheets may form on the lint filter or moisture sensing bars. Clean the filter periodically with warm, soapy water, and dry thoroughly before replacing it.
Important Reminder: Regularly check the entire outdoor exhaust and venting system and clean any lint build-up.
FAQs
- What can I do to optimize the drying performance? After ensuring your lint filter is clean, check to make sure the cycle and settings selected are the right ones for your load type. Avoid overloading your dryer as items need room to tumble freely and use the DRY BOOST option to increase the drying temperature for select drying cycles.
- Is it normal for my dryer to make sounds or noises? Some sounds are part of your dryer’s normal operations. You may hear the suspension rollers or exhaust system moving air through the cycle. For gas models, you may hear a clicking sound as the gas valve opens and closes to control the gas flow. Check your Use & Care Manual to learn more.
- How do I add a forgotten item to the load? To add an item to the dryer, press START/PAUSE, add the item, close the door, and press START/PAUSE again to resume the cycle.

Cycle settings and options revert to default settings each time the dryer is used. The cycle selector, temperature, and dryness level will be set to normal.
See electroluxappliances.com for more FAQs
 * Your model may look slightly different than pictured. See your Use & Care Manual for more information on each cycle, setting & option.
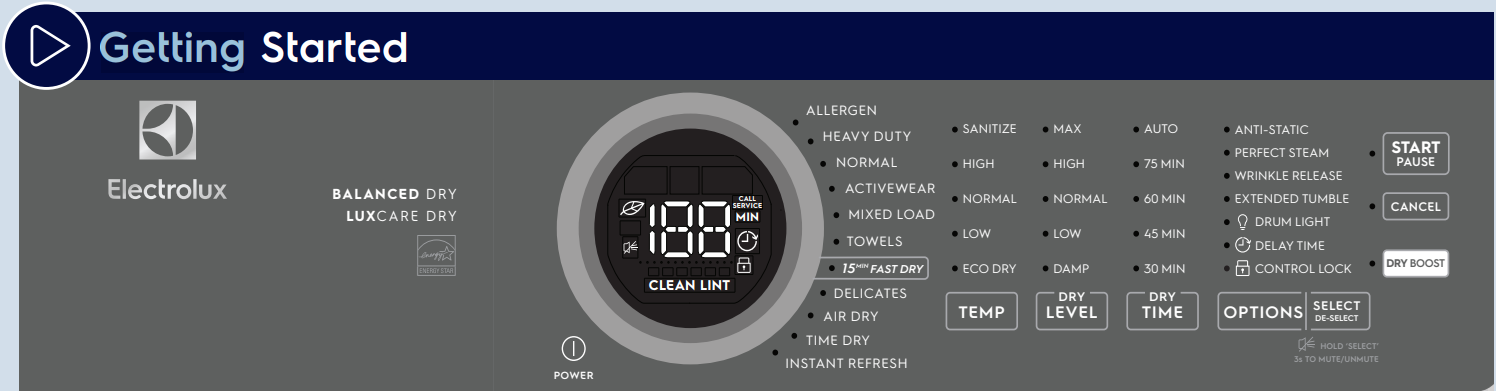
Turn on your dryer
Press the POWER button to turn on your unit.
Select a cycle
Turn the cycle selector in either direction or press the cycles button (depending on your model) to scroll to the desired cycle.ALLERGENAvailable on 500 & 600 series, for allergen reduction, not for delicate items.BULKYAvailable on 300 & 400 series, for large loads and durable fabrics.HEAVY DUTYFor large loads and durable fabrics.
NORMAL (ECO FRIENDLY)For everyday loads including cotton, linen, or sheets. Select the Dry Boost option if needed.ACTIVEWEARAvailable on 500 & 600 series, for lightweight, synthetic, athletic, and stretch fabrics.MIXED LOADAvailable on 500 & 600 series, for mixed fabric loads.TOWELSAvailable on 300, 500 & 600 series, for drying loads of towels.FAST DRYDries small loads consisting of a few items in 15, 18, or 20 minutes depending on your dryer model.DELICATESFor knit and delicate fabrics.
AIR DRY (no heat)Available on 600 series, for small loads of delicate items.TIME DRYVarious drying times and temperature settings can be selected.INSTANT REFRESHAvailable on 400, 500 & 600 series, uses steam to refresh fabrics, remove odors and reduce static.
Select cycle settings
TEMPPress the TEMP button to select the desired dry temperature setting.SANITIZEAvailable on 400, 500 & 600 series, for removing harmful bacteria from your clothing or other items. Check fabric care labels to prevent damage.HIGHFor most cotton fabrics.NORMALFor wrinkle-free, easy-care, lightweight fabrics and bulky loads.LOWFor delicate fabrics.ECO DRY (NO HEAT)Use a time dry cycle to dry items containing feathers, down, foam rubber, plastics, or rubber-like materials.DRY LEVELSelect to choose the desired dryness level. The dryness levels include MAX (on select models), high, normal, low, and damp. Select damp for items you wish to partially dry before hanging or ironing. Not all dryness levels are available with every cycle.DRY TIMEPress the DRY TIME button to choose a dry time of 30–75 minutes for a manual dry time cycle.AUTO
Automatically dries at the selected temperature to the desired dryness level.
Select options
Press the OPTIONS button, turn the cycle selector in either direction to scroll to the desired option then press SELECT to set.PERFECT STEAM™Available on 400, 500 & 600 series, injects steam prior to cool down to reduce wrinkles and static.
ANTI-STATICAvailable on 500 & 600 series, injects steam just prior to cycle end to reduce static.EXTENDED TUMBLESelect to extend tumble time for 30 minutes without heat if the dried load won’t be promptly removed at cycle end.DRUM LIGHTSelect to enable or disable the drum light option.DRY BOOSTSelect to increase the temperature on select drying cycles.WRINKLE RELEASESelect to help prevent wrinkles and tangling by tumbling the dry load without heat for 5 minutes out of every 10 minutes.
CONTROL LOCKSelect to lock the controlsbetween cycles Repeat todeactivate.DELAY TIMEUse delay time to delay the start of the drying cycle to a time convenient to your schedule or during off-peak energy hours.
Start load
Close the door and press the START/PAUSE button.
Learn More
We recommend familiarizing yourself with product features and terminology in your Use & Care Manual.
![]() Peace of Mind & ProtectionUnlock exclusive benefits by registering your product with us. Review your registration card for all the ways to register or visit us online directly.
Peace of Mind & ProtectionUnlock exclusive benefits by registering your product with us. Review your registration card for all the ways to register or visit us online directly.
electroluxappliances.com (877) 435-3287 10200 David Taylor Drive Charlotte, NC 28262electroluxappliances.ca (800) 265-8352 5855 Terry Fox Way Mississauga, ON L5V 3E4
References
[xyz-ips snippet=”download-snippet”]