
Electronic OrganInstruction Manual
Model: NM-7601/7602
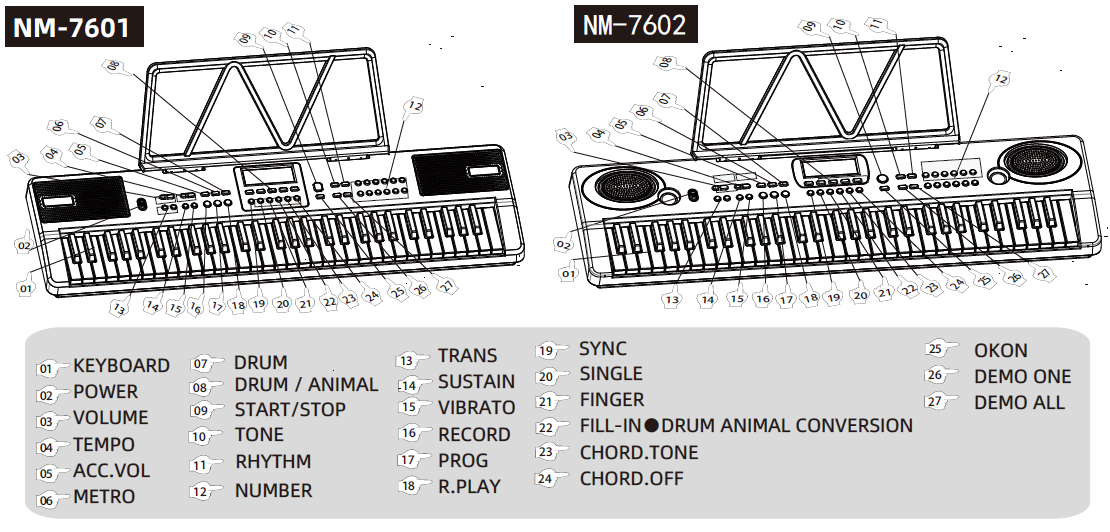
1. POWER SWITCH
Turn on the [POWER] key to play the “keyboard” and enter the playing state. (Figure 2)
2.MAIN VOLUME ADJUSTMENT
Press [- VOLUME +] to increase or decrease the main volume. Press the [- VOLUME +] button once to increase or decrease the main volume. Press and hold to speed up the selection. Press the – volume +] button at the same time to restore the power on setting value. The main volume range is from 00-15, totally divided into 16 levels. The default power on value is level 11 (10). (Figure 3)
3. RHYTHM AND SPEED ADJUSTMENT
Press [- TEMPO +] to increase or decrease the tempo speed. Press [- TEMPO +] once to increase or decrease the tempo speed. Press and hold to speed up the selection. Press [- TEMPO +] at the same time to restore the power on setting value. The main volume range is 45-200, which is divided into 32 (0-31) levels. The default power on value is 120 (15). (Figure 4)
4. STYLE VOLUME ADJUSTMENT
Press [ACC.VOL], and then press [+, -], to increase or decrease the accompaniment volume. Press once to increase or decrease the accompaniment volume, and press and hold to accelerate the selection. The accompaniment volume range is from 00-07, which is divided into 8 levels in total. The default value of power on is level 8. (Figure 5)
5. TONE CONTROL
- Sustain: press the [SUSTAIN] key to turn on or off the sustain function. When the sustain function is turned on, play the keyboard, and the voice will have the effect of prolonging. (Figure 14)
- Trill: press the [VIBRATO] key to turn on or off the trill function. When the trill function is turned on, play the keyboard, and the voice will have a trembling effect. (Figure 15)
- Transfer: press the [- TRANS +] key to move up or down half a tone each time, and the transfer status will be displayed in the data tube. Press the [- TRANS +] key at the same time to return to [c-tune] (Figure 13).
6. PLAYING MODE
- Press the [TONE] key to select the voice status (Figure 10), and use the number selection key [0-9, +, -] to directly input the voice code to select the voice.(Figure 12)
- Press 5 keys of [DRUM / ANIMAL] (Figure 8) to make drum sound or animal sound. Press the key of [FILL-IN
- DRUM ANIMAL CONVERSION] to select drum sound or animal sound.
- Keyboard drum: press the [DRUM] key to get the drum beating tone on the corresponding piano keys (Figure 7).
- Metronome: press the [METRO] key to act as a metronome. There are 4 changes in total, 1 / 4 beat – 2 / 4 beat – 3 / 4 beat – 4 / 4 beat – stop.
7. AUTO ACCOMPANIMENT MODE
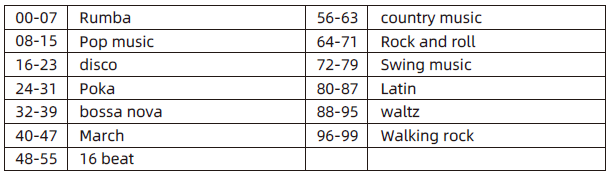
- Rhythm selection: press the [start / stop] key to select the rhythm state, as shown in figure (09). Use the [0-9, + -] number key to directly enter the rhythm code. Figure (12)
- Single finger chord: press the [single] key to turn on the single finger chord function, as shown in figure (20), and press the [single] key again to turn off the single finger chord function.
- Multi finger chord: press the [finger] key to turn on the multi finger chord function, as shown in figure (21). Press the [finger] key again to turn off the multi finger chord function.
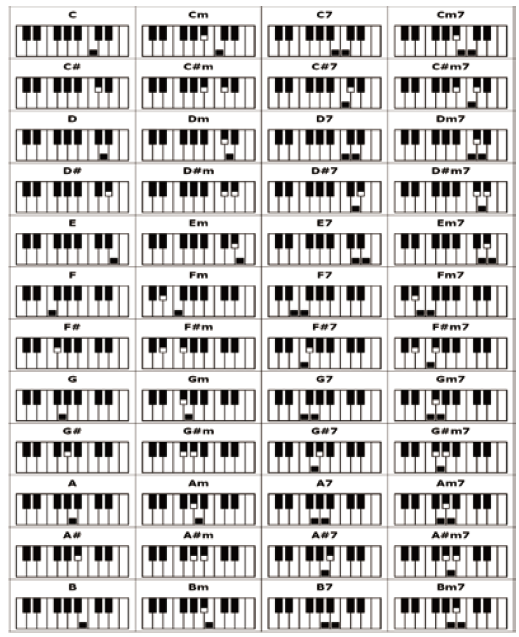
- Chord timbre selection: in general mode, pressing the [c.tone] key will directly broadcast the chord rhythm. There are four chord accompaniment timbres to switch and select the timbre of the required chord (Figure 23)
- Chord closing function: press the [c.off] key to close the chord. At this time, the chord key area is no longer controlled by chord fingering, and the whole keyboard can be played in a solo state. (Figure 24)
- Synchronization function: press the [sync] key to turn on the synchronization function, and press the [sync] key again to turn off the synchronization function. When the synchronization function is started, the rhythm will start to play along with the piano key sound. When there is a single or multiple finger chord setting and the playing conforms to the chord fingering method, the chord will also be sent out at the same time in addition to the rhythm. (Figure 19)
8. RECORDING AND PLAYBACK FUNCTIONS
- Recording function: press the [record] key to turn on the recording function, and press the [record] key again to turn off the recording function. After entering the recording function, you can play the piano keys at will. At this time, the system will automatically record the played notes, up to 64 notes. Figure (16)
- Play function: press the [r.play] key to play back the recording. After playback, it will stop and return to recording state. Figure (18)
9. RHYTHM PROGRAMMING AND PLAYING
- Rhythm programming function: press the [prog] key to turn on the rhythm programming function, and press the [prog] key again to turn off the rhythm programming function. After entering the rhythm programming function, you can press the panel percussion to make a sound and record the drum sound or animal sound, up to 16. Figure (17) and figure (08)
- Programming playback function: press the [r.play] key to perform the playback action of rhythm programming. When playing back rhythm programming, it is necessary to record 16 drums or animal sounds before playing back. Figure (18)
10. DEMONSTRATION MUSIC
- Continuous singing function: press the [demo all] key to start the continuous singing function of demonstration music, which can perform the demonstration music. At this time, the system automatically starts playing from the first one. Figure (27), you can press [0-9, + -] key to select the demo track, figure (12),when one demo is finished, the next song will be played automatically, after all the songs are played, play from the beginning, and then press [demo all] key to stop playing the demo.
- Singing on demand function: press [Demo one] key to start the singing on demand function of demonstration music, and perform the demonstration music. In figure (26), press [0-9, + -] key to select the demonstration music, figure (12). When the demonstration music is finished, the song will be repeated automatically, and then press [Demo one] key to stop playing the demonstration music.
10. LEARNING MODEL
- Strumming mode: press the [okon] key to enable the strumming teaching function, and press the [okon] key again to turn off the strumming teaching function. Figure (25). After entering the teaching mode, the user can select the teaching songs through the white key. After pressing the white key, the disorderly playing mode officially starts. At this time, the system will block the main melody and only play the sub melody. The user can play the piano key at will to promote the main melody to play.
- A section is taken as the unit for disorderly piano teaching. When the main melody of this section has not been fully played out, the system will automatically repeat the sub melody of this section, through the user’s playing until the end of the whole demonstration music.
- After the end of teaching songs, leave the fiddling mode and automatically return to the teaching music selection mode.
WARNING
1. BATTERY
Improper use of the battery will lead to leakage of liquid, corrosion of components around the battery or explosion, resulting in fire and personal damage. The following precautions must be strictly observed.
- do not attempt to disassemble or short the battery.
- do not expose it to the fire source or burn it in the fire.
- do not mix old and new batteries.
- do not mix different types of batteries.
- do not charge the battery.
- the installation direction of positive (-) and negative (-) of the battery must be correct.
- if it is not used for a long time, please take out the battery in the electronic organ
2. ABNORMAL CONDITIONS
When the electronic organ emits peculiar smell or overheat due to smoke, the continuous use may cause fire and electric shock. In case of the above situation, the following operations shall be carried out immediately.
- Turn off the power.
- If you are using an AC transformer for power, unplug it from the wall outlet.
- Contact your dealer.
- if the AC transformer is used for a long time, it will become hot, which is a normal phenomenon and does not mean that there is a fault.
- the built-in function of the piano is huge, sometimes it can’t respond.Please turn off the power switch and then turn it on to work normally.
3. INSTALLING THE BATTERY
- Exit the screw and remove the battery cover.
- Install 4 1.5V “AA” batteries into the battery slot according to the positive (+) negative (-) pole direction of the battery.
- Insert the battery cover into the original position and lock the screws after covering.
TONE

RHYTHM
SINGLE
FINGER

[xyz-ips snippet=”download-snippet”]