Thank you for purchasing ELEGOO Mars series 3D PrinterThis user manual applies to Mars 2 and Mars 2 Pro. We take Mars 2 Pro as an example in this manual.Please unbox and inspect the printer upon receiving it. If you have any questions regarding the printer. Please contact us at 3dp®elegoo.com.Please read the instruction carefully before you use the printer.Multiple language instructions and software are available to download from www.elegoo.com/download.
Follow us on Facebook and get FREE FEP filmFacebook: @ElegooOfficialInstagram: @Elegoo_OfficialL-ELEGOO
Notice: If you need technical support please contact us at 3dp®elegoo.com.
- Please keep the Mars 2 Pro 3D Printer and its accessories out of the reach of children.
- When you use the printer for the first time, you would need to adjust it before printing(Unbox and Test).
- If the printing failed, you would have to clean the resin tank and change resin, otherwise, it may cause damage to your printer.
- Please fill 1/3 of the resin tank only and don’t fill it up.
- Please use 95% degree (or higher) ethyl alcohol or isopropyl alcohol to wash your model unless you are using water washable resin.
- Please use the printer indoors and avoid direct sunlight and dusty environment.
- Please keep your printer away from water or damp environment.
- Please wear a mask and gloves before using and avoid direct skin contact.
- If you want to print models with sharp edges please be careful when removing it from the build platform.
- Please don’t disassemble the Mars 2 Pro 3D Printer by yourself, which will cause your warranty expired. If you have any problems with the printer please contact us at 3dp®elegoo.com and if you run into emergency issues please shut down the power of the printer first.
Package List

Follow us on Facebook to get FREE FEP film
Printer Components

Mars 2 Pro Printer Tech Specs
Printing ParameterSystem: EL3D-3.0.2Operation: 3.5 Inch Touch ScreenSlicer Software: CHITUBOXConnectivity: USB
Printing SpecificationTechnology: LED Display PhotocuringLight Source: UV Integrated Light (wavelength 405nm)XV Resolution: 0.05mm(1620*2560)Z Axis Accuracy: 0.00125mmLayer Thickness: 0.01-0.2mmPrinting Speed: 30-50mm/hPower Requirements: 100-240V 50/60Hz
Hardware SpecificationDimensions: 7.87in (L)*7.87in (W)*16.14in (H), 20cm (L)*20cm (W)*41cm (H)Build Volume: 5.08in(L)*3.15in(W)*6.30in(H) 12 .9cm(L)*8cm(W)*16cm(H)Weight: 13.671bs(6.2kg)
Unbox and Test
- Take out the printer carefully and take off the plastic film.
- Connect power cable to printer and power supply.
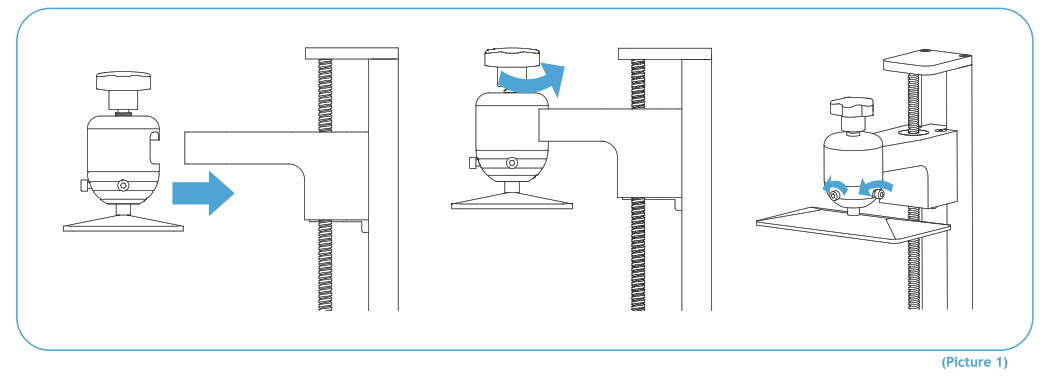
- Please insert the build platform, fasten the rotary knob and loose the screws (see Picture 1).
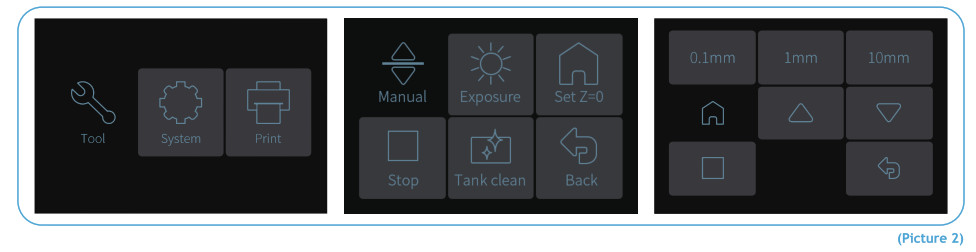
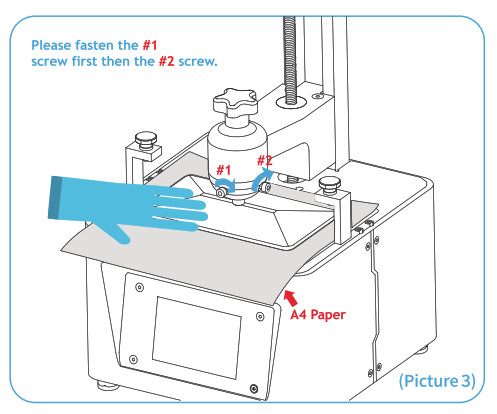
 4. Remove the resin tank and put an A4 paper between the build platform and 2K LCD screen and click “Move Z axis to zero”. (See Picture 2) When the build platform stops please use one hand to press it and make sure it’s in the central position then fasten it using the Allen wrench. (See Picture 3)
5. Since tightening the screws of the build plate will change the tightness when pulling out the A4 paper, you need to calibrate the height of the Z axis slightly again. If there is no resistance or only a few resistance when pulling out the A4 paper, click to descend the Z axis at the distance of 0.1mm. If the paper cannot be pulled out or the resistance is very high, then you should click to rise the Z axis at the distance of 0.1mm. If there is some resistance but you can still pull it out with slight efforts, then stop adjusting Z axis. (See Picture 4)

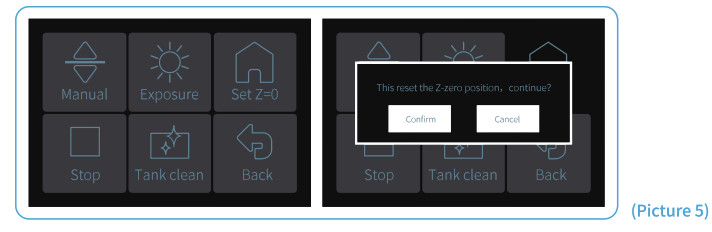
6. After the above leveling is complete, set the current Z axis position as the initial height of the first layer of printing. The operation is as follows: Return to the previous interface and click “Set Z=0″. At this time, the screen will pop up a message as shown in the picture. Then click ” Confirm ” to complete. (See Picture 5)
7. Press “10mm”-then press “up” for 10 times, then Zaxis will go up about 100mm. (See Picture 6)

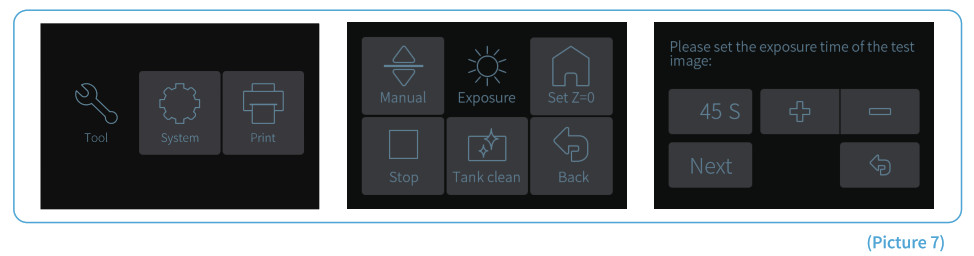
8. Test the UV lights by pressing “Tool” – Exposure” – “Next” (See Picture 7).If the 2K screen can display a complete “ELEGOO TECHNOLOGY www.elegoo.com” then the UV lights work perfectly.
Test Printing
1 Model Printing (Put the silicone rubber seal on the cover)
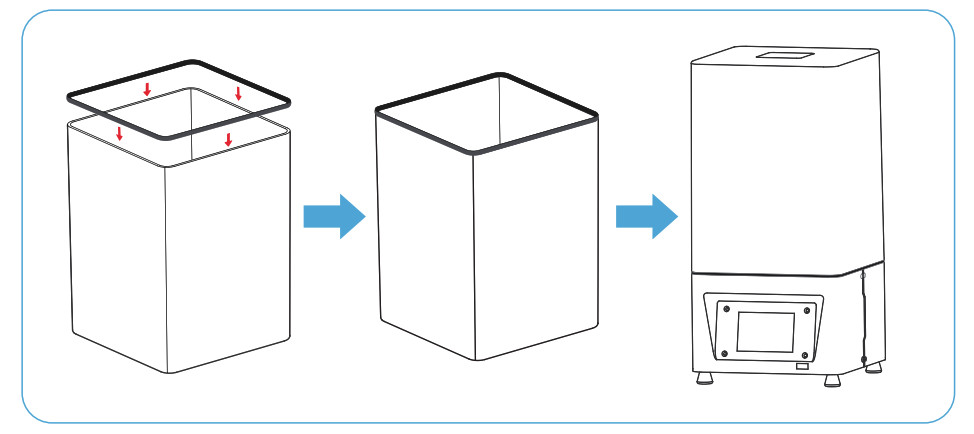
Plug the USB to your printer, wear your mask and gloves and then add resin slowly to the 1/3 level of the tank. (Avoid direct contact with your skin) Select Model file ” Rook.ctb ” (See Picture 8) and start printing. Put on the cover to avoid direct sunlight and make sure the printer is leveled and not shaky.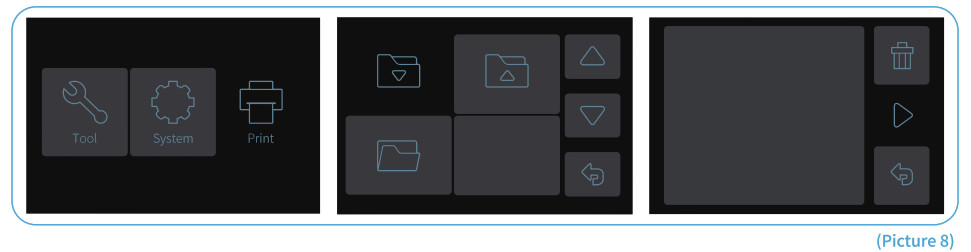 If you found resin is not enough to complete the model during printing, you can press Pause and add more resin into the tank and then press Print to continue printing.
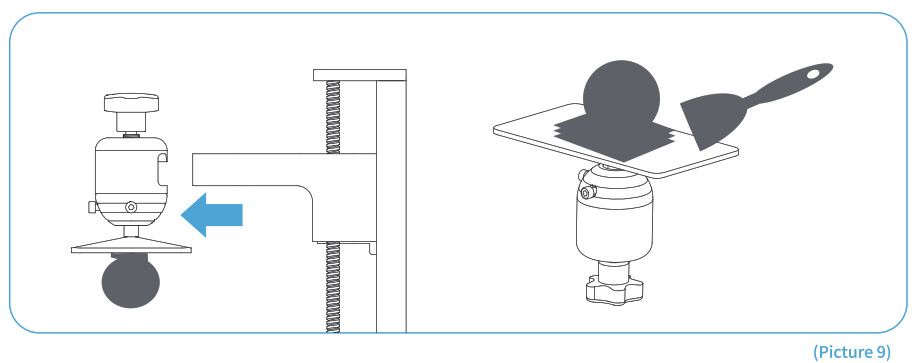
2 Wash Your Print and Clean the TankOnce printing is completed please wait until the resin on the build platform doesn’t drop anymore. Loose the rotary knob and remove the build platform. Use scraper to remove the model and wash it with 95% degree(or higher) ethyl alcohol if you are using standard resin or ABS-like resin(see Picture 9).
1 Install ChiTu BoxELEGOO ChiTu Box is saved in the U Disk. Choose the right version and install it on your computer or you can download the latest version from www.elegoo.com/download if you prefer.
2 How to Use ChiTu BoxAfter installation completed, run ChiTu software. Click File – Open File, then open your own 3D model files (.stl type) or you can download some samples from our website www.elegoo.com. You can control and change the visual angle, size, and position of the model by left-clicking the model and use options on the left menu.
Elegoo ChiTu Box
Other operations:1) Long press the left click and drag the model to the position you want.2) Scroll the mouse wheel to zoom in or zoom out the model.3) Long press the right click to see different perspectives of the model.
3 ChiTu Box Setting3.1 Click “Parameter Settings” and choose ELEGOO MARS 2 Pro as your default printer. (See Picture 10).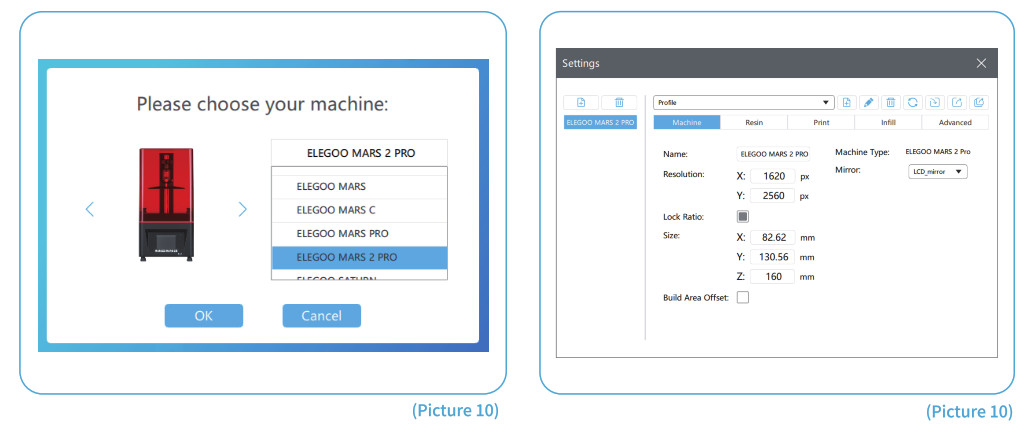 3.2 Build VolumeBelow are the default parameters and you don’t need to change them. If the model is bigger than printer build volume you would need to change its size with ratio locked. (See Picture 10)
3.3 Resin Parameter (See Picture 11)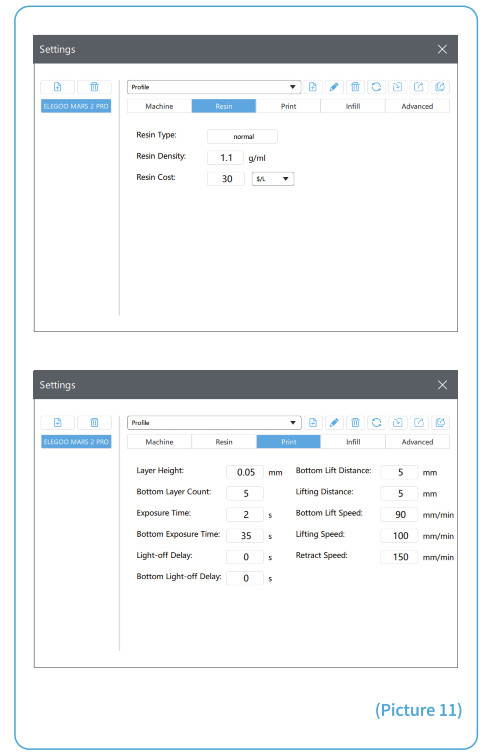 Resin Density: 1.1g/m1Resin Cost: you can input your cost of resin and after slicing you will see how much it costs for your model.
3.4 Parameters (See Picture 11)Layer Height: Recommended height is 0.05mm but you can set it from 0.01-0.2mm. The higher you set, the longer time it will take for exposure time of each layer.Bottom Layer Count: Set from 3-6 layers.Exposure Time: Set from 1.5-3s according to the layer height and complexity of the model, the thicker you set, the longer time will be needed.Bottom Exposure Time: Set from 20-40s, the longer you set, the stickier the bottom will be on the build platform.Light-off Delay/Bottom Light-off Delay: Default parameters and you don’t need to change them.Bottom Lift Distance: When printing the bottom layers, it is recommended to set the lifting distance of the build plate to 5mm.Lifting Distance: When printing the normal layers, it is recommended to set the lifting distance of the build plate to 3-5mm.Bottom Lift Speed: When printing the bottom layers, it is recommended to set the lifting speed of the build plate to 90mm/min.Lifting Speed: When printing the normal layers, it is recommended to set the lifting speed of the build plate to 100mm/min.Retract Speed: When printing the bottom layers, it is recommended to set the retract speed of the build plate to 150mm/min.
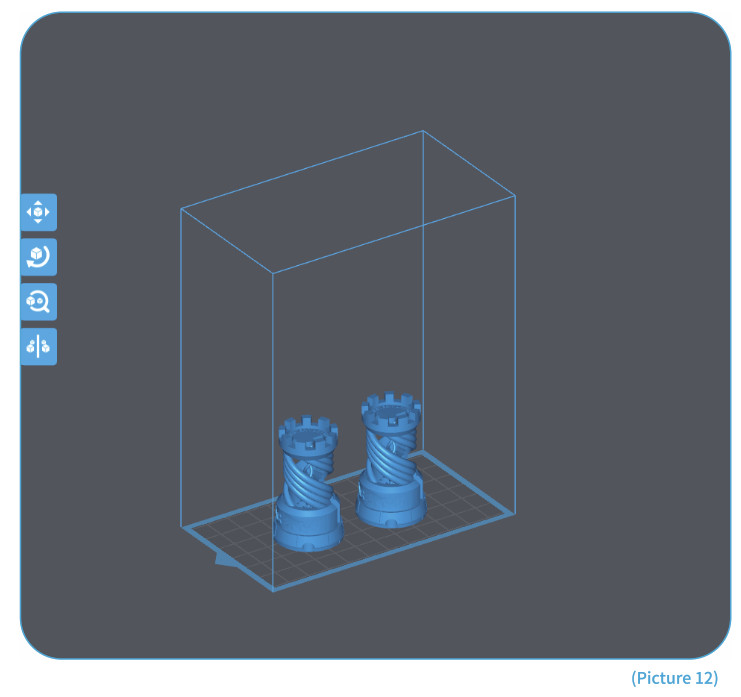
4 Save ModelAfter setting up all the parameters, click “slice” and once it’s done, click “export sliced files to U Disk or SD Card” then plug the U disk to your printer, start printing. (See Picture 12)
FAQ
1. Model doesn’t stick to the build platform– Bottom layer exposure time is too short, please add more time.– Model bottom has very small contact with the build platform and please add more bottom layers.– Leveling is not well set and it will cause first layer too thick or one side is very thick and the other side is very thin.
2. Model layer breakage– Printer is shaking during printing.– Release liner film is very loose due to long-time usage and need to change.– Build platform or resin tank is not fastened.
3. Mars 2 Pro can’t workWe offer a full one-year warranty on the printer and 3-month warranty for the screen. If your printer doesn’t work please contact us at [email protected]. and as to better help and solve problems for you please add your order ID in your email.
4. Printing failureIf the model was not completely printed or failed, there might be some residues left in the resin, which can be filtered out using a funnel when you save the rest resin back into its sealed bottle. If you don’t filter out the residues the platform may cause damage to the 2K Photocuring screen when you’re printing next time. As to the left resin on the platform and tank, you can clean and wipe them up using tissues.
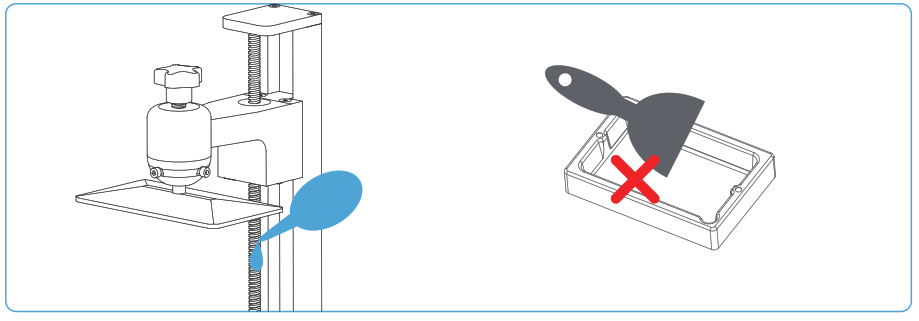
5.Maintenance1. If Z axis keeps making friction noises, please add some lubricant to it.2. Please do not use sharp or pointy objects to scrape the release liner film in case of damages.
 3. Be careful when you remove the build platform in case you may smash the 2K Photocuring screen.4. Remember to pour the rest of the resin in the tank back into the resin bottle and seal it well if you don’t use the printer in the next 48 hours. And if there are any residues please use a filter to filter them out.

5. Please clean up the build platform and the printer using tissues or ethyl alcohol once you complete printing.6. Please clean up the resin tank before changing another colors of resin.
[xyz-ips snippet=”download-snippet”]