![]() ManualDV477W2
ManualDV477W2
VIDEO DOOR INTERCOM7”/ 18cm MONITOR![]() Home is not a place, it’s a feeling
Home is not a place, it’s a feeling
Wired 2 Family Video Door Intercom System
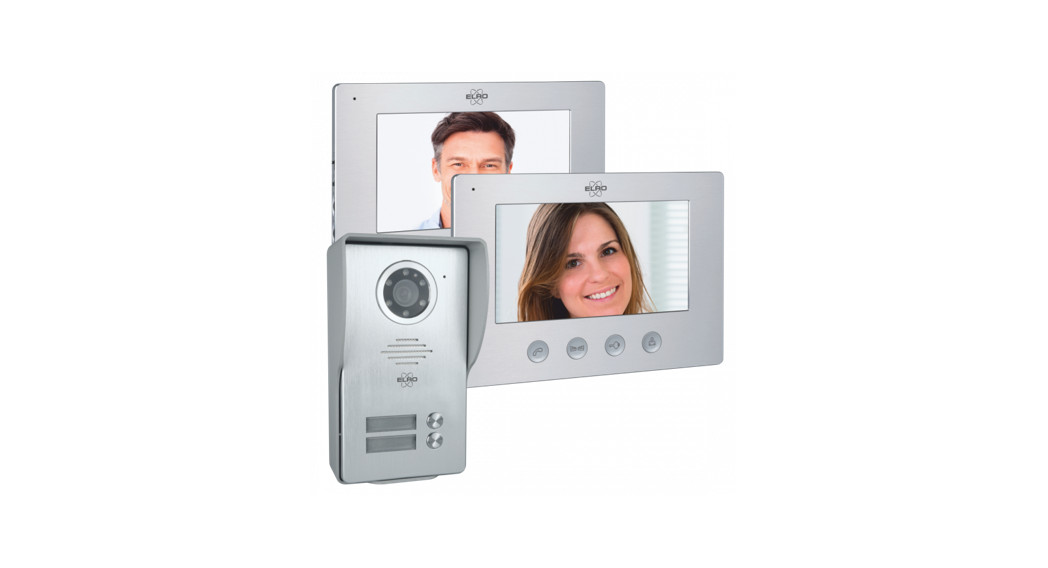
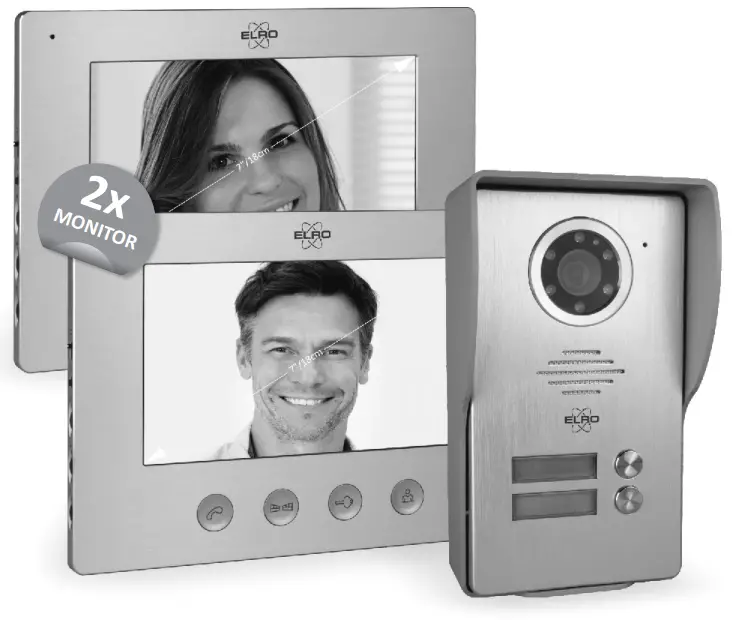
Congratulachase of your new ELRO Video Intercom System, featuring a white light night view, a wired outdoor unit with 2x nameplate in a full-metal housing and a heavy metal rainshade, with a manually adjustable camera and 2x 7” (18cm) brushed aluminum indoor monitors with 16 different melodies and adjustable volume.
We want you to be able to use this ELRO product without having to read an extensive guide, so this user manual will help you to get started, make the outdoor unit and indoormonitor work together and indicate the most important features.If you need more detailed information can visit our website www.elro.eu for a service hotline and more details.
Product description and feature
This ELRO Video Intercom System makes you feel safer and more comfortable when receiving visitors at your home. It has an outdoor unit finished in brushed aluminum with a protece heavy metal rainshade for surface wall mounting.
A pre-embedded box (ELRO DV47EB) for flush is unavailable as an accessory via www.elro.eu or through your retailer.The 700 TVL manually adjustable camera with a 46° view angle comes with 6 real white LEDs for color night view in the dark for at least 2 meters in front of the camera. The outdoor unit also has a lit nameplate.
The 7” (18 cm) indoor monitor has a brushed aluminum front and 16 melodies/sounds to choose from. You can individually set the ring melody volume (H/M/L) and the speaking volume (stepless). You can also adjust the brightness and color intensity.When someone rings the intercom, the monitor will play a melody or sound and show the camera picture. You can then observe, answer and/or open the door and the gate.The door opener can be connected to either the indoor monitor or the outdoor post.Besides the materials (2x mounacket for indoor monitor, dowels, and screws) and user manual, the set contains the following parts:

Installing Your Video Doorphone
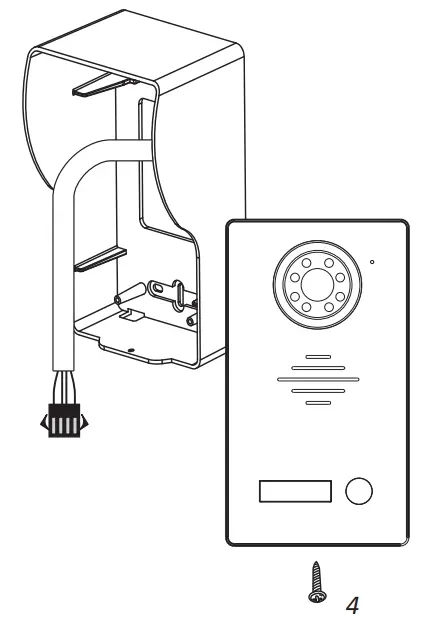
A: Moundoor unit (surface mount)
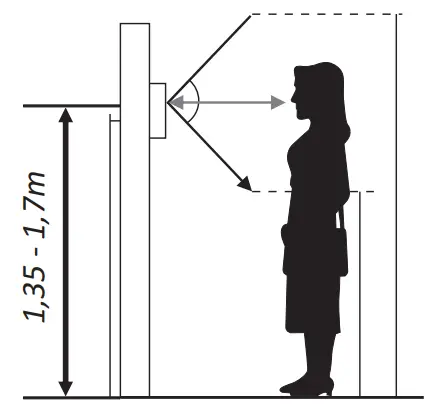
- Take the rainshade and use it to mark the drilling holes on your wall. Make sure that you are able to reach this place from the back with the 2x 4-wire connectable (and the door lock cable if applicable) to link it to the monitor. We recommend an amount of between 1,35 and 1,70 meters. Try to avoid direct sunlight or rain as much as possible.

- Put the 4-wire cable with the connector through the rectangular hole in the rainshade and connect the cable plug to the slot. If you want to use exis wires, make sure you have at least 8 x 0,5 mm and ask a professional electrician for support.
- Optionally can connect an electric door lock.To connect a door lock you always use 2 x 0.1 mm² cables. Refer to the wiring instruction diagrams in the “Adding a Door Lock” section.
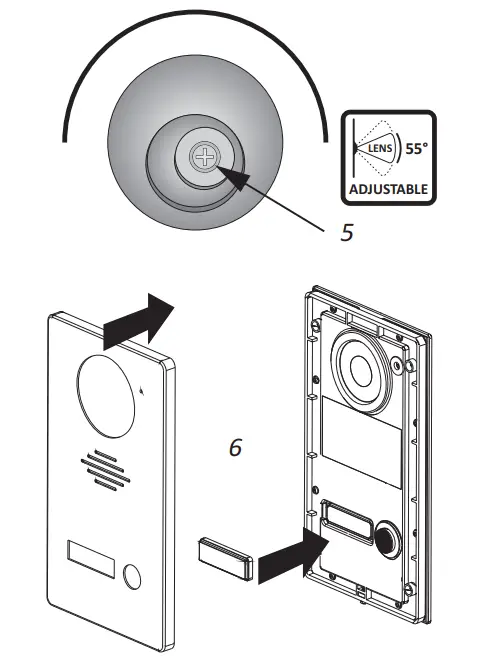
- Remove the aluminum alloy panel with the bus screw; take out the nameplate paper, note your name, and put it back in. Then put it into the rainshade with the top side first and fix it with 2 screws at the boom.
- Unfasten the screw behind the camera lens and manually move the camera into the desired position for the best view; then fasten the screw firmly.
- Put the aluminum alloy panel back and fix it with the bus screw through the hole in the rainshade.B: Mounting the indoor monitor
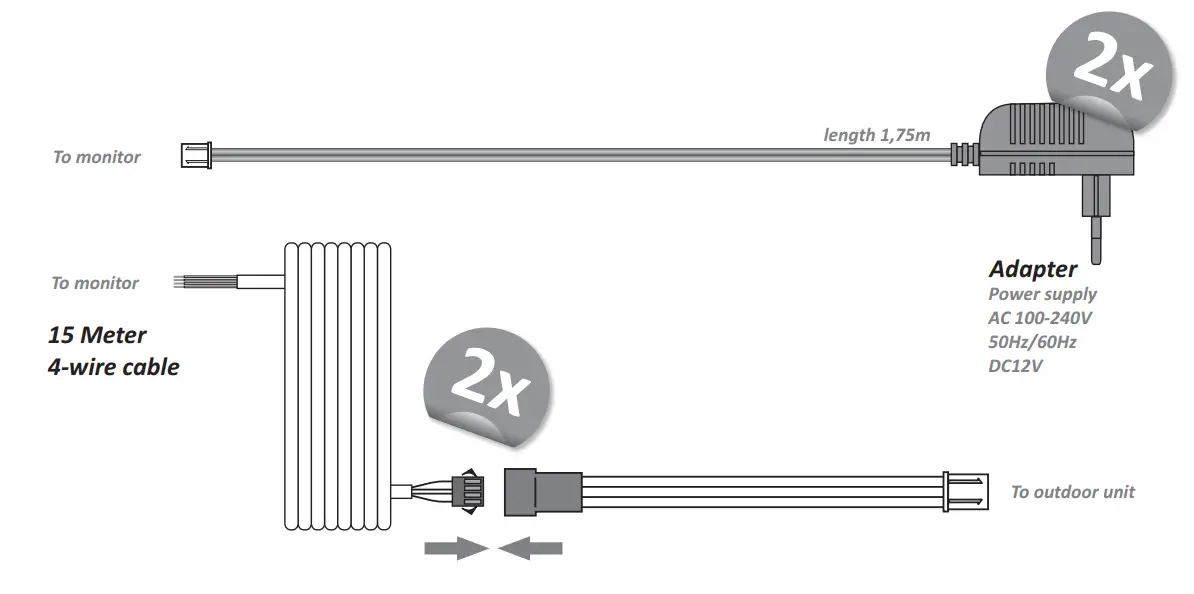
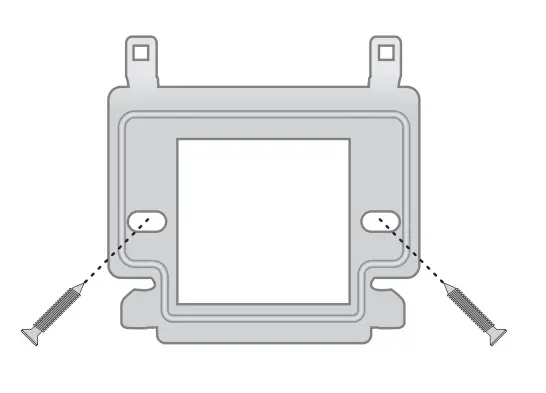
- Use the mounting to mark the drilling holes on your indoor wall and fix it to the wall, so that the 4wire cable and the power cable (plus extra wire for door/gate lock) can go through from the back.
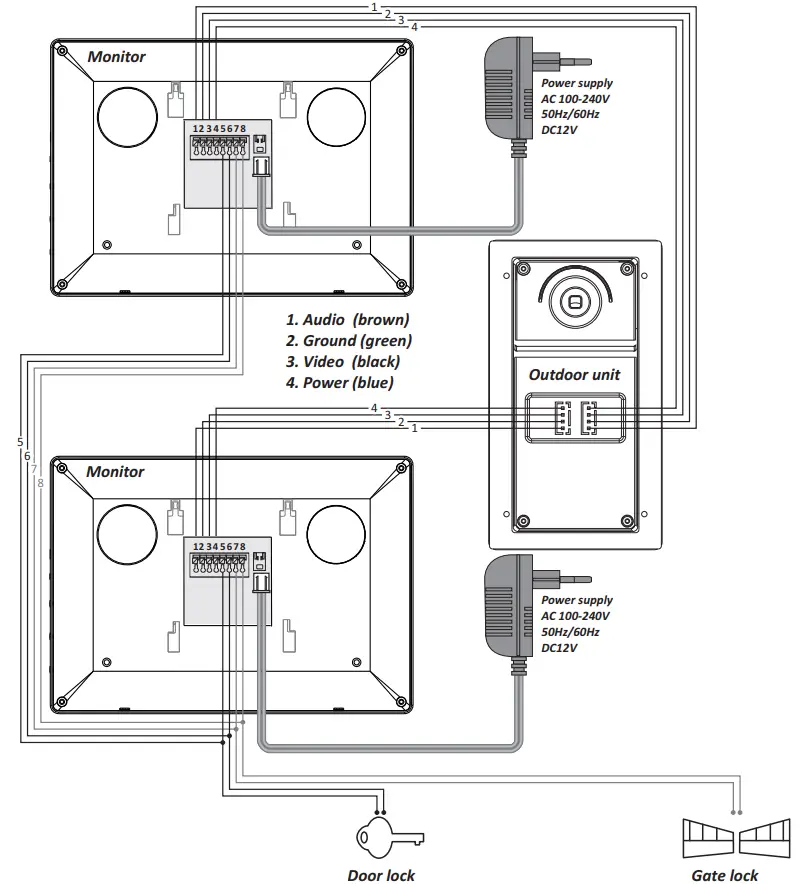
- Connect the 4 wire cable to slots number 1-4:• 1 Audio wire (brown)• 2 Ground wire (green)• 3 Video wire (black)• 4 Power wire (blue)The wires must be in the same order as in the outdoor unit (check wiring diagram in the “Adding a door lock” section for details)
- Lastly insert the power cable and hang the monitor on the mounting bracket. Your new Video Door Intercom is now ready for use. In case you want to use exis wiring, ensure you have at least 4 x 0,5 mm² and keep the maximum length of the cables below 50 meters.
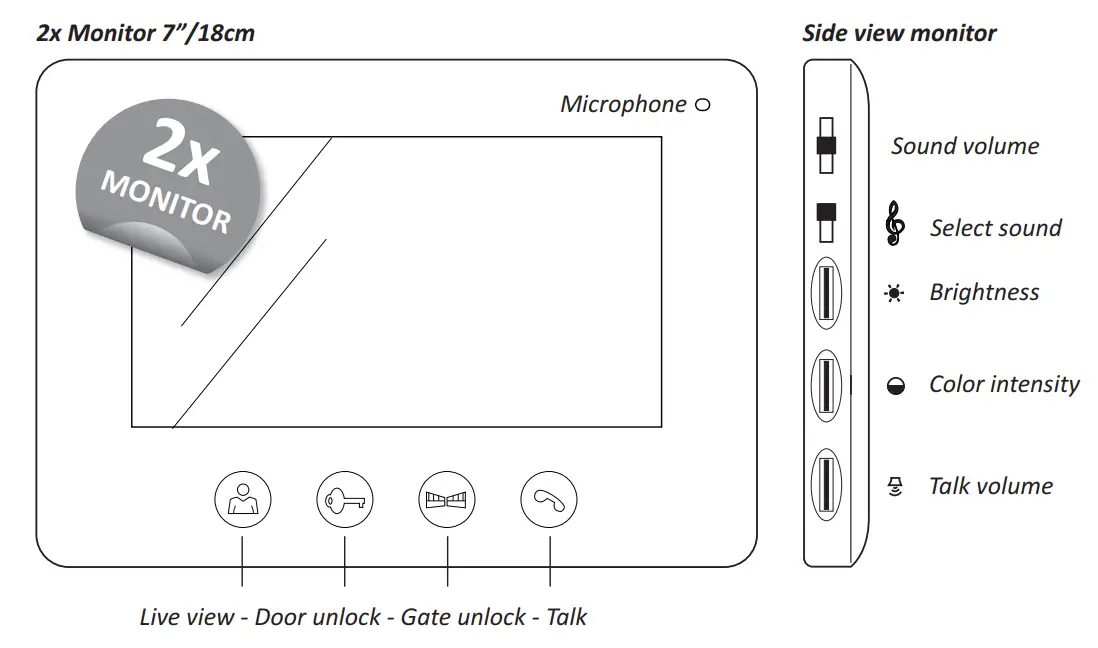
Functions of the indoor monitor
When a visitor rings the bell, the chosen ringtone will sound and the picture will appear automatically on the monitor. You can then talk to the visitor by briefly pressing the TALK button on the monitor. By pressing the DOOR UNLOCK or the GATE UNLOCK button, you can unlock your door or gate. If you want to view the picture from the camera without someone having rung the bell, you can press the LIVE VIEW button to see the live picture for approx. 40 seconds.

With the buttons on the side of the monitor, you can select your ringtone, change the ring and talk volume and adjust the brightness and color intensity of the screen, see page 2
Adding a Door Lock
With this system, you can also control the lock of a door or gate. An electric door or gate lock is connected to at least 2 x 0.1 mm² cables, available at every DIY store.Note: Check carefully who you give permission to enter your home.Connect an optional electric opener to terminals 5 and 6Connect an optional electric opener to terminals 7 and 8
Alternative
(A): Mounting the outdoor unit (Flush Mount)If a surface mount is not appropriate (i.e. because you already have an appropriate hole in the wall or for aesthetic reasons) there is the option to mount your outdoor unit with a pre-embedded box. This is an optional accessory that you can find on our website www.elro.eu or purchase from the retailer where you bought the ELRO door intercom. The pre-embedded box has the ELRO Item number DV47EB. To insert the cables from the back or any other side, you need to open one of the pre-arranged holes of the box. Next, fit the box neatly into the wall, screw it firmly and fix it with putty filler.After that, follow the steps described in the surface mount section but fasten the plastic body with 4 screws and the bus screw of the aluminum alloy panel does not go through the box, but directly into the plastic body.
Specifications
| Outdoor unit | |
| Camera resolution | : 700 TVL |
| Camera angle | : 46°, manually adjustable |
| Power supply | : Over the indoor monitor |
| Working temperature | : -15°C – +50°C |
| Night view | : 6 x real white light LEDs, 2 meter |
| Dimensions | : 112 x 200 x 51 mm |
|
Monitor |
|
| Screen size | : 7” (18 cm) |
| Resolution | : 800 x 480 |
| Power supply (output) | : DC 12V, 2. A, 24W |
| Power consumption | : 2,5 W (standby) – max. 7,5 W |
| Adapter Input Voltage | : AC 100 – 240V; 50 – 60 Hz |
| Cable length | : Max. 50 m; 4 x 0,5 mm |
| Dimensions | : 215 x 152 x 18 mm |
| No. Of melodies | : 16 |
Safety Instructions
- Keep the indoor unit away from high temperature such as near an oven or under direct sunlight, and high humidity such as bathroom and greenhouse
- Do not install the indoor unit close to a television or position with strong jamming- the signals the TV and the intercom use can interfere with each other
- Do not touch the unit with wet hands.
- Avoid throwing, dropping, or hitting the units
- Clean the camera or screen with a so cloth. Do not use detergent, thinner, volatile or corrosive liquid
- Do not expose the camera of the outdoor unit to direct sunlight
- Use the product under the circumstance of barrier-free and no interference
- When a car or a motorbike passes by, the image may become blurred or be cut off due to the interference of radio wave
Caution:
- To prevent damage, the adapter should be fastened on the wall according to the instruction
- Power plug as the disconnecting device should be kept convenient to operate
Symbols:Recycling and disposal: The WEEE symbol (a) means that this product must be disposed of separately from other household waste. When it reaches its end of life, take it to a designated waste collection point in your area to guarantee safe disposal or recycling. Protect the environment, human health, and natural resources! Read the manual (b) before use and store it in a safe place for future use and maintenance.
 report this ad
ELRO Europe | www.elro.euPostbus 9607 – Box E8001006 GC Amsterdam – The Netherland
 GUARANTEEVisit www.elro.eu
References
[xyz-ips snippet=”download-snippet”]