![]()
SJ-110659.1
Slow JuicerInstruction manual![]()
IMPORTANT SAFEGUARDS
- Always disconnect the appliance from the supply if it is left unattended and before assembling, disassembling or cleaning.
- This appliance shall not be used by children. Keep the appliance and its cord out of reach of children.
- Appliances can be used by persons with reduced physical, sensory or mental capabilities or lack of experience and knowledge if they have been given supervision or instruction concerning use of the appliance in a safe way and understand the hazards involved.
- Children shall not play with the appliance.
- There is a potential risk of injuries from misuse.
- Switch off the appliance and disconnect from supply before changing accessories or approaching parts that move in use.
- If the supply cord is damaged, it must be replaced by the manufacturer, its service agent or similarly qualified persons in order to avoid a hazard.
- Please read these instructions carefully before using the appliance.
- Check that your mains voltage corresponds to that stated on the appliance.
- Never leave the appliance unsupervised when in use. Keep out of reach of children or incompetent persons.
- From time to time check the cord for damages. Never use the appliance if cord or appliance shows any signs of damage. Should the cord be damaged, it must be replaced by a competent qualified electrician. All repairs should be made by a competent qualified electrician.
- Only use the appliance for domestic purposes and in the way indicated in these instructions.
- Never immerse the appliance in water or any other liquid for any reason whatsoever.
- Never use the appliance near hot surfaces.
- Before cleaning, always unplug the appliance from the power supply.
- Never use the appliance outside and always place it in a dry environment.
- Never use accessories that are not recommended by the producer. They could constitute a danger to the user and risk to damage the appliance.
- Never move the appliance by pulling the cord. Make sure the cord cannot get caught in any way. Do not wind the cord around the appliance and do not bend it.
- The machine should not be operated by means of an external timer-switch or by means of a separate system with remote control.
- Never leave the appliance unattended during use.
- This appliance is not designed for commercial use.
- Regarding the instructions for cleaning the surfaces which come in contact with food, please refer to the paragraph ” CLEANING AND MAINTENANCE” of the manual.
- Regarding the instructions for operating times, please refer to the below paragraph of the manual.
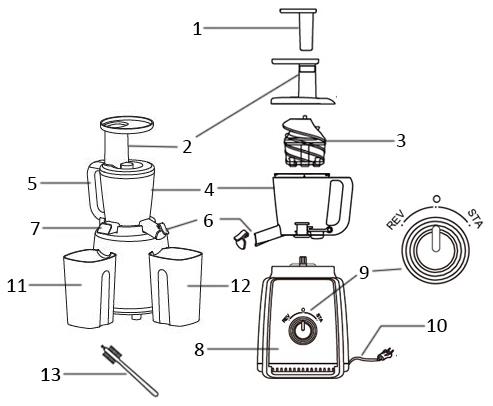
PARTS DESCRIPTION
- Pusher
- Hopper
- Strainer
- Jar
- Handle
- Juice spout with cap
- Pulp spout
- Motor base
- Rotary switch
- Power cord
- Pulp cup
- Juice cup
- Cleaning brush

BEFORE FIRST USE
Carefully wipe the exterior of the appliance to remove any dust that may have accumulated. Dry with a dry towel. Do not use harsh abrasive cleaners. Wash the parts in warm soapy water, dry with a dry towel. Do not immerse the power cord or motor part of this appliance in water or any other liquids. Wash the jar, strainer, hopper, pusher, juice cup, and pulp cup in warm soapy water with a soft cloth or nylon brush. Rinse and dry thoroughly.
ASSEMBLY
Before you assemble the juicer, ensure that the power cord is unplugged.
- Place the motor base on a flat dry surface.
- Underneath the jar is the pulp extraction silicon, which is used to remove the pulp from the spout of the jar.Ensure that the silicon is firmly inserted into the hole. (Fig.1)a. Silicon pulled outb. Silicon inserted inc. Juice spout
- Place the jar on top of the motor base ensuring the 3 recess parts of the jar align with the 3 protuberant parts on the motor base. Make sure the jar is all the way placed onto the shaft of the motor base stably. (Fig.2)
- Put the strainer into the center of the jar. Push the strainer down and make sure the shaft go through the strainer. (Fig.3)Caution! The hopper cannot be closed up if the strainer is not placed properly.
- Place the hopper onto the jar. Align the lock marks on the hopper with the lock marks on the jar handle. Turn the hopper clockwise to lock with the jar. (Fig. 4)
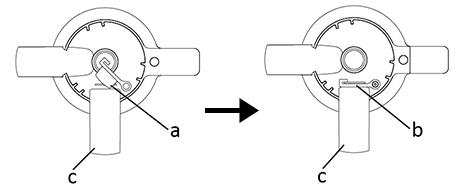 a. Silicon pulled outb. Silicon inserted inc. Juice spout
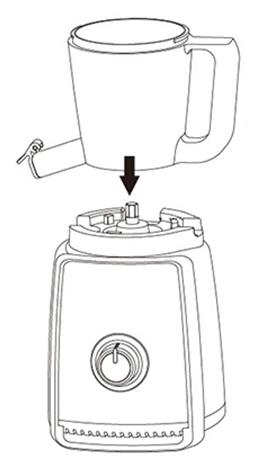
 Caution! The hopper cannot be closed up if the strainer is not placed properly.
USEMake sure the appliance has all parts assembled properly and the hopper has been properly locked in place before use.
- Wash the fruit and/or vegetables and cut them to fit into the hopper.
- If fruit is with stones or hard seeds, pit the fruit. Remove any hard inedible skins, i.e. skin of melons, pineapples and mangoes prior to juicing. If citrus fruits are being used, remove the skin prior to juicing.
- Place the juice cup and pulp cup under the juice spout and pulp spout respectively. Do not forget to open up the cap on the juice spout.
- Turn the rotary switch to “STA” position to turn on the appliance. Put pre-cut pieces into the hopper and gently press the pusher down until all fruit or vegetables have gone through the juicer.Caution! Do not put your fingers or any other objects into the hopper during operation. Do not open the hopper during operation.
- Juice will flow directly into the juice cup and the pulp will be collected in the pulp cup.
- After use, turn the switch to “O” position to turn off the appliance. Unplug and then disassemble the appliance.
Note:
- If ingredients get stuck, turn the rotary switch to “REV” for a few seconds to remove the clogged ingredients. However, switch to “O” position for 5 seconds before switching from “STA” to “REV”.
- Do not use the appliance for more than 20 minutes at a time, and after 20 minutes continuous use, turn off the appliance for at least 30 minutes before reusing it.
DISASSEMBLE YOUR JUICER
- Ensure the juicer is turned off and the power cord is unplugged from the power outlet.
- Remove the pulp cup and juice cup.
- Remove the hopper by turning it anti-clockwise.
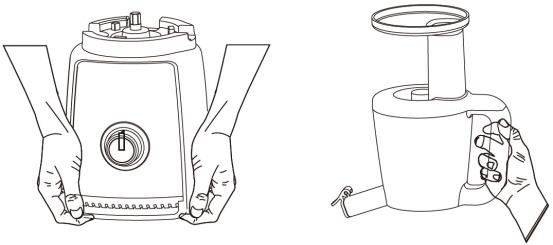
- Take off the jar together with the strainer from the motor base. Take out the strainer by loosening it anti-clockwise.Caution: When moving the appliance, switch off and unplug it, separating the jar from the motor base. (Fig.5)
TIPS FOR JUICING
- Cut food items into small pieces for optimal extraction.
- Do not place ice or frozen ingredients into the juicer. Do not push the food down with excessive force. The food pusher is designed to gently push food down if food becomes stuck.
- Insert food at a regular speed, allowing all the pulp to be extracted. For maximum efficiency, do not rush this process.
- The juice from fresh fruit and vegetables is high in nutritional content. Juice from fresh fruit and vegetables is an important part of a balanced diet. When selecting fruit and vegetables for juicing, always select fresh and well-ripened specimens. Fresh fruit and vegetables carry more flavor and juice than those that are not properly ripened. Juice is best consumed when freshly made as this is when its vitamin and mineral content is highest.
- Your juicer can handle most varieties of fruit and vegetables. If using fruit with hard, inedible skin (i.e. watermelons, pineapple, mangoes etc.) always peel the skin before placing in the juicer. The skin of citrus fruit should also be removed before fruit is placed in the juicer. For better tasting citrus juice, also remove the inner white peel from the fruit. Fruits with stones or hard seeds (i.e. mangoes, nectarines, peaches, apricots, persimmons, and cherries) should be pitted before juicing. A small amount of lemon can be added to apple juice to prevent the juice browning.
- Please do not use the appliance to juice very hard and starchy fruits or vegetables such as sugar cane. When juicing fruit and vegetables of different consistency it may help to juice different combinations, i.e. juice soft fruit first, (i.e. oranges) then follow with hard fruit (i.e. apples). This will help you achieve maximum juice extraction. If juicing herbs or leafy vegetables, wrap them together to form a bundle before placing in the juicer or combine them with other ingredients on low speed.
CLEANING AND MAINTENANCE
Always ensure that the juicer is turned off and the power cord is unplugged from the power outlet before cleaning, disassembling or assembling and storing the appliance.
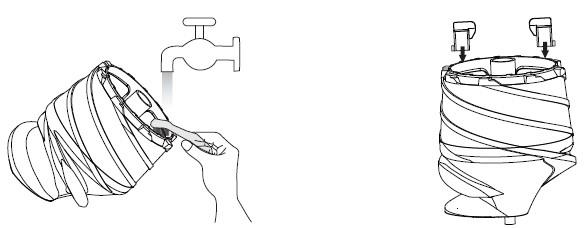
- Immediately after each use, use the cleaning brush thoroughly clean the strainer. Brush the inside of the strainer under running water (Fig.6).You can also clean the strainer by detaching the two rubber pads (Fig.7), but never forget to install the two pads back before use.If the mesh holes of strainer are blocked, soak the strainers in hot water with 10% lemon juice to loosen the blocked holes. If the strainer cannot be cleaned immediately after use, soak the strainer in hot soapy water immediately after juicing is complete. If pulp is left to dry on the strainer, it may clog the fine mesh holes and lessen the effectiveness of the juicer. Do not soak the strainer in bleach.
- Wash the jar, hopper, pusher, pulp cup and juice cup in warm soapy water with a soft cloth. Rinse and dry thoroughly. Discoloration of the plastic parts may occur with brightly colored fruit and vegetables. To help prevent this, wash parts immediately after use. If discoloration does occur, the plastic parts can be soaked in 10% lemon juice and water or they can be cleaned with a non-abrasive cleaner. Do not soak the strainer in bleach.
- Wipe the motor base with a soft damp cloth and dry it thoroughly. Do not use abrasive scouring pads or cleaners when cleaning the motor base as these may scratch the surface. Never immerse the motor base into water or other liquid, nor rinse it under running water.
- Wipe any excess food particles from the power cord.
- All non-electric parts can be cleaned in a dishwasher ( temperature less than 75 ).Note: Do not use heating devices to dry any part. Juice cup and pulp cup cannot be heated in a microwave oven.
 If the mesh holes of strainer are blocked, soak the strainers in hot water with 10% lemon juice to loosen the blocked holes. If the strainer cannot be cleaned immediately after use, soak the strainer in hot soapy water immediately after juicing is complete. If pulp is left to dry on the strainer, it may clog the fine mesh holes and lessen the effectiveness of the juicer. Do not soak the strainer in bleach.
Damage CheckAlways check that the appliance is in good working order and that all removable parts are secure. Check the power supply cord and plug regularly for cuts or damage.
Store in a SafePlace In order to prevent the motor from damp, store the appliance in a cool and dry place.
TROUBLESHOOTING
| Problem | Check | Possible Solutions |
| The product is not working. | Is the power cord connected? | Check if the power cord is plugged into a 220-240V 50/60Hz wall outlet. |
| Is the Juicer assembled correctly? | Assemble the product as described in thisinstruction manual. | |
| Has the power gone off? | Assemble the product as described in this instruction manual. | |
| Have you operated the Juicer for over 20 minutes? | Turn off the product. Wait for a while and reactivate the product. If you want to use the product continuously, pause the operation for at least 30 minutes. | |
| The Juice does not discharge sufficiently or there is juice discharging from pulp ejector. | Did you assemble the rubber pads correctly? | Assemble the rubber pads correctly as described in this instruction manual. |
| Did you use fresh ingredients? | Overripe fruits or vegetable may clog in the product. If you want to use the overripe ingredients, use them after soaking in mineral water for 10 minutes or more. | |
| Did you put too many ingredients or anything else into the machine? | Turn switch to “REV” for several seconds, stop, then to “STA”. | |
| The product stopswhile in operation. | Did you force food into the juicer? | Check if there are many ingredients put into the machine. Use the pusher gently. |
| Did you put the ingredients with hard seeds? | Turn off the appliance. Switch to “REV” for several seconds, stop, and then turn to “STA” and try it again. | |
| The pulp is too wet. | Is the strainer jammed? | Check if there is too much pulp jammed on the strainer. Clean it at once. |
| The motor is running with loud noise and shaking. | Did you check that all parts are assembled properly and in correct positions? | If the product is assembled properly, it is normal to make noise in juicing from overripe fruit and vegetables. Turn the product off and clean the jar. |
TECHNICAL DATAOperating voltage: 220-240V ~ 50/60HzRating power: 150W
GUARANTEE AND CUSTOMER SERVICEBefore delivery, our devices are subjected to rigorous quality control. If, despite all care, damage has occurred during production or transportation, please return the device to your dealer. In addition to statutory legal rights, the purchaser has an option to claim under the terms of the following guarantee: For the purchased device we provide 2 years guarantee, commencing from the day of sale. If you have a defective product, you can directly go back to the point of purchase.
Defects that arise due to improper handling of the device and malfunctions due to interventions and repairs by third parties or the fitting of non-original parts are not covered by this guarantee. Always keep your receipt, without the receipt you can’t claim any form of warranty. Damage caused by not following the instruction manual will lead to a void of warranty, if this results inconsequential damages then we will not be liable. Neither can we hold responsible for material damage or personal injury caused by improper use or if the instruction manual are not properly executed. Damage to accessories does not mean free replacement of the whole appliance. In such case please contact our service department. Broken glass or breakage of plastic parts is always subject to a charge. Defects to consumables or parts subjected to wearing, as well as cleaning, maintenance or the replacement of said parts are not covered by the warranty and are to be paid.
 ENVIRONMENT-FRIENDLY DISPOSALRecycling European Directive 2012/19/EU This marking indicates that this product should not be disposed of with other household wastes. To prevent possible harm to the environment or human health from uncontrolled waste disposal, recycle it responsibly to promote the sustainable reuse of material resources. To return your used device, please use the return and collection systems or contact the retailer where the product waspurchased. They can take this product for environmentally safe recycling.
Emerio Holland B.V.+Zomervaart 1A2033 DA HaarlemThe Netherlands
Customer service:T: +31(0)23 3034369E: i[email protected]
[xyz-ips snippet=”download-snippet”]