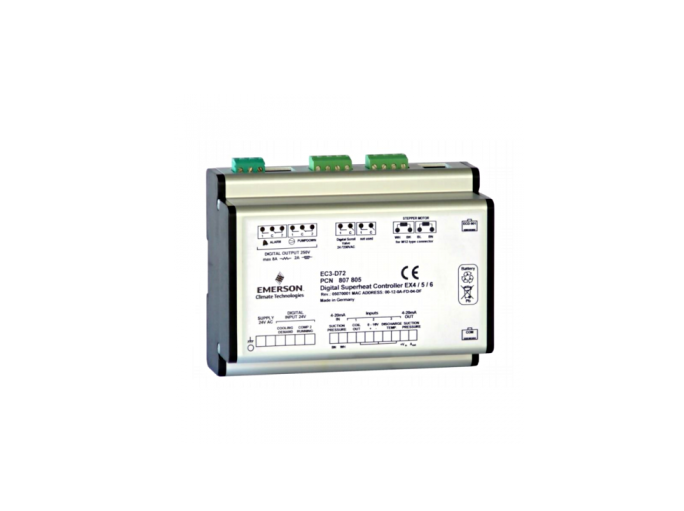
EMERSON Digital Superheat Controller EC3-D72 Instruction Manual
General information
EC3-D72 is the superheat controller with TCP/IP connection for stepper motordriven Electrical Control Valves EX4-6 from EMERSON and is optimized to operate with the Copeland Digital Scroll series utilizing a 0-10V input from a third-party controller. The controller synchronizes the PWM digital compressor solenoid valve with the superheat controlled by the electrical control valve; EX series The EC3-D73 has the same functionality but can only be set-up via the ECD 002 display. It has no external communication functionality.
Safety instructions:
- Read operating instructions thoroughly. Failure to comply can result in device failure, system damage or personal injury.
- According to EN 13313 it is intended for use by persons having the appropriate knowledge and skill.
- Do not exceed the specified maximum ratings for pressure, temperature, voltage and current.
- Before installation or service disconnect all voltages from system and device.
- Do not operate system before all cable connections are completed.
- Entire electrical connections have to comply with local regulations.
Note: The EC3-D7x series contains a VRLA battery = valve regulated rechargeable lead-acid battery. The battery must NOT be disposed of with other commercial waste. Instead, it is the user’s responsibility to pass it to a designated collection point for the safe recycling of batteries (harmonized directive 2012/19/EU). For further information contact your local environmental recycling center
Mounting position
The EC3-D7x is designed to be mounted onto a standard DIN rail. Mounting position: on vertical walls, with stepper motor connector on top side only.
Mounting of ECD-002

- ECD-002 can be installed at any time also during operation.
- ECD-002 can be mounted in panels with 71×29 mm cutout.
- Push controller into panel cut-out.(1)
- Make sure that mounting lugs are flush with outside of controller housing
- Insert Allen key into front panel holes and turn clockwise. Mounting lugs will turn and gradually move towards panel (2)
- Turn Allen key until mounting lug barely touches panel. Then move other mounting lug to the same position (3)
- Tighten both sides very carefully until keypad is secured. Do not over tighten as mounting lugs will break easily.
Electrical Installation
- Refer to the electrical wiring diagram for electrical connections.
- Do not apply voltage to the controller before completion of wiring.
- Ground the metal housing with a 6.3 mm spade connector.
- Keep controller and sensor wiring well separated from mains wiring. Minimum recommended distance 30 mm.
- Use a class II category transformer for 24 VAC power supply. Do not ground the 24 VAC lines. We recommend using individual transformers for EC3 controller(s) and for 3rd party controllers to avoid possible interference or grounding problems in the power supply. Connecting any EC3 inputs to mains voltage will permanently damage the EC3.
- The use of the relay is essential to protect the system in case of power failure if the communications interface or the ECD-002 are not utilized.
- If the output relay is not utilized, the user must ensure appropriate safety precautions are in place to protect the system against damage caused by a power failure.
- In order to provide system protection in the event of power loss, it is recommended to change the battery annually.
Digital input status is dependent to operation of compressor/0-10V input
| System Operating
condition |
Digital Inputs | 0-10V input from third party controller |
| C1 &
C2 in stop mode |
“Cooling demand” open (0 V) “Comp 2 Running” open (0 V) | EXV remains closed irrespective of voltage input value |
| C1 in run &
C2 in stop mode |
“Cooling demand” closed (24 V) “Comp 2 Running” open (0 V) | EXV active
Input = 0V: dig. valve capacity = 10% default capacity. If dig. comp. is in by-pass, EXV will: – close if capacity is <70% – be inhibited if capacity is >70% |
| C1 &
C2 in run mode |
“Cooling demand” closed (24 V) “Comp 2 Running” closed (24 V) | EXV active
EXV always modulates even when the dig. compr. is in by-pass mode. |
| C1 in stop & C2 starts run mode | “Cooling demand” open (0 V) “Comp 2 Running” closed (24 V) | EXV remains closed irrespective of voltage input value |
Note 1: C1 = Compressor 1, C2 = Compressor 2Note 2: Digital comp. should always be regarded as base load compressor 1.
Wiring
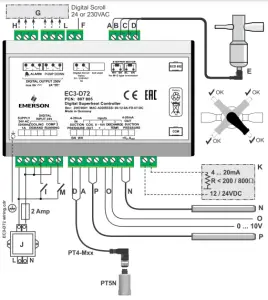
- A: White wire
- B: Black wire
- C: Blue wire
- D: Brown wire
- E: M12 Plug cable assembly EXV-Mxx for connection to EX4-6
- F: 24 V /230V Triac output to PWM Digital Scroll valve
- G: Remote control panel, system controller.
- H: Alarm relay, dry contact. Relay coil is not energized at alarm or power off.
- I: Digital input “Cooling demand” (0 V/open = Stop; 24 V/closed = Start)
- J: Transformer Class II, 24 VAC secondary / 25 VA
- K: Third party controller (can use the analog output signal from EC3)
- L: Pump down relay, dry contact. Relay is energized during normal operation
- M: Digital input 2: “Comp 2 running”(0 V/ open = Comp 2 stop; 24 V /closed = Comp. 2 running)
- N: Discharge Temp. Sensor Copeland® NTC
- O: 0-10 V Digital Scroll capacity demand signal from system controller
- P: TP1-NP… Temperature sensor
Preparation for Start-up
- Vacuum the entire refrigeration system.
- Note: EMERSON Electrical Control Valves EX4-6 are delivered at half open position. Do not charge system before closure of valve.
- Apply supply voltage 24 V to EC3 while the digital input is 0 V (open). The valve will be driven to close position.
- After closure of valve, start to charge the system with refrigerant.
- Start the system and check the superheat and operating conditions.
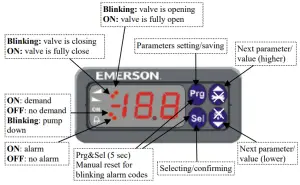
ECD-002 display/keypad unit: (LEDs and button functions)
Procedure for parameter modification using ECD-002:
- Note: Some of the functions/parameters (manual control and TCP/IP configuration) cannot be modified when using ECD-002 comparing to a set up by PC via TCP/IP.
- Warning:All alarms are disabled during manual control. We do not recommend unattended operation of system during manual control.
- The parameters can be accessed via the 4-button keypad. The configuration parameters are protected by a numerical password. The default password is “12”. To select the parameter configuration:
- Press the PRG button for more than 5 seconds, a flashing “0” is displayed
- Press
 until “12” is displayed (password)
 - Press SEL to confirm password
- Press to show the code of the parameter that must be changed;
- Press SEL to display the selected parameter value;
- Press to increase or decrease the value;
- Press SEL to temporarily confirm the new value and display its code;
- Repeat the procedure from the beginning “press to show…”
- To exit and save the new settings: Press PRG to confirm the new values and exit the parameters modification procedure.
- To exit without modifying any parameters: Do not press any button for at least 60 seconds (TIME OUT).
Special Functions
The Special Functions can be activated by:
- Press and together for more than 5 seconds, a flashing “0” is displayed.
- Press or until the password is displayed (default = “12”).If password was changed, select the new password.
- Press SEL to confirm passwordA “0” is displayed and the Special Function mode is activated.
- Press or to select the function. The number of special functions is dynamic and controller dependent. See list below.
- Reset controller to factory settings (this action is possible only when digital input is 0 V i.e. open).
- Displays the current TCP/IP address.
- Assign temporary 192.168.1.101 as TCP/IP address if EC3-D72x has different address.
- Press SEL to activate the function without leaving the special function mode.
- Press PRG to activate the function and leave the special function mode.
Main parameters
(must be checked and modified if necessary)
| Code | Parameter description and choices | Min | Max | Factory setting | Field setting |
| H5 | Password | 1 | 199 | 12 | |
| u0 | System refrigerant | 0 | 15 | 1 | |
| 0 = R22
5 = R410A 8 = R407A 12 = R449A |
1 = R134a 2 = R507 3 = R404A4 = R407C
6 = R124 7 = R744 (subcritical application) 9 = R407F 10 = R32* 11 = R448A 13 = R450A 14 = R513A 15 = R1234ze |
||||
| uP | Installed pressure sensor type | 0 | 2 | 0 | |
| 0 = PT5N-07x (for R22 / R134a / R507 / R404A / R407A / R407C / R407F / R124 / R448A /R449A / R450A / R513A / R1234ze)
1 = PT5N-18x (for R410A/ R32) 2 = PT5N-30x (for R410A / R744 / R32) |
|||||
| ut | Installed valve type | 1 | 3 | 2 | |
| 1 = EX4 | 2 = EX5 3 = EX6 | ||||
| uu | Start valve opening (%) | 10 | 100 | 50 | |
| u9 | Start opening duration (second) | 1 | 30 | 5 | |
| uL | Low superheat alarm function | 0 | 2 | 1 | |
| 0 = disable (for flooded evaporator)
1 = enable auto reset 2 = enable manual reset Cut-out at 0.5K (if it maintains 1 min.); Cut-in immediately at 3K |
|||||
| u5 | Superheat set-point (K)
If uL enabled (auto or manual) If uL disabled |
||||
| 3
0.5 |
30
30 |
6
6 |
|||
| u2 | MOP function | 0 | 1 | 1 | |
| 0 = disable | 1 = enable | ||||
| u3 | MOP set-point (°C) saturation temperature | * | * | ** | |
| **) Factory setting is according to selected refrigerant (u0):
+13°C – R22 +15°C – R134a +7°C – R507 +7°C – R404A +15°C – R407C +15°C – R410A +50°C – R124 -5°C – R744 +10°C – R407A +10°C – R407F +10°C – R32 +12°C – R448A +12°C – R449A +19°C – R450A +13°C – R513A +24°C – R1234ze *) Min. and Max. setting values are dependent to selected type of refrigerant |
|||||
| ┌┘5 | Units conversion | 0 | 1 | 0 | |
| 0 = °C, K, bar 1 = °F, R, psig
(Psig values are divided by 10. Example: Display 12.5 is 125 psig) |
|||||
| ┌┘1 | Value to show | 0 | 5 | 0 | |
| 0 = Measured superheat (K) 1 = Measured evaporating pressure, (bar); 2 = Valve opening (%) 3 = Measured coil-out temperature (°C)
4 = Calculated evaporating temperature (°C) from the pressure 5 = Compressor capacity in % |
|||||
| u4 | Superheat control mode | 0 | 1 | 0 | |
| 0 = Standard, 1 = Slow, | |||||
| uH | High superheat alarm function
0 = disable, 1 = enable auto reset |
1 | |||
| uA | High superheat alarm setpoint | 16 | 40 | 30 | |
| ud | High superheat alarm delay, min. | 1 | 15 | 3 | |
| P2 | Freeze protection cut-out, °C | -40 | 40 | 0 | |
| P3 | Freeze protection cut-in, °C | -37 | 43 | 3 | |
| P4 | Freeze protection alarm function
0 = disable, 1 = enable auto-reset, 2 = enable manual reset) |
0 | 2 | 0 | |
| P5 | Freeze protection alarm delay, sec. | 5 | 199 | 30 | |
| P6 | Pump-down function
(0 = disable, 1 = enable auto-reset) |
0 | 1 | 0 | |
| P7 | Pump-down cut-out, barg | -0,5 | 18 | 0.5 | |
| P8 | Pump-down time delay, sec. | 0 | 199 | 30 | |
| P9 | Low pressure alarm function
(0 = disable, 1 = enable auto-reset, 2 = enable manual reset) |
0 | 2 | 0 | |
| PA | Low pressure alarm cut-out, barg | -0,8 | 17,7 | 0 | |
| Pb | Low pressure alarm delay, sec. | 5 | 199 | 5 | |
| Pd | Low pressure alarm cut-in, barg | -0,5 | 18 | 0.3 | |
| L2 | Output logic | 0 | 3 | 1 | |
| 0: Alarm = normal, pump down. = normal 1: Alarm = inverse, pump down. = normal 2: Alarm = normal, pump down. = inverse
3: Alarm = inverse, pump down. = inverse |
| Code | Parameter description and choices | Min | Max | Factory setting | Field setting |
| b1
! |
Battery error management, when battery is defective, see below | 0 | 3 | 2 | |
|
value |
Alarm
display |
Alarm relay |
Valve |
Reset possibility after
recovery/replacement |
|
| 0 | – | – | Regulating | – | |
| 1 | Ab | – | Regulating | – | |
| 2 | Ab | Signaling | Fully close | Auto | |
| 3 | Ab (blinking) | Signaling | Fully close | Manual | |
|
When setting b1 to option 0 or 1, the user must ensure appropriate safety precautions are in place to protect the system against damage caused by a power failure. |
|||||
| /6 | Show decimal point; 0=yes, 1 = no | 0 | 1 | 0 | |
| A6 | Maximum discharge temperature; °C | 100 | 140 | 130 | |
| A7 | Discharge temp. alarm delay; sec. | 0 | 199 | 30 | |
| F2 | Minimum capacity; % | 10 | 100 | 10 | |
| F3 | Maximum capacity; % | 10 | 100 | 100 | |
| F6 | Scroll Valve, PWM cycle time; sec. | 10 | 20 | 20 | |
| t3 | Monitor discharge temperature sensor 0 = no, 1 = Yes | 0 | 1 | 0 | |
| ru | 0-10V input filtering; 0 = off, 1 = on | 0 | 1 |
Notes for R32: R32 is classified as low flammable refrigerant in Europe. EC3-D7x is designed under consideration of European safety standards and directives for none flammable refrigerants. The use of EC3-D7x with R32 is for systems/regions which it does not require consideration of additional safety standards as for flammable refrigerant.
After selecting the parameters the EC3-D7x is fully functional without connected PC or keypad/display unit ECD-002.
Control (valve) start-up behavior: (Parameter uu and u9)
 EX4/5/6 ≤ 1.5 seconds
Pump down function: (if P6=1 and L2=1)
| Digital input status | Alarm condition | Pump down relay |
| 24 V (ON) | NO | Activate |
| 0 V (OFF) | NO | Deactivate when pressure drops below P7 and after elapsed time P8 |
| 0 V or 24V | YES | Deactivate |
Possibilities of connecting EC3 -D72 to a network or PC:
- A TCP/IP Controller Readme file is available on thewww.climate.emerson.com/en-gb website to provide detailed information about TCP/IP Ethernet connectivity. Please refer to this file if you need information beyond the contents of this instruction sheet.
- Connect the EC3-D72 using the optional ECC-Nxx cable assembly or a standard CAT5 network cable with RJ45 plugs assembly to a network or router that enables the controller to receive a dynamic TCP/IP address or
- Connect the EC3-D72 to a computer using a crossover cable plugged directly into the Ethernet port. In this case, the TCP/IP address of the computer must be manually modified to be compatible with the default address of the controller. Refer to the TCP/IP Controller-Readme file for more details.
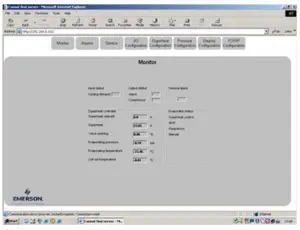
Setting and visualizing Data: WebPages (recommended method)
- Make sure that digital input is 0V (open), turn the power supply ON.
- Four parameters i.e. refrigerant type (u0), pressure sensor type (uP), valve type (ut) and control mode can be set only when digital input is open (0V) while the power supply is ON (24 V). This feature is for added safety to prevent accidental damage of compressors and other system components. All other parameters can be modified at any time.
- The EC3-D72 has a TCP/IP Ethernet communication interface enabling the controller to be directly connected to a network or a PC via the standard Ethernet port. The EC3-D72 controller has embedded WebPages to enable the user to visualize the parameter lists using real text labels.
- To view WebPages on the PC, a standard Web Browser like Internet Explorer® or Mozilla Firefox and JRE Java Runtime Environment is needed. JRE can be downloaded at no charge from the www.java.com website.
- Open the Internet browser program on the computer and, if EC3-D72 is connected directly to PC with a crossover cable enter the default TCP/IP address of the controller (192.168.1.101) into the address line, or the dynamic address from the DHCP server from network/Router. Refer to the TCP/IP Controller Readme file if a specific port is required.
- It is possible to identify the dynamic TCP/IP address assigned by DHCP of the Router or network, refer to the TCP/IP Controller-Readme file.
- After a few moments, the default monitoring page should be displayed. If the browser does not open the default page or display active data, the user should check the Internet browser “Option” configuration. Refer to the TCP/IP Controller Readme file.
- The Monitoring and Alarm WebPages are read only and therefore it is not necessary to enter a username or password. A username and password will be requested upon the initial request to any of the other WebPages. The factory default settings are: Username: “EmersonID”, Password: “12”
- The default settings may be modified on the Display configuration page.
- Press the tabs at the top of the Monitoring page with a left click of the mouse button to enter the respective Webpage.
- The parameters will be visualized in real text together with the program code as defined in the parameter list below.
- After the parameters have been modified, the complete list of settings can be saved to the memory of the computer and used later to upload into another controller. This can save a considerable amount of time when using multiple controllers and over a period of time, a library can be created containing the parameter lists for equipment for different applications.
- It is also possible to display live graphical data from the controller. Superheat, evaporating pressure, coil-out temperature and evaporating temperature are available on a 15 minutes rolling chart. Refer to the TCP/IP Controller Readme file for a complete description of the features available for the TCP/IP series of controllers.
Error/Alarm handling :
| Alarm code | Description | Related parameter | Alarm relay | Valve | What to do? | Requires manual reset after resolving alarm |
| E0 | Pressure transmitter error | – | Signaling | Fully close | Check wiring connection and measure the signal 4…20 mA. | No |
| E1 | Temperature sensor error | – | Signaling | Fully close | Check wiring connection and measure the resistance of sensor. | No |
| E3 | Discharge temp. sensor error | – | Signaling | Regulating | Check wiring connections and measure the resistance of the sensor. Also check the status of the I/O configuration (t3) | No |
| AΠ | EXV electrical connection error | – | Signaling | – | Check wiring connection and measure the resistance of winding. | No |
| Ab | Battery error | b1: 1 | – | Regulating | Battery potentially does not have enough charge to close valve in case of main power supply interruption. May occur temporarily with new controllers or after long storage but should disappear when battery is charged sufficiently. If Ab remains active even when battery is charged, battery may be defective and should be replaced. (Replacement kit: 807790). | No |
| Ab | b1: 2 | Signaling | Fully close | No | ||
| Ab blinking |
b1: 3 |
Signaling |
Fully close |
Yes | ||
|
AE blinking |
Pump down action cannot accomplished |
P6: 1 |
Signaling |
– |
Allocate the source, which does not let suction pressure drops below desired set-point. |
Yes |
| AF | Freeze protection | P4: 1 | Signaling | Fully close | Check the system for cause of low pressure such as insufficient load on evaporator. | No |
| AF blinking | P4: 2 | Signaling | Fully close | Yes | ||
| AL | Low superheat (<0,5K) | uL: 1 | Signaling | Fully close | Check wiring connection and operation of valve. | No |
| AL
blinking |
uL: 2 | Signaling | Fully close | Yes | ||
| AH | High superheat | uH: 1 | Signaling | Fully close | Check the system. | No |
| AP | Low pressure | P9: 1 | Signaling | Fully close | Check the system for cause of low pressure such as refrigerant loss. | No |
| AP blinking | P9: 2 | Signaling | Fully close | Yes | ||
| dA | High discharge temp. | A6: alarm setpoint | Signaling | Fully close Pumpdown deactivated | Check the system | No
Fixed differential = 10°C |
| Er | Data error display
– out of range |
– | – | – | Data send to the display is out of range. Check temperature and pressure sensor. | No |
| — | No data to display | – | – | – | Check Cable and plug connection between EC3-D7… and ECD-002. | No |
Note: When multiple alarms occur, the highest priority alarm is displayed until being cleared, then the next highest alarm is displayed until all alarms are cleared. Only then will parameters be shown again.
Checking system operating conditions using local display/keypad ECD-002 :
The data to be permanently shown on the display can be selected by the user (parameter ┌┘1). It is possible to temporarily display these values. However this function is not available in an alarm condition. The display will show for one second the numerical identifier of the data (see ┌┘1 parameter) and then the selected data. After 5 minutes, the display will return to the value selected by parameter ┌┘1.
Dimensions (mm)

Service / Troubleshooting
| Symptom | Cause | Action |
| Operating superheat is several degrees higher or lower than set-point | Incorrect signal from pressure or temperature sensors | 1- Check the sensors.
2- Make sure ECN-N60 temperature sensor is used. 3- For optimum accuracy, please use: PT5N-07x (for R22 / R134a / R507 / R404A / R407A / R407C / R407F / R124 / R448A /R449A / R450A / R513A / R1234ze) PT5N-18x (for R410A/ R32) PT5N-30x (for R410A / R744 / R32) 4- Make sure the sensor cables are not installed along with other high voltage cables |
| Operating superheat is too low i.e. compressor wet running | 1- Incorrect wiring of ECVs 2- Defective sensors | 1- Check the wiring 2- Check the sensor |
| Valve is not fully closed | 1- The digital input is ON (24 V) 2- Wrong setting of parameter ut. | 1- Valve is shut off only when the digital input is turned off (0 V). 2- Check the setting of parameter ut. |
| Instable superheat (hunting) | Evaporator is designed to operate at higher superheat | Increase the superheat set-point. |
| Valve opens when EC3 commands to close and vice versa | Wrong wiring between EC3-D7… and valve | Correct the wiring. |
| Superheat set-point is shifting after several months of uninterrupted operation or permanent jumper of 24 V digital input | Stepper motor driven valves require synchronization | Do not apply permanent 24 V digital input. Interrupt digital input once every week for 5 seconds if compressor never stops. |
Technical data
| Power supply | 24 VAC ±10%; 50/60 Hz; 1 A |
| Power consumption | 25 VA max. including EX4-6 |
| Plug-in connector | Removable screw terminals wire size 0.14…1.5 mm2 |
| Grounding | 6.3 mm spade earth connector |
| Protection class | IP20 |
| COM, TCP/IP connection | RJ45 Ethernet |
| Connection to optional ECD-002 | ECC-Nxx or CAT5 cable with RJ45 connectors |
| Digital Input; Cooling demand | 0/24 VAC/DC for stop/start function
EX valve closes during stop command. Typically thermostat or third party controller. |
| Digital Input; Comp2 running | 0/24 VAC/DC typically connected to auxiliary connection
EXV control loop remains active when input is 24 V and the digital scroll is idle. |
| NTC input; Coil-out temperature sensor | EMERSON temperature sensor TP1-NPx |
| NTC input; Discharge temperature sensor | Copeland® NTC 86 kΩ at +25 °C |
| 4-20 mA Analog input | EMERSON PT5N Pressure Transmitter |
| 4-20 mA Analog output
Deviation from input signal |
For connection to any 3rd party controller with 12/24 VDC power supply and appropriate burden
±8% max |
| Output alarm relay
(If L2 = 1) Activated: Deactivated: |
SPDT contacts 24 VAC/DC, 2 A inductive load During normal operation (no alarm condition) During alarm condition or power supply is OFF |
| Output pump down relay (If L2 = 1) Activated:
Deactivated |
SPDT contact 24 VAC/DC, 2 Amp inductive load During normal operation
All other conditions |
| Output Digital Scroll Triac | 24 V or 230 V AC output to activate PWM valve on Digital Scroll |
|
Ambient temperature range |
0…+60 °C
+1…+25 °C (for best battery life time)  report this ad report this ad> 35 °C battery life time < 2 years |
| Marking |  |
References
[xyz-ips snippet=”download-snippet”]