
EMILIA Stainless Steel Under Cupboard Rangehoods
User Manual
IMPORTANTThis rangehood is for domestic applications. It is not suitable for commercial applications of any kind. Do not install the rangehood if there is any doubt. Contact Glem Gas Australasia if you require clarification. This rangehood must be installed by a skilled installer in accordance with the installation instructions and the relevant standards. We will not service an incorrectly installed rangehood. Retain these instructions for future reference.
SERVICE 1 300 307 917
Dear Customer, By following the recommendations contained in this Instruction Manual, our appliance will give you constant high performance and will remain efficient for many years to come.
Product Specification & Technical Parameters

RECOMMENDATIONS AND SUGGESTIONS
- The manufacturer will not be held liable for any damages resulting from incorrect or improper installation.
- Please read this instruction manual before using this range hood.
- Please keep this instruction manual in a safe place for future reference.
- Only a qualified and trained service technician is to do the work of installation and servicing.
- Check that the main voltage corresponds to the one indicated on the rating plate fixed inside the hood.
- If the hood is used in conjunction with non-electrical appliances (e. g. gas burning appliances), a sufficient degree of ventilation must be guaranteed in the room to prevent the backflow of exhaust gas. The kitchen must have an opening directly with the open air to guarantee the entry of clean air.
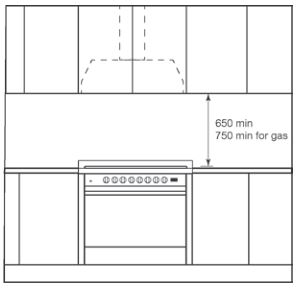
- The minimum distance is 750mm from the range hood to a gas hob, and 650mm to an electric hob. If the installation instructions for gas hobs specify a greater distance, this must be considered.
NOTE: Two or more people are required to install or move this appliance. Failure to do so can cause physical injuries.
USING THE RANGEHOOD
- The rangehood has been designed only for internal domestic use.
- Never use it for purposes other than what it has been designed for.
- Never leave high naked flames under the hood when it is in operation.
- Adjust the flame intensity to direct it onto the bottom of the pan only; making sure that it does not engulf the side of the pan.
- Deep fryer fat must be continuously monitored during use: overheated oil can burst into flame.
- The hood shouldn’t be used by children or persons not skilled in its use.
MAINTENANCE
- Proper ongoing cleaning and maintenance of the range hood will assure proper performance of the unit.
- Disconnect the rangehood from the main electrical supply before carrying out any maintenance work.
- Clean the stainless steel baffle filters regularly and drain the oil collector.
- Clean the hood using a damp cloth and a neutral liquid detergent or warm water.
WARNING!!
- In certain circumstances electrical appliances may be a danger hazard.
- Do not check the status of the filters while the cooker hood is operating
- Do not touch the light bulbs after appliance use
- Do not disconnect the appliance with wet hands.
- Avoid free flame, as it could damage the filters and create a fire hazard
- Constantly monitor any food being deep fried to avoid overheated oil becoming a fire hazard
- Disconnect the electrical plug prior to any maintenance or servicing.
- Children using the rangehood must be under the supervision of adults.
TO REDUCE THE RISK OF FIRE, ELECTRIC SHOCK, OR INJURY TO PERSONS, OBSERVE THE FOLLOWING:
- a) Installation work and electrical wiring must be done by qualified person(s) in accordance with all applicable codes and standards, including fire-rated construction.
- b) Sufficient air is needed for proper combustion and exhausting of gases through the flue (chimney) to prevent back drafting.
- c) When cutting or drilling into a wall or ceiling, do not damage electrical wiring and other hidden utilities.
- d) The rangehoods must always be vented to the outdoors.
- Do not use this product outdoors.
- This appliance is not intended for use by persons (including children) with reduced physical, sensory or mental capabilities, or lack of experience and knowledge, unless they have been given supervision or instruction, concerning use of the appliance by a person responsible for their safety. Children should be supervised to ensure that they do not play with the appliance.
- There shall be adequate ventilation of the room when the range hood is used at the same time as appliances burning gas or other fuels.
- There is a fire risk if cleaning is not carried out in accordance with instructions.
- The exhaust air must not be discharged into a flue which is used for exhausting fumes from appliances burning gas or other fuels.
STAINLESS STEEL BAFFLE FILTERS
The filters should be cleaned frequently. Use a warm detergent solution. Grease filters are washable.
See “INSTALL FILTERS” section for removal and installation instructions.
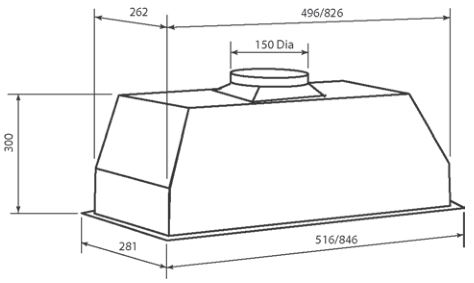
DIMENSIONS
OPERATION OF CONTROLS
The hood is operated using the push button controls on the front panel.The on/off switch turns the hood on and off.The light switch turns the lamps on and off. The blower switch turns the blower on to three speed settings:1 – LOW SPEED2 – MEDIUM SPEED3 – HIGH SPEED

LOCATION ABOVE COOKTOP
The minimum hood distance above the cooktop must not be less than 650mm. A maximum height of 750mm above the cooktop is recommended for the most efficient extraction of cooking odors. Installations greater than 750mm above the cooktop are at the installer’s and user’s discretion.
INSTALLING THE DUCT WORK
(DUCTED HOODS ONLY)
Caution: To reduce the risk of fire, metal ductwork is preferred.
- Decide where the ductwork will run between the hood and the outside.
- A straight, short duct run will allow the hood to perform most efficiently.
- Long duct runs, elbows, and transitions will reduce the performance of the hood. Use as few of them as possible. Larger ducting may be required for best performance with longer duct runs.
- The air must not be discharge into a flue that is used for exhausting fumes from appliances burning gas or other fuels” “Regulations concerning the discharge of air must be fulfilled.
- Install a wall or roof cap. Connect round metal ductwork to cap and work back towards hood location. Use duct tape to seal the joints between ductwork sections.
ELECTRICAL INSTALLATION
Electrical wiring must be done by a qualified person(s) in accordance with all applicable codes and standards. This range hood must be properly grounded. Turn off electrical power at the switchboard before wiring.
If the supply cord is damaged, it must be replaced by the manufacturer, its service agent or similarly qualified persons to avoid a hazard.
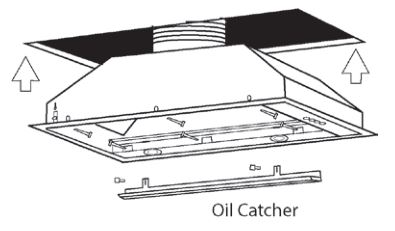
INSTALLING THE RANGEHOOD
NOTE: At least two people will be required to mount the hood.
- Before beginning the installation remove all plastic film, the filters & the oil catcher which is held in with 2 thumb screws. When it is removed there are 3 cut outs to provide access to the screw mounting holes.
- Before installing the hood to the cupboard unit drill a 165mm diameter hole for the 150mm ducting in the top of the cupboard and ceiling.
- Check the location of the power outlet and consider the location of the power cord.
- On the side of the hood are 2 spring clips to assist installation. Adjust the height of the clip to match the thickness of the mounting panel. The hood can then be slid into the opening and these springs will take some of the weight while the screws are fitted.
- Lift the rangehood and fit through the opening of the cabinet feeding the ducting up through the pre-drilled holes.
- Secure the unit using 6 long mounting screws, 3 on each side.
- Refit the oil catcher being careful not to scratch the hood and then fit the filters.
INSTALLING THE FILTERS
- To remove the baffle filter, push on the metal latch tab. This will disengage the filter from the hood. Tilt the filter downward and remove. Be careful not to drop the filter.
- To install the baffle filter slot the back edge into the channel and push against the spring clips. The filter will swing up and lock into position.
PRODUCT WARRANTY
Thank you for choosing an Emilia Glem rangehood, the purchase of this appliance is an important investment in your home and so to protect your investment we urge you to complete the registration card attached, please return it immediately.
The benefits conferred by this warranty are in addition to all other conditions and warranties in respect of this product which the consumer may have under the Trade Practices Act 1974 of the Commonwealth of Australia and/or similar State or Territory Laws.
Our goods come with guarantees that cannot be excluded under the Australian Consumer Law. You are entitled to a replacement or refund for a major failure if the goods fail to be of acceptable quality. You are also entitled to have the goods repaired or replaced if the goods fail to be of acceptable quality and failure does not amount to a major failure.
Glem Gas Australasia Pty Ltd warrants, this appliance to be free from defects in workmanship and materials for a period of:
- a) Where the appliance is intended to be used and is used for DOMESTIC USE – 24 MONTHS FROM DATE OF INVOICE TO THE ORIGINAL PURCHASER.b) Where the appliance is intended to be used and is used for COMMERCIAL USE – 90 DAYS FROM DATE OF INVOICE TO THE ORIGINAL PURCHASER.Glem Gas Australasia Pty Ltd, during the period of warranty, will at its option, and subject to the terms and conditions stated below, repair or replace free of charge this appliance or any component part, which upon examination by Glem Austrasia P/L. is found to be defective.This Warranty shall not apply:
- a) If the rating plate has been removed or the serial number or other details on it have been removed or rendered illegible.b) If the appliance is connected to any electrical voltage other than shown on rating plate.c) If the appliance has been subjected to misuse, abuse accident or want of care.d) If the appliance has been installed, operated or maintained contrary to the instructions supplied by Glem Gas Australasia Pty Ltd.e) If any defect or failure is due to connection to an inadequate or faulty power supply.f) If damage is caused by foreign objects in or on the appliance or because of its use for purposes other than that for which it was delivered.g) If a repair has been made or attempted by the purchaserh) If you live outside the service area of the Glem Gas Australasia service agents this warranty does not cover the cost of transport of the appliance for service or the service agent’s travelling time.
- This warranty does not cover any glass damage or replacement of light bulbs.
- Glem Gas Australasia Pty Ltd accepts no liability pursuant to this Warranty for any cost or consequential damage or economic loss whether direct or indirect, to any person or property, arising from breakdown or failure of this appliance or any part thereof, and no responsibility is to be implied or accepted over and above the replacement value of the product.
- Parts covered under warranty that need replacing can be posted to the customer to put on at their discretion.This Warranty is given by Glem Gas Australasia Pty Ltd and no other person or organisation is authorised to vary its provisions and conditions.
Complete this section and keep for your own record.
Appliance Model No _______________ Serial No ________________________Purchased From ___________________Date of purchase __________________
Please complete the section below and return to:
Glem Gas Australasia Pty Ltd, PO Box 63 Blaxcell PO South Granville NSW 2142Appliance Model No ___________________ Serial No ______________________Purchased From _______________________Date of Purchase ________________Customer Name _____________________________________________________Customer Address____________________________________________________Postcode __________Installer’s signature___________________ Installer’s License __________________

SERVICE 1 300 307 917
[xyz-ips snippet=”download-snippet”]