
emllc Farberware complete dishwasher
SAFETY
| Your safety and the safety of others is very important.
We have provided many important safety messages in this manual and on your appliance. Always read and obey all safety messages.
All safety messages will follow the safety alert symbol.All safety messages will tell you what the potential hazard is, tell you how to reduce the chance of injury, and tell you what can happen if the instructions are not followed. |
 This is the safety alert symbol.This symbol alerts you to potential hazards that can cause serious injury to you and others.
Appliance Specifications:120 Volts, 60 Hertz750 WattsTHIS PRODUCT IS FOR USE IN 120V AC OUTLET ONLY.
OVER 100 YEARS OF EXCELLENCE
Farberware has been an innovator in housewares and a household name for over a century. To this day, the Farberware family of products are designed with the consumer in mind and manufactured to the highest standards.
ONGRATULATIONS ON YOUR PURCHASE OF A FARBERWARE PROFESSIONAL 5-LITER COMPLETE PORTABLE COUNTERTOP DISHWASHER
FEATURES INCLUDE:
- 5 Wash Programs
- Choice of Built-in Tank or Faucet Hookup
- Steam generated during clean cycle cleans baby bottles
- LED Digital controls
- Use any place there is water and electricity
- Automatic Air circulation dries dishes
SPECIFICATIONS AND PARAMETERS
- Power supply is 120VAC 60Hz
- Rated Power: 750W
- Specification of the socket is 10A 120VAC
- Height: 17.3 in Hz
- Width: 17.3 in W
- Depth: 16.5 in D
- Water Pressure: 20-120PSI
- Capacity: 2 Place Settings
- Weight: 36.38 lbs.
 IMPORTANT SAFEGUARDS
- Read all instructions before operating this appliance.
- This appliance is intended to be used indoors in households
- This appliance is NOT A TOY.
- Keep out of reach of children.
- Unsupervised young children and cognitively challenged individuals should never operate this appliance.
- Close supervision is necessary when any appliance is used by or near children.
- To protect against electrical shock do not immerse cord, plug or any part of this unit in water or other liquids.
- Do not operate this appliance when parts are missing or broken.
- Unplug from outlet when not in use, before removing parts and before cleaning. Allow to cool before putting on or taking off any parts and before cleaning.
- DO NOT operate any appliance with a damaged cord or plug, after the appliance malfunctions, or if the appliance has been damaged in any manner. Return the appliance to the nearest repair shop for examination, repair or adjustment.
- The manufacturer does not recommend the use of accessory attachments other than what is provided by the manufacturer. Use of attachments may cause injuries.
- DO NOT use the appliance for other than its intended use.
- DO NOT use outdoors. FOR HOUSEHOLD USE ONLY.
- DO NOT place on or near a hot gas or electric burner or in a heated oven.
- DO NOT allow cord to hang over edge of a table or counter, or touch hot surfaces.
- Always attach plug to appliance first, then plug cord in the wall outlet. To disconnect, turn any control to “off,” then remove plug from wall outlet.
Operating Safety Precautions
- Read all instructions before operating this appliance.
- Check appliance for presence of foreign objects prior to use.
- DO NOT interrupt the power by pulling the power supply cord and/or pulling the power plug out of its socket directly.
- All maintenance on this unit should be done by an authorized repair technician.
- Use a soft cloth moisten with mild soap, and then use a dry cloth to wipe it again.
- Don’t immerse in water or splash water on the back of the appliance as it may cause malfunction.
- This appliance is equipped with a cord having a grounding conductor. The plug must be plugged into an appropriate outlet in accordance with all local regulations. Do not modify the plug provided with the appliance.
- Improper connection can result in risk of an electric shock.
- Check with a qualified electrician or service representative if you are in doubt whether the appliance is being used correctly.
General Safety Precautions
- Do not operate your dishwasher unless all enclosure panels are properly in place.
- Do not place any heavy objects on top of the dishwasher.
- When loading the dishwasher locate sharp objects in the basket with sharp edges facing down so that they do not damage the door seal.
- Only wash dishwasher safe plastics.
- Use only detergent for automatic dishwashers. Dishwasher detergent is corrosive! Keep dishwasher detergent out of the reach of children.
- It is dangerous to open the door when washing, because the hot water may scald you.
- Do not use an extension cord or an adapter plug with this appliance.
- Do not, under any circumstances, cut or remove the grounding plug from the power cord.
Electrical Requirements
Please look at the rating label to know the rating voltage and connect the dishwasher to the appropriate power supply. Use the required fuse 10 amp, time delay fuse or circuit breaker recommended and provide separate circuit serving only this appliance.
Electrical Connection
Ensure the voltage and frequency of the power being corresponds to those on the rating plate.Only insert the plug into an electrical socket which is grounded properly. If the electrical socket to which the appliance must be connected is not appropriate for the plug , replace the socket, rather than using a adaptors.
SAVE THESE INSTRUCTIONS!
QUICK START GUIDE
- Please read the corresponding content on the instruction manual for detailed operating method.
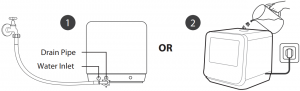
Connecting to Power and Drain
- The power supply is 120VAC 60Hz. The specification of the socket is 10A 120VAC.
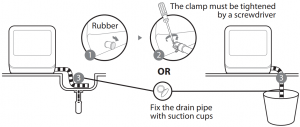
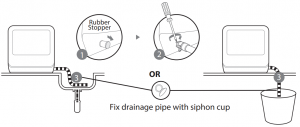
- The connection of the drain pipe: Put end of the drain into a sink or bucket.
- Please make sure drain hose is positioned in the proper space (I.E sink, bucket, etc) to avoid leakage
Adding Water To Dishwasher Tank
- Before adding water, you need to press power button to turn on the dishwasher.
- There are two ways to add water into the tank
- Connect inlet hose to the tap (sink house included for hookup)
- Open the cap and add water into the dishwasher tank
- There are two ways of knowing the tank is filled and ready to use:
- Before starting -When the tanks is filled the machine will beep for 3 seconds (SL – approximately 3 pitchers)
- After Starting – If there is not enough water the water icon will appear on the panel. If there is enough water the water icon light will be off and the machine will beep for 3 seconds.
- To Force Drain – In standby mode, you can press and hold “GLASS” button + “AIR REFRESH” button for 3 seconds simultaneously to drain the water tank.
![]() Note: Make sure the hose is fastened tightly, and there is no leakage, Switch off the faucet at the end of program.
Note: Make sure the hose is fastened tightly, and there is no leakage, Switch off the faucet at the end of program.
Loading the Dishwasher
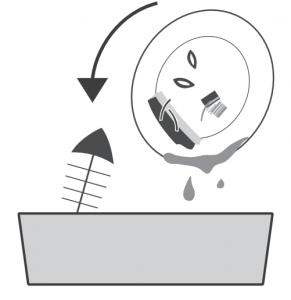
- Please remove large residue from items before placing in the complete washer.
- Open the dishwasher door. Place dishes in order of size starting with two sides to the middle. All cutlery are suggested to be tilted to improve cleaning performance. The arm will be blocked with the improper placement of the cutlery and cleaning effect may not be ideal.
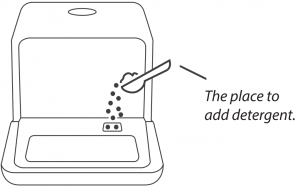
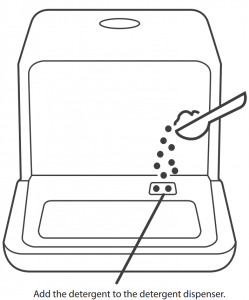
- Add the detergent. Pods, liquid or powder detergent all acceptable.
- When washing fruit, do NOT add detergent.

Close the Door, Select the Program and Start the Dishwasher
- Please make sure drain hose is positioned in the proper space (I.E sink, bucket, etc) to avoid leakage.
GETTING TO KNOW YOUR APPLIANCE
IMPORTANT:
- Before using this dishwasher for the first time and to get the best performance, read these instructions.
DISHWASHER FEATURES
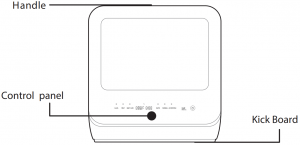

CONTROL PANEL
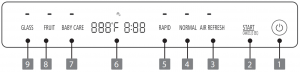
| 1 POWER | To turn on and off. |
| 2. Start/Cancel | Press this button to start or pause the dishwasher, the process pilot lamp will be blinking when starting. |
| 3. Air refresh | Air Exchange function, help to improve the dry performance, or prevent peculiar smelly. Default setting on, touch to close. |
| 4. Normal | For normally soiled loads, such as pots, plates, glasses and lightly soiled pans. |
| 5. Rapid | A shorter wash for lightly soiled loads that do not need drying. |
| 6. Display |
Display the program temperature, time, error code etc. |
| 7. Babycare | Suitable for washing baby bottles. (Steam Adding) |
| 8. Fruit | Use to wash hard surface fruit, only manually adding cold Control Panel and unloading the dishwasher water, no auto mode. |
| 9. Glass | The temperature is suitable for delicate ware with light soiled. |
CONTROL PANEL LOADING THE DISHWASHER BASKETS
Not suitable for use:
- Certain cutlery with wooden or mother of pearl handles
- Plastic items that are not heat resistant
- Non heat resistant bonded cutlery or China
- Pewter or Copper items
- Delicate crystal
- Steel or silver items subject to rusting or discoloration
- Wooden items
- Glazed items may fade
For the best performance of the dishwasher, follow these loading guidelines.
- Scrape off any large food particles.
- Soften remnants of burnt food in pans.
- It is not necessary to rinse all dishes under running water.
- Place objects in the dishwasher in following way:Load hollow items such as cups, glasses, pans etc. with the opening facing downwards Curved items, or those with recesses, should be loaded at aslant so that water can run off.All utensils are placed in the way that the spray arms can rotated freely during washing.
- Very small items should not be washed in the dishwasher as they could fall out.
- Dishes and items of cutlery must not lie inside one another, or cover each other.
- To avoid damage to glasses, they must not be touch.
- Take precautions with large cutlery so that blades do not touch the dishwasher components. It may be necessary to place some large cutlery horizontally.
- Do not overload the dishwasher. Position the dishes and cookware so that they will not get moved by the spray of water
Recommended loading layout with 1 serving bowl and 2 settings personal tableware
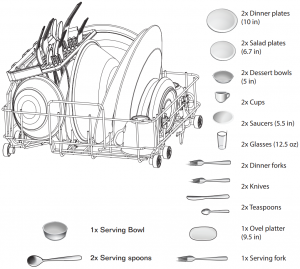
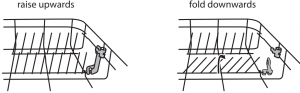
- Folding Down the Rack Shelves
- The spikes are used for holding plates and a platter. They can be lowered to make more room for large items.
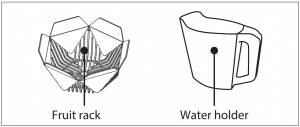
- Folding down to load large size tableware or fruit basket or baby bottle rack.
DETERGENT USE
Only use detergent made specifically for dishwashers. Do not use rinse aids.Dishwasher detergent is corrosive! Keep away from children.Use long programs when using Detergent tablets. Short programs may not allow the tablets to fully dissolve.
- The use of Normal washing program in combination with Low alkaline concentrated detergents with natural enzymes reduces pollution and is good for your dishes.
- The detergent must be refilled before the start of each wash cycle. Your dishwasher uses less detergent than traditional dishwashers. Generally, only one tablespoon of detergent is needed for a normal wash load. Always add the detergent just before starting the dishwasher otherwise it could get damp and will not dissolve properly.
WASH CYCLE
- The table below shows which programs are bet for each cleaning job and how much detergent is needed.
| Program | Cycle Information | Description of Cycle | Detergent | Time (min.) | Energy (Kwh) | Water (Gallon) |
| NORMAL | To clean normally soiled dishes | Wash (136)
Rinse Rinse (158) Drying |
.3 oz | 130
min. |
0.29 | 1.3 |
| RAPID | Shorter wash for lightly soiled dishes | Wash (122) Rinse Rinse | .3 oz | 40 min. | 0.27 | 1.3 |
| BABY CARE | Suitable for washing
baby bottles (Steam Added) |
Wash(158) Rinse Rinse(162) Drying | .3 oz | 120
min. |
0.5 | 1.3 |
| FRUIT* | Wash hard surface fruit by manually adding cold water | Wash | No Detergent | 20 min. | 0.2 | 1.3 |
| GLASS | For lightly soiled delicate dishware | Wash (122) Rinse Rinse (144) | .3 oz | 110
min. |
0.19 | 1.3 |
STARTING A WASH CYCLE:
- Load the basket( according to guidelines in the “Loading the Dishwasher” section.
- Load the detergent according the “Wash cycle table” and “Adding Detergent” section.
- Insert the plug into the socket. The power supply is 120VAC 60HZ
- Press the power button to turn on the appliance,
- Connect the inlet hose to the tap, make sure that the water supply is turned on to full pressure, or add water the tank manually.
- Select a suitable program according to the “Wash cycle table”
- When a program is selected, the appropriate light will illuminate.
- Press the Start/ Pause button and the machine will start.
- To pause the dishwasher press the Start/Pause button. An alarm will sound every minute until the button is pressed again to restart the wash cycle.
TO CHANGE A WASH CYCLE:
A wash cycle can only be changed if it has been running for a short time prior to detergent being released and water being drained.
- Press the Start/Cancel button to pause the washing.
- Then press and hold the Press Start/Cancel for more than 3 seconds, the machine will go into stand by mode.
- Press a new program button to select the desired program
FORGET TO ADD A DISH?
You can only add a dish if the dishwasher has been running for a short time prior to detergent being released and water being drained.
- Press the Start/Cancel button Or open the door a little to stop the washing cycle. When the door is opened the machine will pause.
- After the spray arms stop working, you can open the door completely.
- Add forgotten dishes.
- Close the door.
- Press the Start/Cancel button, the dishwasher will run .
- NOTE: It is dangerous to open the door when washing, has commenced because the hot water may scald you.
WHEN THE CYCLE IS COMPLETE
When the cycle has finished, the buzzer will sound for 8 seconds, then stop the appliance using the ON/OFF button shut off the water supply and open the door of the dishwasher. Wait a 15 minutes before unloading the dishwasher to avoid burning yourself, as the dishes and utensils are still hot.
Switch OFF the Dishwasher
- Switch off the dishwasher by pressing the ON/OFF button.
- Turn off the water tap!
- NOTE: When unloading the dishwasher it is normal that a small bit of water will remain.
FILTER
- Never use the dishwasher without filters! The performance may be affected and dishes and utensils could become damaged.
- Make sure the filter is properly assembled.
- The entire filter assembly should be cleaned once a week. Remove food remnants and clean the filters under running water.
- The filter efficiently removes food particles from the wash water, allowing it to be recycled during the cycle. For best performance and results, the filter assembly must be cleaned regularly. For this reason, it is a good idea tore move the larger food particles trapping in the filter after each wash cycle by rinsing the filter and cup under running water.
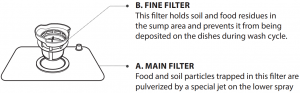
STEP 1: Rotate the filter assembly counter-clockwise, then lift up.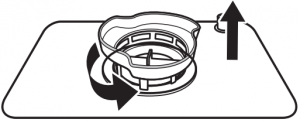
STEP 2: Lift the fine filter up from the main filter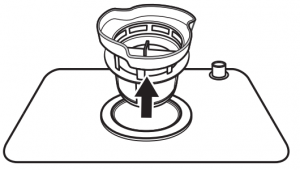
CARING FOR THE DISHWASHER
- The control panel and exterior be cleaned by using a lightly dampened cloth. After cleaning, make sure to dry it thoroughly. .Never use sharp objects, scouring pads or harsh cleaners on any part of the dishwasher. To remove spots or stains from the surface of the interior, use a cloth dampened with water an a little vinegar,
- To clean the edge around the door, you should use only a soft warm, damp cloth. Avoid penetration of water into the door lock and electrical components.
- Never use a spray cleaner to clean the door panel as it may damage the door lock and electrical components. Abrasive agents or some paper towel should not be used because of the risk of scratching or leaving spots on the stainless steel surface. Protect against freezing
- Take the following frost protection measures for he dishwasher operation in winter.
- After each wash cycle perform the following:
- Cut the power to the unit
- Turn off the water supply and disconnect the water inlet pipe from the water valve.
- Drain water from the inlet pipe and water valve (Use a pan to catch the water).
- Remove the filter at the bottom and use a soft cloth to soak up any residual water.
- If your dishwasher cannot work because of the ice, please contact authorised service person.
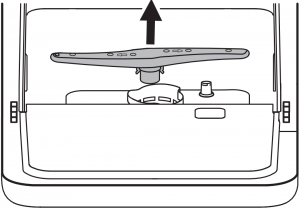
CLEANING THE SPRAY ARMS
- The spray arms can be easily removed for periodic cleaning of the nozzles to prevent possible clogging. Wash them under running water and carefully replace them in their seats, checking that their rotary movement is in no way impeded.
- Grasp the middle of the spray arm, pull it upwards to remove it. Wash the arms under a jet of running water and replace it carefully to its seat. After reassembly, check that the spray arms rotate freely. Otherwise, check that they have been installed correctly.
GENERAL TIPS
- Before cleaning or performing maintenance, always remove the plug.
- After every wash, turn off the water supply to the appliance and leave the door slightly ajar.
- When not in use for a longtime – It is recommend that you run a wash cycle with the dishwasher empty and then remove the plug from the socket, turn off the water supply and leave the door of the appliance slightly open. This will help the door seals to last longer and prevent odors.
- Moving the appliance – If the appliance must be moved, try to keep it in the vertical position.
- Installation preparation – The installation position of dishwasher should be near the existing water inlet tap. One side of the cabinet sink should be chosen to facilitate the connection of drain hoses of the dishwasher.
- Water connection – Connect the hot water supply hose to a threaded 3/4 (inch) connector and make sure that it is fastened tightly in place. If the water pipes are new or have not been used for an extended period of time, let the water run to make sure that the water is clear and free of impurities. If this precaution is not taken, there is a risk that the water inlet can get blocked and damage the appliance.
Please Note: If the supplied hose does not fit your tap, you may need to contact a plumbing supply company for an adapter.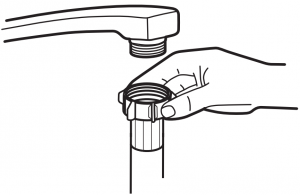
CONNECTION OF DRAIN HOSES
- The drain hose must be correctly fitted to avoid water leaks. Ensure that the water drain hose is not kinked or in any way impeded.
- How to drain excess water from hoses – If the sink is higher than the surface where you have placed your dishwasher it will be necessary to It will be necessary to drain excess water in to a bucket that is lower than the dishwasher position.
- If you need a drain hose extension, make sure to use a similar drain hose an no longer than 12 feet otherwise the cleaning effect of the dishwasher could be reduced.
TROUBLESHOOTING
| Problem | Possible Causes | What To Do |
| Dishwasher doesn’t start | Fuse blown, or the circuit breaker tripped | Replace fuze or reset circuit breaker |
| Power supply is not on | Make sure the dishwasher is turned on and the door is closed securely.Make sure the power cord is properly plugged into the wall socket. | |
| Error code:E1 Water pressure is low | Check that the water supply is connected properly and the water is turned on. | |
| Door of dishwasher is not closed properly | Make sure to close the door
properly and latch it. |
|
| Water not pumped form dishwasher | Twisted or trapped drain hose | Check the drain hose. |
| Filter clogged. | Check the filter. | |
| Kitchen sink clogged. | Check the kitchen sink to make sure it is draining. If not you may need a plumber. | |
| Suds in the tub | Wrong detergent. | Use only the dedicated dishwasher detergent. If suds exist, Open the door for 20-30min. to allow the foam to evaporate. If foam persists, add 1/3 gallon of water, close the door and run a force drain. Repeat until foam is cleared. |
| White film on inside surface | Hard water minerals. | To clean the interior, use a damp sponge with dishwasher detergent and wear rubber gloves. Never use any other cleaner than dishwasher detergent otherwise, it may cause foaming or suds. |
| There are rust stains on cutlery | The affected items are not corrosion resistant. | Avoid washing items that are not corrosion resistant in the dishwasher |
| Knocking noise in dishwasher | A spray arm is knocking against an item in a basket | Interrupt the cycle and rearrange the items which are obstructing the spray arm. |
| Rattling noise in the dishwasher | Dishes are not positioned properly in the dishwasher. | Interrupt the cycle and rearrange the items which are not in the proper position. |
| The dishes are not clean | The dishes were not loaded correctly | See notes in “Loading & unloading section. |
| You did not select the correct cycle | Select a more powerful cycle. | |
| Not enough detergent | Check the cycle chart to assure you are using the correct detergent and correct amount of detergent. | |
| Items are blocking the spray arms | Rearrange the items so that the spray arms can move freely. | |
| The filter is not clean | Clean the filter. | |
| Cloudiness on glassware | Combination of soft water and not enough detergent | Try using the glassware cycle and using the correct detergent. |
| White spots on dishes | Hard water | Try adding more detergent. |
| Black or grey marks on dishes | Aluminum utensils have rubbed dishes | Check that dishes are loaded properly and not rubbing against each other. |
| Detergent left in dispenser | Dishes blocking detergent dispenser | Check that dishes are loaded properly. |
| The dishes are not drying | Improper loading | Check that dishes are loaded properly. |
| Dishes are removed too soon | Do not empty your dishwasher immediately after washing. Open the door slightly so that the steam can escape. Wait at least 15 minutes from end of cycle to remove dishes. Unload the lower basket first to prevent the dropping water
from the upper basket. |
|
| Error Codes | E1 – Longer inlet time | It is a drain problem. Call a plumber. |
| E3 – Not reaching proper temperature | The heating tube is malfunctioning. Needs to be repaired by a qualified service professional. | |
| E4- Overflow | Some element of the dishwasher is leaking. If overflow occurs, turn off the main water supply before calling a service professional.If there is water in the base pan because of an overfill or small leak, remove water with a soft cloth. | |
| E9 – Touch buttons are not functioning | Water has gotten into the buttons. Needs to be repaired by a qualified service professional. |
ONE YEAR LIMITED WARRANTY
This warranty applies to products purchased and used in the U.S. and Canada.
This is the only express warranty for this product and is in lieu of any other warranty or condition.
This product is warranted to be free from defects in material and workmanship for a period of one (1) year from the date of original purchase. This warranty is valid for the original retail purchaser or gift recipient from the date of initial retail purchase and is not transferable.
Keep your original sales receipt as proof of purchase is required to make a warranty claim.
IMPORTANT: This warranty does not cover damages resulting from use not in conformity with the printed directions, accident, misuse or abuse, alternation, the affixing of any attachments not provided with the product, loss of parts, or subjecting the appliance to any but the specified voltage. (Read directions carefully.) This warranty is void if the product is used for other than single-family household use or subjected to any voltage and waveform other than as specified on the rating label (e.g., 120V ~ 60 Hz).
Englewood Marketing LLC excludes all claims for special, incidental, and consequential damages caused by breach of express or implied warranty. All liability is limited to the amount of the purchase price. Every implied warranty, including any statutory warranty or condition of merchantability or fitness for a particular purpose, is disclaimed except to the extent prohibited by law, in which case such warranty or condition is limited to the duration of this written warranty. This warranty gives you specific legal rights. You may have other legal rights that vary depending on where you live. Some states or provinces do not allow limitations on implied warranties or special, incidental, or consequential damages, so the foregoing limitations may not apply to you.To make a warranty claim or if service is required, please call our CUSTOMER SERVICE NUMBER.For faster service, please have the model, type, and series numbers ready for the operator to assist you.
Customer Service NumberIn the US 844-918-0509Englewood Marketing LLCEmail: [email protected]

References
[xyz-ips snippet=”download-snippet”]