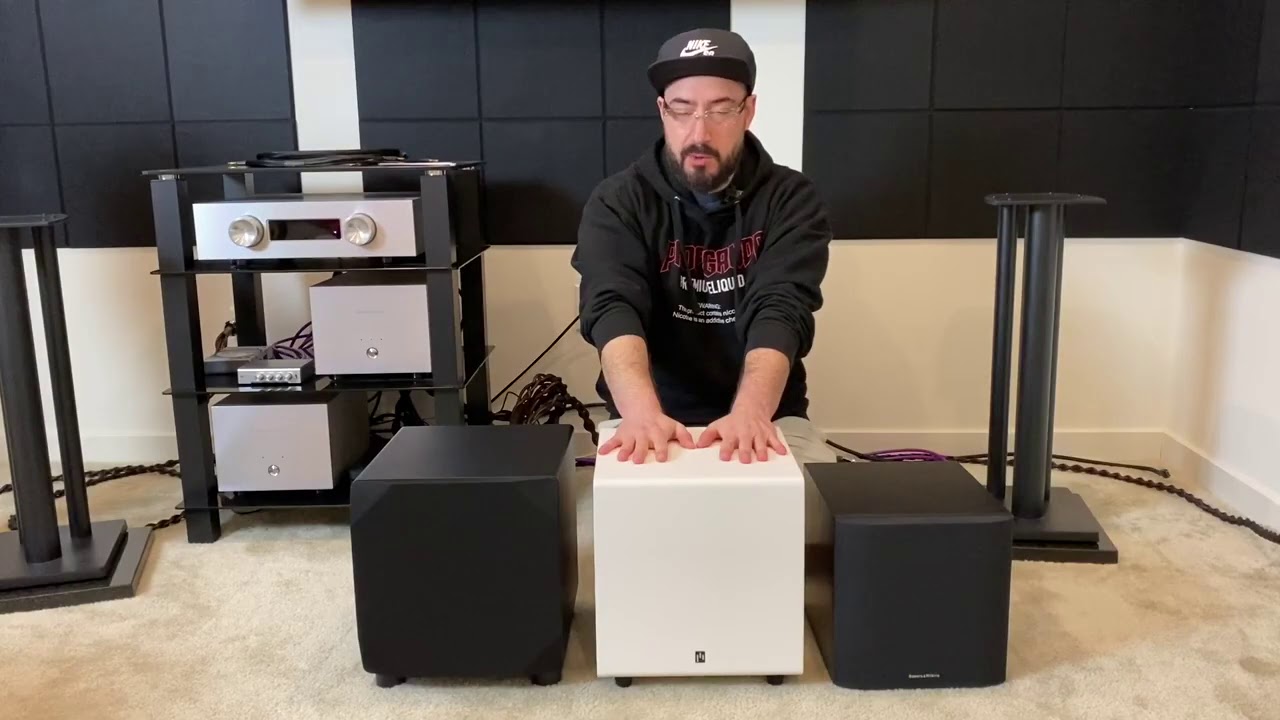
EMOTIVA Airmotiv SE8-SE12 Flex Subwoofer
Important Safety Precautions and Explanation of Symbols
- The exclamation point within an equilateral triangle is intended to alert the user to the presence of important installation, operation, and service instructions in this manual.
- The lightning flash with arrowhead symbol within an equilateral triangle is intended to alert the user to the presence of uninsulated dangerous voltages within the enclosure that may be of sufficient magnitude to constitute a risk of electrical shock to the user.
- Please read this manual thoroughly before attempting to install, configure, or operate the Emotiva Airmotiv Flex Subwoofer. After successful installation and configuration of the Flex Sub, be sure to retain this manual in a safe place for future reference.
- Safety is a key component to a long lasting and trouble free installation. Please read and follow all instructions and heed all warnings on the Flex Sub and in this manual. The vast majority of the subsequent safety precautions are common sense. If you are not comfortable with the installation of audio/video entertainment equipment, you should seek the services of a qualified installation professional or call us for help.
- WARNING: TO REDUCE THE RISK OF FIRE OR ELECTRIC SHOCK, DO NOT USE THE FLEX SUB NEAR WATER OR IN WET LOCATIONS, DO NOT EXPOSE IT TO RAIN OR MOISTURE, DO NOT EXPOSE IT TO DRIPPING OR SPLASHING FROM OTHER SOURCES, AND ENSURE THAT NO OBJECTS FILLED WITH LIQUIDS (SUCH AS VASES) ARE PLACED ON IT. DOING SO MAY RESULT IN DAMAGE TO THE UNIT AND THE RISK OF ELECTRIC SHOCK, WHICH MAY RESULT IN BODILY INJURY OR DEATH.
- WARNING: TO REDUCE THE RISK OF ELECTRIC SHOCK, DO NOT REMOVE THE AMPLIFIER PLATE OR DRIVERS FROM THE FLEX SUB. THERE ARE NO USER-SERVICEABLE PARTS INSIDE THE UNIT. REFER ALL SERVICE TO QUALIFIED SERVICE PERSONNEL.
- Do not install the Flex Sub near or above any heat sources such as radiators, heating vents, or other apparatus’ that produce heat. Do not block any ventilation openings or heat sinks. Avoid installing the unit directly above other heat-producing equipment unless sufficient ventilation or forced-air cooling is provided.
- Do not install the Flex Sub in locations without proper ventilation. The Flex Sub should not be operated on a bed, sofa, rug, or similar surface that may block vents. The unit should not be installed in an enclosed location such as a bookcase, cabinet, or closed equipment rack unless sufficient forced-air ventilation is provided, and clearance should be maintained between the rear-mounted heat sinks and objects like drapes that may reduce ventilation.
- Always install your Flex Sub according to the manufacturer’s instructions and only use attachments or accessories specified by the manufacturer.
- Do not install the Flex Sub on any stand, shelf, or other piece of furniture that is unable to support its weight. If a cart is used to move the unit, use caution to avoid injury from tip-over.
- Connect the Flex Sub only to power sources of the correct voltage (as shown in this manual and on the Flex Sub unit).
- Protect power supply cables from being pinched, walked on, or otherwise damaged. Be especially careful where the power cable enters the power outlet and the unit.
- Only connect the Flex Sub to an electrical outlet or extension cord of appropriate type and rating.
- DO NOT defeat the safety purpose of a grounding or polarized plug by removing ground pins or using unsafe adapters. A polarized plug has two blades – one wider than the other. A grounding plug has a third ground prong in addition to the two main conductors. The wide blade or third groundling prong is provided for your safety. If the provided plug does not fit your outlet, consult an electrician to replace your obsolete outlet. If you replace the power cord, only use one of similar type and equal or greater current rating.
- The power cable for the Flex Sub should be unplugged from the outlet during severe electrical storms, or when unused for a long period of time.
- Only replace the fuse(s) in the Flex Sub with fuse(s) of proper value and voltage rating.
- The Flex Sub should only be cleaned as directed in the manual. Avoid spraying liquids directly onto the unit or drivers.
- You should seek service for your Flex Sub by qualified service personnel if any of the following occur:
- The power-supply cord or the plug has been damaged.
- Objects or liquid have fallen or spilled into the unit.
- The unit has been exposed to rain.
- The unit exhibits a marked change in performance.
- The unit has been dropped, or its enclosure or drivers are damaged.
NOTE: TO COMPLETELY DISCONNECT THE FLEX SUB FROM THE AC POWER MAINS, DISCONNECT THE AC POWER CORD FROM THE AC RECEPTACLE.NOTE: THE POWER CORD ON THE FLEX SUB MUST REMAIN READILY ACCESSIBLE AT ALL TIMES.
Introduction
Thank you for purchasing the new Emotiva Airmotiv™ Flex Subwoofer.Emotiva Airmotiv™ Subwoofers are designed to reproduce the lowest frequencies in the audio spectrum accurately and with exceptionally low distortion – even at the high listening levels found in modern movies. All of our Airmotiv Subwoofers deliver the dynamics and raw power you need to make a modern movie sound track rattle the walls… with the precision and superb musicality you need to get the most from well recorded music. With our Airmotiv Subwoofers, you don’t have to compromise; you really can have it all.
The Airmotiv SE8 and SE12 Flex Subwoofers were specifically designed from the ground up to fulfill a wide variety of needs. The heavy duty long throw downward firing powered driver, forward firing passive radiator, and efficient 200 watt Class-D amplifier, deliver more than enough low bass to fill a room, and the compact footprint enables the Flex Sub to easily fit in a wide variety of locations. If you have a large room, or like your bass a little more extreme, the Flex Sub’s small size and affordable price tag will simplify your decision to use two or three Flex Subs, positioned at strategic locations in your room.
Both the Airmotiv SE8 and SE12 Flex Subwoofers have the standard complement of Level, Crossover Frequency, and Phase adjustments, and include both manual and automatic turn-on options. However, where they really earn the title of Flex Subwoofer is with their flexible connection options, which enable you to integrate one or more Flex Subwoofers into virtually any home theater or stereo music system. Use the LFE input to connect the Flex Sub directly to the subwoofer output on any home theater AVR or preamp/processor that has its own bass management. Or, if your source has a line level subwoofer output, but doesn’t have internal bass management, simply use the controls on the Flex Sub to adjust it to work perfectly with the rest of your system. If the only outputs you have on your AVR or amp are speaker outputs, you can connect them to the High Level Inputs on the Flex Sub, and use the controls on the Flex Sub to configure a perfect match to the rest of your system. And, if you’ve got a preamp or DAC that has line level outputs, but no bass management, you can connect it to the line level inputs on the Flex Sub, connect the line level outputs on the Flex Sub to your power amp, then use the full 2.1 channel active bass management that’s built into the Flex Sub.
And, of course, we’ve made sure that the Airmotiv SE8 and SE12 Flex Subs look good, with or without their removable sculpted grills, and sound great with both music and movies.
Happy listening!The Emotiva Team
About This Manual
This manual will provide you with all the information you need to achieve great performance, accurate sound, and many years of reliable service from your Airmotiv SE8 or Airmotiv SE12 Flex Subwoofer.We suggest that you read through the entire manual; we kept things as short and direct as possible. Even if you’re an expert user, you will probably find some interesting information and useful suggestions.
If you’re really in a hurry to get started, please read the Quick Start section (on page 6); you may then read the remainder of the manual at your leisure.You may wish to record serial numbers or other purchase information on the Notes page at the back of this manual.
Features
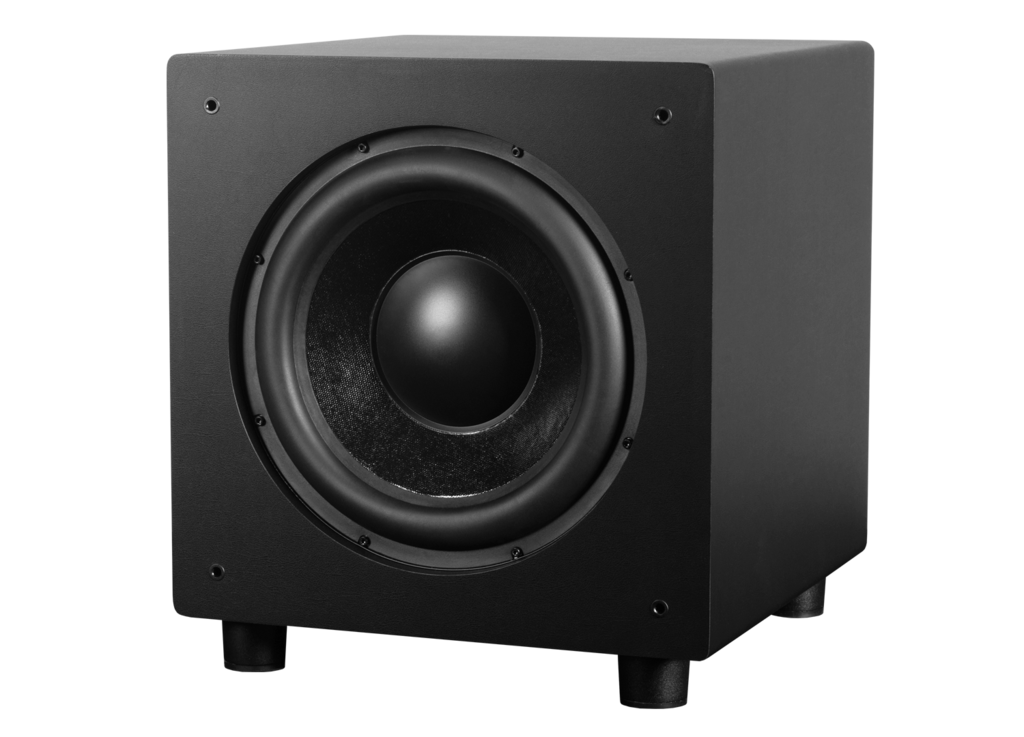
The Emotiva Airmotiv™ SE8 and SE12 Flex Subwoofers were designed to combine good looks, and great performance and sound quality, in a small footprint that enables them to fit easily into almost any room. Flexible connection options enable the Flex Sub to integrate perfectly with almost any home theater or stereo music system. The Airmotiv SE8 and Airmotiv SE12 share the same features, but the Airmotiv SE12 is slightly larger, has a frequency response that extends slightly lower, and can deliver slightly more output at very low frequencies.
The following are a few of the feature highlights of our Airmotiv Flex Subwoofers:
- High performance, compact size, and great sound – The Airmotiv Flex Subwoofer is a flexible, compact, high-performance powered subwoofer that sounds great with both music and home theater content.
- Downward firing active driver and forward firing passive radiator – The long excursion active driver and heavy duty passive radiator deliver clean, powerful, musical low bass, with no distracting port noise.
- Powerful Class-D amplifier – The efficient, audiophile quality, Class-D amplifier provides 200 watts RMS of clean power to drive the Flex Sub to satisfying listening levels.
- Transparent limiter circuitry – ensures that the Flex Sub always sounds good, but is almost impossible to overdrive.
- Flexible power options – The Flex Sub can be configured to automatically switch itself on when it senses music at its inputs, to be turned on manually, or to remain on continually.
- Flexible input options – The Flex Sub includes both speaker level and line level inputs for maximum flexibility and compatibility with a wide variety of different systems.
- Flexible controls and adjustments – allow you to configure the Level, Crossover Frequency, and Phase of the Flex Sub for a perfect match with the rest of your system.
- Internal 2.1 channel line level active crossover – for use with preamps, DACs, and other audio sources that don’t otherwise support a subwoofer. This allows you to add fully active bass management to systems that don’t already include it by simply connecting the output of your preamp or DAC to the Flex Sub, and then connecting the line level outputs of the Flex Sub to the inputs of your power amp. Low frequency content is routed directly to the internal amp on the Flex Sub, while the remainder of the audio spectrum is routed to your main power amp, and both are controlled by the fully active bass management in the Flex Sub.
- Heavy acoustically inert MDF cabinet – keeps distracting cabinet noises and vibration to an absolute minimum. Integral feet, with non-slip decoupling pads, protect delicate floors and ensure that your Flex Sub will stay exactly where you want it.
- Tough textured exterior and removable sculpted fabric grill – The cabinet on the Flex Sub is covered in tough yet attractive textured black vinyl, and a removable sculpted black fabric grille, supportd by a heavy, vibration resistant frame, is included.
- Full five year warranty – ensures that you’ll enjoy your Flex Sub for years to come.
You can find more information about the Airmotiv SE8 and Airmotiv SE12 Flex Subwoofers on our website at www.emotiva.com
Unpacking
Your Airmotiv Flex Subwoofer was carefully packed and should reach you in perfect condition.
If you notice any shipping damage or other issues when you unpack it, please contact Emotiva immediately.
Gently remove your Flex Sub from the packing carton and remove all wrappings and shipping material.
It is important to save the box and all packing materials in case your Flex Sub subwoofer ever needs to be moved or shipped back to the factory for service.
Please keep your sales receipt in a safe place. It is the easiest way to verify your purchase date for warranty purposes, and may also be required if you ever have to file an insurance claim.We truly value customer feedback and would like to hear from you.
WARNING: The Airmotiv Flex Subwoofer has speaker drivers installed on both the front and BOTTOM surfaces of its cabinet. USE CARE TO AVOID PRESSING ON THE CONE OF THE DRIVER ON THE BOTTOM OF THE CABINET WHEN LIFTING OR HANDLING THE FLEX SUB.
DO NOT set the Flex Sub on soft surfaces that may touch or press against the driver on the bottom or impair its motion.
Quick Start
To get the most from your Airmotiv Flex Subwoofer, we urge you to read the entire manual. If you just can’t wait to hear how great your Flex Sub sounds, this section will cover the basics you need to get started.
- Find a secure location for your Flex Sub.
- Make sure your Flex Sub is set for the proper line voltage for your area.
- Connect your Flex Sub to the LFE or subwoofer output on your AVR or pre/pro.
- Configure your AVR or pre/pro to work with a subwoofer.
- Find some music you really like to listen to.
- Enjoy!
While you’re enjoying your Airmotiv Flex Sub, it would be a great time to read the rest of the manual to learn more about them.
Setting The AC Line Voltage
Before plugging in your Airmotiv Flex Subwoofer for the first time, confirm that it is configured to operate at the correct line voltage for your area. If you move to a different country, or a different region, with a different line voltage, you MUST change the Line Voltage setting on your Flex Sub to the correct line voltage.
Note: Attempting to operate your Flex Subwoofer with the Line Voltage Selector Switch set to the wrong voltage for your area may result in damage to your Flex Sub.To configure the AC Line Voltage for your Flex Sub, use a small screwdriver to slide the Line Voltage Selector Switch to the proper position.
Note: See pages 9 through 11 for the location of the Line Voltage Selector Switch. The currently configured line voltage is displayed through the window on the top of the switch protector cover.
Airmotiv SE8 Flex Subwoofer
The Airmotiv SE8 Flex Subwoofer is the ideal way to extend the bass response of your audio system to cover the last octave of bass with authority and finesse. The Airmotiv SE8 Flex Sub can deliver the solid low bass response you need to add that final touch of realism to a movie, while still offering the low distortion and precise control necessary for superb sounding music reproduction.
Driver ComplementActive driver: 8” downward firing heavy duty long throw subwoofer with a vented steel frame, rubber surround, and treated paper cone.Passive radiator: 8” front firing passive radiator with a steel frame, rubber surround, and treated paper cone.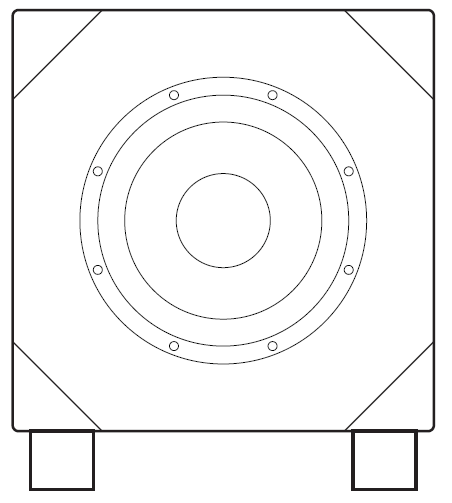
CabinetHeavy, acoustically inert MDF cabinet, covered on all sides with tough attractive textured vinyl. Includes a removable sculpted fabric grill with heavy vibration resistant MDF support frame.
Electronics
Amplifier: 200 Watt RMS, cool running, audiophile quality, high efficiency Class D amplifier.Protection: Acoustically transparent limiter.Frequency response: 33 Hz – 200 Hz (+/- 3 dB).Inputs: Stereo left and right unbalanced RCA inputs; LFE unbalanced RCA input; high level left and right inputs for connection to speaker outputs.Outputs: Stereo left and right unbalanced RCA stereo inputs (with user-configurable 60/80/100 Hz high-pass bass management crossover).Controls: Volume, X-Over Frequency, Phase, and Power mode; separate switch to control high-pass crossover frequency.AC power: User selectable line voltage; 115 VAC/60 Hz (6.3A Fuse); 230 VAC/50 Hz (3A Fuse).
MechanicalPermanently attached feet with anti-slip rubber pads.Dimensions: 11-3/4” high x 11-3/4” wide x 11-3/4” deep. (add 3/4” for grill; add 1-1/2” for feet).Weight: 19.2 pounds.
Airmotiv SE12 Flex Subwoofer
The Airmotiv SE12 Flex Subwoofer is the ideal way to extend the bass response of your audio system to cover the last octave of bass with authority and finesse. The Airmotiv SE12 Flex Sub can deliver the solid low bass response you need to add that final touch of realism to a movie, while still offering the low distortion and precise control necessary for superb sounding music reproduction.
Driver ComplementActive driver: 12” downward firing heavy duty long throw subwoofer with a vented steel frame, rubber surround, and treated paper cone.Passive radiator: 12” front firing passive radiator with a steel frame, rubber surround, and treated paper cone.
CabinetHeavy, acoustically inert MDF cabinet, covered on all sides with tough attractive textured vinyl. Includes a removable sculpted fabric grill with heavy vibration resistant MDF support frame.
ElectronicsAmplifier: 200 Watt RMS, cool running, audiophile quality, high efficiency Class D amplifier.Protection: Acoustically transparent limiter.Frequency response: 28 Hz – 200 Hz (+/- 3 dB).Inputs: Stereo left and right unbalanced RCA inputs; LFE unbalanced RCA input; high level left and right inputs for connection to speaker outputs.Outputs: Stereo left and right unbalanced RCA stereo inputs (with user-configurable 60/80/100 Hz high-pass bass management crossover).Controls: Volume, X-Over Frequency, Phase, and Power mode; separate switch to control high-pass crossover frequency.AC power: User selectable line voltage; 115 VAC/60 Hz (6.3A Fuse); 230 VAC/50 Hz (3A Fuse).
MechanicalPermanently attached feet with anti-slip rubber pads.Dimensions: 15-3/4” high x 15-3/4” wide x 15-3/4” deep. (add 3/4” for grill; add 1-1/2” for feet).Weight: 38 pounds.
Airmotiv Flex Subwoofer Controls
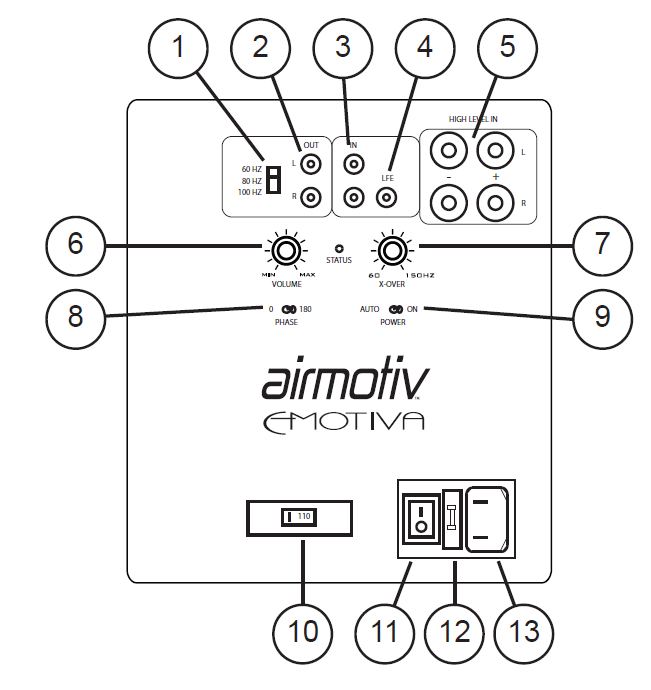
Both the Airmotiv SE8 and Airmotiv SE12 Flex Subwoofers have identical controls and input connections located on their rear panels.
- High-Pass Crossover FrequencyThis switch selects the crossover frequency for the high-pass filter portion of the internal bass management on the Flex Sub. This switch controls ONLY the crossover frequency for the high-pass filter that is applied to the Line Level Outputs on the Flex Sub.
- Line Level OutputsConnect the Line Level Outputs to the input on your power amp if the Flex Sub is providing bass management for your system. These outputs provide an audio signal that has been processed by the user configurable high-pass filter portion of the internal bass management on the Flex Sub.
- Stereo Line Level InputsUse the Stereo Line Level Inputs to connect the Flex Sub to a line level source that has stereo full range outputs. Also use this Input to connect the Flex Sub to the Subwoofer Output from a device like the Emotiva PT-100, which provides a summed mono output for a subwoofer, but doesn’t include internal bass management capabilities. Since the Line Level Inputs are summed, if your device has a single output, you may connect it to either of these inputs.
- LFE Line Level InputUse the LFE Line Level Input to connect the Flex Sub to the Subwoofer Output on a preamp, home theater AVR, or pre/pro that has built-in bass management.
- High Level InputsUse the High Level Inputs to connect the Flex Sub directly to the Speaker Outputs on an AVR or amplifier that doesn’t have line level outputs.WARNING: Because this connection uses a common ground, it should NOT be used with amplifiers that have fully balanced outputs, like our XPA-DR2 or PA-1.Note: When you use this connection, your main speakers continue to receive a full-range audio signal. At the same time, the bass management feature in the Flex Sub extracts the low frequency content and routes it to the internal amplifier in the Flex Sub.Note: Some people find that they get a more seamless integration between their subwoofer and their main speakers when they use this type of connection. However, a line level connection will usually deliver a cleaner signal, with slightly less distortion and noise, and so is usually recommended.Note: This connection only draws a tiny amount of current from the speaker drive signal, so it has virtually no effect on the speaker load impedance seen by your amplifier.
- Volume ControlThis control sets the relative gain of your Flex Sub. Use this control to match the amount ofbass delivered by your Flex Sub to the output of your main speakers. If your system has bass managament, or you’re not sure, just start with this at its center position – with the index mark at the top. You may then adjust it later to fine tune the sound of your system.
- X-Over (Crossover) ControlThe Airmotiv Flex Sub includes a built-in active crossover. This control allows you to adjust the crossover frequency of the internal low pass filter for the best match with your main speakers. If you are using the Flex Sub with a home theater pre/pro or AVR that has its own bass management, you should set this control to highest frequency setting (fully clockwise – 150 Hz). If not, then the proper setting will depend on your main speakers, but 80 Hz (about 10 o’clock) is a good starting point, and is generally considered to be the industry standard crossover point for subwoofers.
- Phase SwitchThe phase control is used to adjust the phase on the Flex Sub to match the phase of your main speakers. The best setting here will depend on your main speakers and where your sub is located in relation to them. Try both switch positions, and then set the switch in the position where you hear the most low bass at your listening position.
- Power Mode Switch (and Status LED)Note: Your Flex Sub will only operate if the AC POWER Switch is turned ON. If the AC POWER Switch is OFF, your Flex Sub will NOT operate.When the Power Mode Switch is set to On, the Flex Sub will remain On continuously.When the Power Mode Switch is set to Auto, the Flex Sub will turn On automatically when incoming audio is detected. Once the Flex Sub is On, it will remain On for several minutes; if no audio is detected after several minutes, the Flex Sub will return to Standby Mode.The Status LED is located between the Volume Control and X-Over Control and shows the current status of the Flex Sub. The Status LED illuminates Red when the Flex Sub is in Standby, and is waiting for an audio signal, and Green when it is fully On. (The Status LED will always remain Green when the Power Mode Switch is set to On and the AC Power Switch is set to On.)
- Line Voltage SelectorThis switch is used to select the appropriate line voltage for your area.Note: Be sure to set this switch to the correct line voltage for your area. Failure to do so may result in damage to your Flex Sub.
- AC Power SwitchUse this switch to turn the main AC Power to your Flex Sub On and Off.Note: Your Flex Sub will only operate if the AC POWER Switch is turned ON. If the AC POWER Switch is OFF, your Flex Sub will NOT operate, and the Power Mode Switch will have no effect.
- Fuse HolderTo change the fuse in your Flex Sub, remove the power cable, then gently pry the fuse compartment open. (The fuse holder opens like a drawer.) Replace the fuse with one of the correct value, replace the fuse drawer, and reinsert the power cable.Note: If the fuse in your Flex Sub blows repeatedly without apparent reason, then you might have an electrical fault in your Flex Sub, and you should call Emotiva Technical Support for assistance.
- IEC Power Cable ReceptacleThe IEC Power Cable receptacle accepts any standard IEC power cable. A high quality commercial power cable is provided with your Flex Sub.
Subwoofer Placement and Configuration
The best location for your subwoofer will depend on a lot of things – including the acoustics of your room, the characteristics of your main speakers, and practical considerations like where you have room for it. Whole books have been written about the subject – and even experts often disagree. The compact footprint of the Flex Sub simplifies the task of find a location that delivers the sound you want but doens’t intrude on your room decor.
Some frequently chosen locations include: in the front between your main front speakers, in a front or rear corner, or in the center of a side wall or rear wall. Each has advantages and disadvantages, and each may or may not work well in your particular system.
One way of choosing a good location is sometimes humorously referred to as the “subwoofer crawl”. To use this method, you connect your subwoofer temporarily to your audio system, place the sub in your normal listening position, where you would normally sit, and play music through it with plenty of bass. You then crawl around on the floor, stopping and listening at each location where you’re considering putting your sub. Once you find the spot where the bass sounds the best and cleanest, you switch places with the subwoofer, placing it in the location where the bass sounded the best. This often turns out to be a good location for your sub.
Note: Your Flex Sub contains a powerful yet efficient Class D amplifier. While the back plate of the Flex Sub will get slightly warm in normal use, no special ventilation or clearance is required.
The Airmotiv Flex Subwoofer may be used with a wide variety of different systems. How you configure your Flex Sub will depend on the type of system you have. The following section provides several typical examples of how the Flex Sub may be connected and configured. Please feel free to call us at Emotiva Technical Support if you have any questions about how to connect or configure your Flex Sub.
A properly configured subwoofer should add depth and a solid foundation to your listening experience, but should not be audible as a separate sound source, and you should not be able to detect its physical location in the room by listening to it. The visceral low bass delivered by a subwoofer should simply fill the listening area.
Note: The way your main speakers and sub blend together will sound slightly different at different locations in the room. These adjustments should be made by listening at your normal listening location. If your equipment is located across the room, walk back to your favorite chair and listen to the results from there each time you make an adjustment.
Note: After you’ve configured everything on your pre/pro, or used your automatic room correction to do so, you should AVOID changing the Crossover and Phase Control settings on your Flex Sub, as this will change the way it sounds. However, you may use the Volume Control to increase or reduce the overall amount of bass to suit your tastes.
WARNING: The Airmotiv Flex Subwoofer has speaker drivers installed on both the front and BOTTOM surfaces of its cabinet. USE CARE TO AVOID PRESSING ON THE CONE OF THE DRIVER ON THE BOTTOM OF THE CABINET WHEN LIFTING OR HANDLING THE FLEX SUB. DO NOT set the Flex Sub on soft surfaces that may touch or press against the driver on the bottom side.
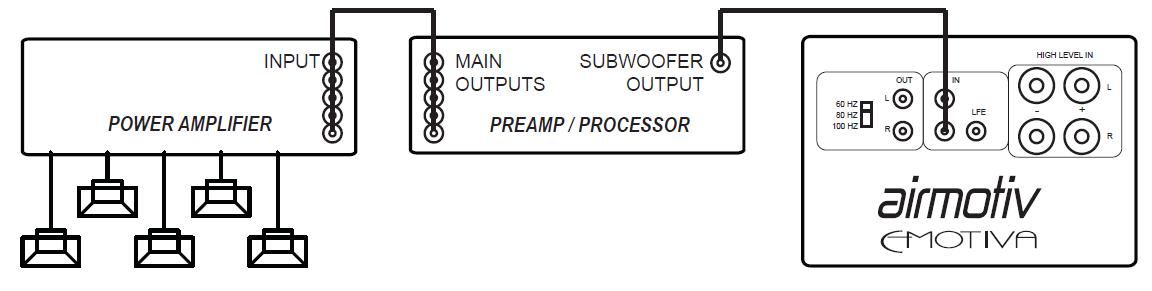
System Configuration #1
System: A surround sound preamp/processor, A/V receiver, or stereo preamp, with built-in bass management and a subwoofer output.
Connections:
- Connect the subwoofer output of your AVR, processor, or preamp to the LFE Input on the Flex Subwoofer. If your source component has stereo subwoofer outputs, you may use the separate Left Input and Right Input on the Flex Sub. If your source component only has a balanced subwoofer output or outputs you may need to purchase a low cost passive balanced-to-unbalanced adapter or adapter cable.
Configuration:
- Set the Power switch to Auto so your Flex Sub will turn on automatically when the music starts.
- Set the Volume control to its center position.
- With the Phase switch, try both settings, and leave it set in the direction where you hear the most low bass at your listening position.
- Set the X-Over control to its highest setting (fully clockwise, 150 Hz).
- The setting on the High-Pass Crossover Frequency switch doesn’t matter.
Notes:
- Connect your main power amp and speakers as you normally would.
- Follow the instructions on your AVR or processor for adjusting the bass management, or for using their built-in room correction software.

System Configuration #2
System: A surround sound preamp/processor, A/V receiver, or stereo preamp, with a subwoofer output, but with no built-in bass management.
Connections:
- Connect the subwoofer outputs of your AVR, processor, or preamp, to the Left Input and Right Input on the Flex Subwoofer. If your source component has a single subwoofer output, you may simply connect it to the Left Input on the Flex Sub. If your source component only has a balanced subwoofer output or outputs you may need to purchase a low cost passive balanced-to-unbalanced adapter or adapter cable.
Configuration:
- Set the Power switch to Auto so your Flex Sub will turn on automatically when the music starts.
- With the Phase switch, try both settings, and leave it set in the direction where you hear the most low bass (at your listening position).
- Adjust the X-Over control so you get the smoothest transition between the Flex Sub and your main speakers. The correct setting will depend on your room and your other speakers.
- Adjust the Volume control so that the level of the Flex Sub matches the level of your other speakers. The output of the sub should blend smoothly with your other speakers and you should not hear the sub as a separate source of sound.
- The setting on the High-Pass Crossover Frequency switch doesn’t matter.
Notes:
- Connect your main power amp and speakers as you normally would.
- Once you set the Volume and X-Over controls on the Flex Sub, leave them alone, and use the controls on your processor or preamp to control the level of your entire system.
- You may wish to consider System Configuration #3.It requires more cables, but has the benefit of a true crossover, with an active high-pass filter. The high pass filter limits the low frequency content being sent to your main speakers, reducing the power requirements on the amplifier powering them, and reducing the demands on the speakers themselves.
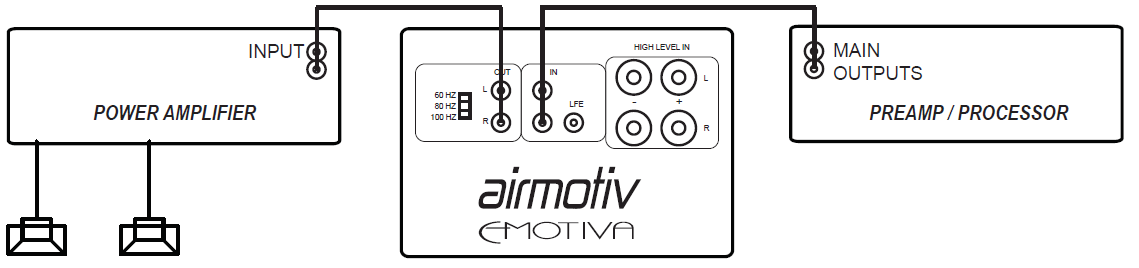
System Configuration #3
System: A stereo preamp or processor that has line-level connections to a separate power amp but lacks a separate subwoofer output.
Connections:
- Disconnect the outputs of your preamp or processor from the inputs of your power amp and connect them to the Left Input and Right Input on the Flex Sub.
- Connect the Left Output and Right Output of your Flex Sub to the left and right inputs on your power amp.
Configuration:
- Set the Power switch to Auto so your Flex Sub will turn on automatically when the music starts.
- With the Phase switch, try both settings, and leave it set in the direction where you hear the most low bass (at your listening position).
- Set the High-Pass Crossover Frequency switch to select the bass management crossover point for your system. The industry standard setting is 80 Hz, which is a good starting point, but you may find that one of the other settings provides for a smoother transition with your particular speakers.
- Start with the X-Over control set to the same frequency as you’ve chosen for the High-Pass Frequency setting. However, you may need to adjust it so you get the smoothest transition between the Flex Sub and your main speakers. The correct setting will depend on your room and your other speakers.
- Adjust the Volume control so that the level of the Flex Sub matches the level of your other speakers. The output of the sub should blend smoothly with your other speakers and you should not hear the sub as a separate source of sound.
Notes:
- For best noise performance, try to keep the cable lengths between your source, your amplifier, and your Flex Sub as short as possible.
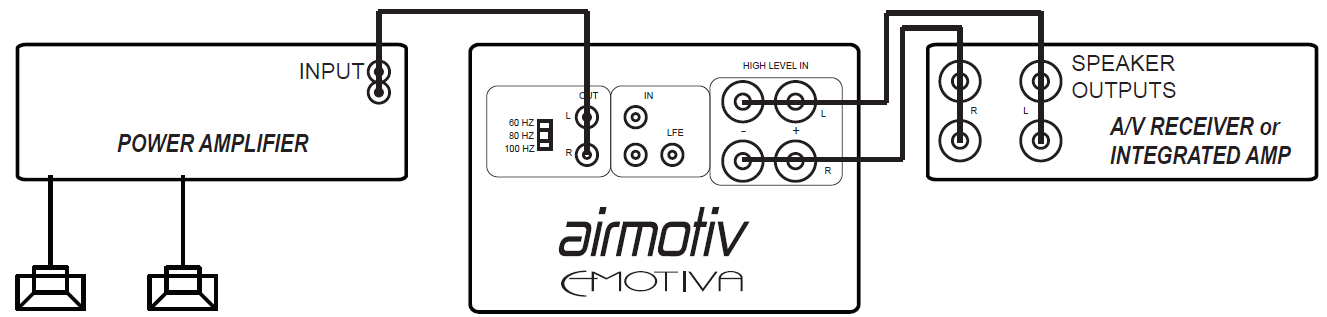
System Configuration #4
System: An AVR or integrated amplifier that has no line level outputs or internal bass management.
Connections:
- Connect an extra set of speaker cables from the output of your amplifier to the High Level Inputs on the Flex Sub.
Configuration:
- Set the Power switch to Auto so your Flex Sub will turn on automatically when the music starts.
- With the Phase switch, try both settings, and leave it set in the direction where you hear the most low bass (at your listening position).
- Adjust the X-Over control so you get the smoothest transition between the Flex Sub and your main speakers. The correct setting will depend on your room and your other speakers.
- Adjust the Volume control so that the level of the Flex Sub matches the level of your other speakers. The output of the sub should blend smoothly with your other speakers and you should not hear the sub as a separate source of sound.
Notes:
- You may connect the Flex Sub to the speaker terminals on your amplifier or the terminals on your speakers. You should use actual speaker wire for this connection. However, because very little current flows through this connection, using thin gauge speaker cables for this will not compromise performance.
WARNING: DO NOT connect an amplifier with a balanced output to the High-Level Inputs on the Flex Sub. This input uses a common ground, which is incompatible with most amplifiers that have fully balanced outputs, and may cause distortion, or damage to the amplifier, if connected to them. (Please call us if you have any doubts.)
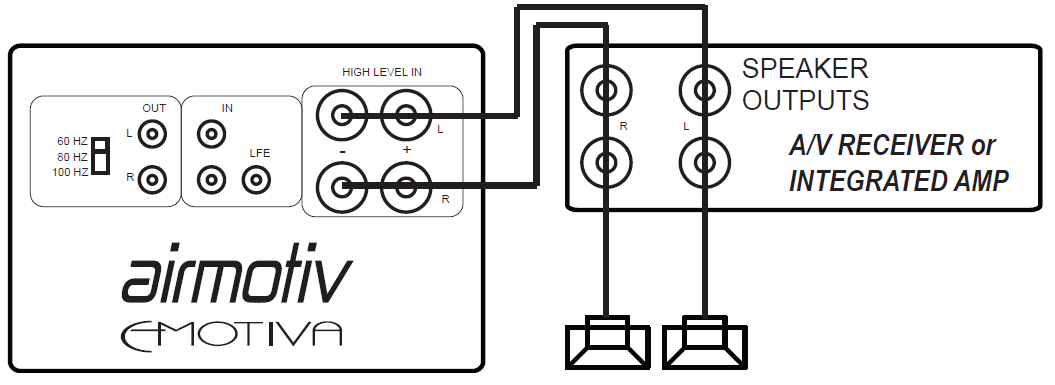
System Configuration #5
System: You have a stereo receiver or integrated amplifier, which has no subwoofer output or bass management, and that you wish to use with a subwoofer and a separate power amplifier.
Connections:
- Connect a set of speaker cables from the Speaker Outputs on your receiver or integrated amplifier to the High Level Inputs on the Flex Sub.
- Connect the Left Output and Right Output of your Flex Sub to the left and right Line Level inputs on your power amp. (These are the regular inputs on your power amplifier.)
Configuration:
- Set the Power switch to Auto so your Flex Sub will turn on automatically when the music starts.
- With the Phase switch, try both settings, and leave it set in the direction where you hear the most low bass (at your listening position).
- Adjust the Volume control so that the level of the Flex Sub matches the level of your other speakers. The output of the sub should blend smoothly with your other speakers and you should not hear the sub as a separate source of sound.
- Set the High-Pass Crossover Frequency switch to select the bass management crossover point for your system. The industry standard setting is 80 Hz, which is a good starting point, but you may find that one of the other settings sounds better.
- Start with the X-Over control set to the same frequency as you’ve chosen for the High-Pass Frequency setting. However, you may need to adjust it so you get the smoothest transition between the Flex Sub and your main speakers.
Notes:
- You may connect the Flex Sub to the speaker terminals on your amplifier or on your speakers. You should use actual speaker wire for this connection. However, because very little current flows through this connection, using thin gauge speaker cables for this will not compromise performance.
- With this configuration, use the Volume control on your receiver or integrated amp to control the overall level and the Volume control on the Flex Sub to adjust the balanced between the subwoofer and your main speakers.
- How well this connection option performs, and the sound quality you can expect from it, will depend on the specific characteristics of your receiver or integrated amplifier. Somewill deliver excellent sound quality in this configuration while others will not. If you cannot achieve satisfactory performance using this connection method we suggest you try one of the other options.
WARNING: DO NOT connect an amplifier with a balanced output to the High-Level Inputs on the Flex Sub. This input uses a common ground, which is incompatible with most amplifiers that have fully balanced outputs, and may cause distortion, or damage to the amplifier, if connected to them. (Please call us if you have any doubts.)
Care and Maintenance
Periodic MaintenanceYour Airmotiv Flex Subwoofer requires no periodic maintenance or calibration.
Cleaning the Cabinet and Baffle
- The cabinet of your Flex Sub should normally be cleaned with a rag dampened with plain water. DO NOT spray water directly onto or into the speaker and DO NOT use abrasive or chemical cleaners. Gently dry the surface with a clean soft rag after cleaning.
- If necessary, use a mild detergent, wipe the surface with a rag dampened with plain water afterwards to rinse it, and then gently dry the surface with a clean soft rag.
- If something nasty does get on the sides or top of your Flex Sub, use a rag dampened with a weak solution of dish detergent or other mild cleaning liquid, followed by a rag dampened with plain water, and then dry with a clean rag.
Cleaning the Grill Cloth
- If necessary, the grill cloth may be carefully vacuumed to remove dust or hair.
- Animal hair may be removed by using a “tape” type lint remover or soft brush. Avoid using brushes with stiff bristles that may pull or damage the grill cloth.
Note: DO NOT use any sort of liquid or wet cloth on the woofer cone or passive radiator.
Emotiva Audio Corporation Five-Year Limited Warranty
What does this warranty cover?Emotiva Audio Corporation (Emotiva) warrants its products against defects in materials and workmanship. This warranty, and all rights provided hereunder, is granted to the original owner, and may be transferred by the current owner to a new owner if the unit is gifted or sold. In the event the original owner transfers ownership of the Product prior to the expiration of the applicable term described below, this Warranty shall terminate at the end of the original term.
This Warranty only applies to Products purchased directly from Emotiva or any of its Authorized Dealers or International Distributors.Emotiva warrants any replacement product or part furnished hereunder against defects in materials and workmanship for the longer of the following: (i) the amount of time remaining under the original warranty, or (ii) 120 days from your receipt of the repaired or replaced product. The duration described in this paragraph is hereinafter referred to as the “Term”.
TO THE FULLEST EXTENT PERMITTED BY LAW, ALL IMPLIED WARRANTIES RELATED TO THE ORIGINAL PRODUCT AND ANY REPLACEMENT PRODUCT OR PARTS (INCLUDING IMPLIED WARRANTIES OF MERCHANTABILITY AND FITNESS FOR A PARTICULAR PURPOSE) ARE EXPRESSLY LIMITED TO THE TERM OF THIS LIMITED WARRANTY. SOME STATES DO NOT ALLOW LIMITATIONS ON HOW LONG AN IMPLIED WARRANTY LASTS, SO THE ABOVE LIMITATION MAY NOT APPLY TO YOU.
The original owner must make a claim within the Term of the Warranty. A claim shall not be valid (and Emotiva has no obligation related to the claim) if it is not made within the Term and if it is not made in strict compliance with the requirements of the “How do you get service?” section.
How long does this coverage last?The warranty on the Emotiva Airmotiv Flex Subwoofer commences on the date of retail purchase by the original retail purchaser and runs for a period of five years thereafter. This warranty may be transferred by the current owner to a new owner at any time during the original term. Emotiva warrants any replacement product or part furnished hereunder against defects in materials and workmanship for the longer of the following: (i) the amount of time remaining under the original warranty, or (ii) 120 days from your receipt of the repaired or replaced product. The duration described in this paragraph is hereinafter referred to as the “Term”.
What will Emotiva do?Emotiva will, at its option, either:(i) repair the product, or(ii) replace the product with a new consumer product which is identical or reasonably equivalent (in Warrantor’s sole discretion) to the product. In the event Warrantor, in its sole discretion, is unable to replace or repair the Product or it is not commercially practicable to do so, then:(i) if the claim was submitted during the first 365 days of the Term, Warrantor shall refund to you the purchase price that you paid for the Product; and(ii) if the claim was submitted after the first 365 days of the Term, Emotiva shall issue you a credit equal to the purchase price that you paid for the product.
The credit may only be used for the purchase of merchandise from Emotiva, and cannot be used for freight charges.
When a Product or part is repaired or replaced, any replacement item becomes your property and the replaced item becomes Emotiva’s property. When a refund or credit is given, the Product for which the refund or credit is provided must be returned to Emotiva and becomes Emotiva’s property.
What is not covered by this warranty?This warranty does not apply:(i) to damage caused by use with products not manufactured by Emotiva, where the non-Emotiva product is the cause of the damage;(ii) to damage caused by service or maintenance performed by anyone who is not a representative of Emotiva;(iii) to damage caused by accident, abuse, misuse, flood, fire, earthquake or other external causes;(iv) to a product or part that has been modified after its retail purchase, where the modification caused or contributed to the damage;(v) to consumable parts, such as batteries or failure of or damage to the Product caused by batteries;(vi) if any Emotiva serial number has been removed or defaced on the product;(vii) glass or plastic panels, cabinetry, trim or other appearance items;(viii) cosmetic wear or damage to remote controls by user.
EMOTIVA SHALL NOT BE LIABLE FOR ANY INCIDENTAL OR CONSEQUENTIAL DAMAGES ARISING FROM OR RELATED TO ANY DEFECTS IN OR DAMAGES TO ITS PRODUCTS. SOME STATES DO NOT ALLOW THE EXCLUSION OR LIMITATION OF INCIDENTAL OR CONSEQUENTIAL DAMAGES, SO THE ABOVE LIMITATION OR EXCLUSION MAY NOT APPLY TO YOU.
How do you get service?In order to make a claim under the Warranty, you must:
- Call or e-mail a customer service representative at 1-877-EMO-TECH (1-877-366-8324) or You must provide a description of your problem, the serial number of the Product for which the warranty claim is being made, and the original purchase date.
- Then, you will be provided with a warranty service authorization number (“WS”).
- Next, you must ship the Product to the following address, with the WS written in large, bold numbers on the outside of the box, and with the letters “WS” written before the number, for example: WS1234. Parcels arriving without a WS number on the outside of the box will be refused. The customer pays for the shipping to Warrantor. Warrantor pays for the shipping back to the customer within the continental United States only. Customer is responsible for shipping charges on all other warranty claims.
How does state law apply?This warranty gives you specific legal rights, and you may also have other rights which vary from state to state.
What if my product is damaged on the way to you?Emotiva is not liable for damages that may incur while an item is in transport to us. Please purchase insurance when you ship your item. If your Product was not adequately packaged, we will refuse receipt and the damaged package will be returned to you at your cost. If you do not have the original Emotiva Audio packaging, please check with our sales department to purchase replacement-shipping cartons.
How does the Warranty and service apply to international orders?The Product Warranty is only valid in the country where the Emotiva product was originally shipped via an authorized dealer, distributor, or direct from the Emotiva factory. The Warranty is subject to change at any time depending on the laws and regulations within your specific country. Please check with your distributor for a complete understanding of the warranty in your county.
If you purchased your Emotiva Product outside of the USA and wish to have it serviced at the factory, all freight charges are your responsibility. If you do not have an authorized distributor or repair center in your country, your Product must come back to the Emotiva USA factory for warranty service.
All information contained in this manual is accurate to the best of our knowledge at thetime of publication. In keeping with our policy of ongoing product improvement, we reserve the right to make changes to the design and features of our products without prior notice. 
References
[xyz-ips snippet=”download-snippet”]