EMPOWER 1/4″ 24V Max Cordless Impact Driver
 MODEL: CIS334A
WARNING!
- Read and understand all instructions. Failure to follow all instructions listed below may result in serious personal injury.
- When using electric tools, machines or equipment, basic safety precautions should always be followed to reduce the risk of fire, electric shock, and personal injury. Completely read the manual before proceeding to use this tool. KEEP THESE INSTRUCTIONS.
- Some dust created by power sanding, sawing, grinding, drilling and other construction activities contains chemicals known to the state of California to cause cancer, birth defects or other reproductive harm. Some examples of these chemicals are:
- Lead from lead-based paints.
- Crystalline silica from bricks and cement and other masonry products, and arsenic and chromium from chemically-treated lumber.
- Your risk from these exposures varies, depending on how often you do this type of work. To reduce your exposure to these chemicals, work in a well ventilated area with approved safety equipment, such as those dust masks that are specially designed to filter out microscopic particles.
- For more information go to www.P65WARNINGs.ca.gov
IMPORTANT SAFETY INSTRUCTIONS
WARNING: When using electric tools, machines or equipment, basic safety instructions should always be followed to reduce the risk of fire, electric shock, and personal injury.
- KEEP THE WORK AREA CLEAN: Clean areas prevent injuries.
- CONSIDER THE WORK AREA ENVIRONMENT: Do not use power tools in damp, wet, or poorly lit locations. Do not expose your tool to the rain. Keep the work area well lit. Do not use tools in the presence of flammable gases or liquids.
- KEEP CHILDREN AWAY: All children should be kept away from the work area. Do not let them handle machines, tools, and extensions cords.
- STORE UNUSED EQUIPMENT: Store equipment in a dry area to inhibit rust. Equipment also should be in a high location or locked up to keep out of reach of children.
- DON’T FORCE THE TOOL: For your safety, do not force the tool or it may damage the tool and void warranty.
- USE THE RIGHT TOOL: Do not force a small tool or attachment to do the work of a larger industrial tool. Do not use a tool for a purpose for which it was not intended.
- DRESS APPROPRIATELY: Do not wear loose clothing or jewelry as they can get caught in moving parts. Protective, non-electrically conductive gloves and non-skid footwear are recommended when working. It is good practice to keep hair tied back and / or wear a suitable head covering.
- USE EYE PROTECTION: Use a full-face mask if the work you are doing produces metal filing, dust, or wood chips. Goggles are acceptable in other situations. Wear a clean dust mask if the work involves creating a lot of sparks or heavy dust.
- DO NOT TOUCH BITS OR BLADES WITH HANDS AFTER USE: They can become extremely hot during use.
- SECURE WORK: Use clamps or a vise to hold the item when applicable. It is safer than using your hands and it frees up both hands to operate the tool.
- DON’T OVERREACH: Always maintain proper footing and balance Do not reach over or across tools or machinery in use.
- MAINTAIN TOOLS WITH CARE: Keep tools sharp and clean for better and safer performance. Follow instructions for lubricating, safe performance and changing accessories. Keep handles dry, clean, and free from oil and grease.
- REMOVE ALL ADJUSTING KEYS AND WRENCHES: Make it a habit to check that keys and adjusting wrenches are removed from any rotating tool before using.
- AVOID UNINTENTIONAL STARTING: Do not carry tools with the finger on the switch. Be sure the directional switch is in self-lock position when not in use or when changing attachments.
- STAY ALERT: Watch what you are doing & use common sense. Do not operate any tool when you are tired.
- CHECK FOR DAMAGED PARTS: Before each use, check the tool for any damage. Check bits and blades to make sure they are sharp and not chipped. Inspect screws and tighten any loose screws. Any part that is damaged should be properly repaired or replaced by an authorized service center unless indicated elsewhere in the instruction manual. Defective switches should be replaced by an authorized service center. Do not use the tool if the switch does not turn on and off or work properly.
- GUARD AGAINST ELECTRIC SHOCK: Prevent body contact with grounded surfaces such as: pipes, radiators, ranges, and refrigerators. Before drilling or cutting into walls, floors, or an area where “live” electrical wires may be present, always ensure that you will not encounter live wires to avoid electric shock.
SAFETY NOTES FOR BATTERY AND CHARGER
- CHARGE AT ROOM TEMPERATURE: Operating temperature must be higher than 32°F and lower than 122°F.
- DO NOT CHARGE IF THE CHARGER’S CORD OR PLUG IS DAMAGED: Charging with a damaged cord may results in fire or electrical shock. If the charger is damaged in any way, have it repaired by an authorized service center.
- DO NOT CAUSE SHORT CIRCUITS IN YOUR BATTERY: If connection is made between the positive (+) and negative (-) terminal directly or via accidental contact with metallic objects, the battery will short circuit and an intense current will flow causing heat generation which may lead to causing rupture or fire.
- NEVER ATTEMPT TO OPEN BATTERY FOR ANY REASON.WARNING: The warnings, cautions, and instructions detailed in this manual cannot cover all possible conditions and situations that occur. Please use common sense and caution when operating this tool.
SPECIFICATIONS
- Voltage: 24V Max
- NO Load Speed: 0-2500 RPM
- Impact Frequency: 0-3500 IPM
- Chuck Size: 1/4″
- Chuck Type: Quick Release Collect
- Max Torque: 180Nm (1590 in-lbs.)
- Battery Type: Li-ion
- Charging Time: 1-2 Hours
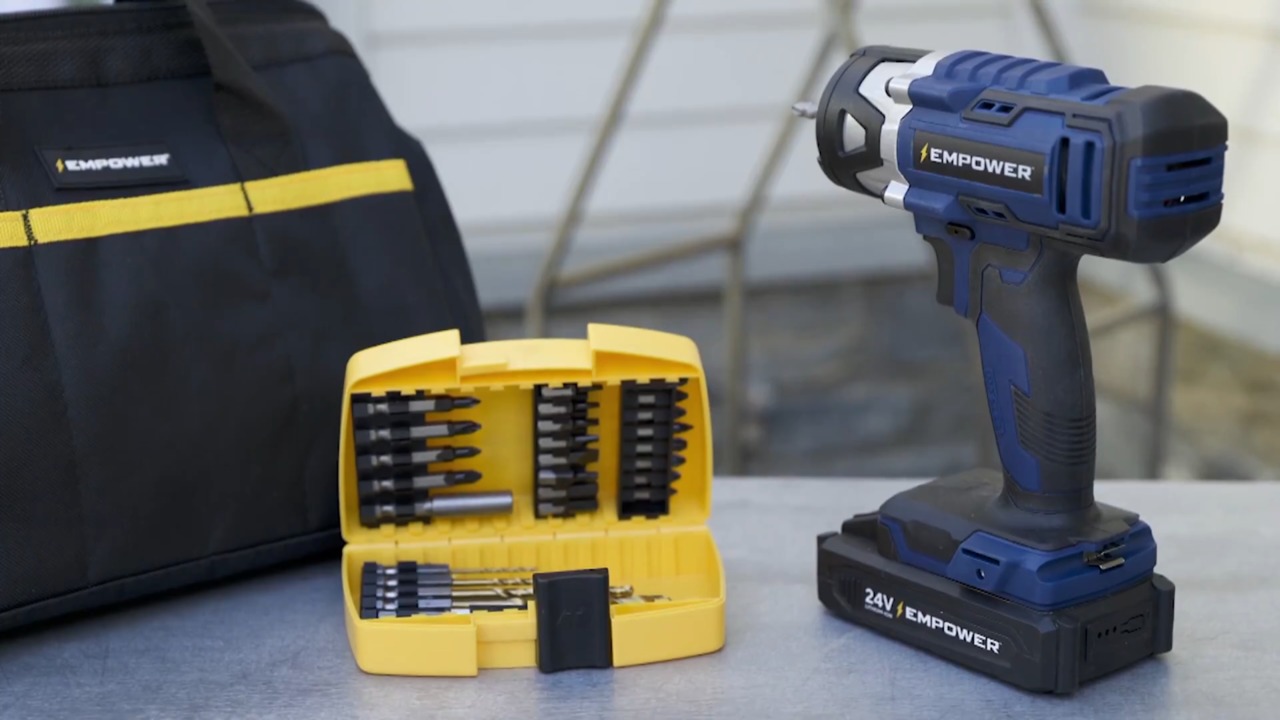
PACKAGE CONTENT
- 1 pc 24V Cordless impact driver
- 1 pc 24V Lithium-ion battery(2000mAh)
- 1 pc Charger
- 1 pc Double-end driver bit
- 1 pc Metal Belt Hook
- 1 pc Canvas bag
- 1 pc Drill/Driver Bits Set(26pcs)
- 1 pc Instruction manual
FUNCTION DESCRIPTION
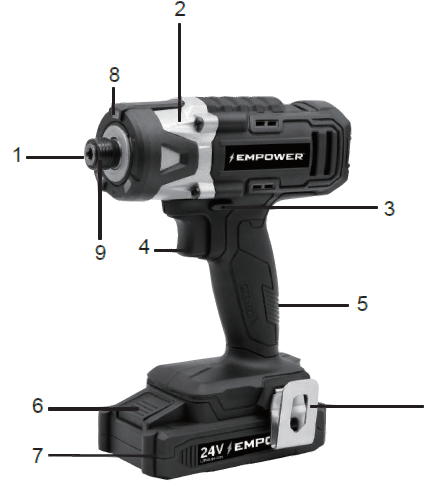
- Chuck Sleeve
- Metal Gear Housing
- Direction Button (Forward / Self-lock /Reverse)
- Variable Speed Trigger Switch
- Rubber Handle
- Battery Release Button
- Battery Pack
- LED Light
- 1/4” Fast Load Chuck
- Metal Belt Hook
ASSEMBLY
TO INSTALL/ REMOVE BATTERY PACK (SEE FIG.1) 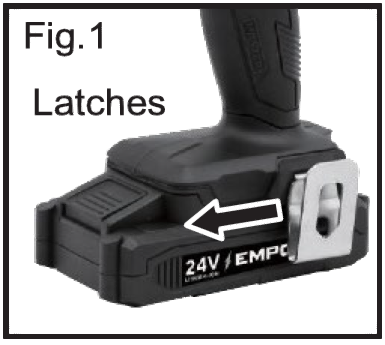
- To Install: Place the battery pack in the tool. Align the rib on the battery pack with groove in the battery port. Make sure the latches on the battery pack snap in place and that the battery pack is secured in the tool before beginning operation.
- To Remove: Press the battery release button in the front of the battery pack to release the battery pack and remove it from the tool.
TO INSTALL/REMOVE METAL BELT HOOK (SEE FIG.2)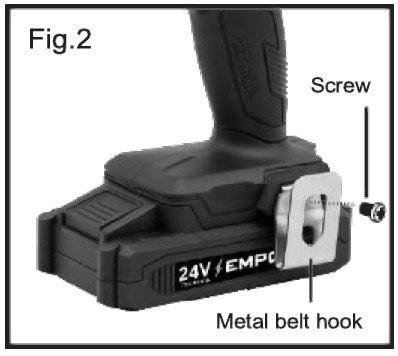 Attach metal belt hook to Handle using supplied Screw: Clockwise is to tighten.Counterclockwise is to loosen. Metal belt hook should be attached as shown using the provided screw.
OPERATING PROCEDURES
BATTERY PACK
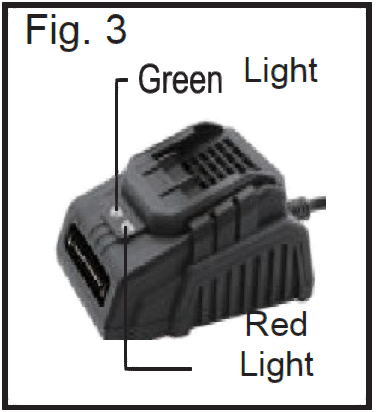
- The green light is the power indicator. When the charger is connected to AC household current, the green light is on. (Fig.3)
- When the battery is properly inserted into the charger and charging, the red light is on. When the battery is properly full charged, the red light will turn off and the green light is on.
- Normal charging time is 1 to 2 hours. After the charging is completed, remove the battery pack from the charging stand immediately.
- When charging more than one battery pack, allow 15 minutes between charges.
- After many charge/discharge cycles, your battery may lose its ability to hold a charge. It should then be replaced. Dispose of batteries at an appropriate waste disposal facility. Do not throw batteries away in common trash receptacles
WARNING: When the machine is obstructed, please turn off the switch right away and check if the work piece is right. An obstruction may cause the machine motor to be burn out.
REMEMBER: This tool is cordless and does not need to be connected to a power supply.CAUTION: Do not expose either the tool or charger to the rain or water. It is best not to overcharge the battery as this may damage the battery. If the battery power is low, stop working and recharge the battery pack. To prolong the using life of the tool, do not work continually for more than 20 minutes at a time.
APPLICATION
- If the tool shows signs of decreased power, stop, and recharge the battery. Do not use the tool to do heavy work when battery is not fully charged as it may drain the battery very quickly and can cause damage to battery.
- Use the variable speed only for starting.
- Allow the tool to come up to full speed.
- When you hear the sound of the impacts, stop after three or four times. The fastener is tight.
OPERATING PROCEDURES
INSTALLING/REMOVING BITSThe 1/4” fast load chuck provides fast, easy one-handed bit loading and ejecting.To install bits:
- Lock, forward / self-lock / reverse switch on the tool by placing the direction of rotation selector in self-lock (middle) position. Remove battery pack. Pull the chuck sleeve away from the driver.
- Push the bit into the chuck, release the chuck sleeve to lock bit into place.
- Pull on the bit to make sure it is secured in the chuck. It’s normal to have a small gap for bit installation.
NOTE: Use only quick connect bits with a locking groove. \
To remove bits:
- Lock the trigger by placing the rotation selector in the self-lock position. Remove the battery pack from the impact driver.
- With the nose of the tool pointed away from you, pull the chuck sleeve away from the driver. Remove the bit from the chuck.
CAUTION: The impact driver is not designed to be used as a drill.
DRIVING OR REMOVING SCREWS :
- Place the direction of rotation selector in the correct position for the operation.
- Hold the impact driver with one hand.
- Place the bit on the screw head and slowly depress the switch trigger. Start the bit slowly for more control.NOTE: The LED work light will illuminate as the trigger is depressed. As the screw is driven, impacting will begin.
WARNING: Do not drive a screw where there is likelihood of wiring behind the surface. Contact with a “live” wire will make exposed metal parts of the tool “live” and shock the operator.
VARIABLE SPEED
You can vary the spindle rotation speed by changing the pressure on the trigger.ROTATION DIRECTION (SEE FIG.4)
- Your tool is equipped with a 3-position switch (forward / self-lock / reverse) through the housing above the trigger.
- When the knob is pushed toward the right, the rotation is forward (clockwise).
- When pushed from right to left, the rotation is reversed (counterclockwise).
- When in center self-lock position, it is locked into stop and the trigger is locked.
- Do not push the rotation direction knob until the drive stops turning.
LED WORKING LIGHT
- The impact driver has 3 LED lights to illuminate the work area and improve vision when working in areas with insufficient light.
- The LED light will be turned on or off accompanied by situation of the trigger switch.
MAINTENANCE
- Keep the tool clean by using a soft damp (not wet) cloth. Do not use solvents on the plastic parts.
- Lubrication is not necessary. After long-term use, find an authorized service center to maintain and lubricate the tool.
- To maintain the best performance of your rechargeable battery, protect it from overheating and overcharging. Occasionally charger the battery for 6 hours. The battery may also benefit from a full discharge from time to time.
COMPONENT LIST
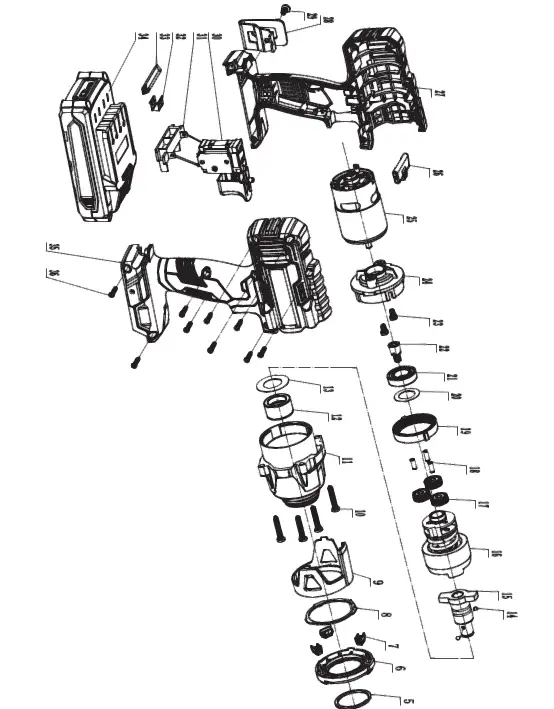
| No. | Description | Qty. | No. | Description | Qty. |
| 1 | C-Circlip | 1 | 19 | Big gear ring | 1 |
| 2 | Quick change sleeve ring | 1 | 20 | Washer | 1 |
| 3 | Quick change sleeve | 1 | 21 | 6902Z Bearing | 1 |
| 4 | Quick change sleeve spring | 1 | 22 | Motor gear | 1 |
| 5 | Shaft Circlip | 1 | 23 | Screw | 2 |
| 6 | LED bracket plate | 1 | 24 | Motor connecting piece | 1 |
| 7 | LED transparent cover | 3 | 25 | 755#Motor | 1 |
| 8 | LED Light | 1 | 26 | Forward / Reverse switch | 1 |
| 9 | LED bracket | 1 | 27 | Left housing | 1 |
| 10 | Screw | 4 | 28 | Metal Belt Hook | 1 |
| 11 | Gear box | 1 | 29 | Screw | 2 |
| 12 | Spindle sleeve | 1 | 30 | Switch | 1 |
| 13 | Washer#2 | 1 | 31 | Battery clip assembly | 1 |
| 14 | ∅3.5mm Steel ball | 1 | 32 | Driver bit support | 1 |
| 15 | Main spindle | 1 | 33 | Driver bit | 1 |
| 16 | Impact block | 1 | 34 | Battery | 1 |
| 17 | Planet gear | 3 | 35 | Left housing | 1 |
| 18 | Pin | 3 | 36 | Screw | 9 |
EXPLODED VIEW
This Empower limited three year warranty is subject to the following terms:
What Is CoveredYour product is warranted against original defects in material and workmanship for a period of three years from the date of purchase, when used for private household purposes in accordance with the owner’s manual. This warranty provides, at no extra cost to you, all labor and parts to place your product in proper operating condition during the warranty period.
What Is Not CoveredQVC, Inc. shall not be liable for costs incurred as a result of:
- Use of parts not in accordance with the owner’s manual.
- Careless operation or handling, misuse, abuse and/or lack of maintenance or use not in accordance with the owner’s manual.
- External sources such as weather.
- Repairs or alterations carried out by unauthorized parties or agents.
- Use of the product other than for normal domestic purposes within the United States, e.g., for commercial or rental purposes.
Warranty Service
- Service under this warranty will not extend the period of this warranty.
- If your product is not functioning properly, please call QVC Customer Service at 1-800-367-9444.
Warranty Limitations and Exclusions
- Any implied warranties relating to your product, including but not limited to warranty of merchantability or warranty of fitness for a particular purpose, are limited to the duration of this warranty. This limitation is not allowed by some states and so this limitation may not apply to you.
- Your remedy for breach of this warranty is limited to the warranty service described above. QVC, Inc. will not be liable for any consequential damages or incidental damages you may incur in connection with your purchase and use of this product. This limitation is not allowed by some states and so this limitation may not apply to you.
- This warranty gives you specific legal rights. You may also have other rights which vary by state.
- This warranty is not transferable.
QVC Inc.1200 Wilson Drive West Chester, PA 19380 1-800-367-9444
 report this ad
![]()
References
[xyz-ips snippet=”download-snippet”]