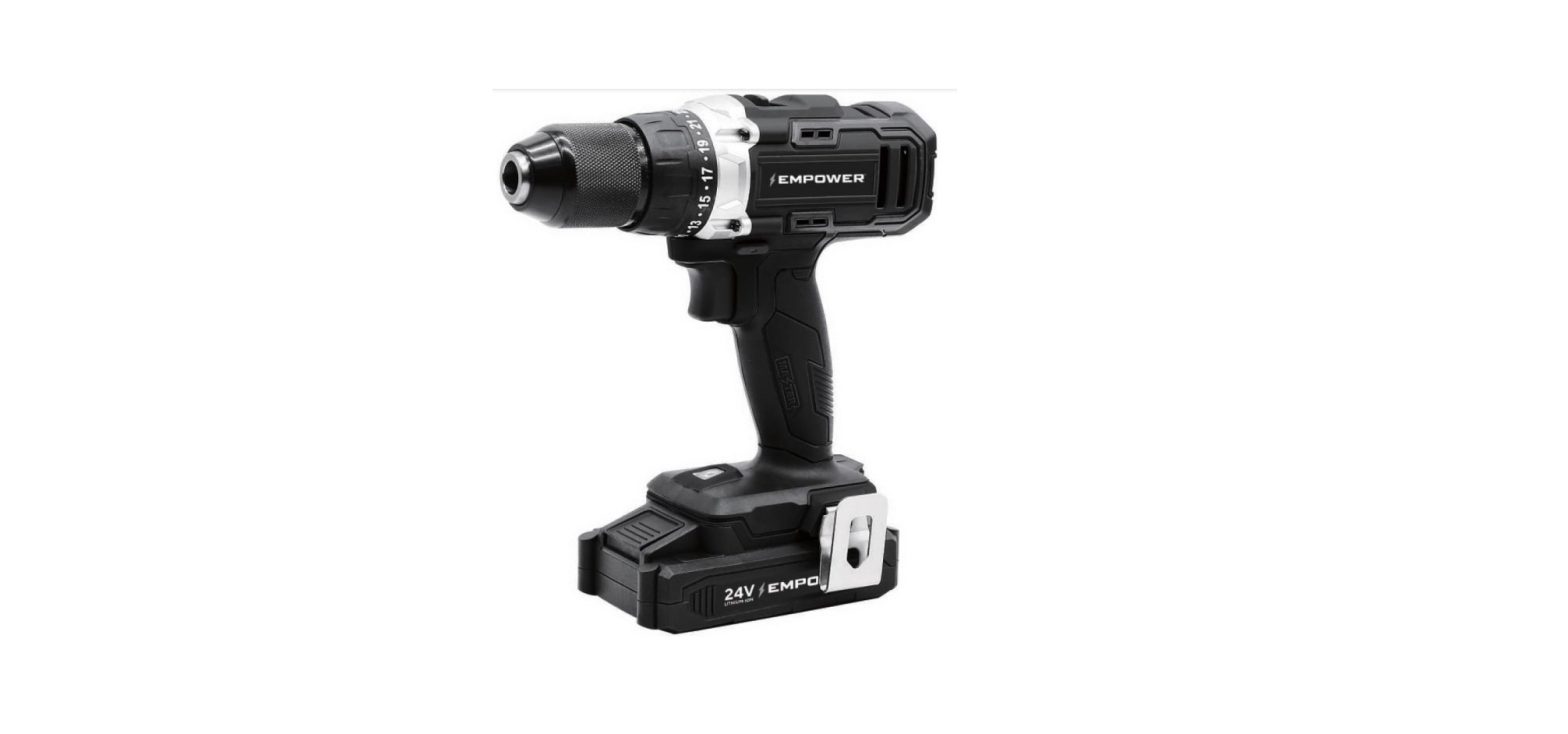
EMPOWER CD334 1/2″ 24V Max Cordless Drill Instruction Manual
SAVE THIS MANUALYou will need this manual for safety instructions, operating procedures, and warranty. Put this manual and the original sales receipt in a safe dry place for future reference.
![]() WARNING! Read and understand all instructions. Failure to follow all instructions listed below may result in serious personal injury.
WARNING! Read and understand all instructions. Failure to follow all instructions listed below may result in serious personal injury.
![]()
![]()
![]()
![]()
![]()
![]()
![]()
![]()
![]()
CALIFORNIA PROP 65![]()
![]()
![]()
![]()
![]()
![]()
![]()
![]()
![]()
- Lead from lead-based paints.
- Crystalline silica from bricks and cement and other masonry products, and arsenic and chromium from chemically-treated lumber.Your risk from these exposures varies, depending on how often you do this type of work.To reduce your exposure to these chemicals, work in a well ventilated area with approved safety equipment, such as those dust masks that are specially designed to filter out microscopic particles.For more information go to www.P65WARNINGs.ca.gov.
IMPORTANT SAFETY INSTRUCTIONS
WORK AREA
- Keep your work area clean and well lit. Cluttered benches and dark areas invite accidents.
- Do not operate power tools in explosive atmospheres, such as in the presence of flammable liquids, gases, or dust. Power tools create sparks which may ignite the dust or fumes.
- Keep bystanders, children, and visitors away while operating a power tool.Distractions can cause you to lose control. Protect others in the work area from debris such as chips and sparks. Provide barriers or shields as needed. ELECTRICALSAFETY
- Double Insulated tools are equipped with a polarized plug. This power plug will fit in a polarized outlet only one way. If the plug does not fit fully in the outlet, reverse the plug. If it still does not fit, contact a qualified electrician to install a polarized outlet. Do not change the plug in any way. Double Insulation eliminates the need for the three wire grounded power cord and grounded power supply system.
- Avoid body contact with grounded surfaces such as pipes, radiators, ranges, and refrigerators. There is an increased risk of electric shock if your body is grounded.
- Do not expose power tools to rain or wet conditions. Water entering a power tool will increase the risk of electric shock.
- Handle the cord carefully. Never use the cord to carry the tools or pull the plug from an outlet. Keep cord away from heat, oil, sharp edges or moving parts. Replace damaged cords immediately. Damaged cords increase the risk of electric shock.
- When operating a power tool outside, use outdoor extensions cord marked “W-A” or “W”. These cords are rated for outdoor use and reduce the risk of electric shock.PERSONAL SAFETY
- Stay alert, watch what you are doing, and use common sense when operating a power tool. Do not use tool while tired or under the influence of drugs, alcohol, or medication.A moment of inattention while operating power tools may result in serious personal injury.
- Dress properly. Do not wear loose clothing or jewelry. Tie back long hair. Keep your hair, clothing, and gloves away from moving parts. Loose clothes, jewelry, or long hair can be caught in moving
- Avoid accidental starting. Be sure switch is off before plugging in. Carrying tools with your finger on the switch or plugging in tools with the switch on invites accidents.
- Remove adjusting keys before turning the tool on. A wrench or a key that is left attached to a rotating part of the tool may result in personal injury.
- Do not overreach. Always keep proper footing and balance. Proper footing and balance enables better control of the tool in unexpected situations.
- Use safety equipment. Always wear eye protection. Dust mask, non-skid safety shoes, hard hat, or hearing protection must be used for appropriate conditions.POWER TOOL USE AND CARE
- Use clamps or other practical way to secure and support the work piece to a stable platform. Holding the work by hand or against your body is unstable and may lead to loss of control.
- Do not force tool. Use the correct tool for your application. The correct tool will do the job better and safer at the rate for which it is designed.
- Do not use tool if switch does not turn it on or off. Any tool that cannot be controlled with the switch is dangerous and must be repaired.
- Disconnect the plug from the power source before making any adjustments, changing accessories, or storing the tool. Such preventive safety measures reduce the risk of starting the tool accidentally.
- Store idle tools out of reach of children and other untrained persons. Tools are dangerous in the hands of untrained users.
- Maintain tools with care. Keep accessories sharp and clean. Properly maintained tools with sharp cutting edges are less likely to bind and are easier to control. Do not use a damaged tool. Tag damaged tools “Do not use” until repaired.
- Check for misalignment or binding of moving parts, breakage of parts, and any other condition that may affect the tool’s operation. If damaged, have the tool serviced before using. Many accidents are caused by poorly maintained tools.
- Use only accessories that are recommended by the manufacturer for your model.Accessories that may be suitable for one tool may become hazardous when used on another tool.BATTERY TOOL USE AND CARE
- Ensure the switch is in the off position before inserting the battery pack.Inserting the battery pack into power tools that have the switch on may cause an accident.
- Recharge only with the charger specified by the manufacturer. A charger that is suitable for one type of battery pack may create a risk of fire when used with another battery pack.
- Use power tools only with specifically designed battery packs. Use of any other battery packs may create a risk of injury or fire.
- When battery pack is not in use, keep it away from other metal objects like paper clips, coins, keys, nails, screws, or other small metal objects that can make a connection from one terminal to another. Shorting the terminals together may cause burns or a fire.
- Do not use the tool in wet or damp conditions.
- Always keep the work area free of tripping hazards.
- When using the tool, always ensure you are wearing protective safety equipment including safety glasses/goggles, ear plugs, dust mask and other protective clothing including gloves and apron.
- Under abusive conditions, liquid may be ejected from the battery; avoid contact. If contact accidentally occurs, flush with water. If liquid contacts eyes, additionally seek medical help. Liquid ejected from the battery may cause irritation or burns.SERVICE
- Tool service must be performed only by qualified repair personnel. Service or maintenance performed by unqualified personnel could result in a risk of injury.
- When servicing a tool, use only identical replacement parts. Follow instructions in the Maintenance section of this manual. Use of unauthorized parts or failure to follow Maintenance instructions may create a risk of electric shock or injury.
SAFETY INSTRUCTIONS FOR CORDLESS DRILL/DRIVER
- Always wear safety goggles or eye protection when using this tool. Use a dust mask or respirator for applications which generate dust.
- Do not grasp the tool or place your hands too close to the spinning chuck or drill bit.Your hand may be lacerated or may cause injury.
- Secure the material being worked on. Never hold it in your hand or across your legs.Unstable support can cause loss of control and injury.
- Position yourself to avoid being caught between the tool or side handle and walls or posts. Should the socket or bit become bound in the work, the reaction torque of the tool could crush your hand or leg.
- Check to see that keys and adjusting wrenches are removed from the Cordless Drill before switching the tool “ON”. Keys or wrenches can fly away at high velocity striking you or a bystander.
- When using the Cordless Drill, always maintain a firm grip on the tool with both hands.
- Hold tool by insulated gripping surfaces when performing an operation where the cutting tool may contact hidden wiring. Contact with a “live” wire will also make exposed metal parts of the tool “live” and shock the operator.
- Keep the handle of the Cordless Drill dry, clean, and free from oil and grease.
- Do not run the Cordless Drill while carrying it at your side. A spinning socket or bit could become entangled with clothing and injury may result.
- Disconnect the plug or remove the battery pack from tool and place the switch in the locked or “OFF” position before making any assembly adjustments, changing accessories, performing any inspection, maintenance, or cleaning procedures. Such preventive safety measures reduce the risk of starting the tool accidentally.
- Do not use the Cordless Drill if it has been damaged, left outdoors in the rain, snow, wet or damp environments, or immersed in liquid.
SAFETY INSTRUCTIONS FOR BATTERIES AND CHARGER
BATTERY
- Never attempt to open or modify battery for any reason. Released electrolyte is corrosive and may cause damage to eyes and skin. It may be toxic if swallowed.
- Under extreme conditions, battery leakage may occur. When you notice liquid on the battery, proceed as follows:
- Carefully wipe the liquid off using a cloth. Avoid skin contact.
- In case of skin or eye contact, follow the instructions below.
- The battery fluid, a 25-30% solution of potassium hydroxide, can be harmful.In case of skin contact, immediately rinse with water. Neutralize with a mild acid such as lemon juice or vinegar. In case of eye contact, rinse abundantly with clean water for at least 10 minutes.
- Do not expose to water.
- Do not store in locations where the temperature may exceed 104°F.
- Charge at room temperature: 32°F-113°F. It is normal for the battery charger to hum and be warm but not hot during operation.
- Charge only using the charger provided with the tool.
- Before charging, make sure that the battery is dry and clean.
- Use only the battery supplied with your tool.
- Exercise care in handling and storing batteries in order not to short them with conductive materials such as rings, keys, coins. There is a real risk of the battery or the conductor overheating which can cause fire or burns.
- Do not dispose of battery in fire. It may explode. Follow instructions and regulations given by local authorities concerning environmental protection.Dispose of old batteries at an appropriate waste disposal facility.
CHARGER
- Use your charger only to charge batteries supplied with your tool. Other batteries could burst, causing personal injury and damage.
- Never attempt to charge a non-rechargeable battery.
- Have defective cords replaced immediately.
- Do not expose to water.
- Do not open the charger.
- Indoor use only. Do not recharge the battery in rain or in wet condition
SPECIFICATIONS
- Voltage: 24V Max
- NO Load Speed: 0-350/0-1350RPM
- Chuck Size: 1/2″
- Chuck Type: Single Sleeve
- Max Torque: 350in-lbs (40N.m)
- Torque Setting: 23+1
- Battery Type: Li-ion
- Charging Time: 1-2Hours
- Mode Select: DrillingDriving
- Built-in LED Work LightIncludes:
- 1 pc 24V Cordless Drill
- 1 pc 24V Lithium-ion battery(2000mAh)
- 1 pc Charger
- 1 pc Double-end driver bit
- 1 pc Metal Belt Hook
- 1 pc Instruction manual
FUNCTIONAL DESCRIPTION
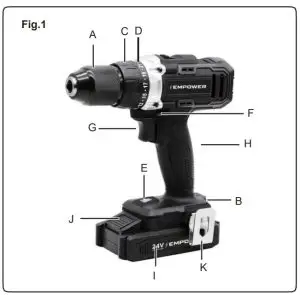

- 1/2” (13 mm) chuck
- Double-end driver bit storage
- Torque regulation ring
- Torque indicator scale
- LED work light
- Forward /self-lock/ reverse switch
- Variable speed trigger with electric brake
- Rubber-covered handle
- 24V Lithium-ion battery
- Battery lock button
- Metal belt hook
ASSEMBLY
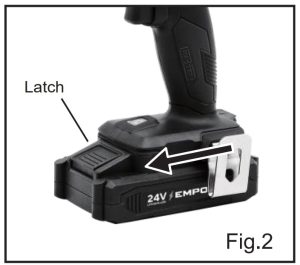

TO INSTALL/REMOVE BATTERY PACK (SEE FIG.2)To install:Place the battery pack in the tool. Align the rib on the battery pack with groove in the battery port. Make sure the latches on the battery pack snap in place and that the battery pack is secured in the tool before beginning operation.To remove:Press the battery lock button in the front of the battery pack to release the battery pack and remove it from the tool.
TO INSTALL/REMOVE METAL BELT HOOK (SEE FIG.3)

OPERATION
BATTERY PACK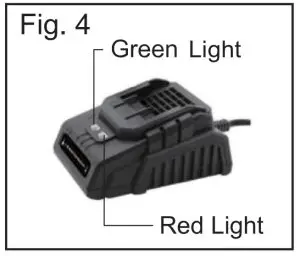

- The green light is the power indicator. When the charger is connected to AChousehold current, the green light is on.(Fig.4)
- When the battery is properly inserted into the charger and charging, the red light is on.
- When the battery is properly full charged, the red light will turn off and the green light is on.
- Normal charging time is 1 to 2 hours. After the charging is completed, remove the battery pack from the charging stand immediately.
- When charging more than one battery pack, allow 15 minutes between charges.
- After many charge/discharge cycles, your battery will lose its ability to hold a charge. It should then be replaced. Dispose of batteries at an appropriate waste disposal facility. Do not throw batteries away in common trash receptacles
![]()
![]()
![]()
![]()
![]()
![]()
![]()
![]()
![]()
REMEMBER: This tool is cordless and does not need to be connected to a power supply.
CAUTION: Do not expose either the tool or charger to the rain or water.It is best not to overcharge the battery as this may damage the battery.If the battery power is low, stop working and recharge the battery pack.To prolong the using life of the tool, do not work continually for more than 20 minutes at a time.
TORQUE REGULATOR

- When arrow on the top of the housing points to 1 on the Torque indicator scale (D in the functional description), torque is at minimum before the clutch disengages the chuck from the drive.
- When indicator is just past 23, output is at maximum before it is disengaged.This is useful in driving screws into different types of material.
- More torque will set a screw deeper into material, less torque will prevent it from stripping. Larger screws require more torque to drive than smaller ones. A little trial and error can show you which is the optimum setting for the situation.
- Release the trigger when the clicking sound indicates the chuck will not turn further.
- For drilling, always use the drill setting, indicated by the pictogram of a drill bit. At this setting, the drive does not disengage from the chuck.
MASONRY DRILLINGFor maximum performance, use carbide-tipped masonry impact bits or designated hammer drill bits when drilling holes in brick, tile, concrete, etc. Select hammer mode
- Apply light pressure at medium speed for best results in brick.
- Apply additional pressure for hard materials such as concrete.
- When drilling holes in tile, practice on a scrap piece to determine the best speed and pressure. Begin drilling at a very low speed to prevent the bit from slipping off the starting point.
KEYLESS CHUCK
- Center the rotation direction knob to prevent the motor accidentally starting.
- Note there are two rings on the chuck. Turning the endmost knurled ring, the chuck tightening ring of the chuck (A in Fig 6) clockwise by hand while with the hand, holding the second chuck stop ring (C in Fig 6) to prevent the motorturning; this closes the jaws of the chuck.


- Turning that same chuck tightening ring counterclockwise opens the jaws.Open the jaws to insert a bit and then close the jaws so they clamp the bitti ghtly.
FORWARD/REVERSING LEVER & TRIGGER LOCK
![]()
![]()
![]()
![]()
![]()
![]()
![]()
![]()
![]()
For forward rotation, (with chuck pointed away from you) move the lever to the far left.For reverse rotation move the lever to the far right. To activate trigger lock move lever to the center self-lock position.

![]()
![]()
![]()
![]()
![]()
![]()
![]()
![]()
![]()
MAINTENANCE
- Keep the tool clean using a soft damp (not wet) cloth. Do not use solvents on the plastic parts.
- Lubrication is not necessary. After long use, have an authorized service center maintain and lubricate the tool.
- Should the chuck require replacemen
- Remove the battery pack
- Open the chuck jaws as widely as possible so you can get at the chuck retaining screw.
- Unscrew the chuck retaining screw with a Philips screwdriver. Note that this is a left-hand threaded screw and you remove it by turning it clockwise.
- Clamp the shorter arm of a large Allen wrench in the chuck, aligning it with about 1/2″ (13 mm) above that surface. Or press the drill body on the working table and place the chuck over the edge of the table. (Be careful with your hand!)Strike the long arm of the wrench with a hammer so that the chuck turns counterclockwise and unscrews from the spindle. This may require a fairly sharp blow.Repeat the process in reverse to install a new chuck.We recommend that this is done by a certified professional.
- To maintain the best performance of your rechargeable battery, protect it from overheating, both from overcharging and during storage. Occasionally charge the battery for 7 hours
PARTS LIST
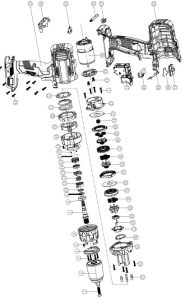
| No. | Description | Qty. | No. | Description | Qty. |
| 1 | Screw | 1 | 30 | 3 Class planet support | 1 |
| 2 | Chuck | 1 | 31 | 3 Class planet gear | 5 |
| 3 | Screw | 8 | 32 | 3 Class gear ring | 1 |
| 4 | Plate | 1 | 33 | Washer 02 | 1 |
| 5 | Sounder | 2 | 34 | Compensating gear | 1 |
| 6 | Torque setting ring | 1 | 35 | 2 Class planet support | 1 |
| 7 | Shaft | 1 | 36 | 2 Class planet gear | 5 |
| 8 | Bearing | 1 | 37 | 2 Class gear ring | 1 |
| 9 | Washer 01 | 1 | 38 | 1 Class planet support | 1 |
| 10 | Steel ball | 19 | 39 | 1 Class planet gear | 3 |
| 11 | Knob | 1 | 40 | 1 Class gear ring | 1 |
| 12 | Impact spring | 1 | 41 | Motor gear | 1 |
| 13 | Impact disc | 1 | 42 | Washer 03 | 1 |
| 14 | Moving gear disc | 1 | 43 | Rear gear box | 1 |
| 15 | Fixed gear disc | 1 | 44 | Screw | 2 |
| 16 | Spring | 1 | 45 | Motor connecting piece | 1 |
| 17 | Screw | 1 | 46 | Motor | 1 |
| 18 | Impact button sleeve | 1 | 47 | Switch | 1 |
| 19 | Thread ring | 1 | 48 | Forward / Reverse switch | 1 |
| 20 | Impact flange | 1 | 49 | Steel wire | 1 |
| 21 | Torque spring | 1 | 50 | Steel wire | 1 |
| 22 | Torque washer | 1 | 51 | Button | 1 |
| 23 | Pin | 6 | 52 | Left housing | 1 |
| 24 | Screw | 13 | 53 | Driver bit support | 1 |
| 25 | Front gear box | 1 | 54 | Driver bit | 1 |
| 26 | Shaft spring washer | 1 | 55 | LED transparent cover | 1 |
| 27 | Locking ring | 1 | 56 | Battery clip assembly | 1 |
| 28 | Pin | 2 | 57 | Right housing | 1 |
| 29 | Powder metallurgy plate | 1 |
![]()
![]()
![]()
![]()
![]()
![]()
![]()
![]()
![]()
![]()
![]()
![]()
![]()
![]()
![]()
![]()
![]()
![]()
SCHEMATIC DRAWING

This Empower limited three year warranty is subject to the following terms:
What Is CoveredYour product is warranted against original defects in material and workmanship for a period of three years from the date of purchase, when used for private household purposes in accordance with the owner’s manual. This warranty provides, at no extra cost to you, all labor and parts to place your product in proper operating condition during the warranty period.
What Is Not CoveredQVC, Inc. shall not be liable for costs incurred as a result of:
- Use of parts not in accordance with the owner’s manual.• Careless operation or handling, misuse, abuse and/or lack of maintenance or use not in accordance with the owner’s manual.
- External sources such as weather.
- Repairs or alterations carried out by unauthorized parties or agents.
- Use of the product other than for normal domestic purposes within the United States, e.g., for commercial or rental purposes.
Warranty Service
- Service under this warranty will not extend the period of this warranty.
- If your product is not functioning properly, please call QVC Customer Service at 1-800-367- 9444.
Warranty Limitations and Exclusions
- Any implied warranties relating to your product, including but not limited to warranty of merchantability or warranty of fitness for a particular purpose, are limited to the duration of this warranty. This limitation is not allowed by some states and so this limitation may not apply to you.
- Your remedy for breach of this warranty is limited to the warranty service described above.QVC, Inc. will not be liable for any consequential damages or incidental damages you may incur in connection with your purchase and use of this product. This limitation is not allowed by some states and so this limitation may not apply to you.
- This warranty gives you specific legal rights. You may also have other rights which vary by state.
- This warranty is not transferable.
QVC Inc.1200 Wilson DriveWest Chester, PA 193801-800-367-9444


References
[xyz-ips snippet=”download-snippet”]

