

5″ 24V MAX CORDLESS ORBITAL SANDERMODEL: COS326Instruction Manual

SAVE THIS MANUALYou will need this manual for safety instructions, operating procedures, and warranty. Put this manual and the original sales receipt in a safe dry place for future reference.
![]() WARNING! Read and understand all instructions. Failure to follow all instructions listed below may result in serious personal injury.
WARNING! Read and understand all instructions. Failure to follow all instructions listed below may result in serious personal injury.
![]() WARNING! When using electric tools, machines, or equipment, basic safety precautions should always be followed to reduce the risk of fire, electric shock, and personal injury. Completely read the manual before proceeding to use this tool. KEEP THESE INSTRUCTIONS.
WARNING! When using electric tools, machines, or equipment, basic safety precautions should always be followed to reduce the risk of fire, electric shock, and personal injury. Completely read the manual before proceeding to use this tool. KEEP THESE INSTRUCTIONS.
CALIFORNIA PROP 65![]() WARNING: Some dust created by power sanding, sawing, grinding, drilling and other construction activities contains chemicals known to the state of California to cause cancer, birth defects, or other reproductive harm. Some examples of these chemicals are:
WARNING: Some dust created by power sanding, sawing, grinding, drilling and other construction activities contains chemicals known to the state of California to cause cancer, birth defects, or other reproductive harm. Some examples of these chemicals are:
- Lead from lead-based paints.
- Crystalline silica from bricks and cement and other masonry products, and arsenic and chromium from chemically treated lumber.Your risk from these exposures varies, depending on how often you do this type of work. To reduce your exposure to these chemicals, work in a well-ventilated area with approved safety equipment, such as those dust masks that are specially designed to filter out microscopic particles. For more information go to www.P65WARNINGs.ca.gov.
IMPORTANT SAFETY INSTRUCTIONS
WORK AREA
- Keep your work area clean and well-lit. Cluttered benches and dark areas invite accidents.
- Do not operate power tools in explosive atmospheres, such as in the presence of flammable liquids, gases, or dust. Power tools create sparks that may ignite dust or fumes.
- Keep bystanders, children, and visitors away while operating a power tool.
- Distractions can cause you to lose control. Protect others in the work area from debris such as chips and sparks. Provide barriers or shields as needed.
ELECTRICAL SAFETY
- Double Insulated tools are equipped with a polarized plug. This power plug will fit in a polarized outlet only one way. If the plug does not fit fully in the outlet, reverse the plug. If it still does not fit, contact a qualified electrician to install a polarized outlet. Do not change the plugin anyway. Double Insulation eliminates the need for the three-wire grounded power cord and grounded power supply system.
- Avoid body contact with grounded surfaces such as pipes, radiators, ranges, and refrigerators. There is an increased risk of electric shock if your body is grounded.
- Do not expose power tools to rain or wet conditions. Water entering a power tool will increase the risk of electric shock.
- Handle the cord carefully. Never use the cord to carry the tools or pull the plug from an outlet. Keep cord away from heat, oil, sharp edges, or moving parts. Replace damaged cords immediately with a qualified professional. Damaged cords increase the risk of electric shock.
- When operating a power tool outside, use an outdoor extensions cord marked “W-A” or “W”. These cords are rated for outdoor use and reduce the risk of electric shock.
PERSONAL SAFETY
- Stay alert, watch what you are doing, and use common sense when operating a power tool. Do not use tools while tired or under the influence of drugs, alcohol, or medication. A moment of inattentiveness while operating power tools may result in serious personal injury.
- Dress properly. Do not wear loose clothing or jewelry. Pull long hair up and away from the face. Keep your hair, clothing, and gloves away from moving parts. Loose clothes, jewelry, or long hair can be caught in moving parts.
- Avoid accidental starting. Be sure the switch is off before plugging in. Carrying tools with your finger on the switch or plugging in tools with the switch ON invites accidents.
- Remove adjusting keys before turning the tool on. A wrench or a key that is left attached to a rotating part of the tool may result in personal injury.
- Do not overreach. Keep proper footing and balance at all times. Proper footing and balance enable better control of the tool in unexpected situations.
- Use safety equipment. Always wear eye protection. Dust masks, non-skid safety shoes, hard hats, or hearing protection should be used for appropriate conditions.POWER TOOL USE AND CARE
- Use clamps or another practical way to secure and support the work piece to a stable platform. Holding the work by hand or against your body is unstable and may lead to loss of control.
- Do not force tool. Use the correct tool for your application. The correct tool will do the job better and safer at the rate for which it is designed.
- Do not use a tool if the switch does not turn it ON or OFF. Any tool that cannot be controlled with the switch is dangerous and must be repaired.
- Disconnect the plug from the power source before making any adjustments, changing accessories, or storing the tool. Such preventive safety measures reduce the risk of starting the tool accidentally.
- Store idle tools out of reach of children and other untrained persons. Tools are dangerous in the hands of untrained users.
- Maintain tools with care. Keep accessories sharp and clean. Properly maintained tools with sharp cutting edges are less likely to bind and are easier to control. Do not use a damaged tool. Tag damaged tools “Do Not Use” until repaired.
- Check for misalignment or binding of moving parts, breakage of parts, and any other condition that may affect the tool’s operation. If damaged, have the tool serviced before using. Many accidents are caused by poorly maintained tools.
- Use only accessories that are recommended by the manufacturer for your model. Accessories that may be suitable for one tool may become hazardous when used on another tool.
BATTERY TOOL USE AND CARE
- Ensure the switch is in the off position before inserting the battery pack. Inserting the battery pack into power tools that have the switch ON may cause an accident.
- Recharge only with the charger specified by the manufacturer. A charger that is suitable for one type of battery pack may create a risk of fire when used with another battery pack.
- Use power tools only with specifically designed battery packs. Use of any other battery packs may create a risk of injury or fire.
- When the battery pack is not in use, keep it away from other metal objects like paper clips, coins, keys, nails, screws, or other small metal objects that can make a connection from one terminal to another. Shorting the terminals together may cause burns or a fire.a. Do not use the tool in wet or damp conditions.b. Always keep the work area free of tripping hazards.c. When using the tool, always ensure you are wearing protective safety equipment including safety glasses/goggles, earplugs, damask, and other protective clothing including gloves and apron.
- Under abusive conditions, liquid may be ejected from the battery; avoid contact. If contact accidentally occurs, flush with water. If liquid contacts eyes, additionally seek medical help. Liquid ejected from the battery may cause irritation or burns.SERVICE
- Tool service must be performed only by qualified repair personnel. Service or maintenance performed by unqualified personnel could result in a risk of injury.
- When servicing a tool, use only identical replacement parts. Follow instructions in the Maintenance section of this manual. Use of unauthorized parts or failure to follow Maintenance Instructions may create a risk of electric shock or injury.
SAFETY INSTRUCTIONS FOR CORDLESS SANDER
- This power tool is intended to function as a sander. Read all safety warnings, instructions, illustrations, and specifications provided with this power tool. Failure to follow all instructions listed below may result in electric shock, fire, and/or serious injury.
- Operations such as grinding, wire brushing, polishing, or cutting off are not recommended to be performed with this power tool. Operations for which the power tool was not designed may create a hazard and cause personal injury.
- Do not use accessories which are not specifically designed and recommended by the tool manufacturer. Just because the accessory can be attached to your power tool, it does not assure safe operation.
- The rated speed of the accessory must be at least equal to the maximum speed marked on the power tool. Accessories running faster than their RATED SPEED can break and fly apart.
- The outside diameter and the thickness of your accessory must be within the capacity rating of your power tool. Incorrectly sized accessories cannot be adequately guarded or controlled.
- The arbor size of wheels, flanges, backing pads, or any other accessory must properly fit the spindle of the power tool. Accessories with arbor holes that do not match the mounting hardware of the power tool will run out of balance, vibrate excessively, and may cause loss of control.
- Do not use a damaged accessory. Before each use inspects the accessory such as abrasive wheels for chips and cracks, backing pad for cracks, tear, or excess wear, wire brush for loose or cracked wires. if a power tool or accessory is dropped, inspect for damage or install an undamaged accessory. After inspecting and installing an accessory, position yourself and bystanders away from the plane of the rotating accessory and run the power tool at maximum no-load speed for one minute. Damaged accessories will normally break apart during this test time.
- Wear personal protective equipment. Depending on the application, use a face shield, safety goggles, or safety glasses. as appropriate, wear a dust mask, hearing protectors, gloves, and workshop apron capable of stopping small abrasive or workpiece fragments. the eye protection must be capable of stopping flying debris generated by various operations. The eye protection must be capable of stopping flying debris generated by various operations. The dust mask or respirator must be capable of filtering out particles generated by your operation. Prolonged exposure to high-intensity noise may cause hearing loss.
- Keep bystanders a safe distance away from the work area. Anyone entering the work area must wear personal protective equipment. Fragments of workpiece or of a broken accessory may fly away and cause injury beyond the immediate area of operation.
- Hold power tool by insulated gripping surfaces only, when performing an operation where the accessory may contact hidden wiring or its own cord. An accessory contacting a ″live″ wire may make exposed metal parts of the power tool ″live″ and shock the operator.
- Never lay the power tool down until the accessory has come to a complete stop. The spinning accessory may grab the surface and pull the power tool out of your control.
- Do not run the power tool while carrying it at your side. Accidental contact with the spinning accessory could snag your clothing, pulling the accessory into your body.
- Regularly clean the power tool’s air vents. The motor’s fan will draw the dust inside the housing and excessive accumulation of powdered metal may cause electrical hazards.
- Do not operate the power tool near flammable materials. Sparks could ignite these materials.
- Do not use accessories that require liquid coolants. Using water or other liquid coolants may result in electrocution or shock.
- Maintain labels and nameplates on the tool. These carry important safety information.
- Avoid unintentional starting. Prepare to begin work before turning on the tool.
- Do not depress the spindle lock when starting or during operation.
- Do not leave the tool unattended when the Battery Pack is connected. Turn off the tool and remove the Battery Pack before leaving.
- Use clamps (not included) or other practical ways to secure and support the workpiece to a stable platform. Holding the work by hand or against your body is unstable and may lead to loss of control and personal injury.
- The battery charger gets hot during use. The charger’s heat can build up to unsafe levels and create a fire hazard if it does not receive adequate ventilation, due to an electrical fault, or if it is used in a hot environment. Do not place the charger on a flammable surface. Do not obstruct any vents on the charger. Especially avoid placing the charger on carpets and rugs; they are not only flammable, but they also obstruct vents under the charger.
- This product is not a toy. Keep it out of reach of children.
- People with pacemakers should consult their physician(s) before use. Electromagnetic fields in close proximity to the heart pacemakers could cause pacemaker interference or pacemaker failure.
- In addition, people with pacemakers should:
- Avoid operating alone.
- Do not use with the power switch locked on.
- Properly maintain and inspect to avoid electrical shock.
- Properly ground power cord. Ground Fault Circuit Interrupter
- (GFCI) should also be implemented–it prevents sustained electrical shock.
- The warnings, precautions, and instructions discussed in this instruction manual cannot cover all possible conditions and situations that may occur. It must be understood by the operator that common sense and caution are factors that cannot be built into this product but must be supplied by the operator.
SPECIFICATIONS
Voltage: 24V MaxNo Load Speed (Variable Speed): 7000-11000 RPMPad Size: 5 in.Switch Type: Dust ResistantBattery Type: Li-ionCharging Time: 1-2 Hours
Includes:1 pc 24V Cordless Orbital Sander1 pc 24V Lithium-ion battery(2000mAh)1 pc Charger1 pc Dust collection bag10 pcs Sanding paper1 pc Instruction manual
FUNCTIONAL DESCRIPTION
A. Speed control knobB. SwitchC. Battery lock buttonD. 24V Lithium-ion batteryE. Dust collection bagF. Dust outletG. Backing Pad

ASSEMBLY
- Push the Dust Collection Bag toward the Locking Tabs, rotate it counterclockwise until it snaps into place in the Tab Slots.
- The collection of the dust will only work if the sandpaper has holes that line up with the 8 dust collection holes in the Backing Pad. There are 4 other holes in the Backing Pad for the Screws that attach the Backing Pad to the Sander.
OPERATION
BATTERY AND CHARGER
- The green light is the power indicator. When the charger is connected to the AC household current, the green light is on.

- When the battery is properly inserted into the charger and charging, the red light is on. When the battery is properly fully charged, the red light will turn off and the green light is on. The normal charging time is 1 to 2 hours. After the charging is completed, remove the battery pack from the charging stand immediately.
- When charging more than one battery pack, allow 15 minutes between charges.
- After many charge/discharge cycles, your battery will lose its ability to hold a charge. It should then be replaced. Dispose of batteries at an appropriate waste disposal facility. Do not throw batteries away in common trash receptacles.

![]() WARNING: When the machine is obstructed, please turn off the switch right away and check if the workpiece is right. An obstruction may cause the machine motor to burn out.
WARNING: When the machine is obstructed, please turn off the switch right away and check if the workpiece is right. An obstruction may cause the machine motor to burn out.
REMEMBER: This tool is cordless and does not need to be connected to a power supply.CAUTION: Do not expose either the tool or charger to the rain or water. It is best not to overcharge the battery as this may damage the battery. If the battery power is low, stop working and recharge the battery pack. To prolong the using life of the tool, do not work continuously for more than 20 minutes at a time.
Setting and testing
![]() WARNING:TO PREVENT SERIOUS INJURY FROM ACCIDENTAL
WARNING:TO PREVENT SERIOUS INJURY FROM ACCIDENTAL
OPERATION:
Make sure that the Switch is in the off position and remove its Battery pack before performing any procedure in this section.
Attaching Sandpaper to the Backing pad
- The Sanding Disc is attached by Hook and Loop to the Backing Pad.
- Unplug the sander before attaching the Sanding Discs.
- Place the desired Sanding Disc on the Backing Pad, lining up the 8 holes so that the dust can be collected into the Dust Bag.
Workpiece and Work area Set up
- Designate a work area that is clean and well-lit.
- The work area must not allow access by children or pets to prevent distraction and injury.
- Secure loose workpieces using a vise or clamps (not included) to prevent movement while working.
- There must not be hazardous objects, such as utility lines or foreign objects, nearby that will present a hazard while working.
- You must use personal safety equipment including, but not limited to, ANSI-approved eye and hearing protection, as well as heavy-duty work gloves.
Sanding instructions
![]() WARNING:TO PREVENT SERIOUS INJURY: Grip the tool firmly in both hands.
WARNING:TO PREVENT SERIOUS INJURY: Grip the tool firmly in both hands.
Wipe the work surface clean of all dirt and debris, especially that of previous coarser sanding sessions, which will scratch the surface of a finer grit sanding session.
- Press the “O” on the Switch to place it in the off position, then attach the battery.
- To start, grip the tool firmly with both hands and press the “I” on the Switch. Press the “O” on the Switch to stop the tool.
- Wait until the tool has reached full speed, then gently contact the surface.
- Keep heavy pressure off the tool when operating. Allow the tool to do the work.
- Move the tool in a uniform pattern up and down or side to side while sanding to ensure even sanding.CAUTION! Empty the Dust Bag frequently and after use to prevent fire hazards.
- Periodically, press the “O” on the Switch to stop the tool and check for disc wear and empty Dust Bag. Replace worn Sanding Disc(s) as needed.
- TO PREVENT ACCIDENTS, AFTER USE:
Turn off the tool.
![]() WARNING: Allow the tool to come to a complete stop before setting it down. Procedures not specifically explained in this manual must be performed only by a qualified technician.
WARNING: Allow the tool to come to a complete stop before setting it down. Procedures not specifically explained in this manual must be performed only by a qualified technician.
![]() WARNING:TO PREVENT SERIOUS INJURY FROM ACCIDENTAL OPERATION:Make sure that the Switch is in the off position and remove its Battery pack before performing any procedure in this section.
WARNING:TO PREVENT SERIOUS INJURY FROM ACCIDENTAL OPERATION:Make sure that the Switch is in the off position and remove its Battery pack before performing any procedure in this section.
![]() TO PREVENT SERIOUS INJURY FROM TOOL FAILURE: Do not use damaged equipment. If abnormal noise or vibration occurs, have the problem corrected before further use.
TO PREVENT SERIOUS INJURY FROM TOOL FAILURE: Do not use damaged equipment. If abnormal noise or vibration occurs, have the problem corrected before further use.
CLEANING, MAINTENANCE, AND LUBRICATION
- BEFORE EACH USE, inspect the general condition of the tool.Check for:
- leaking, swollen, or cracked battery pack,
- loose hardware
- misalignment or binding of moving parts
- cracked or broken parts
- any other condition that may affect its safe operation.
- AFTER USE, empty the Dust Bag and wipe the external surfaces of the tool with a clean cloth.
- Wear ANSI-approved safety goggles and NIOSH- approved breathing protection and blow dust out of the motor vents using dry compressed air periodically to increase tool life.
- Disconnect battery pack and store battery pack, charger, and tool in a dry, indoor area out of reach of children and away from metal objects (i.e., paperclips, coins) to prevent shorting.
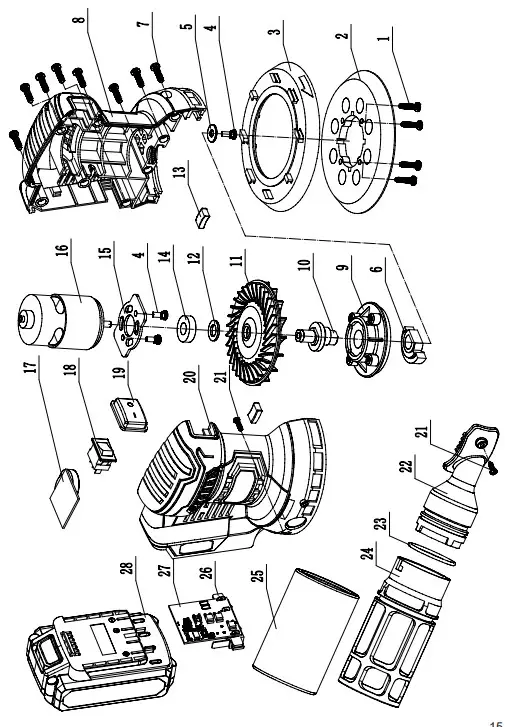
PARTS LIST
| No. | Description | Qty. | No. | Description |
Qty. |
| 1 | Screw | 4 | 15 | Motor bracket | 1 |
| 2 | Sanding plate | 1 | 16 | Motor#755 | 1 |
| 3 | Backing pad | 1 | 17 | Speed control assembly | 1 |
| 4 | Screw | 3 | 18 | Switch | 1 |
| 5 | Washer | 1 | 19 | Switch dust-proof cover | 1 |
| 6 | Balance block | 1 | 20 | Left housing | 1 |
| 7 | Screw | 8 | 21 | Screw | 2 |
| 8 | Right housing | 1 | 22 | Dust outlet | 1 |
| 9 | Fixed stand | 1 | 23 | 0-Ring | 1 |
| 10 | Eccentric shaft | 1 | 24 | Dust collection shelf | 1 |
| 11 | Fan | 1 | 25 | Dust collection bag | 1 |
| 12 | Washer | 1 | 26 | Battery clip assembly | 1 |
| 13 | Rubber mat | 2 | 27 | PCB | 1 |
| 14 | Bearing | 1 | 28 | Battery | 1 |
![]() WARNING: Repairs should be made by an authorized repair center. Opening this tool could invalidate your warranty.
WARNING: Repairs should be made by an authorized repair center. Opening this tool could invalidate your warranty.
![]() NOTE: Due to continuous product improvement, we reserve theright to change the product specification without prior notice.
NOTE: Due to continuous product improvement, we reserve theright to change the product specification without prior notice.
SCHEMATIC DRAWING
This Empower limited three-year warranty is subject to the following terms:What Is CoveredYour product is warranted against original defects in material and workmanship for a period of three years from the date of purchase when used for private household purposes in accordance with the owner’s manual. This warranty provides, at no extra cost to you, all labor and parts to place your product in proper operating condition during the warranty period.What Is Not CoveredQVC, Inc. shall not be liable for costs incurred as a result of:
- Use of parts not in accordance with the owner’s manual.
- Careless operation or handling, misuse, abuse, and/or lack of maintenance or use not in accordance with the owner’s manual.
- External sources such as weather.
- Repairs or alterations carried out by unauthorized parties or agents.
- Use of the product other than for normal domestic purposes within the United States, e.g., for commercial or rental purposes.
Warranty Service
- Service under this warranty will not extend the period of this warranty.
- If your product is not functioning properly, please call QVC Customer Service at 1-800-367-9444.
Warranty Limitations and Exclusions
- Any implied warranties relating to your product, including but not limited to the warranty of merchantability or warranty of fitness for a particular purpose, are limited to the duration of this warranty. This limitation is not allowed by some states and so this limitation may not apply to you.
- Your remedy for breach of this warranty is limited to the warranty service described above. QVC, Inc. will not be liable for any consequential damages or incidental damages you may incur in connection with your purchase and use of this product. This limitation is not allowed by some states and so this limitation may not apply to you.
- This warranty gives you specific legal rights. You may also have other rights which vary by state.
- This warranty is not transferable.
QVC Inc.1200 Wilson DriveWest Chester, PA 193801-800-367-9444
 report this ad
References
[xyz-ips snippet=”download-snippet”]