
![]() Wireless Switch/Receiver ControllerInstallation Guide
Wireless Switch/Receiver ControllerInstallation Guide

To avoid electric shock while installing the Receiver, please disconnect the mains voltage (switch off circuit breaker) before installation. Failure to observe the installation instructions can cause fire or other hazards. Do not attempt to service or repair the product yourself. We recommend the installation by a qualified electrician only. Do not continue to operate the product if it becomes visibly damaged.
*Work on 230 V mains supply shall only be carried out by Licensed Electricians.Important note: Wi-Fi frequency is 2.4GHz and not 5GHz (5GHz not supported). You can do this by contacting your broadband service provider and requesting to either switch to 2.4GHz entirely or split it between 2.4GHz and 5GHz.www.ener-j.co.uk
Product Features
- The thinnest place of the switch is only 9.9mm.
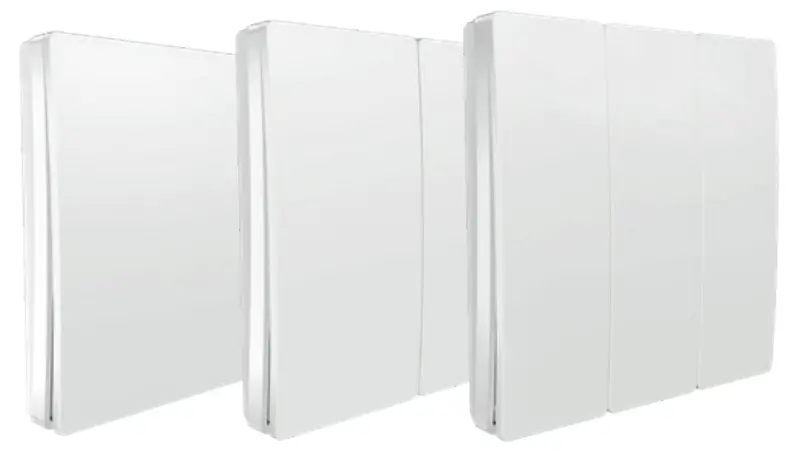
- Frameless and large panel design.
- Switch can be directly installed without any restrictions on a wide range of applications, such as marble, glass, metal, wood, etc.
- Switch panel requires no batteries and wires thereby saving the users time, labor cost, and recurring electricity bills.
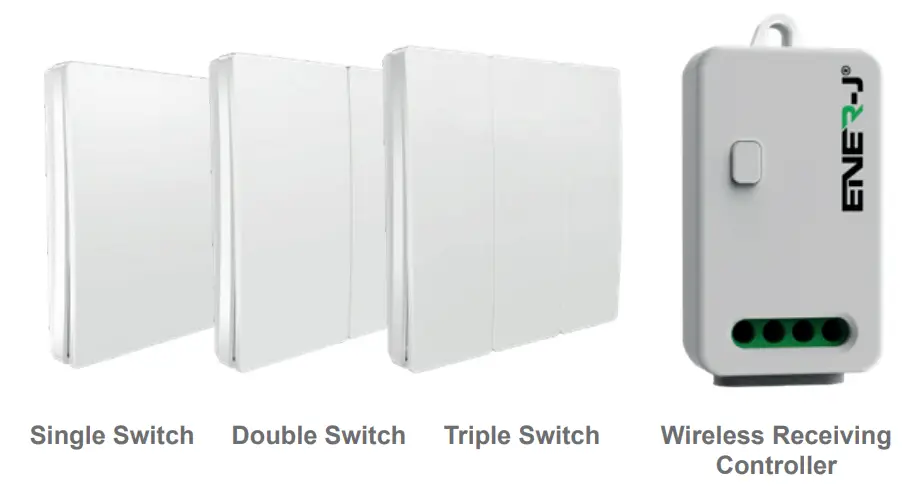
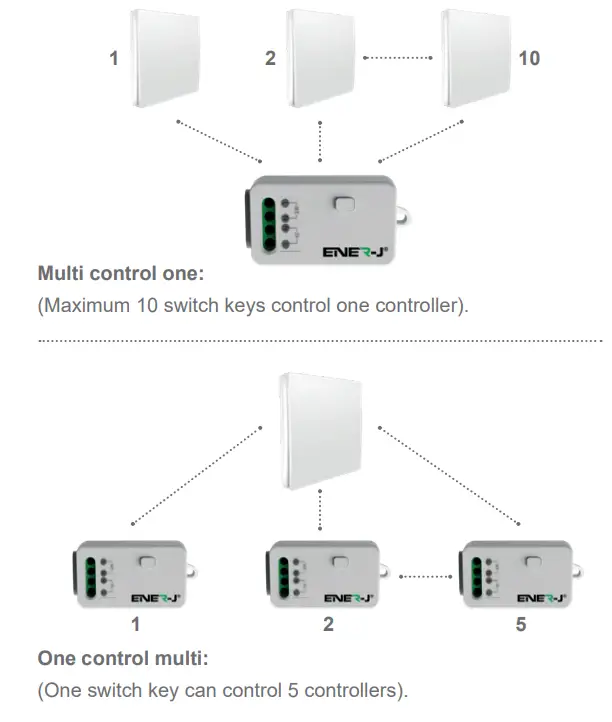
- Easy installation, multiple combinations of control – Single switch to operate multiple receivers or multiple switches operate by one receiver.
- Switch is unaffected of any moisture! Self-generating power – safe and reliable.
Switch Technical Parameters
- Work Type: Reciprocating work by 86 type lever
- Power Model: Power generation by mechanical force
- Work Frequency: 433MHz
- Number Keys: 1, 2, 3 keys
- Color: White
- Lifetime: 100,000 times
- Distance: 30m(indoor), 80m(outdoor)
- Waterproof Level: IPX5
- Weight: 80g
- Certification: CE, RoHS
- Dimension: L86mm * W86mm * H14mm
Receiver Technical Parameters For Non-Dimmable Receiver
- Model No: K10R
- SKU: WS1055
- Power Consumption: <0.1W
- Working Temperature: -20°C – 55°C
- Storage Capacity: 10 switch-keys
- Power Model: AC 100-250V, 50/60 Hz
- Distance: 30m(indoor), 80m(outdoor)
- Color: White
- Rated Current: 5A
- Weight: 50g
- Comm: ASK / 433MHz
- Certification: CE, RoHS
- Dimension: L64mm * W32mm * H23mm

Do not place the Receiver controller in a metal enclosure.Important note: Isolate power before connecting the receiver. Failure to do so can cause electric shock, fire or other hazards.
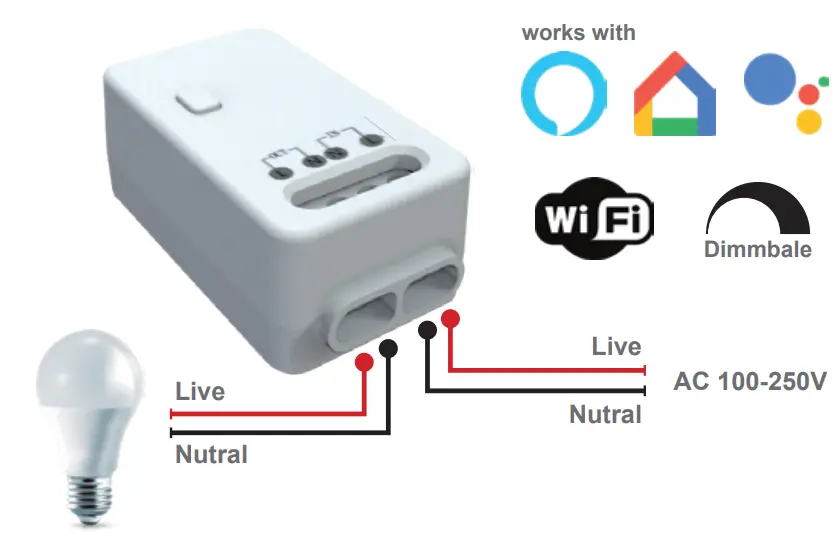
Receiver Technical Parameters For Dimmable + Wi-Fi Receiver
- Model No: K10DW
- SKU: WS1056
- Power Consumption: <0.1W
- Working Temperature: -20°C – 55°C
- Storage Capacity: 10 switch-keys
- Power Model: AC 100-250V, 50/60 Hz
- Distance: 30m(indoor), 80m(outdoor)
- Color: White
- Rated Current: 1.5A
- Weight: 50g
- Comm: ASK / 433MHz / 2.4G Wi-Fi
- Certification: CE, RoHS
- Dimension: L64mm * W32mm * H23mm

*Alexa and Google Home compatible only with our Wi-Fi Receiver Module WS1056 & WS1057.Do not place the Receiver controller in a metal enclosure.Important note: Isolate power before connecting the receiver. Failure to do so can cause electric shock, fire or other hazards.
Receiver Technical Parameters For Non-Dimmable + Wi-Fi Receiver
- Model No: K10W
- SKU: WS1057
- Power Consumption: <0.1W
- Working Temperature: -20°C – 55°C
- Storage Capacity: 10 switch-keys
- Power Model: AC 100-250V, 50/60 Hz
- Distance: 30m(indoor), 80m(outdoor)
- Color: White
- Rated Current: 5A
- Weight: 50g
- Comm: ASK / 433MHz / 2.4G Wi-Fi
- Certification: CE, RoHS
- Dimension: L64mm * W32mm * H23mm
*Alexa and Google Home compatible only with our Wi-Fi Receiver Module WS1056 & WS1057.Do not place the Receiver controller in a metal enclosure.Important note: Isolate power before connecting the receiver. Failure to do so can cause electric shock, fire, or other hazards.
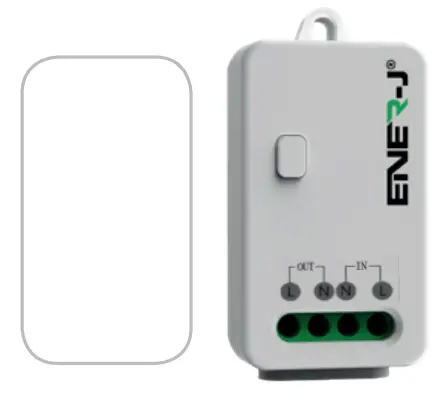
Installation method of stainless steel fixed plate
- Open the switch panel.
- Fix the base on the wall (expansion screw sleeve is needed) or fixture.
- Fix it, install the button shell to the base shell.
Installation method of Double-sided adhesive tape
- Paste the double-sided adhesive on the back of the switch.
- Clean the wall or glass surface to paste the switch on it.

Important note: There are precision parts inside the switch. When installing, it is strictly prohibited to dismantle the panel.
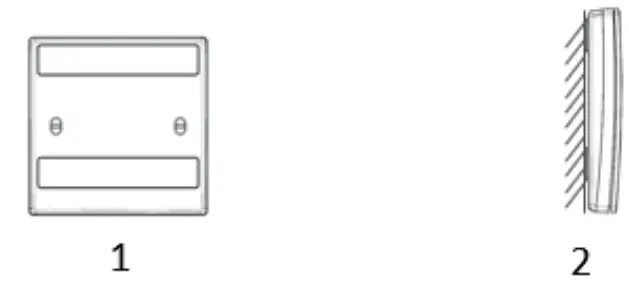
Installation method and Combination Method
 |
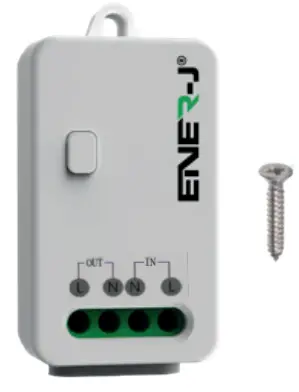 |
| Installation method 1:Paste with double-side adhesive tape on a clean surface. | Installation method 2:Fix into expansion screw in the wall. |
Important note: Isolate power before connecting the receiver. Failure to do so can cause electric shock, fire, or other hazards.
Instruction of Dimming Function
- K10D controller uses TRIAC components. Supports incandescent lamp, tungsten lamp and mostly all LED lamp which supports TRIAC dimming. If flickering occurs during dimming, we recommend replacing the LED lamp. Segmented dimmers and lamps with dimmers are not supported.
- This controller can only pair with a push-button switch: after pairing is successful, quickly press the push button switch 3 times and you will be able to adjust lamp brightness. Press the switch once when you reach the level of brightness desired. Also can use the mobile APP or Alexa voice control to control brightness.
- This controller has a brightness memory function. When turning on the lamp again, it maintains the last brightness level. If paired with multiple switches, this controller can memorize the brightness level of each switch.
- If you didn’t press the switch key to confirm the brightness, the controller dims from the darkest to brightest for 2 cycles and will stop dimming when reaching maximum brightness after 2 cycles.
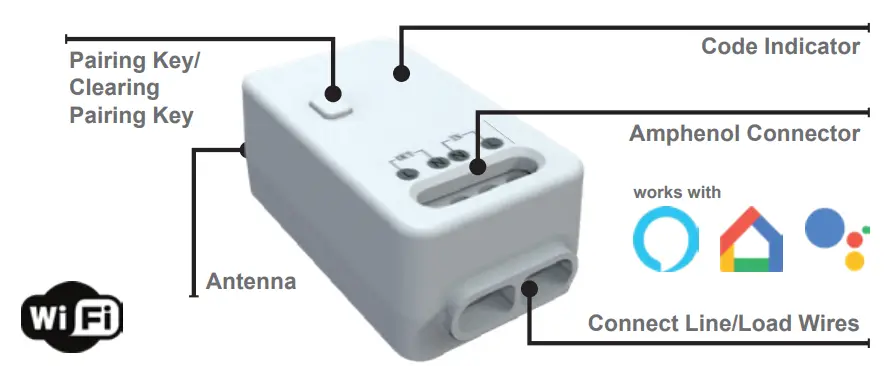
Switch Pairing Method
- Ensure the receiver controller is connected to 100-250V AC and power is ‘on’.
- Press the function button for 3~5 seconds, (the indicator light will flicker slowly) then release the button to enter the pairing mode.
- Press the “wireless switch” to be paired, when the indicator light stops flashing, at this time the indicator lights will come on or off with the press of a switch, indicating pairing a success.
- Repeat the above steps to add multiple switches. The receiver can store up to 20 switch codes.
- Repeat this process for each button on the Double and Triple switches.
Clear pairing
- Press the button for more than 6~7 seconds, the indicator quickly flashes 10 times and at the same time, the relay performs the turn-on/off action quickly, this indicates all recorded codes have been deleted.
Connect Wi-Fi Method
- Download the ENERJSMART App from the Apple app store or the Google Play store. Or scan the QR code below.

https://play.google.com/store/apps/details?id=com.enerjsmart.homehttps://itunes.apple.com/us/app/enerj-smart/id1269500290?mt=8
- Start the ENERJSMART.
- If you’re using it for the first time, you’ll have to register and create a new account. If you already have an account, log in using your login details.
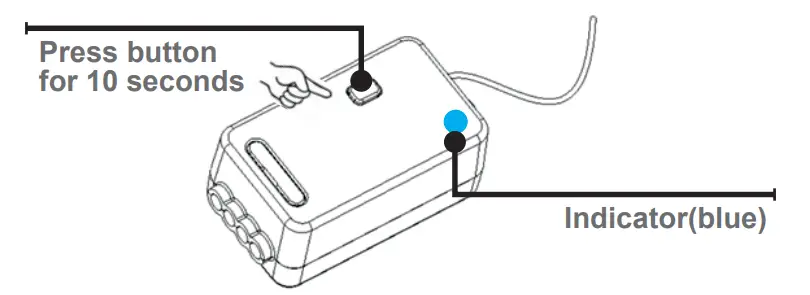
- After installation of the Receiver & Switch (by a qualified electrician), Hold down the function button on the receiver for 10 seconds. The indicator light flashes turn to blue from red to indicate the device is in discoverable mode.
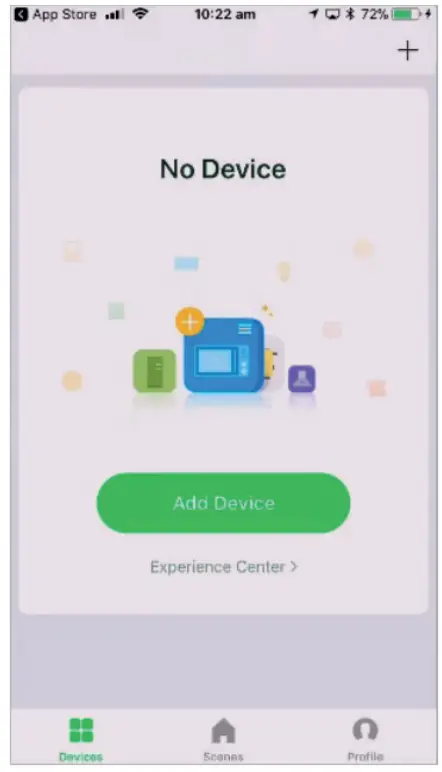
- In the APP, select the “+” or add “equipment” at the top right of the home page. Select “Electrician” from the left side menu, then select “Switch (Wi-Fi)”.
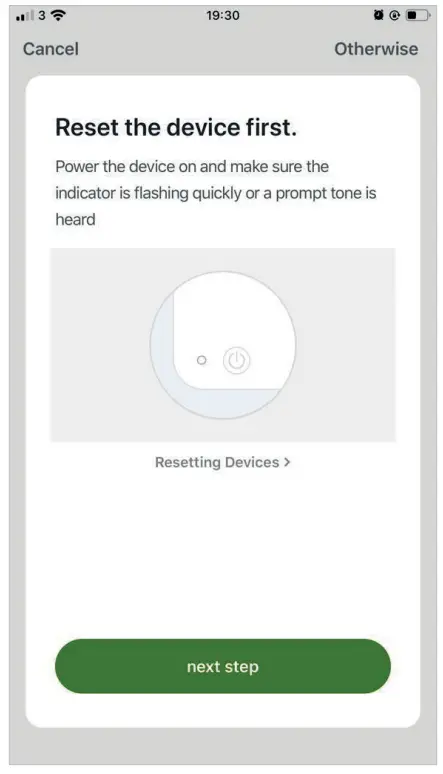
- Confirm that the device LED (Blue) flashes quickly.
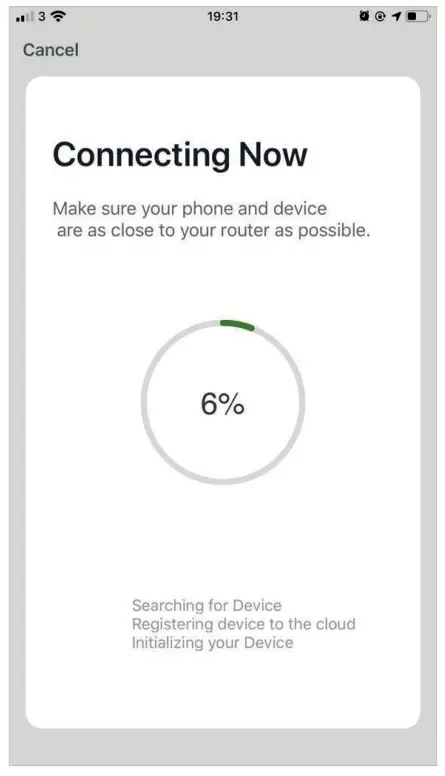
- Now enter the name of your Wi-Fi network and the password to confirm.(Note: To be sure the Wi-Fi account or password is entered correctly.)
- The APP will automatically register your device to the network. Once complete you will be directed to the device operation screen. Here you are can edit parameters such as name, device location, assign to a room or group, etc.
- Home Page
- Add Device
- Confirm Pairing
- Finish Pairing
Third-Party Control Overview:

If you’re new to Echo, it’s a super-smart speaker from Amazon that responds to your voice.Once you’ve bought Amazon Echo and downloaded the ENERJSMART App, you’ll need to enable…
- Enable the ENERJSMART App In your Alexa app, tap Skills in the menu and search for ENERJSMART. Tap Enable.
- Link AccountEnter your ENERJSMART App username and password and follow the onscreen instruction.
- Talk to Alexa Now the fun part Ask Alexa to control your ENERJSMART device. Check a full list of things you can control by clicking here.
 report this ad
Now you can use Google’s voice-activated speaker to control your Smart Home Sockets and adaptors. With Google Assistant, you can turn on lights without pressing a button.
- SetupStart by getting the Google Home app and setting up you’re Google Home if you have not done this already.
- Add ENERJSMART Action In the Google Home app, tap the menu icon and select Home Control. Then tap the + button to see a list of Actions tapping ENERJSMART to select the Action.
- Link you ENERJSMART Account Now follow the in-app instructions to link your ENERJSMART App account. Once complete you’ll be able to say “Okey Google, turn my lamp on” or “Okay Google, set hallway to ON/OFF”.
Thank you for choosing ENER-J!Customer satisfaction is our TOP priority, please let us know how you felt about your experience. Happy? We are so happy that you are pleased with our product. Feel free to express your newfound joy! Share your experience by writing a review.Not Happy? If you are not fully satisfied with the item you received, have any problems like damages, or have questions, please contact us. We typically respond within 24-48 hours.
CautionProducts should be installed as per the instructions mentioned in this manual and also as per current electrical codes National Electric Code (NEC).To avoid the risk of fire, electrical shock, or injury, it is advisable that the installation is done by a trained Electrician. Also, it is important that the mains power supply is switched off before the product is installed or repaired. It is advisable to keep the manual for future reference.
Please NoteWi-Fi frequency is 2.4GHz and not 5GHz (5GHz not supported). You can do this by contacting your broadband service provider and requesting to either switch to 2.4GHz entirely or split it between 2.4GHz and 5GHz.If despite following the process as instructed above, you still fail to add the device, then possibly there is a firewall on your Wi-Fi router blocking this device to be connected to your Wi-Fi Router. In such a case you would need to disable the firewall, add this device following the above process and once the device is added, enable the firewalls back again.Stuck? Confused?Contact our Technical Support team on:T: +44 (0)2921 252 473 | E: [email protected]Lines are open Mon – Fri (8am to 4pm)
References
[xyz-ips snippet=”download-snippet”]