
GETTING STARTED
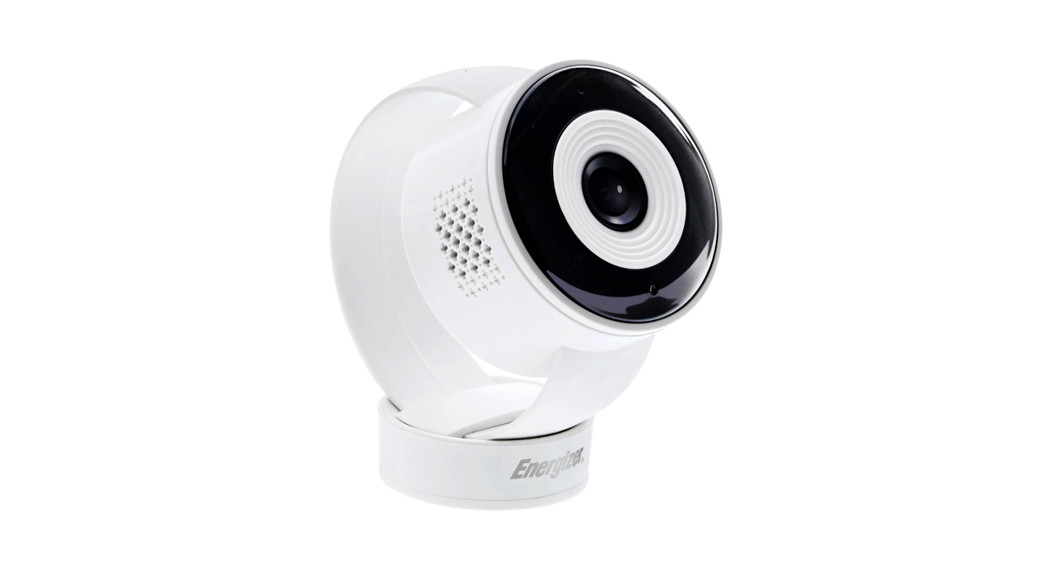
Thank you for choosing the Energizer Smart Camera. This quick start guide will help you with setup and installation.
Package Includes:
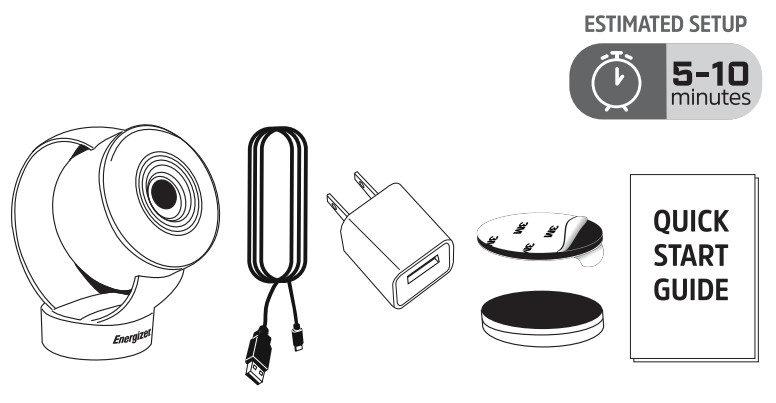
- Smart Camera
- 6ft Cable
- USB Power Adapter
- Magnet
- Double-Sided Tape
- Quick Start Guide
What You Need:
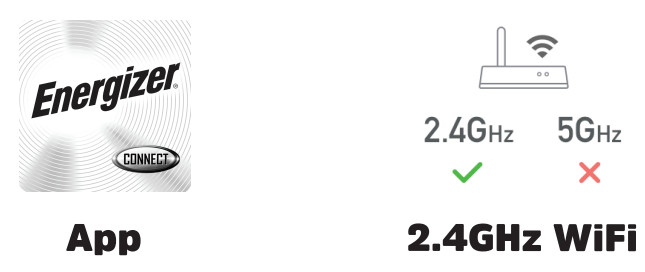
![]() Before setup, make sure your phone is connected to the 2.4GHz WiFi network that your device will be placed on.You may also need to turn on location and & Bluetooth to find nearby networks.
Before setup, make sure your phone is connected to the 2.4GHz WiFi network that your device will be placed on.You may also need to turn on location and & Bluetooth to find nearby networks.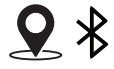
CONNECT THE DEVICE
STEP 1Download the free Energizer. Connect app from the App Store (for iPhones) or Google Play Store (for Android phones).

STEP 2Make sure your mobile device is connected to your 2.4GHz Wifi network.Open the app and click “Create Account” by following the on-screen instructions.After your initial sign-in, your app will remember your password and log you in automatically. You can also choose to manually log out under Settings in the Main menu.
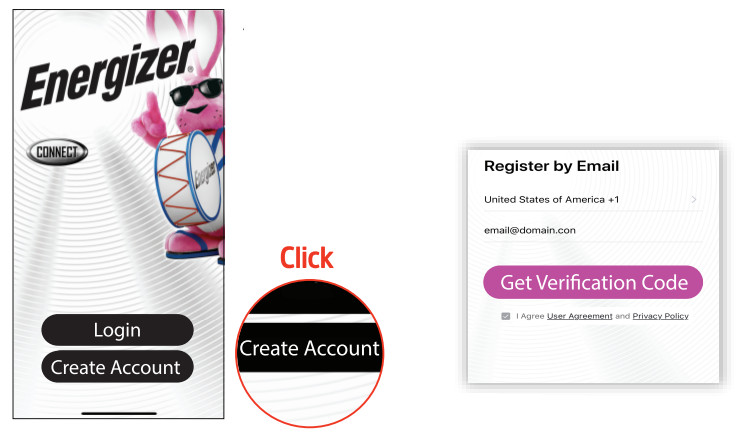
![]() You may need to check your Spam Lil folder for the verification code
You may need to check your Spam Lil folder for the verification code
STEP 3Plug the camera into a wall outlet using the provided 6-foot cable and USB power adapter.
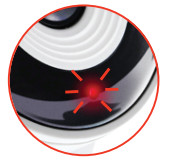 The indicator light on the camera should start blinkingRED for pairing mode.The camera will also make a chime sound, letting you know it has started up.
| LED Behavior | Device Status | |
| Red | Blinking | Pairing Mode |
| Solid | Starting Up | |
| Blue | Blinking | Attempting to Pair |
| Solid | Connected |
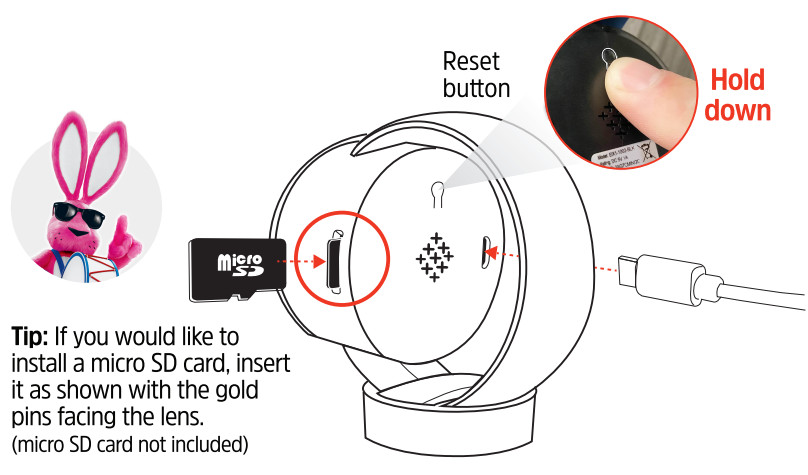
If the LED is not blinking, then you are not in pairing mode. Reset the camera by using your finger to hold down this button for 5 seconds until you hear the camera make a chime sound.
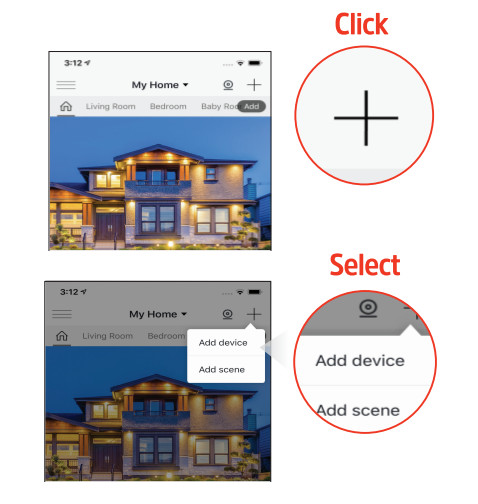
STEP4After logging in, click “+” on the top right of the screen and select “Add device”.
STEP 5Select the Camera category and confirm the indicator light is still blinking red. Click “Next Step”.
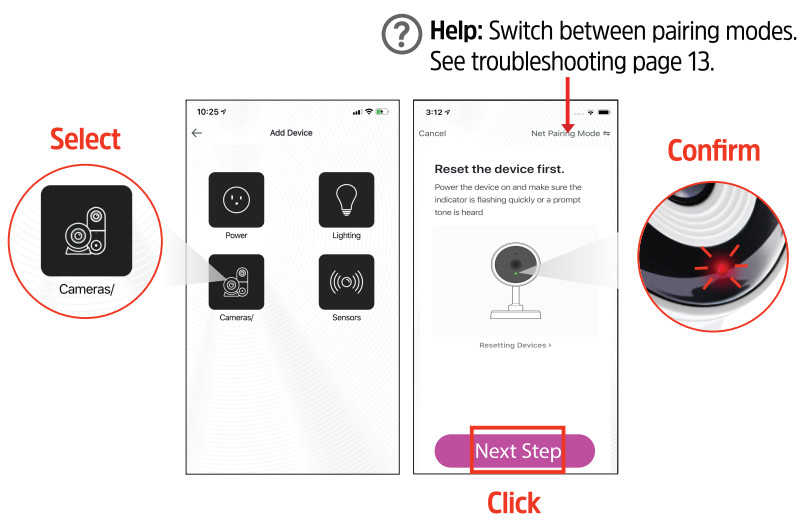
STEP 6Confirm that the displayed WiFi network is your 2.4GHz WiFi network, enter your WiFi password and click “Confirm”.

STEP7On the next screen, a QR Code will appear.Position your camera to scan this QR code on your phone.Click “Continue” when you are ready. Touch the lens of the camera directly against the QR code on your phone and slowly move the camera away.
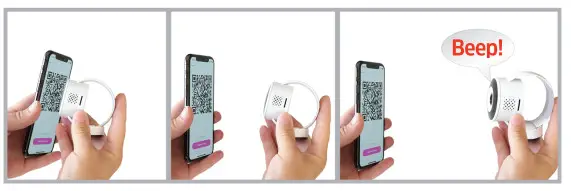
Once you hear an audible prompt from the camera, click the “I Heard a Prompt” button.
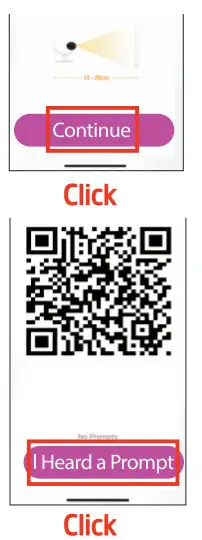
Once you hear an audible prompt from the camera, click the “I Heard a Prompt”button.
 Tip: If you don’t hear the prompt, try pairing using EZ mode. Take a look at troubleshooting on page 13.
STEP 8Your Smart Camera will now be connected to the network. Confirm the settings for your device and then click “Done”.TIP: You can put your camera directly in a room by selecting one of the available rooms. Click the e button to change the name of the product.
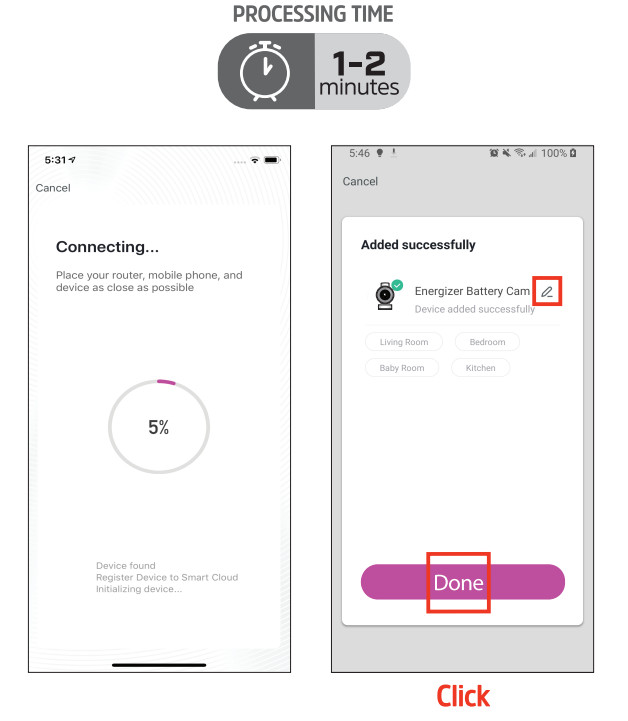
Your Energizer, Smart Camera is now ready to use. You can now view the camera remotely and receive mobile alerts. We hope you enjoy using your Energizer,, Smart Camera. For frequently asked questions and instruction videos, please visit our website at www.energizerconnect.com.
INSTALLATION
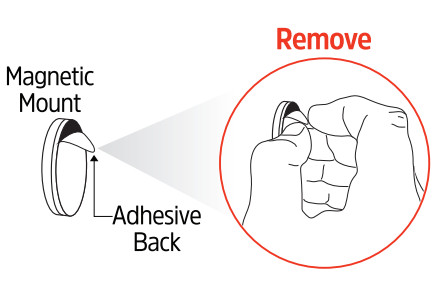
STEP 1Remove adhesive back from magnet mount.
![]() NOTE: For best mounting “results first clean placement area with a clean cloth and rubbing alcohol. Place adhesive with one attempt. Reapplying multiple times will not guarantee secure mounting onto the surface.
NOTE: For best mounting “results first clean placement area with a clean cloth and rubbing alcohol. Place adhesive with one attempt. Reapplying multiple times will not guarantee secure mounting onto the surface.
 STEP 2Firmly place the magnet on the wall. Hold it tightly against the wall for 5 seconds to help create a good bond. For best bonding results, let the magnet sit on the wall for at least 10 minutes before attaching the camera.

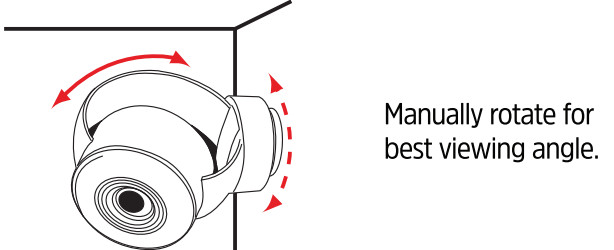
STEP 3Place camera base directly onto magnet mount.
LIVE VIEW CONTROLS
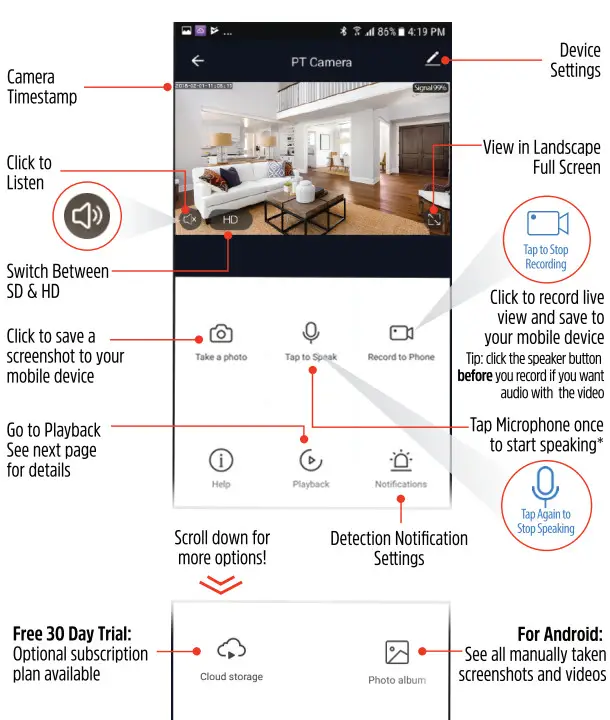
By default, when you lick to turn off your microphone, the speaker will automatically turn on. This way once you are done speaking, you can immediately hear a response!You won’t be able to turn the microphone and speaker on at one time. See Troubleshooting on page 14 for more details.
RECORDING CONTROLS
How to turn on Event (Motion) Triggered Recordings that save to the microSD card in the camera.
STEP 1Click the icon in the top right of the live view screen to enter Device Settings.

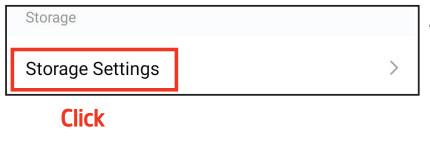
STEP 2Scroll down and click “Storage Settings”.
![]() If you don’t see the Stoaoe sets take out the micro SD card (not included) from the camera and make sure it is inserted properly.
If you don’t see the Stoaoe sets take out the micro SD card (not included) from the camera and make sure it is inserted properly.
STEP 3Switch on the local recording switch to enable recording to your SD card.STEP4Select “Event Recording” to enable recording to your SD card when motion is detected.

Tip: You can also set schedules for when you want recordings to be enabled.Enabling Event Recording will allow you to select individual recordings triggered by motion in the Playback Controls.
PLAYBACK CONTROLS
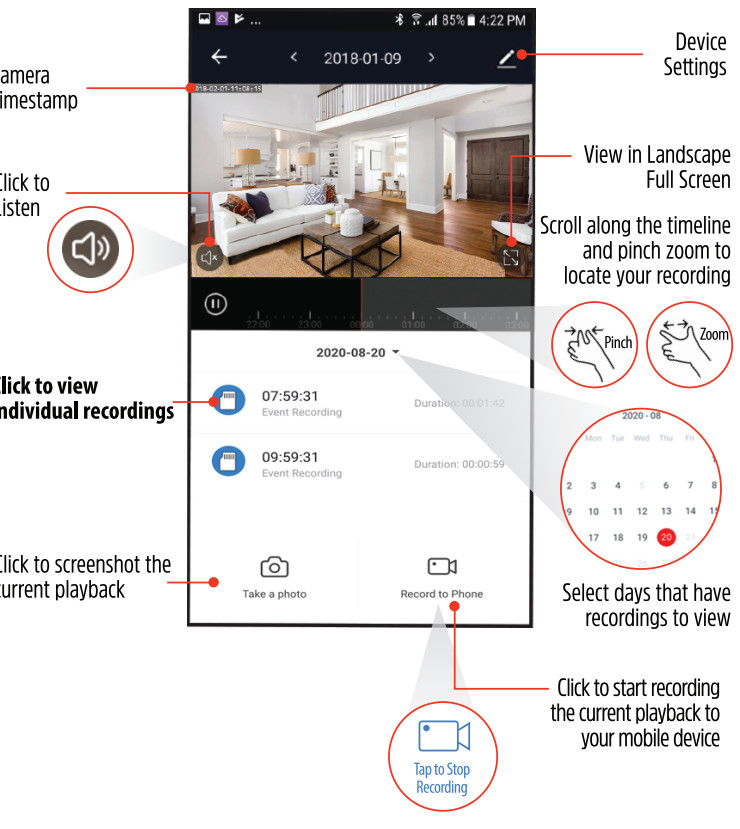
Tip: Click the speaker button before you record if you want audio with the video.
VOICE ACTIVATION
To enable voice access for your Smart Camera, you will need to link the Energizer, Connect skill with your choice of voice assistant.
Voice Activation for Alexa
Make sure your Alexa device is installed and set up first.
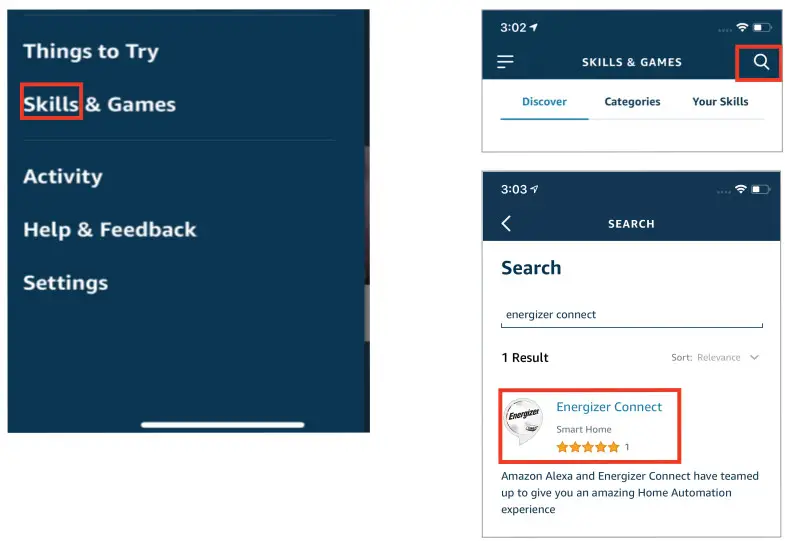
STEP 1Open your Alexa app.STEP 2Open the menu to search for “Skills”.
STEP 3Search for & choose Energizer, Connect.
STEP4Authorize your account with the Alexa skill using the username and password from your Energizer, Connect app.STEP 5Using the name you assigned your camera, you can ask Alexa to turn on/off your camera.Ex: “Alexa, show me the kitchen camera”.
Voice Activation for the Google Assistant
Make sure your Google Assistant device is installed and set up first.
STEP 1Open your Google Home app.STEP 2Click the “+” to add a new device.STEP 3Click “Set up device”.
 STEP4Click “Have something already set up?”
STEP 5Search for & choose Energizer, Connect.

STEP 6Authorize your account with the Google Assistant skill using the username and password from your Energizer, Connect app.STEP7 Using the name you assigned your camera, you can ask the Google Assistant to turn on/off your camera. Ex: “Ok Google, show me the kitchen camera”.
LEGAL & WARRANTY
To see Warranty information and Certification Legal warnings, please see our website.www.energizerconnect.com02020 Energizer. Energizer, Energizer Bunny design, and certain graphic designs are trademarks of Energizer Brands, LLC, and related subsidiaries and are used under license by Jem Connected I0T, Inc. All other brand names are trademarks of their respective owners. Neither Jem Connected I0T, Inc. nor Energizer Brands, LLC is affiliated with the respective owners of their trademarks.Apple and the Apple logo are trademarks of Apple Inc.,registered in the U.S. and other countries.App Store is a service mark of Apple Inc.Google, Android, and Google Play are trademarks of Google LLC.Amazon, Alexa, and all related logos are trademarks of Amazon.com, Inc. or its affiliates.
TROUBLESHOOTING
HAVING TROUBLE WITH SETUP?Don’t return this product to the retailer, we’re here to helpPlease call us at 888-693-4189 or visit www.energizerconnect.com for video tutorials, updated manuals, and more FAQs for your device.My device won’t connect to my network!
- Make sure you are connected to your 2.4 GHz networks and your device is blinking red before you start trying to connect your device.
- You may need to reset your device if you are having trouble.Check out page 2 for the location of your device’s reset button.
- To allow the app to locate the network, you may need to allow permissions for location and turn on your Bluetooth
- If you are not certain what type of network you have, contact your Internet Service Provider and ask them to create a separate, dedicated 2.4GHz network. You can also do this manually in your router’s settings.
- Try moving to a spot closer to your router for connecting.
- You can also purchase a WiFi extender to increase your WiFi range and strength.
- In some cases, you can try using the secondary pairing mode by clicking “Net Pairing Mode” on the Add Device screen (see bottom of page 3). Follow the on-screen instructions.
My device says it’s already bound when I try to connect it!
- When you get the ALREADY BOUND screen, click the blue link to send us an Unbind Request. We can assist you further from the in-app Help Center.
When my camera is pointed at a window at night, I can’t see through the glare!
- At night, the camera’s IR LEDs will turn on automatically to provide night vision when it gets dark. IR light reflects off of the glass. So if you are trying to use your Indoor Camera through a window at night, go into the Device Settings->IR Night Vision and set it to OFF.
When I try to view live view, it says “Offline” or “Cannot establish encryption channel”
- Unplug your camera from power and plug it back in.
- Check to make sure you have the newest firmware for your camera. Go to the device settings and scroll down to Firmware Information.
- Contact us so we can assist you.
Setting up Motion Detection and Recording
- From the live view of the camera, click Notifications, or from the device settings click Detection Settings.—You can schedule when you want to receive notification of motion.
- To save recordings, you can purchase Cloud Recording or install a microSD card (max 12868, not included) into the camera for LOCAL recordings.—Recordings can be based of motion or can be All Day.—Please note: All Day recording will fll up a microSD card much quicker.
- Every time a motion is detected, a screenshot is (:) saved for your review. They can be found in the Notification Center. From the Home page, click the three lines in the top left, and then click Notifications.

- If you are using a microSD card, it will continue to record until the microSD card fills up.—If you are using Motion-based recording: Separate files are recorded for each detection, so when the memory fills up, it will beg in to record over the oldest detections, one at a time.—If you are using AII Day recording: One file is saved as the video is continuously recording. When the memory fills up, It will clear the entire recording and start fresh.

Two Way Audio
- By default, the camera will only use the microphone OR the speaker. When you click the microphone on the live view, you will be able to speak through the camera, and when you click the microphone again to turn it off, the speaker will automatically turn on so you can hear what’s being said at the camera.
- For some cameras, you can turn on Full Two Way Audio by going to the Device Settings -> Basic Function Settings -> Talk Mode and click on Two-Way Talk.
[xyz-ips snippet=”download-snippet”]