ENFORCER Self-Contained Siren or Siren/Strobe Installation Guide
| Model | Product | Mount |
| SH-816S-BQ | Siren | Surface or back box (single-gang, double-gang, or C-type) |
| SH-816S-SQ/x* | Siren with Strobe | Surface or back box (single-gang, double-gang, or C-type) |
- Replace “x” with the first letter of the lens color, amber, blue, clear, or red.
The ENFORCER Siren/Strobe is a multi-purpose device: siren, speaker, and (SH-816S-SQ only) an LED strobe. It can serve as a regular siren, but also has an audio input that can be used to play audio or broadcast messages. Audio input will override the siren for the duration of the broadcast.The SH-816S-SQ strobe light is available with amber, blue, clear, or red lenses.
- 9~15 VDC and low current draw
- 120dB Warble-tone siren
- 25W Speaker for audio or broadcast system input (broadcast will interrupt the siren)
- Built-in tamper alarm output
- Weatherproof for outdoor/indoor use, IP65
- Mount directly to wall or to most common back boxes
In addition to the above, SH-816S-SQ adds:
- Bright LED strobe light
- Strobe can be triggered separately from siren
- Strobe available in amber, blue, clear, or red
Parts List
- 1x Siren/Strobe
- 1x Back removal tool
- 4x Mounting screws
- 1x Manual
- 4x Plastic wall anchors
Specifications
| Model | SH-816S-BQ | SH-816S-SQ/x* |
| Type | Siren | Siren with strobe |
| Operating voltage | 9~15 VDC | |
| Current draw | Siren | |
| Strobe | N/A | |
| Both | N/A | |
| Siren volume | 120dB | |
| Speaker rating | 25W Peak | |
| Strobe flash rate | N/A | 100 per minute |
| Tamper output | VAC/VDC | |
| IP Rating | IP65 | |
| Operating humidity | 0~95% | |
| Operating temperature | -4°~131° F (-20°~55° C) | |
| Housing | White polycarbonate plastic | |
| Dimensions | 61/8″x415/16″x41/2″ (155x126x115 mm) | 61/8″x7″x41/2″ (155x178x115 mm) |
| Weight | 1-lb 13-oz (812g) | 2-lb 2-oz (957g) |
Overview
- Siren

- Siren/Strobe
Installation
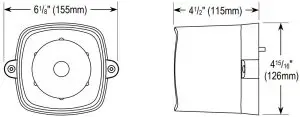 Fig. 1Fig. 2Fig. 3
- Determine the desired location and installation—surface or to a back box.
- Remove the two screws from the two tabs that attach the mounting base to the main unit (See Fig. 1).
- Squeeze the included base removal tool and insert through the wiring access hole in the back of the unit. Release and pull carefully until the mounting base is removed from the unit.
- Remove the base removal tool and turn the mounting base over to view the wiring terminals (see Fig. 2)
- Thread the wires (up to 8 wires, depending on installation, see “Sample Applications” on pg. 4) through the center hole in the base and install the base to the wall/back box using the four mounting holes in the base, oriented so that the engraved arrow is pointing up. Be careful not to use the hole for the tamper switch (see Fig. 2).NOTE: For non-standard boxes, drill out any other holes engraved in the oval indentations on the mounting base as needed.
- Connect the wires for the desired installation to the terminals on the mounting base as shown in Fig. 3 and referring to the sample applications on pg. 4. Note that audio input requires power to the P.A. (+) terminal.
- Carefully slide the main unit onto the base, ensuring the correct orientation (note the notch and the arrows) and ensuring the terminal plugs are correctly engaged (see Fig. 1).
- Attach the main unit to the base using the two screws removed in step 2.
Sample Applications
Triggering both siren and strobe* together (also showing audio input)
Siren and strobe* triggered by separate devices (also showing audio input)
- Strobe available on SH-816S-SQ only
NOTE: The audio broadcast will override and interrupt the siren for the duration of the broadcast.
IMPORTANT: Users and installers of this product are responsible for ensuring that the installation and configuration of this product complies with all national, state, and local laws and codes. SECO-LARM will not be held responsible for the use of this product in violation of any current laws or codes.
California Proposition 65 Warning: These products may contain chemicals which are known to the State of California to cause cancer and birth defects or other reproductive harm. For more information, go to www.P65Warnings.ca.gov.
WARRANTY: This SECO-LARM product is warranted against defects in material and workmanship while used in normal service for one (1) year from the date of sale to the original customer. SECO-LARM’s obligation is limited to the repair or replacement of any defective part if the unit is returned, transportation prepaid, to SECO-LARM. This Warranty is void if damage is caused by or attributed to acts of God, physical or electrical misuse or abuse, neglect, repair or alteration, improper or abnormal usage, or faulty installation, or if for any other reason SECO-LARM determines that such equipment is not operating properly as a result of causes other than defects in material and workmanship. The sole obligation of SECO-LARM and the purchaser’s exclusive remedy, shall be limited to the replacement or repair only, at SECO-LARM’s option. In no event shall SECO-LARM be liable for any special, collateral, incidental, or consequential personal or property damage of any kind to the purchaser or anyone else.
NOTICE: The SECO-LARM policy is one of continual development and improvement. For that reason, SECO-LARM reserves the right to change specifications without notice. SECO-LARM is also not responsible for misprints. All trademarks are the property of SECO-LARM U.S.A., Inc. or their respective owners. Copyright © 2021 SECO-LARM U.S.A., Inc. All rights reserved.
Customer Support
 report this ad
16842 Millikan Avenue, Irvine, CA 92606Phone: (949) 261-2999(800) 662-0800Website: www.seco-larm.comEmail: [email protected]
References
[xyz-ips snippet=”download-snippet”]