

User’s GuideThin Client Mount
Features & Specifi cations
 < 6 lbs. (2.7 kg)CAUTION: DO NOT EXCEED THE MAXIMUM LISTED WEIGHT CAPACITY. SERIOUS INJURY OR PROPERTY DAMAGE MAY OCCUR!
 IMPORTANT! This product adds an additional 2 lbs. (1 kg) to your mounting solution. When mounting between a monitor and VESA plate, the mounting solution’s monitor weight capacity must be reduced by 2 lbs. (1 kg) when using standard monitors and thin clients which when combined are less than or equal to 2.5″ (64 mm) thick. Additional reduction will be required if the combined monitors and thin client are greater than 2.5″ (64 mm) thick.
 For the latest User Installation Guide please visit: www.ergotron.comUser’s Guide
![]() www.ergotron.com
www.ergotron.com USA 1-800-888-8458Europe -32 033-45 45 600China 86-769-86018920
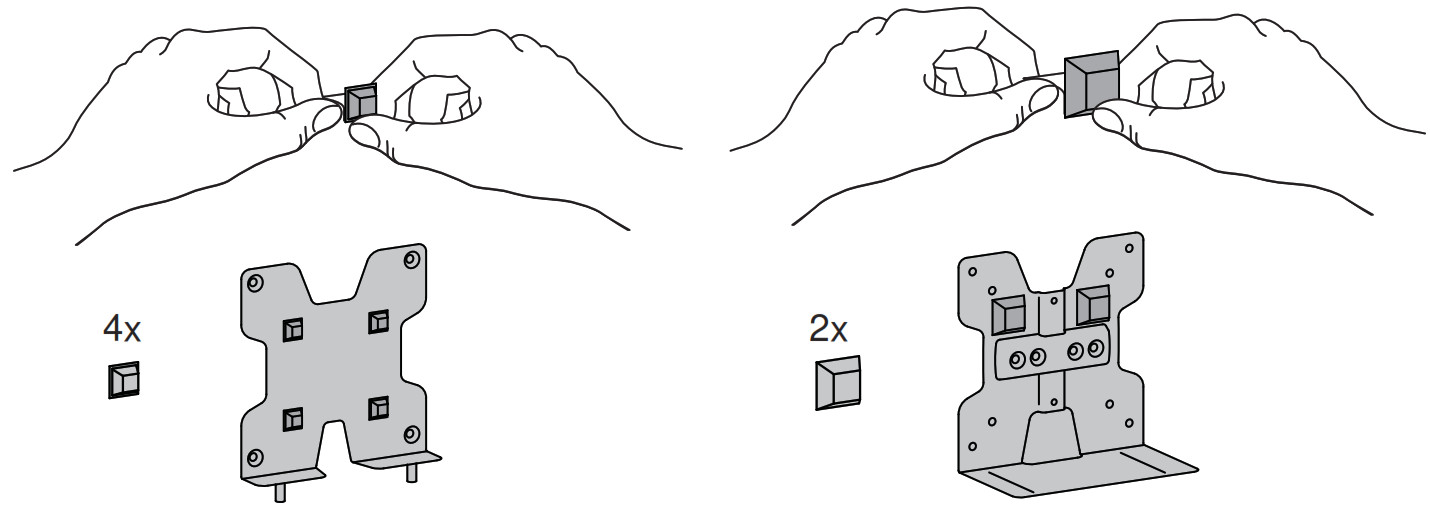
Components

Follow desired mounting application instructions.
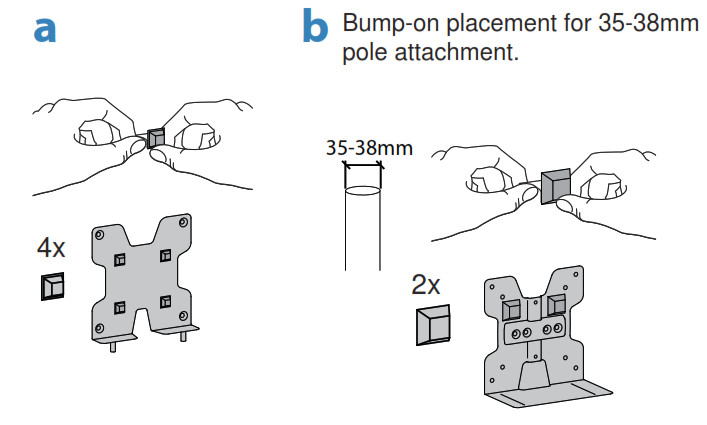
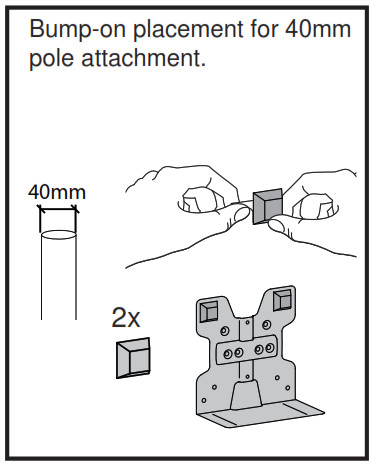
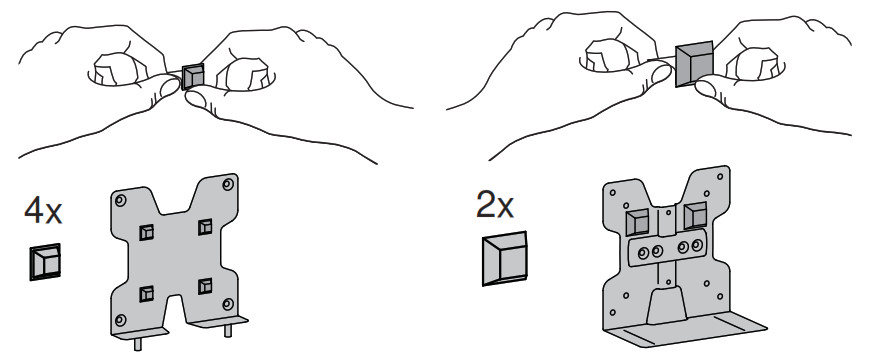
1 Attach bump-ons as shown.
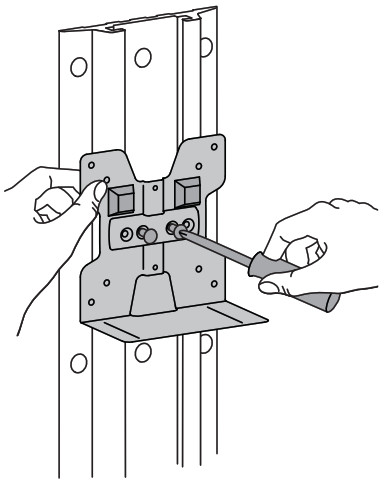
2 Install Portrait/Landscape rotation stop screw.Insert the provided washer and one of the three provided rotation stop screws : M3x10 mm, M3.5x8mm, or M4x10mm depending on the diameter of the hole in your VESA plate.
 WARNING! Thin Client may fall out of brackets. Install the Portrait/Landscape rotation stop screw to keep monitor from rotating through the portrait/landscape rotation. Failure to follow these instructions may result in the Thin Client falling out of the brackets and could result in equipment damage and/or personal injury.

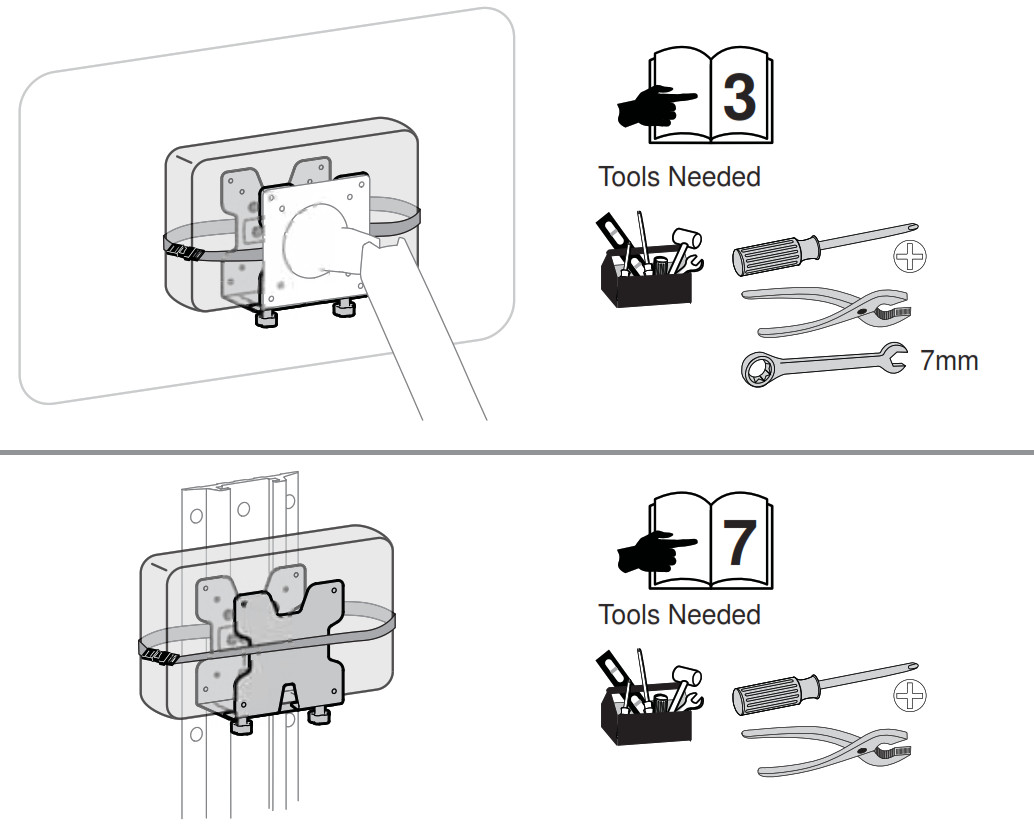
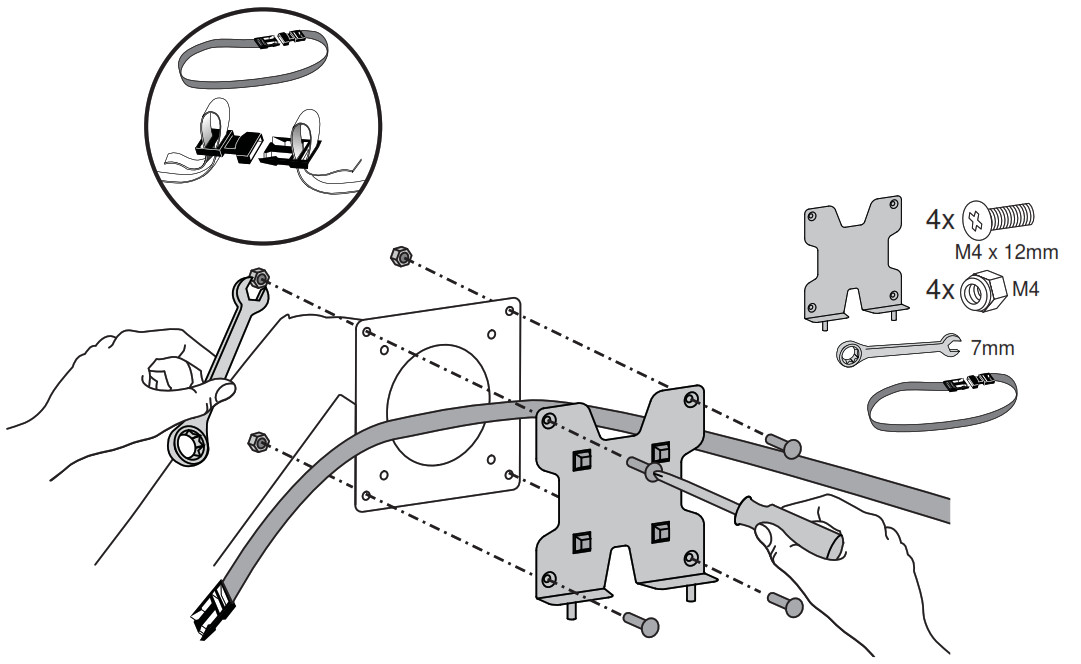
3 Attach bracket shown to VESA mount.
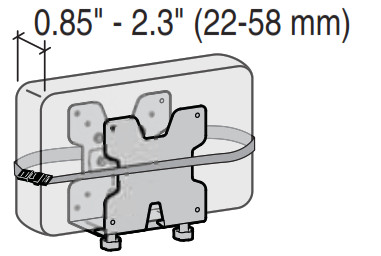
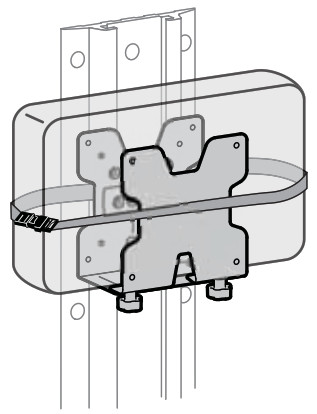
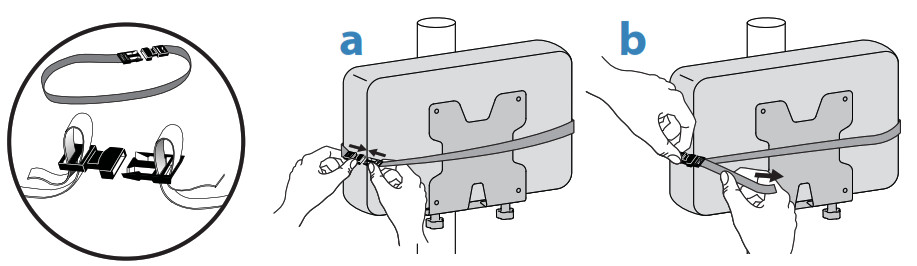
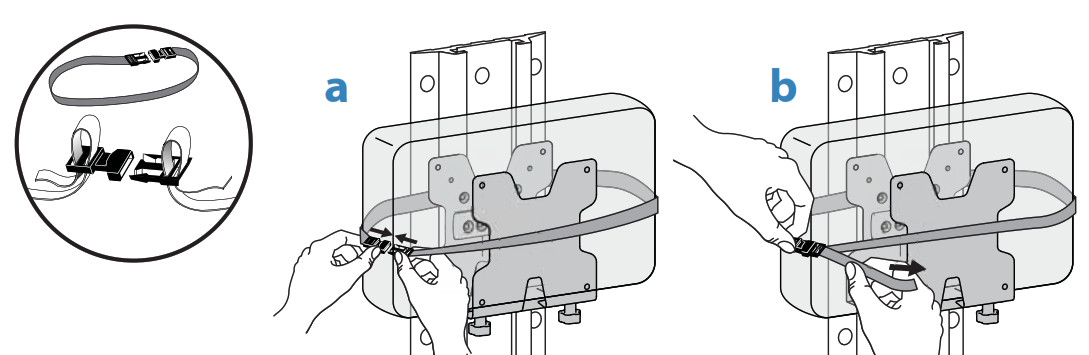
 NOTE: Using the strap and buckle is optional. If you would like to include the strap and buckle, make sure the strap is between the VESA mount and the bracket when attaching, as shown.
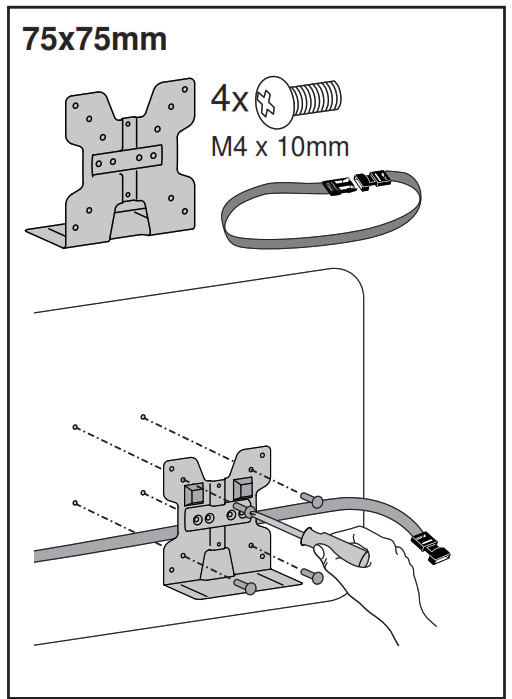
4 Attach bracket to monitor.
NOTE: Using the strap and buckle is optional. If you would like to include the strap and buckle, make sure the strap is between the bracket and the monitor when attaching, as shown. This installation step requires 2 people.


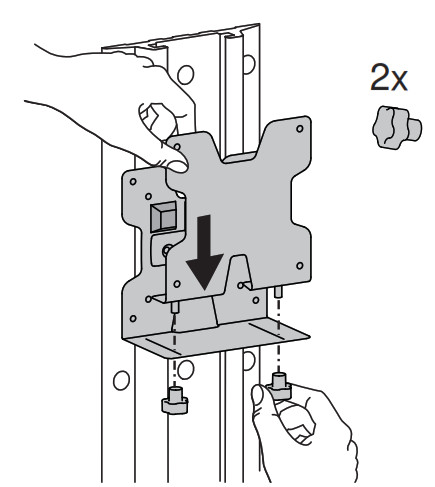
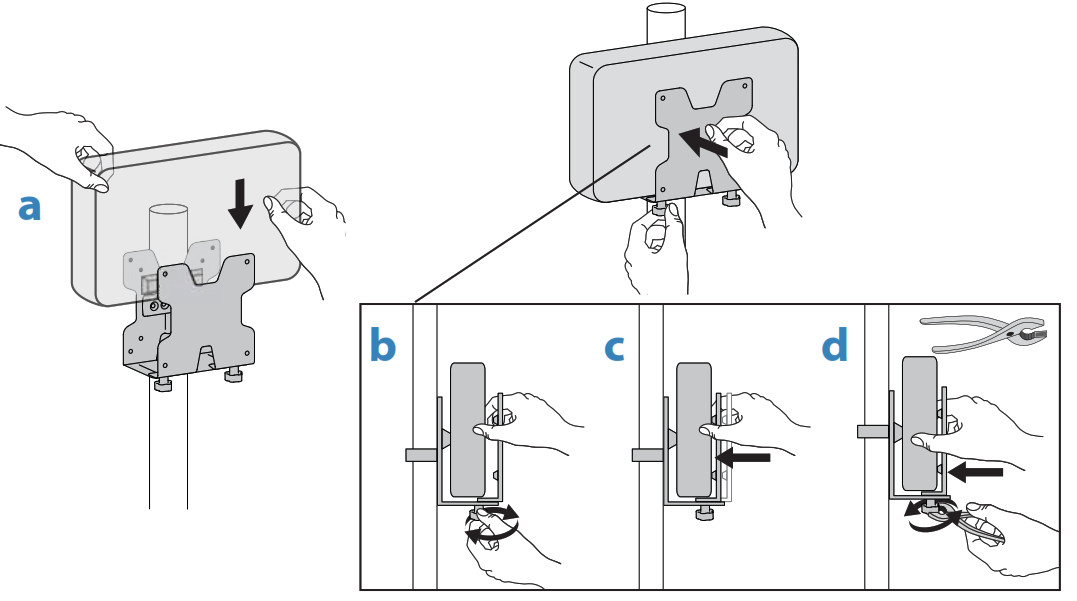
5 Attach brackets.

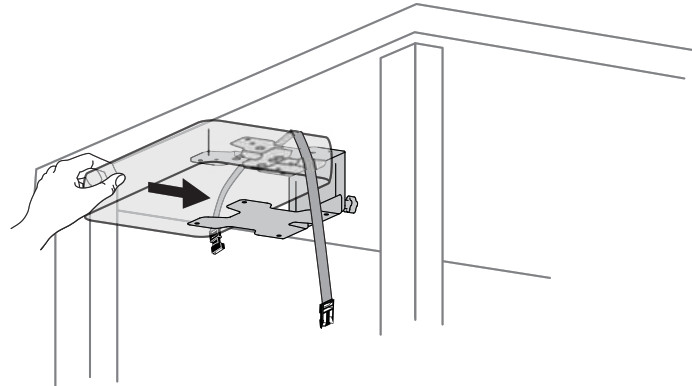
6 Attach Thin Client.
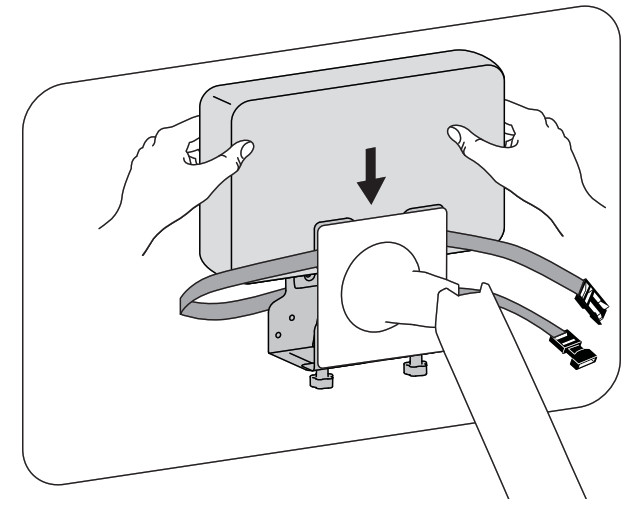
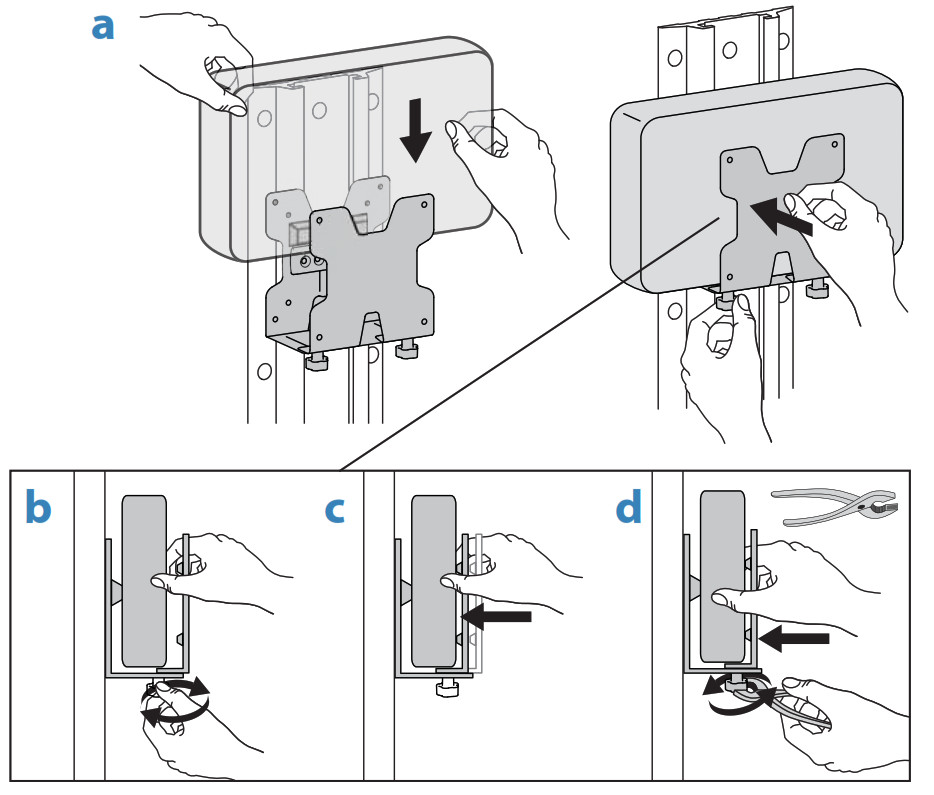
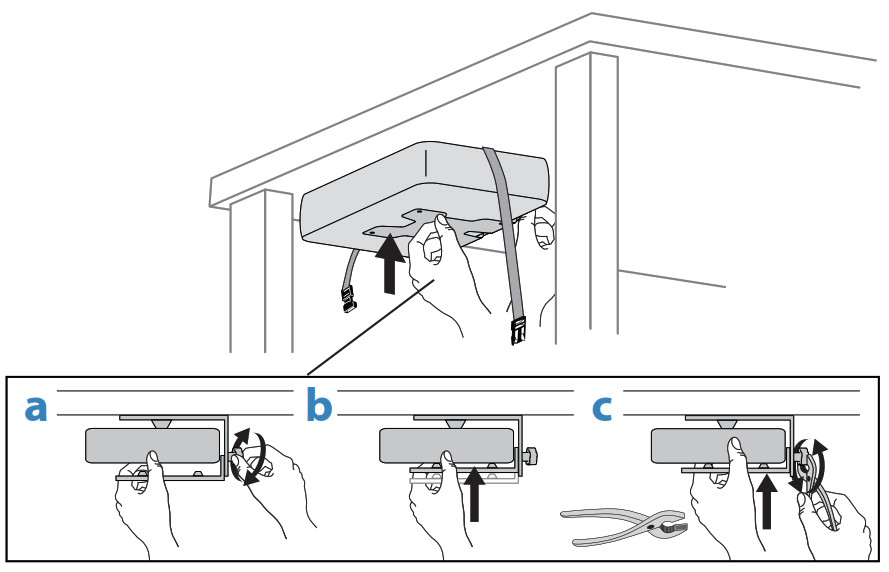
7 Secure Thin Client.a. Loosen knobs.b. Push brackets together.c. Tighten knobs with pliers as needed.

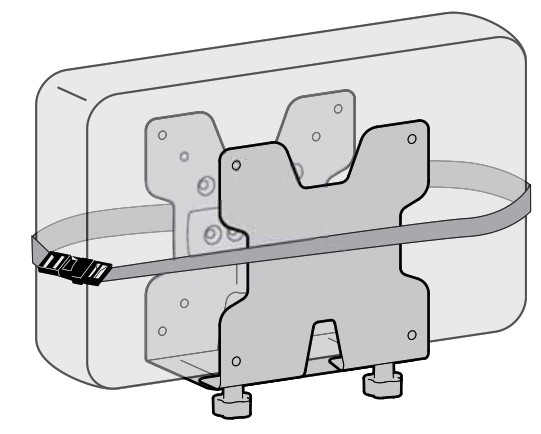
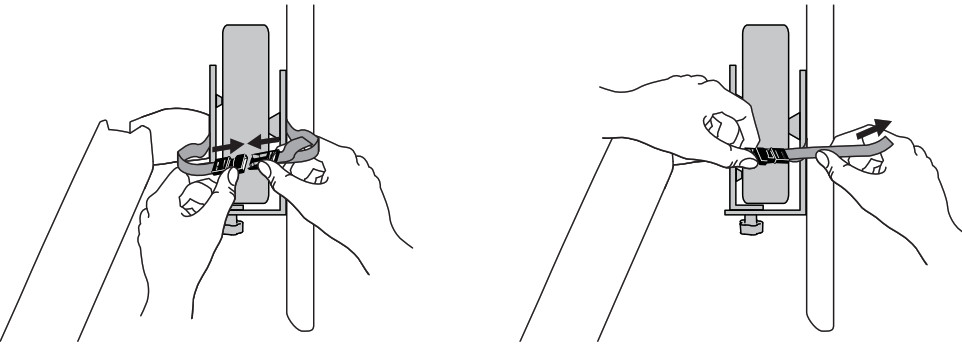
8 If you are using the strap and buckle, clip buckle together and tighten strap.
1 Attach bump-ons as shown.

2 Attach bracket shown to Wall Track bracket.NOTE: Leave enough space between brackets to allow sliding onto Wall Track.

3 Attach brackets to Wall Track.
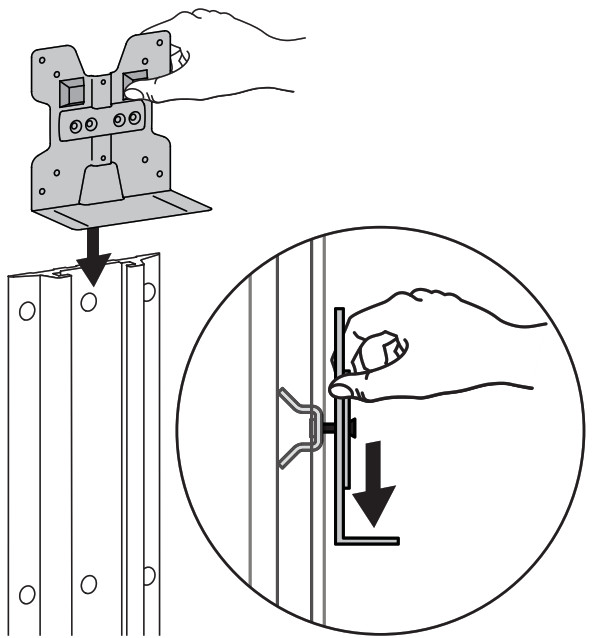
4 Tighten screws to secure brackets to Wall Track at desired height.
5 Attach brackets.
6 a. Attach Thin Client to brackets.Secure Thin Client.b. Loosen knobs.c. Push brackets together.d. Tighten knobs with pliers as needed.
7 If you want to use the optional strap and buckle:a. Wrap the strap around the brackets and Thin Client then clip buckle together.b. Tighten strap.
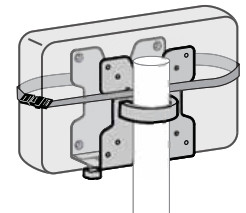
NOTE: If Thin Client is mounted on a pole, this may limit the amount of arm rotation.
1 Attach bump-ons as shown.
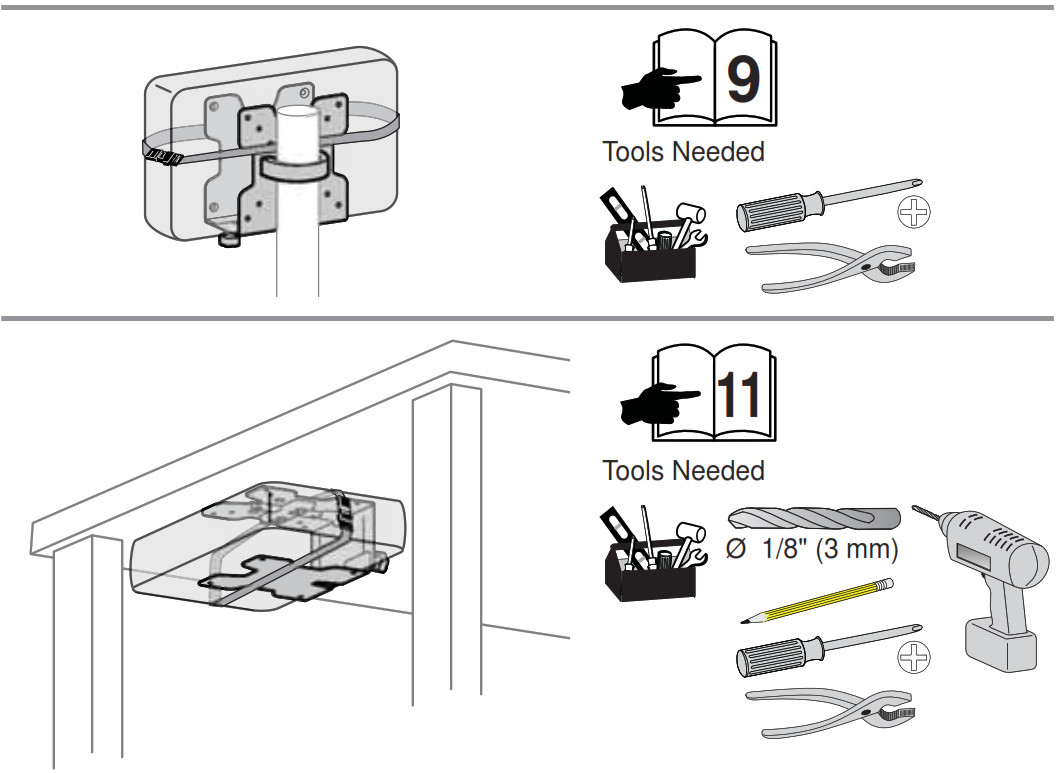
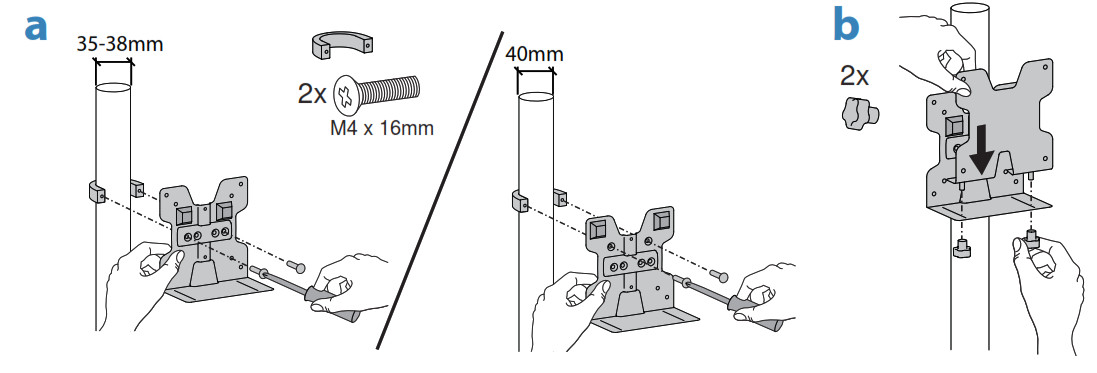
2a. Attach bracket shown to pole and pole clamp.b. Attach brackets.
3a. Attach Thin Client to brackets.Secure Thin Client.b. Loosen knobs.c. Push brackets together.d. Tighten knobs with pliers as needed.
4If you want to use the optional strap and buckle:a. Wrap the strap around the brackets and Thin Client then clip buckle together.b. Tighten strap.
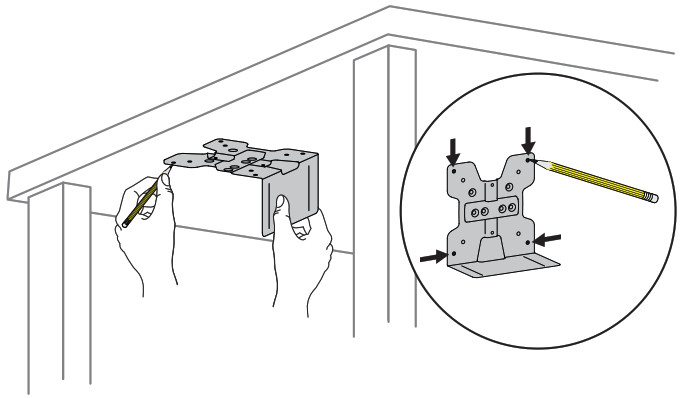
1 Attach bump-ons as shown.
2 Mark mounting holes in desired location using bracket shown.
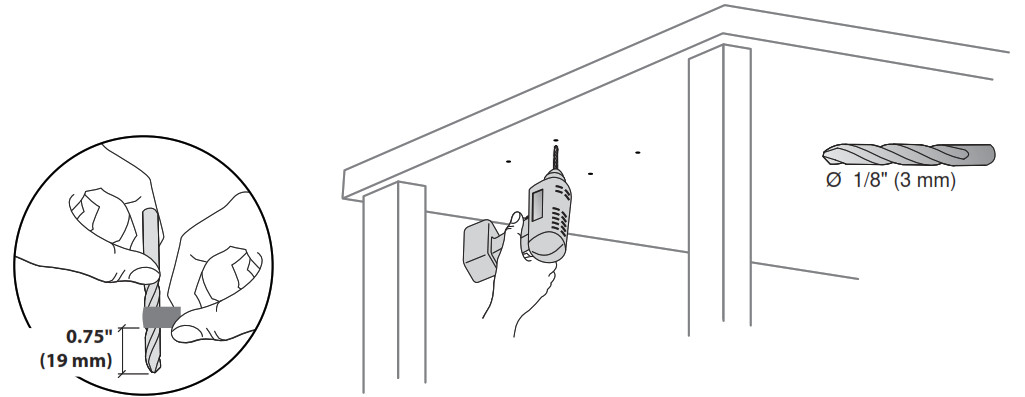
3 Drill holes.TIP: To ensure proper depth, place a piece of tape on the drill bit 0.75″ (19 mm) from the tip.
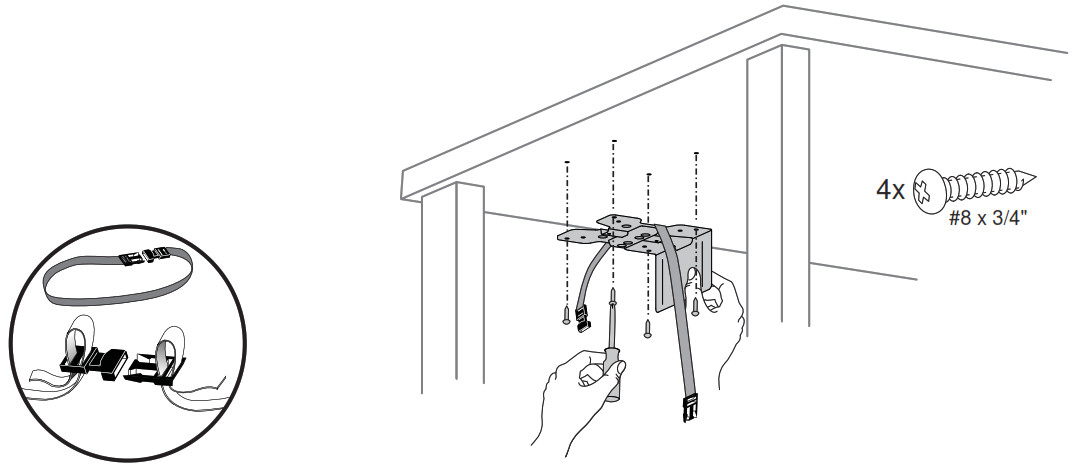
4 Attach bracket shown.
NOTE: Using the strap and buckle is optional. If you would like to include the strap and buckle, make sure the strap is between the desk and the bracket when attaching, as shown.
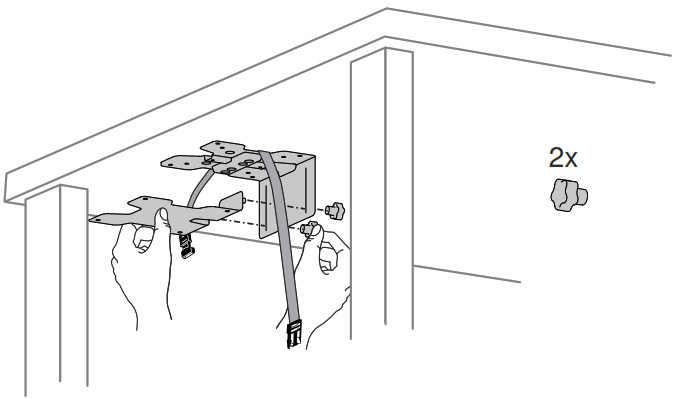
5 Attach brackets.
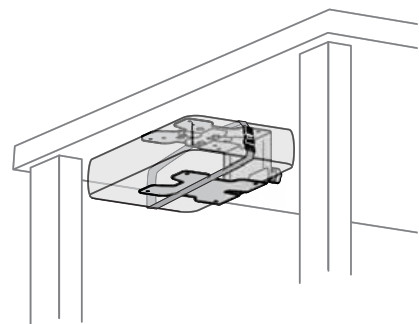
6 Attach Thin Client.
7 Secure Thin Client.a. Loosen knobs.b. Push brackets together.c. Tighten knobs with pliers as needed.
8 If you are using the optional strap and buckle:a. Wrap the strap around the brackets and Thin Client then clip buckle together.b. Tighten strap.

Set Your Workstation to Work For YOU!

Learn more about ergonomic computer use at: www.computingcomfort.org
Height Position top of screen slightly below eye level.Position keyboard at about elbow height with wrists fl at.Distance Position screen an arm’s length from face—at least 20” (508mm).Position keyboard close enough to create a 90˚ angle in elbow.Angle Tilt screen to eliminate glare.Tilt the keyboard back 10° so that your wrists remain fl at.
To Reduce FatigueBreathe – Breathe deeply through your nose.Blink – Blink often to avoid dry eyes.Break • 2 to 3 minutes every 20 minutes• 15 to 20 minutes every 2 hours.
Service and Warranty
For service and warranty visit www.ergotron.comFor local customer care phone numbers visit: http://contact.ergotron.com
NOTE: When contacting customer service, reference the serial number.
ERGO-mon.© 2013 Ergotron, Inc. All rights reserved.While Ergotron, Inc. makes every effort to provide accurate and complete information on the installation and use of its products, it will not be held liable for any editorial errors or omissions (including those made in the process of translation from English to another language), or for incidental, special or consequential damages of any nature resulting from furnishing this instruction and performance of equipment in connection with this instruction. Ergotron, Inc. reserves the right to make changes in the product design and/or product documentation without notification to its users. For the most current product information, or to know if this document is available in languages other than those herein, please contact Ergotron. No part of this publication may be reproduced, stored in a retrieval system, or transmitted in any form or by any means, electronic, mechanical, photocopying, recording or otherwise without the prior written consent of Ergotron, Inc.,1181 Trapp Road, Eagan, Minnesota, 55121, USA Patents Pending and Patented U.S. & Foreign. Ergotron is a registered trademark of Ergotron, Inc.
Americas Sales and Corporate HeadquartersSt. Paul, MN USA(800) 888-8458+1-651-681-7600www.ergotron.com[email protected]
EMEA SalesAnnersfoort, The Netherlands+31 33 45 45 600www.ergotron.com[email protected]
APAC SalesTokyo, Japanwww.ergotron.com[email protected]
Worldwide OEM Saleswww.ergotron.com[email protected]
888-97-341-G-01 rev. C • 02/14
References
[xyz-ips snippet=”download-snippet”]