erica synths BLACK JOYSTICK2 Instruction Manual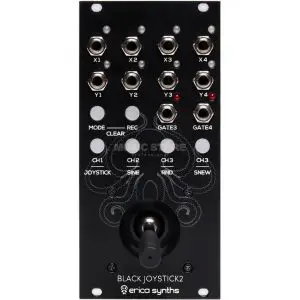
THANK YOU FOR PURCHASING ERICA SYNTHS BLACK SERIES MODULE!Erica Black Series include high-end, unique functionality and superior quality modules. Only the best, highest quality components are used, all inputs and outputs are protected against undesired overvoltage.Erica Black Series consist of range of modules that are needed to put together entire synth. Enjoy!
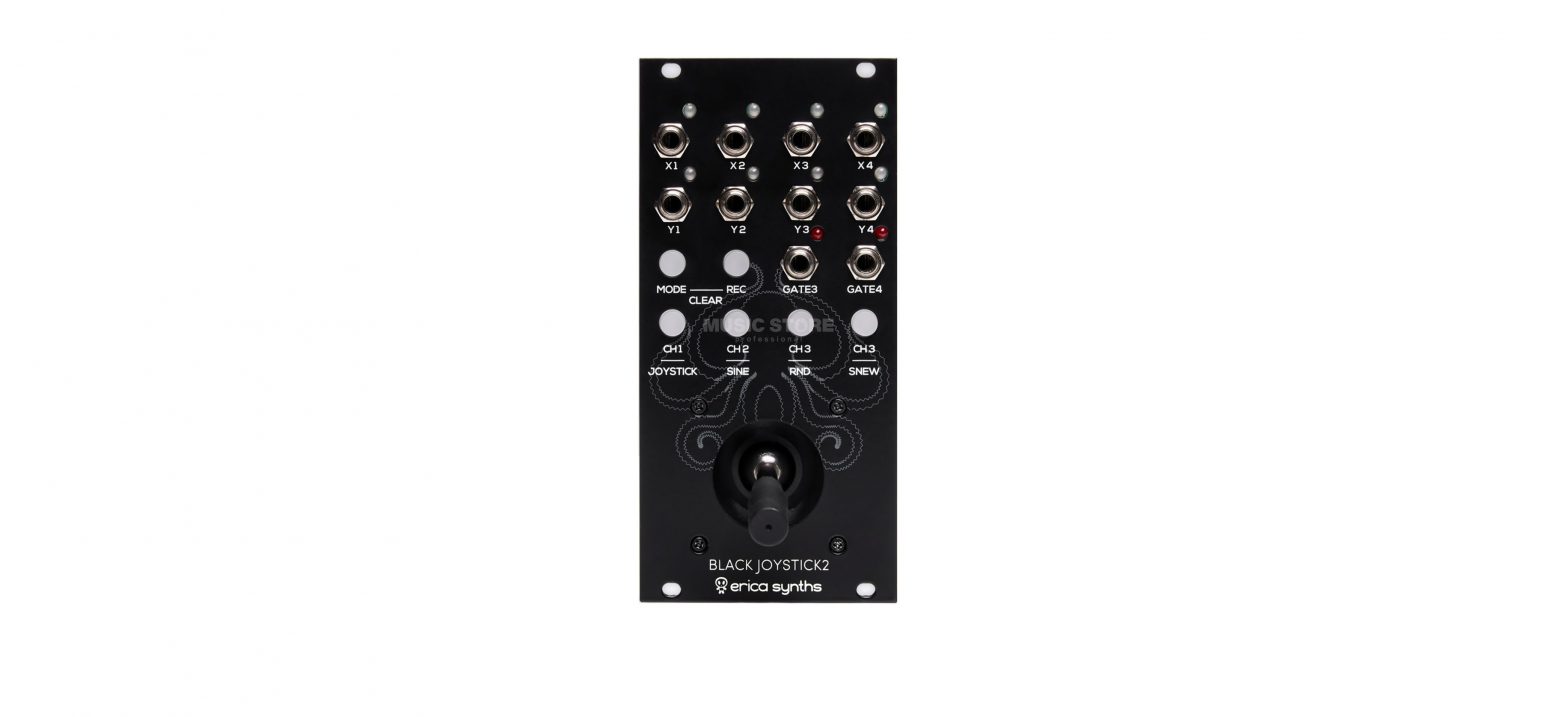
Erica Synths Black Joystick2 is 8 channel multi functional CV and sound source – joystick, movement recorder, distinct LFO and drone/noise oscillator. . It provides great interaction with the modular system and allows to develop unconventional modulation patterns instantly.
FEATURES:
- 8 simultaneous CV outputs
- 2 gate outputs
- 4 motion record channels
- Sine and Random LFOs with adjustable frequency and amplitude
- Drone/noise oscillator
- Gate record
- Two 4-position CV panners
- Skiff friendly design
- An octopus
Specification
CV output amplitude: -5V – +5VLFO frequency range :0.1Hz – 32HzDrone oscillator frequency range: 32Hz – 1kHzMax motion record time :8” per channelPanel width: 12HPModule depth: 30mmPower consumption :+12V,
CONFIGURATION
There are two configurable options available:
- joystick position save, when switching to other channel. For example, you are in SINE mode on channel 1 and you have set a joystick is a specific position to achieve desired rate/amplitude ratio, and then switch to the channel 2 and record some automations. If a joystick position save is NOT engaged, as soon you switch back to the channel 1, the rate/amplitude ration will be different, because the joystick position has changed. If a joystick position save IS engaged, the rate/amplitude ratio will remain the same till you move the joystick through the originalposition. If you want immediate response from the joystick, we recommend to turn a joystick position save off; if you want more control over joystick position settings, turn a joystick position save on.
- recall of last active channel on powering the module off. If this option is engaged, the module will save all settings of the last selected channel and recall them next time, you power a case on
In order to access configuration, power a modular case off, push and hold the MODE button, and power the case on. Now, you can push CH1 button to engage the joystick position save and CH2 button to engage recall of last active channel. If the option is engaged, the relevant channel button will be lit.
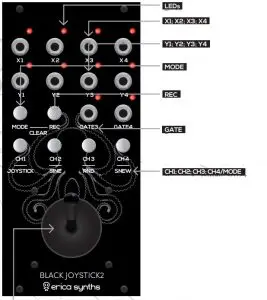
- JOYSTICKMove the joystick to control X/Y CV outputs and/or record the motion of the joystick. In the LFO and Drone Oscillator mode X movement of joystick changes the frequency, Y movement – amplitude of the signal on outputs. You can also record LFO automations – frequency and amplitude change. When the motion is recorded in a certain channel, and in the same channel the joystick is moved, the recording is overridden by the movement momentarily. As movement stops, the output CVs smoothly fade back to the recorded motion and playback continues.
- LEDsThe bicolour LEDs indicate the output CV state. Green means the output is positive, yellow – negative
- X1; X2; X3; X4These are CV outputs that correspond to joystick movement along X axis and these are primary CV outputs in the LFO mode
- Y1; Y2; Y3; Y4These are CV outputs that correspond to joystick movement along Y axis and these are 90o phase shifted CV outputs in the LFO mode
- MODESelect one or several channels simultaneously, you wish to initiate one of four action modes, and then push and hold the MODE button and push one of CHANNEL/MODE buttons to select the output mode. Push and hold the MODE button and push REC button to clear recorded automations on a selected channel.
- RECPush and hold the REC button to record a motion of a joystick. Once released the motion will start to play back automatically. A maximum record time is 8” per channel. You can also record frequency/amplitude automations of the LFO and drone/noise oscillator. If automation is recoded and plays back, a LED behind the relevant channel button will be half dimmed until you clear the recording.
- GATEThese are the Gate outputs for channels 3 and 4. In Joystick and SNEW modes a +5V signal is present during a motion of the joystick. In LFO mode and Joystick motion record mode a +5V signal is present when CV is above 0V. This means, you can record rhythmic gates by moving a joystick vertically. The LEDs are on, when the gate is high. When in sine or random LFO mode, the Gate output becomes a random trigger generator, when in drone/noise oscillator mode, the Gate output provides another audio output – squarewave.
- CH1; CH2; CH3; CH4/MODEThese are the CHANNEL SELECT and MODE buttons. Push one or several buttons simultaneously to select the output channel. If several channels are selected simultaneously, you can control parameters on selected channels simultaneously. Buttons of the selected channels will be lit.Push and hold the MODE button and push one of the CHANNEL/MODE buttons to select the CV output mode of the channel. The button of the selected mode will start to blink. Available modes are:JOYSTICK. In this mode, depending on a joystick position up to -5V to +5V signals are available on X and Y outputs. You can record up to 8” of a motion of the joystick by pushing and holding the REC button. The recorded motion will start to loop automatically. To clear the recording push and hold the MODE button and push the REC button
SINEWAVE LFO/DRONE OSCILLATOR. In this mode you have low frequency sinewave on the X output and same, but 90o phase shifted sinewave on the Y output. X position of the joystick defines the frequency of the sinewave, Y position defines the amplitude. You can record the change of the frequency and amplitude by pushing and holding the REC button. The recorded motion will start to loop automatically. To clear the recording push and hold the MODE button and push the REC button. To switch to the DRONE OSCILLATOR mode (audio frequency sinewave) push and hold the MODE button and push the relevant channel button for 2″. The channel button will become 50% dimmed, and next time, you select a channel, it will be in drone oscillator mode. To turn drone oscillator mode off, push and hold the MODE button and push the relevantchannel button for 2″. Try to use all 8 outputs in the Drone oscillator mode! Please note that the sine oscillator is primarily in intended to work as FM modulation source; as a sound source it may not sound perfect due to 20kHz sampling rate
RANDOM LFO/NOISE OSCILLATOR. In this mode you have stepped random voltages on the X and Y outputs. X position of the joystick defines the frequency of the random voltage change, Y position defines the amplitude. You can record the change of the frequency and amplitude by pushing and holding the REC button. The recorded motion will start to loop automatically. To clear the recording push and hold the MODE button and push the REC button. You can swith the NOISE OSCILLATOR mode on/off same way as sine oscillator.
SNEW (SOUTH-NORTH-EAST-WEST) PANNER. In this mode you have 4×2 CV outputs, each changing from 0V to +5V. Meaning, if you set the SNEW mode on the CHANNEL1 and CHANNEL2, and Y1 outputs 0-+5V, when thejoystick is mover from the center right (east), X1 outputs 0-+5V, when the joystick is moved from the center up (north), Y2 outputs 0-+5V, when the joystick is moved from the center to the left (west), X2 outputs 0-+5V, when the joystick is moved from the center to the down (south). Same works for pair of CHANNEL3 and CHANNEL4.This is particularly useful for controlling VCAs in quadraphonic performances or controlling several X-faders, VCAs, VCFs or other modules simultaneously. You can record the motion of the joystick by pushing and holding the REC button. The recorded motion will start to loop automatically. To clear the recording push and hold the MODE button and push the REC button.When operating the Black Joystick2 module you select the CHANNEL, push and hold the MODE button to check, what MODE is selected – the relevant MODE button will start to blink. When you select a different mode, all reordered automations are instantly cleared.
SAFETY INSTRUCTIONS
Please follow the instructions for use of the Erica Synths module below, ‘cause only this will guarantee proper operation of the module and ensure warranty from Erica Synths.
 Water is lethal for most of the electric devices, unless they are made waterproof. This Erica Synths module is NOT intended for use in a humid or wet environment. No liquids or other conducting substances must get into the module. Should this happen, the module should be disconnected from mains power immediately, dried, examined and cleaned by a qualified technician.
 Do not expose the module to temperatures above +50° C or below -20° C. If you have transported module in extreme low temperatures, leave it in room temperature for an hour before plugging it in.
![]() Transport the instrument carefully, never let it drop or fall over. Warranty does not apply to modules with visual damages.
Transport the instrument carefully, never let it drop or fall over. Warranty does not apply to modules with visual damages.
 The module has to be shipped in the original packaging only. Any module shipped to us for return, exchange and/or warranty repair has to be in its original packaging. All other deliveries will be rejected and returned to you. Make sure you keep the original packaging and technical documentation.
 This device complies to the EU guidelines and is manufactured RoHS conforming without use of lead, mercury, cadmium and chrome. Nevertheless, this device is special waste and disposal in household waste is not recommended.
User manual by Girts Synths.Design by Ineta Copying, distribution or any commercial use in any way is prohibited and needs the written permission by Erica Synths. Specifications are subject to change without notice.In case of any questions, feel free to contact us through www.ericasynths.lv.
You will find Erica Synths terms of warranty atwww.ericasynths.lvItems for return, exchange and/or warranty repair have to be registered at SUPPORT on www.ericasynths.lv and send back to us according to instructions in the support page.

References
[xyz-ips snippet=”download-snippet”]