Esco Water Heaters User Manual
©ESCO Institute 2020
This manual was developed by The ESCO INSTITUTE Mount Prospect, IL 6005
ESCO InstituteP.O. Box 521Mount Prospect, IL 60056Phone: (800) 726-9696Fax: (800) 546-3726Website: www.escogroup.orgE-Mail: [email protected]
COPYRIGHT © 2020 ESCO INSTITUTEAll rights reserved
Printed in the United States of America
ISBN Print Edition: 1-930044-49-6ISBN Ebook Edition: 1-930044-50-X
No part of this manual may be reproduced, stored in a retrieval system, or transmitted by any means, electronic, mechanical, photocopying, recording, or otherwise, without written permission of the authors. No patent liability is assumed with respect to the use of the information contained herein. While every precaution has been taken in the preparation of this book, the authors and publisher assume no responsibility for errors or omissions. Neither is any liability assumed for damages resulting from the use of the information contained herein.
Water Heaters
Learning Outcomes:
After completing this section, the reader should be able to:
- Recognize safety-related issues when working on gas or electric water heaters.
- the most common water heater ratings and sizes.
- Describe how to calculate a water heater’s first hour rating.
- Identify and discuss components common to both electric and gas water heaters.
- Describe the typical operation of gas water heaters and the gas-related components.
- Describe the typical operation of electric water heaters.
- Explain typical routine maintenance procedures for gas and electric water heaters.
- Discuss troubleshooting common faults for both gas and electric water heaters.
Introduction to Water Heaters
Storage water heaters are used to provide domestic hot water to plumbing fixtures such as sinks, dishwashers, washing machines, and showers. A properly sized water heater should meet the occupant’s needs while operating at peak efficiency. They use either gas or electricity to heat the water which is stored in a tank for later use. Other types of water heaters include tankless water heaters, solar water heaters, and heat pump water heaters. The focus of this text will be electric and gas-fired storage water heaters.
Safety
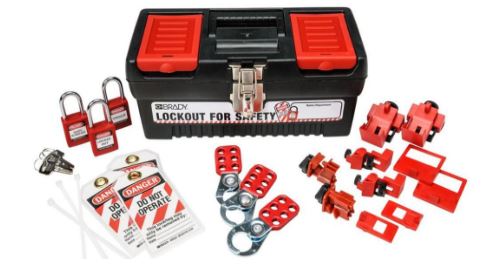
When working on water heaters (or any appliance), safety should always be your first priority. Proper personal protective equipment (PPE), should be worn at all times. A proper lockout/tagout procedure should be used when the equipment is de-energized. A multimeter should be used to verify that there is no voltage present before beginning work.
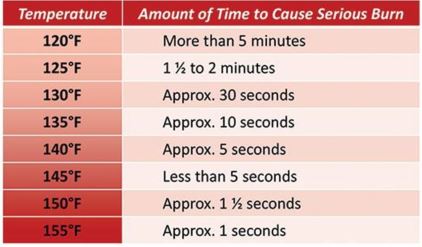
Water heaters can pose a variety of different safety hazards that a technician must be prepared for. The heated water in the tank can cause severe burns if proper service or installation procedures are not followed. Temperatures of 120°F and higher can cause scalding or burns.
Water Temperature Safety Chart
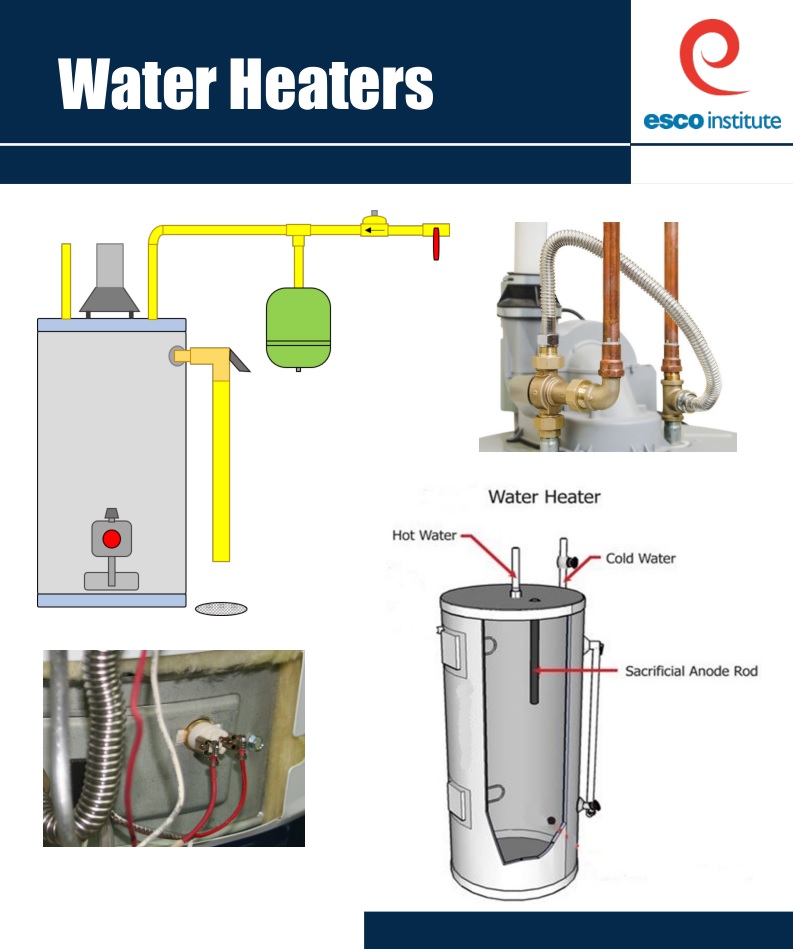
The excess water volume pushes into the expansion tank maintaining the pressure in the water heater at a safe level. Some manufacturers may void the warranty if the water heater is installed without an expansion tank. In addition, numerous municipalities require an expansion tank be installed on all hot water tanks. Always adhere to local codes where applicable.
Pressure Reducing Valve (PRV)
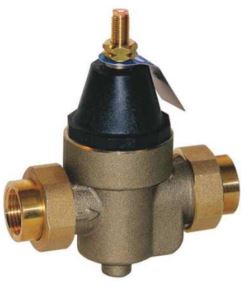
A pressure reducing valve drops inlet water pressure to a lower outlet pressure. It is often used in areas where the municipal water pressure is very high. High water pressure can damage water heaters, boilers, toilet valves, ice makers, dish washers, and washing machines. A dripping temperature and pressure relief (T & P) valve can sometimes be an indication that the inlet water pressure is too high. Pressure reducing valves are usually adjustable and should be set to a pressure that is lower an the maximum working pressure for the appliance or fixture that they are feeding water to. The body of the valve is marked with an arrow to indicate the direction of flow. Some models have a removable inlet screen to filter out debris. This screen should be checked and cleaned on a regular basis.
Thermostatic Mixing Valve
Higher tank temperatures can increase the amount of hot water available for use and can prevent bacterial growth in the storage tank. However, the higher temperatures can also increase the risk of scalding or burns. A thermostatic mixing valve, or tempering valve, mixes cold water from the water inlet with the hot water leaving the tank, going into the house. If the tank thermostat temperature is set above 120°F, a thermostatic mixing valve should be installed. Most municipalities have plumbing codes that indicate the maximum allowable temperature that can be delivered to each type of fixture (shower, sink, dish washer, etc.). Refer to local codes and manufacturer’s literature when adjusting the outlet temperature of a mixing valve.

Gas-Fired Water Heaters
Gas-fired water heaters typically burn natural gas or propane, to generate heat needed to heat the water in the tank. As with any gas-fired appliance, proper combustion and venting of the flue gas is vital for safe operation. Prior to 2003, most gas water heaters had an open combustion chamber which allowed the pilot to be lit manually with a match r lighter. An open combustion chamber, located near the floor, posed a major safety risk as any flammable vapors in the area of the water heater could be ignited. Residential gas water heaters manufactured after 2003 must be flammable vapor ignition resistant (FVIR) as required by the Federal Trade Commission (FTC). In order to be FVIR compliant, gas water heaters must have sealed combustion chambers as well as additional flame safety components.
In addition to FVIR compliance, some jurisdictions require gas-fired water heaters to be Low NOx or Ultra-Low NOx. NOx is an abbreviation for Nitrogen Oxide, a toxic greenhouse gas that can be produced by the combustion of fuel. These emissions are measured in nanograms per Joule or ng/J. The level required to meet the low or ultra-low standards may vary from appliance to appliance and from state to state. At the time of this writing, low NOx commercial water heaters are required in Texas and ultra-low NOx water heaters are required in most of California. For example, in some California jurisdictions, low NOx furnaces must emit no more than 40 ng/J and ultra-low NOx furnaces 14 ng/J. Ultra-low NOx water heaters must emit no more than 10 ng/J as required by South Coast Air Quality Management District (SCAQMD) Rule 1121.
Gas Piping
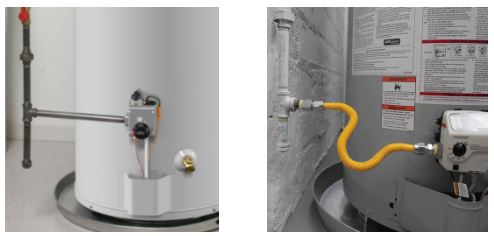
Gas-burning water heaters require fuel, air, and an ignition source (heat) to achieve combustion. The piping that supplies the fuel to the water heater must be installed according to local codes. In most installations, the piping will be threaded iron pipe with a manual gas shutoff. The piping should also have a vertical “drip leg” prior to entering the gas valve. This drip leg prevents sediment or condensation in the gas line from entering and damaging the gas valve. In some jurisdictions, a 24 to 36-inch flexible gas connector is permissible as the final connection to the gas valve. The flexible connector has flared connections and, in most cases, cannot be reused if removed for any reason. They also have code-specific ratings and a date of manufacturing stamped onto them that should not be removed.
Draft Hood
All natural draft gas water heaters are equipped with a draft hood, located on top of the tank, where the flue gas exits the water heater. The vent system for the water heater is connected to the draft hood. The draft hood allows air from the room to enter the flue pipe which will cool and dilute the flue gas as it travels up the chimney or stack pipe. It is designed to ensure proper draft across the burner and to help create a constant flow of flue gas into the vent system.
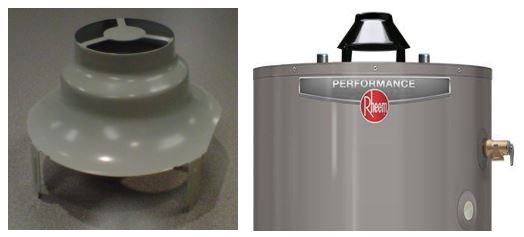
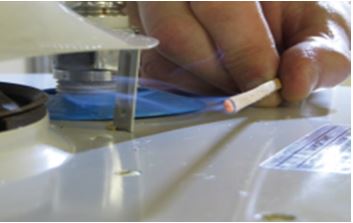
One important safety concern with a draft hood is spillage. If the vent system is not installed properly, or if it becomes obstructed, the flue gas can spill back into the living space. The draft can be tested at the draft hood wit draft gauge, a match, or a smoke pen. The water heater should be allowed to run for about 5 minutes to establish a draft before being tested for spillage. When a proper draft is present (0.02 – 0.04 inches of water column), smoke should be drawn into the draft hood and up the flue pipe.
Vent Pipe
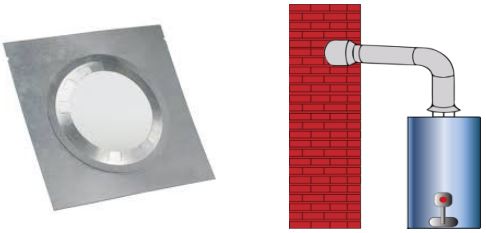
The venting system for a gas water heater must be stalled according to local and/or national building code. It be sloped upward, at least 1/4-inch per 10 feet in most cases. The vent piping for natural draft water heaters must be made of metal and have fire protection rings wherever it passes through a wall or ceiling. The pipe diameter should never be reduced to one smaller than the opening of the draft hood, which is typically 3 inches. If a transition is used to upsize from 3-inch to 4-inch pipe the transition should be installed at the draft hood.
Pilot Tubing and Assembly
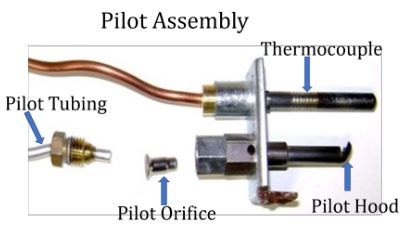
The pilot tubing is the small aluminum tubing that carries gas from the gas control to the pilot assembly. When working with or near the pilot tubing, care should be taken not to bend, kink, or crack the tubing as it can be easily damaged. The pilot assembly contains the pilot orifice, which regulates the gas pressure to the pilot. The assembly also has a mounting location for proper placement of the thermocouple. A part of the pilot assembly, called the pilot hood, is designed to direct the gas and pilot flame toward the thermocouple.
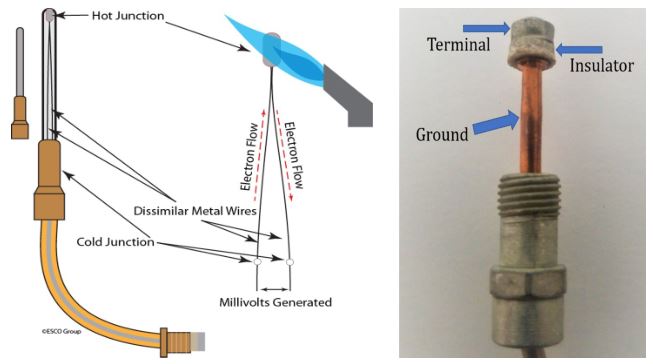
Thermocouple
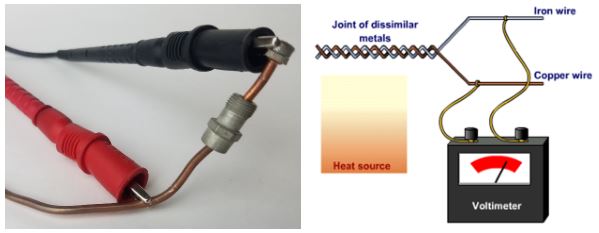
A thermocouple is made of two dissimilar metals (usually copper and iron) fused together at one end, referred to as the hot junction. The opposite end is called the cold junction. The head, or hot junction, of the thermocouple should be positioned so that it is engulfed by the pilot flame. When the hot junction is exposed to heat, it causes electrons to flow. This DC voltage is generated due to the temperature difference between the two dissimilar metals when they are heated. A properly functioning thermocouple will produce 18 to 30 DC mV when no load applied. It should produce no less than 10 DC mV under load. The voltage that is generated by the thermocouple is used to power the water heater gas control and its related components.
Electric Water Heaters
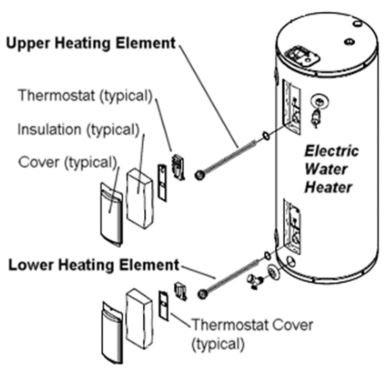
Electric water heaters use electric immersion type heating elements to heat the water inside of the tank. Most residential electric water heater controls include a manual reset high-limit switch, an upper thermostat, a lower thermostat, and two resistive heating elements. One heating element is located near the top of the tank and one near the bottom. Single-element water heaters have one heating element, mounted at bottom of the tank, controlled by a single thermostat and high-limit switch. Electric wat heaters typically operate with 240 VAC power supply, though some smaller models may operate on 120 VAC. The design and construction of the electric water heater storage tank is similar to gas water heater tanks. They also use a sacrificial anode rod to help slow tank corrosion.
Typical Operation
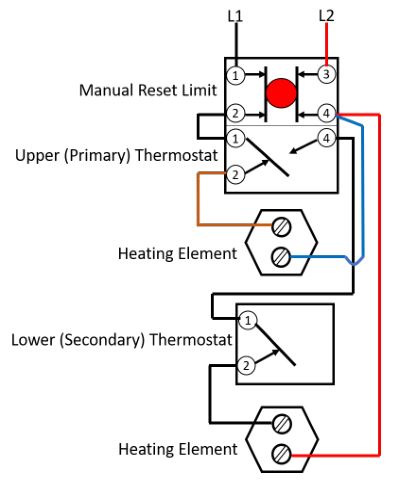
The upper and lower heating elements will never operate at the same time, they are cycled. When the water heater is powered, the upper element is energized, and heats the water in the upper portion of the tank. When the upper portion of tank is heated to the upper thermostat setting, the power is then switched to the lower heating element. The lower element heats the water until the temperature in the lower portion of the tank reaches the lower thermostat setting. If the water temperature in the tank reaches 170°F (for most residential models), the manual reset high-limit switch will open. The limit switch can be reset by pushing in the red button, located above the upper thermostat. If the upper element burns out, the water heater will no longer function. The upper thermostat will never be satisfied, and power will never switch to the lower element.
Thermostat and Limit Switch
The mechanical thermostats found on most electric water heaters use a bimetal switch to open and close the thermostat contacts. A dual-element thermostat has a single-pole double-throw switch to power the top and bottom elements. A manual reset limit switch is also connected to the upper, or primary thermostat. The temperature at which the limit switch opens is approximately 170°F to 180°F and is non-adjustable. The lower thermostat on a………….. Page 20 & 21 missing.
Routine Maintenance Procedures
Performing regular maintenance on an appliance can prevent it from breaking down and keep it in good condition. Regular servicing can be more efficient than repairing or replacing a water heater after it breaks down or fails. It can prevent the number of repairs necessary over the life of the water heater and ensure that it operates at its rated capacity and efficiency. In this section, we will cover some of the most common general maintenance tasks performed on water heaters.
Inspecting the Anode Rod
Most manufacturers recommend that the anode rod be inspected every three years. It should be inspected yearly in areas with hard or well water, or, where water softeners are used. The following is a list of general procedures for inspecting or replacing the anode rod. Refer to manufacturer’s literature for more specific instructions.
- Turn off the cold water supply to the water heater.
- Turn off the heat source, gas (shutoff) or electric (breaker).
- Connect a hose to the drain valve and drain the upper portion of the tank (a few gallons). Note: It is not recommended to drain the entire tank. The weight of the water in the tank will help prevent movement of the tank when the anode rod is being removed.
- Use a socket (typically 1-1/16 in.) to remove the anode rod. A 2×4 placed between the hot and cold water pipes can be used for leverage.
- Inspect the rod and replace if necessary. A flexible anode rod is available where overhead clearance makes replacement difficult. Use several turns of Teflon tape on the threads of the anode rod. Note: The anode head must make “electric” contact with the threaded seat for it to function properly. Make sure to tighten it until the head makes metal-to-metal contact with the tank.
- Open the cold water supply, turn on the gas or breaker, and light the pilot if necessary.
- Inspect for leaks.

Flushing the Tank
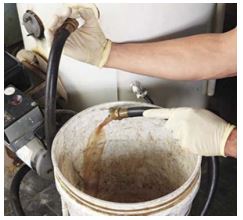
Flushing a storage-type water heater should be done as often as necessary. Over time, excessive scale accumulates at the bottom of a tank as minerals, sediment and other deposits settle in the water. This problem can be worse in gas water heaters as the burner is located at the bottom of the tank. Heat from the burner can “cook” the scale d cause it to harden, making it difficult or impossible to flush the tank. Flushing out these deposits regularly can extend the lifespan of a water heater and prevent problems, such as bursts of cold water during hot water use.
Page 23-25 missing
- Visually inspect the burner for proper flame characteristics. Note: It is normal to see some orange streaks in the flame after a thorough cleaning. These are due to the dust particles in the air and should disappear after a few minutes of burner operation.

Inspecting the Electric Heating Elements
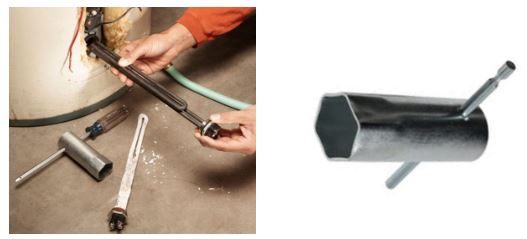
The electric resistance heating elements on an electric water heater should be inspected for damage and/or corrosion periodically. They should be inspected more frequently in areas with hard water or water softeners. They can be tested with a multimeter while installed on the tank. The tank must be drained in order to remove and inspect them. The following is a general list of procedures for removing and inspecting the heating elements. The manufacturer’s literature should be referenced for more specific procedures.
- Turn off the cold water supply to the water heater.
- Turn off the electric (breaker).
- Connect a hose to the drain valve and run the other end outside or to a floor drain. Note: Open some of the hot water taps in the residence to prevent a vacuum from developing in the water lines or the tank.
- Open the drain valve and watch the quality of the water coming from tank. If excessive sludge or scale are present, a back flushing may be necessary. Caution: The water being drained may be very hot. Proper PPE should be worn to protect against injury from splashing hot water.
- Once the tank is drained to a level below the elements, the elements can be removed with an element wrench after disconnecting the wires.
- Inspect and/or replace the elements and reconnect the electrical wires. Replace the covers.
- Open the cold water supply and allow the tank to fill.
- Allow the faucets to run for a few minutes to bleed any air out of the water lines and tank and then close them.
- Inspect the tank and elements for leaks.
- Turn on the breaker and energize the water heater.
Pilot lights but won’t stay lit
- If the pilot goes out as soon as the control knob is released, there is likely an electrical problem. (Be sure to hold the control knob down for at least 60 seconds after the pilot is lit to allow enough time for the thermocouple to generate voltage.)
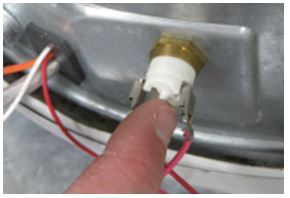
- Check the reset button on the thermal switch. If thermal switch is tripd, you should hear or feel a click when it is reset. Further inspection should be done to find the cause of the open thermal switch.
- Verify that the thermocouple is properly placed in the pilot flame.
- Test the thermocouple with a multimeter:

- Set the meter to DC millivolts.
- Remove the lead end from the gas control.
- Light the pilot. (The control knob must be held down for the duration of the test.)
- Using the meter, measure the voltage output of the thermocouple. (Alligator clips can make this check easier.)
- If the reading is less than 10 mV, replace the thermocouple.
- If the reading is 10 mV or higher and all wiring connections are secure, replace the gas control. (The problem may be the valve or an open ECO (reset), neither of which can be repaired. The ECO can be tested for continuity on some models.)
Tripped thermal switch
- A tripped thermal switch is typically caused by a combustion air or draft issue.
- Clean the LDO filter and/or the flame arrestor.
- Ensure that the mechanical room has enough combustion air for all gas-burning appliances located within it.
- Conduct a draft test at the draft hood. In the event of a failed draft test, inspect the vent system and correct any faults.
- Make sure there are no flammable vapors present in the vicinity. If present, remove the source from the mechanical room and ventilate.
Review Questions
Name: ________________________________ Date: _______________________________
Water Heater Review Questions
- A __________________________ should be used to verify that a piece of equipment is de-energized.
- Water at a temperature of ________°F can cause a serious burn in approximately 5 seconds.
- On the Energy Guide label of a gas water heater, the estimated yearly energy consumption is listed in _________________.
- On the Energy Guide label of an electric water heater, the estimated yearly energy consumption is listed in _________________.
- The ________________________________ indicates the fully-heated water capacity that a water heater can deliver in the first hour of operation.
- The tank inside of a storage water heater is typically constructed of ____________________.
- Most storage water heater T & P valves are designed to open at a pressure of _________ psig or at a temperature of _________°F.
- ____________________________ is defined as “an electrochemical process in which one metal corrodes preferentially to another when both metals are in electrical contact and immersed in an electrolyte”.
- To protect the tank and its metal components from corrosion, a ____________________________ is used.
- When draining a water heater, the faucets should be opened to prevent the formation of a ____________________ within the water lines and water heater.
- On a closed-loop plumbing system, a _______________________ must be installed to protect the water heater and piping from excessive pressure.
- A _______________________________ should be installed anytime a water heater thermostat is set higher than 120°F.
- In areas with excessively high water pressure, a _____________________________ should be installed to protect the water heater.

Esco Water Heaters User Manual – Esco Water Heaters User Manual –
[xyz-ips snippet=”download-snippet”]

