![]()

Safety Precautions and WarningsRC helicopter is controlled by radio signals. It may be interfered with by other radio signals during operation. This interference may cause the helicopter to lose control.
- Improper operation to ESKY 300 V2 may lead to damage or loss. It is prohibited for children under 14 years to operate this product.
- Keep it away from a high-temperature environment for storage and flight.
- Suggested operation temperature: 5-35°C, Humidity: 20-80%.
- Keep away from the fan, air conditioner, table light while flying.
- Do not contact the motor in case of damage or injury.
![]()
- Keep away from crowds in case of accidents.
- Do not operate ESKY 300 V2 in shower room or under the rain. Moisture may go inside the helicopter which may cause electronic parts malfunction and unexpected incidents.
- Do not re-equip, upgrade or repair your helicopter with unauthorized parts.
- Keep people and objects away from the spinning unit and parts in case of damage or injury.

Specifications
| Length | 310mm |
| Height | 88mm |
| Main Rotor Diameter | 332mm |
| Tail Rotor Diameter | 55mm |
| Flying Weight | 123g |
| Flight Time | 7 Minutes |
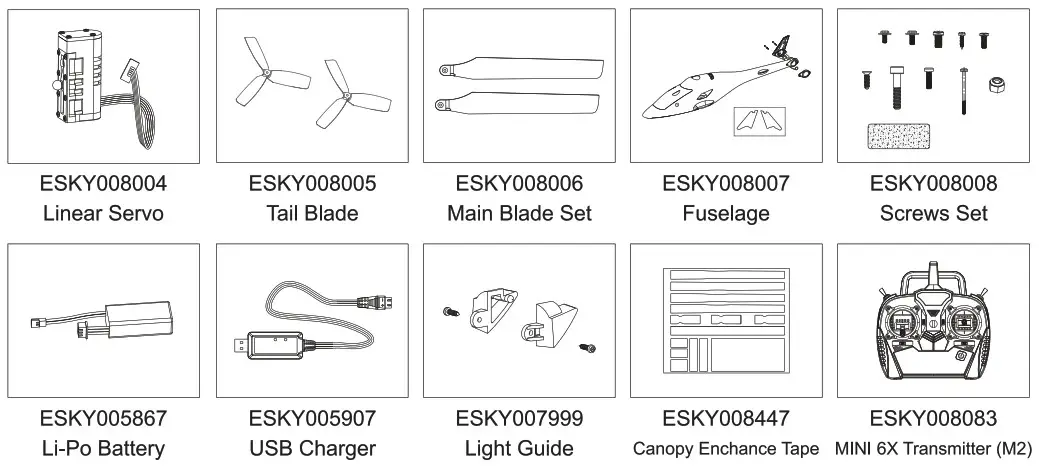
Box Contents
| 1 x ESKY 300 V2 Helicopter | 1 x 2.4GHz Transmitter |
| 1 x 320mAh 2S 7.4V Li-Po Battery | 4 x AA Size Alkaline Batteries (Not Included) |
| 1 x USB 2S Li-Po Charger | 2 x Main Blade, 1 x Tail Blade |

Battery Charging
- Insert the 7.4V 2S LiPo Battery into the charger and insert the charger into the USB port or a USB power supply.
- The LED on the charger glows solid red and blinking green, indicating charging has begun.
- When the LiPo Battery is fully charged, the LED glows solid red and solid green.
Red Solid and Green Blinking LED: ChargingRed and Green Solid LED: Charging CompleteRed Solid LED: Power Connected (Stand By)Red Blinking LED Only: Battery ErrorRed and Green Blinking LED: Charger ErrorRed Blinking and Green Solid LED: Input (V) too high
Flying Checklist
- Always turn the transmitter on first (4 x AA-size alkaline batteries are required for the transmitter) El Plug the flight battery into the helicopter
- Set the CALIBRATE switch in the helicopter to the GREEN dot position and place the helicopter on a level surface
- Lower the throttle stick to the lowest position in the transmitter and set the THROTTLE CUT switch in the transmitter to the GREEN dot position (The motor will control by throttle and spin at low idle speed)
- Fly the helicopter
- Green LED indicator in the helicopter being from solid to flashes slowly, indicating the flight battery voltage is low, Land the helicopterNOTICE: Ensure set the THROTTLE CUT switch in the transmitter to the RED dot position then set the CALIBRATE switch in the helicopter to the RED dot position after every flight NOTICE: Allow the helicopter to initialize and place the helicopter on a level surface (Initialization time is about 10 seconds, initialize successfully until the LED Indicator in the helicopter from blue flashes rapidly to solid blue)
Helicopter Parts
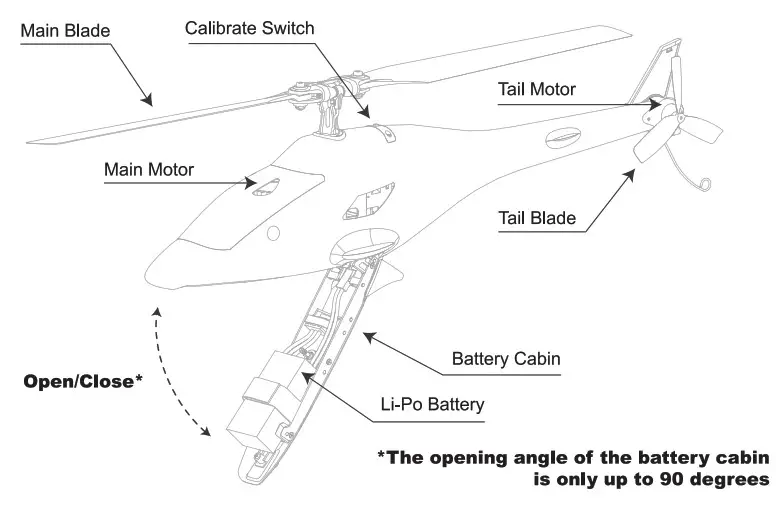
Installing the Flight Battery
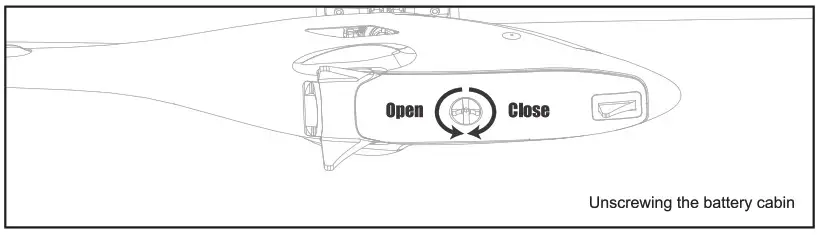
- Unscrewing the battery cabin (Caution: the opening angle of the battery cabin is only up to 90 degrees)
- Installing the battery and fixing the battery with the velcro strap
- Putting the balance plug into the plug cabin
- Connecting the power lead to the port next to the balance plug cabin
- Screwing in the battery cabin after closing it
Transmitter Control – Left-hand throttle transmitter Mode 2
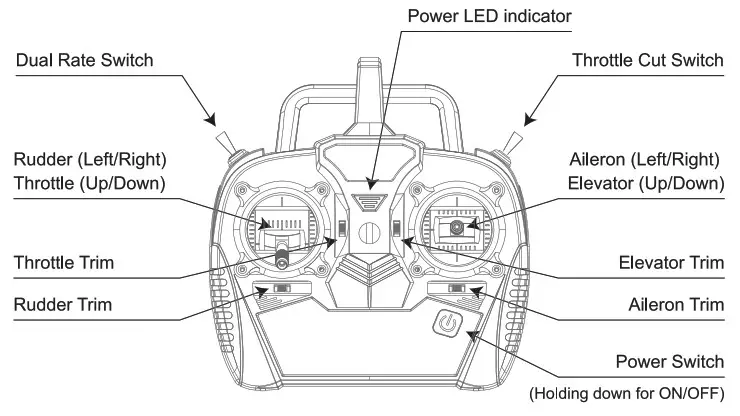
Understanding the Primary Flight Controls Mode 2
When pushing the “Left Stick” up or down, the helicopter lift up or descend accordingly; This procedure is Throttle control. When pushing the “Left Stick” left or right, the head of the helicopter turns left or right accordingly; This procedure is Rudder control.

When pushing the “Right Stick’ up or down, the helicopter moves forward or backward accordingly; This procedure is Elevator control. When pushing the “Right Stick” left or right, the helicopter tilts left or right accordingly; This procedure is Aileron control.
Transmitter Control – Right-hand throttle transmitter Mode 1
Understanding the Primary Flight Controls Mode 1
When pushing the “Right Stick” up or down, the helicopter lifts up or descends accordingly; This procedure is Throttle control. When pushing the “Left Stick’ left or right, the head of the helicopter turns left or right accordingly; This procedure is Rudder control.

When pushing the “Left Stick” up or down, the helicopter moves forward or backward accordingly; This procedure is Elevator control. When pushing the “Right Stick” left or right, the helicopter tilts left or right accordingly; This procedure is Aileron control.
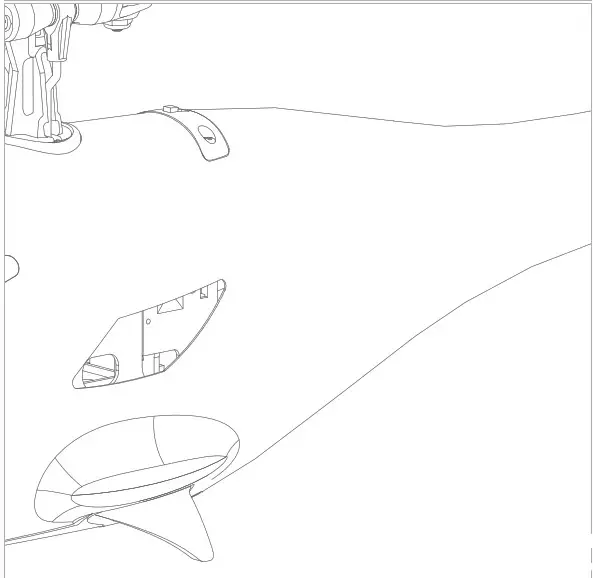
Canopy Enhance Tape
The canopy is fragile parts, a spare Enhance Tape is inside the box for repairing when the canopy cracked. Applying the Enhance Tape to the place where the canopy is bonded as the diagram. Applying the Enhance Tape before usage, it can strengthen the canopy and reduce the destructiveness.
Throttle Cut
Throttle Cut is used to turn off the motor quickly if the helicopter is out of control. The motor will stop spinning and out of throttle control when Throttle Cut is switched to RED dot position, the motor will continue to spin at low idle speed and control by throttle when Throttle Cut is switched to GREEN dot position and the throttle at the lowest position. If Throttle Cut is switched to GREEN dot position and the throttle position is NOT at the lowest throttle, the motor will still spin at low idle speed but out of throttle control until the throttle moves to the lowest throttle.
Dual Rate Selection
The control sensitivity can be changed by set the Dual Rate switch HI and LO. When flying with Low Rate(LO) outdoor under windy weather and encountering control difficulty, you can use High Rate(HI).
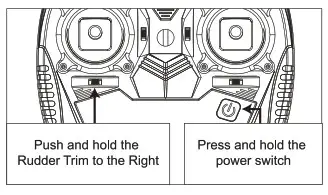
Transmitter and Receiver Binding
- Power off the transmitter and power on the helicopter, the condition green LED in the helicopter flashes rapidly in a short period of time.
- Push and hold rudder trim to right and power on the transmitter.
- When the condition green LED from the helicopter is lit up which implies the binding is completed, release the rudder trim button.(Helicopter was completely bound in the factory setting.)
Low Voltage Warning (Transmitter)
The blue power LED indicator flashes slowly when the transmitter battery voltage gets low. Replace the transmitter battery as soon as possible to prevent affecting normal operation. When the blue power LED indicator flashes slowly with beeps during flight, Land the model and replace the transmitter battery immediately. Failure to do so could result in the destruction of the model and possibly bodily injury!
Maintenance Tool
Please use the provided screwdriver to install all the screws. Other tools can damage the screw and the helicopter.
Parts Listing
Troubleshooting Guide
*If you could not solve the problems by using the below methods* *Please contact our service support team*Problem: Battery bulge after several flights Possible Cause: Keep the helicopter spinning when it can no longer be raised or over-discharge the battery or long time not in use (Solution: Replace a new battery) Problem: Green LED in the helicopter flashes slowly in flight Possible Cause: LiPo battery low voltage (Solution: Recharge the LiPo battery) Problem: Green LED in the helicopter flashes rapidly Possible Cause: Helicopter in Binding Mode (Solution: Power off transmitter and repeat bind process) Problem: Green LED in the helicopter goes off and blue LED in the helicopter glows solid Possible Cause: Helicopter does not receive any signal from transmitter (Solution: Rebind or reboot the transmitter) Problem: Green LED and blue LED in the helicopter goes off Possible Cause: Battery connection error or battery damaged (Solution: Reconnect the battery or charge the new battery) Problem: Green LED in the helicopter glows solid and blue LED in the helicopter goes offPossible Cause: Helicopter Calibrate Function not activate (Solution: Set the Calibrate Switch to GREEN in the helicopter) Problem: Motor do not spin after Initialize successfully but servo works normally Possible Cause: Throttle Cut Function is activated (Solution: Set the Throttle Cut Switch to GREEN in the transmitter) Problem: Helicopter skewed slightly in flight Possible Cause: Incorrect trim value (Solution: Maintain the helicopter level flight by adjusting the trim button) Problem: Helicopter vibrates or shakes in flight Possible Cause: Main rotor blade grip or main blade bent (Solution: Check them for damage and replace if necessary) Problem: Helicopter spin rapidly in flight Possible Cause: Tail blade installation direction was wrong (Solution: reinstall the tail blade with correct installation direction) Problem: Helicopter skewed heavily in flight Possible Cause: Servo or linking parts error (Solution: Check each linking parts) Possible Cause: Incorrect trim value in some direction (Solution: Set all the transmitter trim in the middle or neutral position) Problem: How to Judge whether the transmitter trim is in the moddle or neutral position? Possible Cause: / (Solution: The middle or neutral trim position is heard as a longer tone)
 report this ad
![]()
All Instructions are subject to change at the sole discretion of Zonda Hobby. For up-to-date product literature, visit eskyurc.com and dick on the support tab for this product. esky-rc.com.cn
[xyz-ips snippet=”download-snippet”]