


ESPRESSO MACHINE SETwith ELECTRIC GRINDER
FAQs can be found at www.espresso-works.com
Email us for any unanswered questions: [email protected]
For product registration, please visit www.espresso-works.com
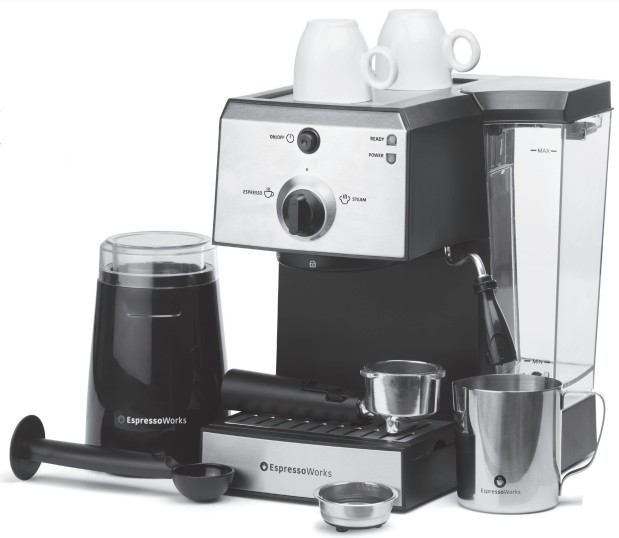
INCLUDED IN YOUR PURCHASE

POWERING UP YOUR MACHINE
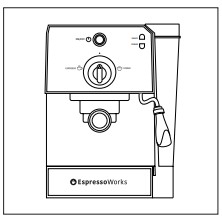
STEP 1Place your espresso machine on a flat, dry surface.
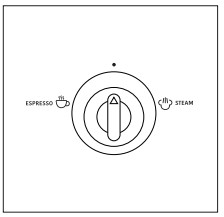
STEP 2Make sure the central control dial is set to “•”. Do not plug your machine into a power source until Step 6.
STEP 3Remove the filter holder is locked into the brew head.
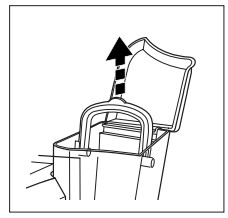
STEP 4Open the water tank located on the side of the machine. Open the lid and lift out the tank using the provided built-in handle.
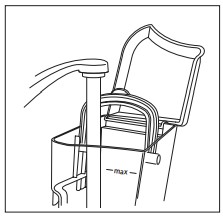
STEP 5Fill the water tank with cold water to the MAX level mark. Carefully slide the tank back into position.Once secure, close the tank lid.
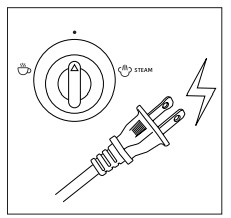
STEP 6Make sure the central control dial is set to “ •”, plug the machine into a 110/120V power outlet.
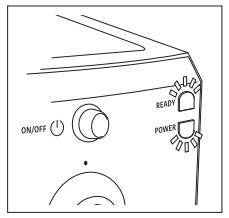
STEP 7Press the “ON/OFF”![]() button. The POWER light will illuminate in orange color to confirm the machine is powered up. Once the machine is warmed up and ready for use, the READY light will illuminate in green color.
button. The POWER light will illuminate in orange color to confirm the machine is powered up. Once the machine is warmed up and ready for use, the READY light will illuminate in green color.
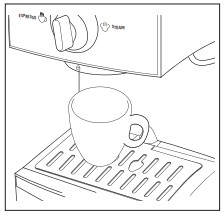
STEP 8Place an empty cup or container under the brew head.
STEP 9 AUTO-OFF FUNCTIONThe machine will turn itself off automatically after 25 minutes of no usage, 25 minutes of continuous usage, or if the pump has been functioning continuously for 3 minutes. NOTE: Hold down the “ON/OFF“![]() button for 4 seconds to power the machine off. There is no need to remove the cord plug from the outlet after every use.
button for 4 seconds to power the machine off. There is no need to remove the cord plug from the outlet after every use.

PREPARING YOUR ESPRESSO
STEP 1
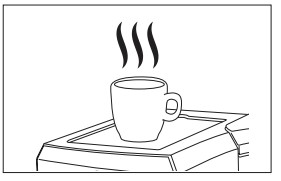
If desired, pre-warm the espresso cups by placing the cups on the heating tray located at the top of the machine.
STEP 2
Insert the coffee filter into the filter holder. When inserting, align the “male” part on the filter into the “female” part on the filter holder as shown.
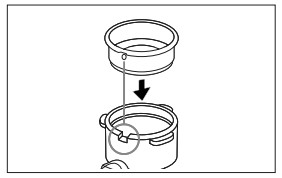
NOTE: Use the appropriate filter for either a single or double-shot espresso with the respective shot basket included with your espresso set.
STEP 3
Using the tamper/measuring spoon fill the filter with the correct measure of ground coffee. Tamp the coffee firmly. Clean the excess coffee from the rim.
NOTE: Do not pack down the coffee too tightly. Packing too tightly may not allow the water to flow properly through the filter.
STEP 4Lock the filter holder firmly into the brew head. Place one or two empty cups under the filter holder.
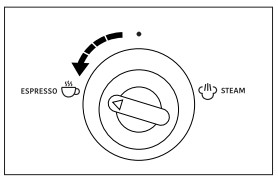
STEP 5Turn the control dial to the “ESPRESSO”![]() position. After a few seconds, espresso will begin to run through.
position. After a few seconds, espresso will begin to run through.
STEP 6
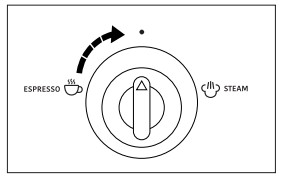
Once sufficient coffee has flowed into the cup(s), move the control dial to the “•” position. This will stop the flow of coffee. Clean the coffee out of the filter and repeat.
NOTE:
When making espresso, ensure that the grind is suitable for making espresso. You can purchase pre-ground coffee, or grind it yourself. The grind should be fine, but not too fine or powdery. If the grind is too fine (feels like powder when rubbed between the fingers) the water will not flow properly and the espresso will not be optimal.
You may notice that after brewing the coffee, the filter is wet. This is normal, and this is how we get that perfect crema.
We recommend preparing your milk before removing the filter from the machine. This will allow some time to evaporate some of the residual water in the coffee grinds.
FROTHING THE MILK
STEP 1Fill the stainless steel milk frothing cup 1/3 of the way with fresh, cold milk. Please use whole or half-skimmed milk for best results.
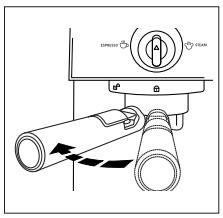
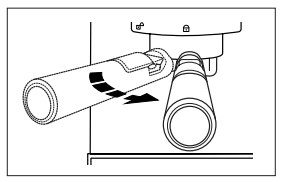
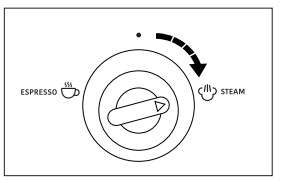
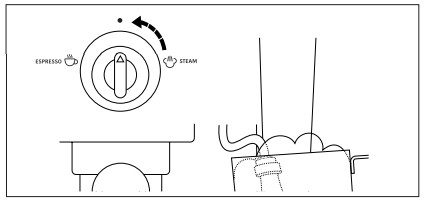
STEP 2Direct the steam wand away from the drip tray so that the steam wand is easy to insert into the frothing cup. Hold the frothing cup at an angle so that the top of the steam wand sits just below the surface of the milk. Turn the dial of the machine to “STEAM”![]() .
.

STEP 3Turn the dial on the machine to “STEAM”![]() . The steam will move the milk around the cup in a circular motion.
. The steam will move the milk around the cup in a circular motion.
STEP 4
When the foam starts to increase in volume, immerse the steam wand deeper into the frothing cup.
When the foam is at the desired level, turn the dial to “•”.
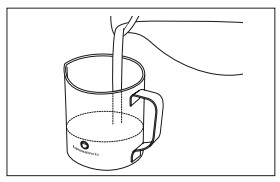
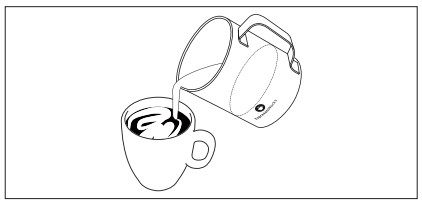
STEP 5
Pour the steamed froth.
NOTE: To avoid milk buildup, make sure the steam wand is cleaned immediately after each use Loosen the steam nozzle and wash it under running water and clean the pipe with a cloth.
DIFFERENT BREWS WITH YOUR MACHINE

TROUBLESHOOTING YOUR MACHINE
| Problem | Reason | Solution |
| Water leaks from the bottom of the coffee maker | The drip tray is filled with water | Please clean the drip tray |
| The coffee machine is malfunctioning | Please contact us at co espresso-works.com | |
| Water leaks from the outer side of the filter | Therein some coffee powder on the filter edge | Use a damp cloth to wipe away any residual coffee powder |
| There is a slight taste of acidity in the espresso | The machine was not cleaned and there are residual coffee grounds | Refer to the CLEANING & MAINTENANCE section on page 3 of this quick start guide |
| The coffee powder has turned bad after being stored in a hot and wet place for long periods of time | Please use fresh coffee powder, or store the unused coffee powder in a cool and dry place. After opening a pack of coffee, reseal it tightly and store it in a refrigerator to maintain its freshness | |
| The machine is not working | The power cable was not correctly plugged into the power outlet | Plug the power cord into a wall outlet and if the machine still ceases to function, please contact us at cseespresso-works. corn |
| The built-in steamer does not produce any milk froth | The green indicator is not illuminated | The steamer will only produce steam to froth milk only after the READY indicator is green |
| The cup used for frothing milk is not of the correct size | Use a high and narrow cup or the stainless steel milk frothing cup provided with your purchase | |
| You used skimmed milk | Please use whole milk or half-skimmed milk |
Do not attempt to dismantle your machine. If the cause of failure is not listed above, please contact us at [email protected]
COFFEE GRINDER SAFETY WARNINGS
- Do not use attachments or accessories that are not recommended by the manufacturer. They may cause malfunction or injury.
- Make sure there is no hard object in the grinding chamber before use. This may cause damage to the appliance and personal injury to persons.
- This appliance can be used by children aged 8 years and above and persons with reduced physical, sensory or mental capabilities or lack of experience and knowledge if they have been given supervision or instruction concerning the use of the appliance in a safe way and understand the hazards involved. Children shall not play with the appliance. Cleaning and user maintenance shall not be made by children without supervision.
- This appliance is for household use only. Do not use it for professional catering.
- Do not use the appliance outdoors.
USING YOUR COFFEE GRINDER
Careful UPpack year co. tee sin- per and •imode and I packing material. Wipe the grinding chamber, blades with a damp lint-free cloth or sponge. Handle blades with the care they are extremely sharp. Note: Only the transparent lid can be immersed in water for cleaning. Never immerse the motor base in water for cleaning, or fill the grinding chamber with water for cleaning.
- Place the coffee grinder on a flat surface. Remove the lid.
- Pour coffee beans into the grinding chamber. Do not use more than 30g of coffee beans.
- Secure the lid onto the motor base. Align the arrowY with the “OFF” marking on the motor base.
- Connect the coffee grinder to the power supply.
- Turn the lid clockwise to the “ON” mark on the motor base. The coffee grinder will operate. Hold the lid at the “ON” position.
- if the lid is released, it will return to the “OFF” position and the coffee grinder will stop operating. Turn and hold the lid to the “ON” position if you want the coffee grinder to operate again. Note: Do not run the appliance continuously for more than 30 After a full 30-second cycle, allow the grinder to rest for another three minutes before using it again.
- View the consistency of the coffee grounds from the transparent lid. Note: Never remove the lid until the blades stop completely.
- Once the desired ground size has been obtained, disconnect the power cable from the power outlet.
Remove the transparent lid and pour out the coffee ground.
COFFEE GRINDER CLEANING & MAINTENANCE
- Always switch off and unplug before
- Never let the motor unit, power cable, or plug get wet.
- Clean the lid with water and mild detergent. The lid is not dishwasher-safe. Rinse and dry thoroughly. Note; Never immerse the motor base in water for cleaning, or fill the grinding chamber with water for cleaning.
- Wipe the grinding chamber and blades with a damp cloth, then dry thoroughly. Handle blades and cutting plates with care -they are extremely sharp.
IMPORTANT SAFEGUARDS
WARNING: Before using the electrical appliance, the following basic precautions should always be followed:
- Read all instructions.
- Before using check that the voltage of the wall outlet corresponds to the rated voltage marked on the rating plate.
- This appliance has been incorporated with a grounded plug. Please ensure the wall outlet in your house is well earthed.
- To protect against fire, electric shock, and injury to persons do not immerse cord & plug in water or other
- Remove plug from the wall outlet before cleaning and when not in Allow appliance to cool down completely before taking off, attaching components, or before cleaning.
- Do not place the coffee maker on a hot surface or beside a fire in order to avoid being damaged.
- To disconnect, remove the plug from the wall outlet. Always hold the plug but never pull the cord.
- Do not use an appliance other than its intended use and place it in a dry environment
- Close supervision is necessary when your appliance is being used near children.
- Be careful not to get burned by the steam.
- Do not touch the hot surface of the appliance (such as the steam wand, and the steel mesh while boiling). Use handle or dials.
- Do not let the machine operate without water.
- Do not operate any appliance with a damaged cord or plug or after the appliance malfunctions, or was dropped or damaged in any manner. Please contact us at [email protected]-works.com to arrange for examination, repair, or electrical or mechanical adjustment.
- The use of accessory attachments not recommended by the appliance manufacturer may result in fire, electric shock, or injury to persons.
- Place appliance on flat surface or table, do not hang power cord over the edge of table or counter.
- Ensure the power cord does not touch any hot surface of the appliance.
- Do not remove the metal funnel when the appliance is brewing coffee or when frothing milk.
- Connect the plug to the wall outlet before using it and turn any switches off before the plug is removed from the wall outlet.
- This appliance is not intended for use by persons (including children) with reduced physical, sensory or mental capabilities, or lack of experience and knowledge unless they have been given supervision or instruction concerning the use of the appliances by a person responsible for their safety.
- Children should be supervised to ensure that they do not play with the appliance.
SAVE THESE INSTRUCTIONS. HOUSEHOLD USE ONLY
IMPORTANT INSTRUCTIONS FOR SAFE USE
NOTES ON THE CORD PLUGThis appliance has a polarized plug, to reduce the risk of electric shock, this plug is intended to tit into a polarized outlet one way only. If the plug does not fa fully into the outlet, reverse the plug. If it still does not fit. contact a qualified electrician, do not attempt to modify the plugin anyway.
NOTES ON THE CORD
a)A short power-supply cord (or detached power-supply cord) is to be provided to reduce risks resulting from becoming entangled in or tripping over a long cord.b)Longer detachable power-supply cords or extension cords are available and may be used if care is exercised in their use.c)If a long detachable power-supply cord or extension cord is used,
- The marked electrical rating of the detachable power supply cord or extension cord should be at least as great as the electrical rating of the appliance.
- If the appliance is of the grounded type, the extension cord should be a grounding type-3 wire cord.
- The longer cord should be arranged so that it will not drape over the countertop or tabletop where it can be pulled on by children or tripped
CLEANING & MAINTENANCE
AUTO SHUT-OFF FUNCTION
When your EspressoWorks espresso machine has been switched on and has not been functioning for 25 minutes. or when the pump has been in use for three minutes continuously, or if the machine has been functioning for 25 minutes continuously, your machine will turn itself off automatically and its POWER light will be disabled. Should you wish to continue using your machine, simply press the “ON/OFF’ button once and your espresso machine will be ready to work again.
CLEANING AND MAINTENANCE
- Unplug your espresso machine from the power outlet and allow for it to completely cool off before cleaning.
- Clean your machine frequently with a damp sponge and clean the water tank, drip tray, and removable heating tray on a regular basis before drying them. Note: Do not clean the machine with alcohol or solvent cleaner. Never immerse the machine in water.
- Detach the steam wand by turning it clockwise, unclog any coffee residual before rinsing it clean with water.
- Clean all attachments with water before drying thoroughly.
CLEANING RESIDUAL COFFEE GROUNDS
To ensure your espresso machine is operating efficiently while making high-quality brews, clean out the residual coffee grounds every two to three months.
- Fill the tank with water and a household descaling agent of your choice to the MAX level.
- Place the milk frothing cup under the built-in steamer and turn the dial on the machine to “•”. Press the ‘ON/OFF’ °button once and wait while the machine starts heating up and the POWER indicator will illuminate with a red light.
- Once your machine has completed the heating phase, the READY indicator will illuminate with a green light. Make two cups of coffee (roughly 2oz) by turning the dial on the machine to “ESPRESSO” Next, turn the dial to “•” and wait for five seconds.
- When the READY indicator flashes green, turn the dial to “STEAM” CC7 and wait for two minutes before turning the dial back to “•” to stop the steaming process. Press and hold the “ON/OFF”
 buttons for about three seconds and your machine will turn itself off and all indicators will not have any light indications. Allow for the descaling agent to work for at least 15 minutes.
 - Restart your espresso machine and repeat steps 2 to 4 at least thrice.
- With the dial set to “•”, turn the knob to “ESPRESSO” 6 while the READY indicator is green. This allows your machine to flush out any remaining descaling agent.
- Ensure that the tank is filled with water to the MAX level, before setting the dial to “ESPRESSO”ek[ffepeatsteps 2 to4-at,, least thrice until there is no water left in the tank.
- Repeat step 7 thrice to ensure that your espresso machine is in full working condition.
WARRANTY
PRODUCT REGISTRATION
EspressoWorks” strongly encourages you to register your purchase. You can register online at vmw.espresso-worIcs.com Registering your purchase will allow EspressoWorks’ to better serve you with any of your customer service needs.
WHO CAN SEEK WARRANTY COVERAGE
This warranty is extended by EspressoWorks’m to the owner of this machine for personal household use only. This warranty does not apply to products used for commercial, rental, or resale purposes.
WHAT IS COVERED
EspressoWorks” warrants to the owner that if this machine fails within 1 year from the date of purchase on the purchase receipt due to a defect in material or workmanship, EspressoWorks’ will repair or replace the failed machine or component part of the machine. Shipping and handling charges may apply. Please retain the original purchase receipt for the duration of the warranty period. EspressoWorks”, reserves the right to refuse a warranty repair if proof of purchase cannot be provided. In the event of a warranty claim, please return the product with the original purchase receipt.
WHAT IS NOT COVERED
This warranty does not apply to machines that have been used commercially or in non-household applications. This warranty does not cover cosmetic changes that do not affect performance, such as discoloration or the effects of the use of abrasives or cleaners or food build-up. This warranty is only valid if the machine is used and maintained in accordance with the instructions, warnings, and safeguards contained in the owner’s manual. The warranty does not apply in the event of failure to observe the operating or assembly instructions.
EspressoWorks” will not be responsible for the cost of any unauthorized warranty repairs.
NO EMPLOYEE OR REPRESENTATIVE OF ESPRESSOWORKSTM IS AUTHORIZED TO MAKE ANY ADDITIONAL WARRANTY OR ANY MODIFICATION TO THIS WARRANTY WHICH MAY BE BINDING UPON ESPRESSOWORKS7“. ACCORDINGLY, PURCHASER SHOULD NOT RELY UPON ANY ADDITIONAL STATEMENTS MADE BY ANY EMPLOYEE OR REPRESENTATIVE OF ESPRESSOWORKS”. IN NO EVENT, WHETHER BASED ON CONTRACT, INDEMNITY, WARRANTY, TORT (INCLUDING NEGLIGENCE), STRICT LIABILITY, OR OTHERWISE, SHALL ESPRESSOWORKS BE LIABLE FOR ANY SPECIAL, INDIRECT, INCIDENTAL, OR CONSEQUENTIAL DAMAGES, INCLUDING, WITHOUT LIMITATION, LOSS OF PROFIT OR REVENUE.
Some states do not allow limits on warranties. In such states, the above limitations may not apply to you. Outside the U.SA. and Canada, other warranties may apply.
For more information, visit www.espresso–wocks.com
Complete user instructions, FAQ, and usage tips can be found at Espresso-Works.com
Email us at [email protected]for any unanswered questions
Complete user instructions, FAQ, and usage tips can be found at Espresso-Works.com
Email us at [email protected] for any unanswered questions
 This symbol on the product or in the instructions means that your electrical and electronic equipment should be disposed of at the end of its life separately from your household wares. There are separate collection systems for recycling in the EU. For more information, please contact the local authority or your retailer where you purchased the product.
 FOR HOUSEHOLD USE
MADE IN CHINA© 2018
References
[xyz-ips snippet=”download-snippet”]