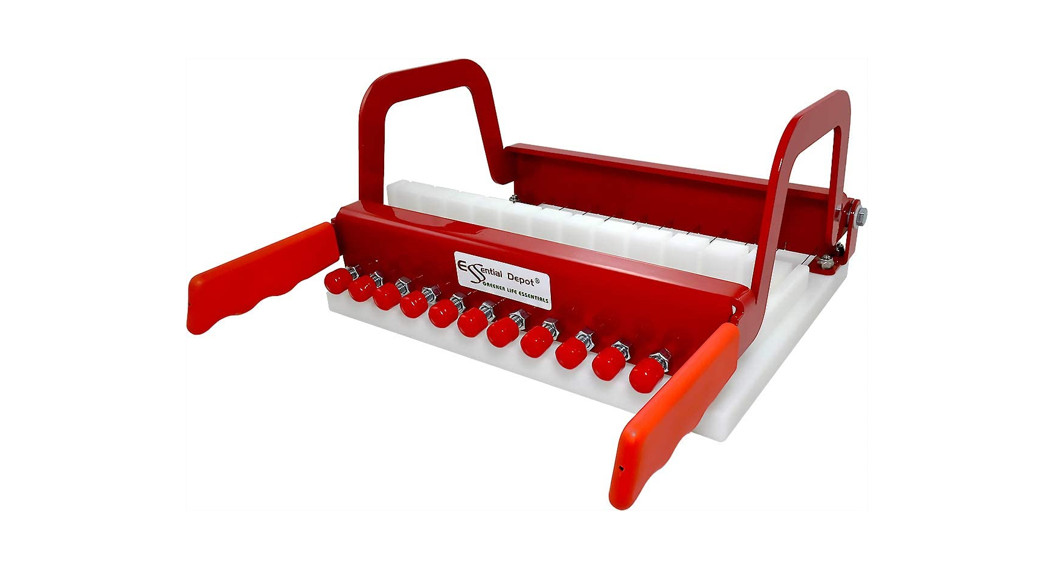
Essential Depot Loaf CutterInstructions
There is no assembly required for your cutter.
- CUT AS SOON AS POSSIBLE. This is easier on you and your wires. Read “Important Note” below.
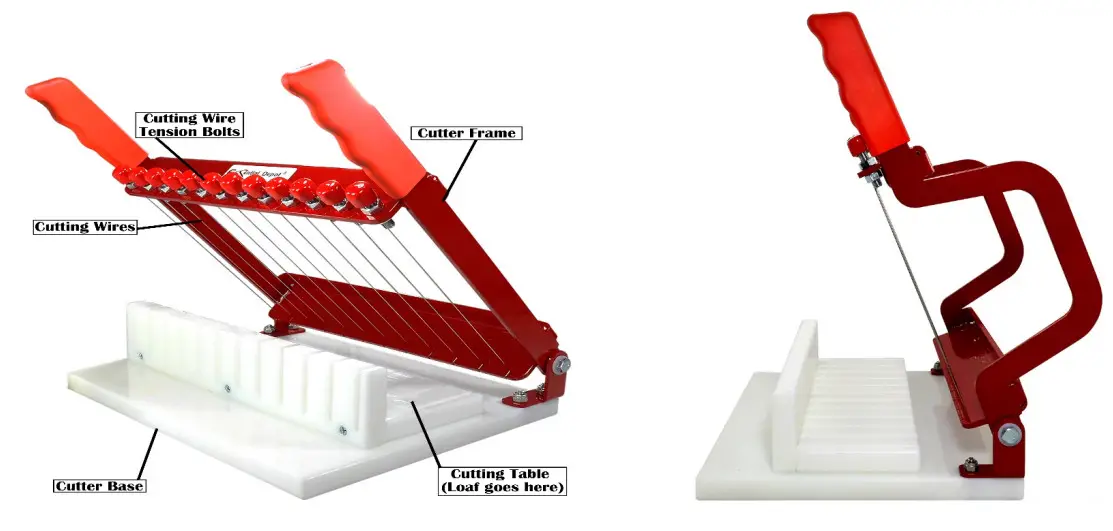
- Place your Loaf Cutter on a surface that affords a comfortable height for cutting. You will be pushing down and it is always best, to use your upper body weight if possible, for easier cutting. For most people, between, 28” to 32” (71cm to 81cm) is good.
- To use your Loaf Cutter; simply place your soap loaf on the cutting table, aligning it for the best cut (see above).
- Holding onto the two handles, pull down until the wires almost touch the soap, check alignment again. If everything is okay, push the Cutting Frame on through.
- Leaving the Cutting Frame down and remove your bars. If you bring the Frame back up through your soap, it may leave small slivers of soap or imperfections in the face of your bar.
- For most average-size loaves you can usually cut two at once if you so desire.
- Routine use of your cutter to cut soap is normally sufficient to preserve the wires. However, if your cutter is unused for a few days then you should wipe down the wires with mineral oil. Re-apply after non-use of approximately 60 days (depending upon the environment in which you store the cutter).
Cutting Your Soap:
1. The most important thing to remember is to cut your soap as soon as possible. Start checking your soap after about 12 hours (take notes). It is important to cut as soon as possible the first few times you pour. This will give you an idea on how quickly your soap is ready. The softer the soap, the easier it is on you and your wires.2. Important Note:
- If you cut your water (Discount Water), your soap will be harder to cut. Cut sooner or add backwater.
- If you Oven Process, Hot Process, you must cut right away.
- If you use Steric Acid, Animal Fats, Beeswax. Your soap will be harder….Cut sooner. If you use lots of Hard Oils, Palm, etc…..Cut as soon as possible. Then experiment by seeing how long you can go.
- If you use herbs, clays, oats, etc., your wait time to cut will be much shorter, and your soap may be harder to cut through. Cut as soon as possible. Then experiment by seeing how long you can go.
- Watch your first few batches carefully and take notes. If you change your base formula often, take notes.
- We use the toughest and strongest wires in existence. Thousands of our cutters are cutting soap every day. If you are having trouble cutting your loaf, look to Time, Formula, Water Discount, Ingredients, and Method.
- Just one little change can bring you success, perfectly cut bars, more speed, and greater efficiency in your production.
3. Note on cleaning wires: You can clean your cables and wires with a clean brush or cloth. However, if you clean the wires then you should re-lubricate them using plain mineral oil. Merely apply a small amount of mineral oil to a clean cloth and wipe each wire.
Adjusting Tension on Your Cutting Frame:
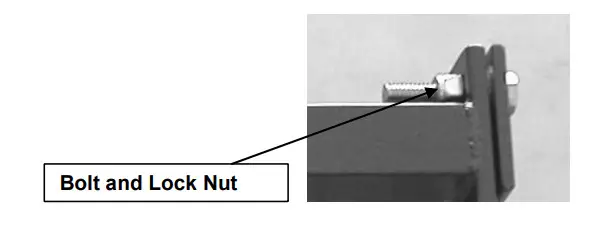
- You may want more or less tension on your cutting frame to keep it in the “ Open” position. Here is how to do this.a. Using two, ½” wrenches, pliers or a crescent wrench, tighten or loosen the bolts holding the frame onto the Cutter Base.b. It does not take much of an adjustment to make a difference.
Replacing Wires :
https://www.essentialdepot.com/product/RED-SOAP-CUTTER-11-WIRE.html
Tools needed: You will need a pair of side-cut pliers or electrical dykes (best), two ½” (13mm) open-end wrenches, and a small pair of vice-grip pliers. You will also want Mineral Oil and a cloth or paper towel. Don’t scrimp on tools. If you are making soap professionally, you should have the proper tools to get you back up and running fast. The whole point of having production equipment is efficiency. Your time is valuable and the last thing you want to do is to waste it on improper tools.”Before starting, look at the way the other wires are strung. Remember these wires are sharp. BE CAREFUL!
- A single wire runs from one bolt, to the back, loops around and connects to a second bolt.
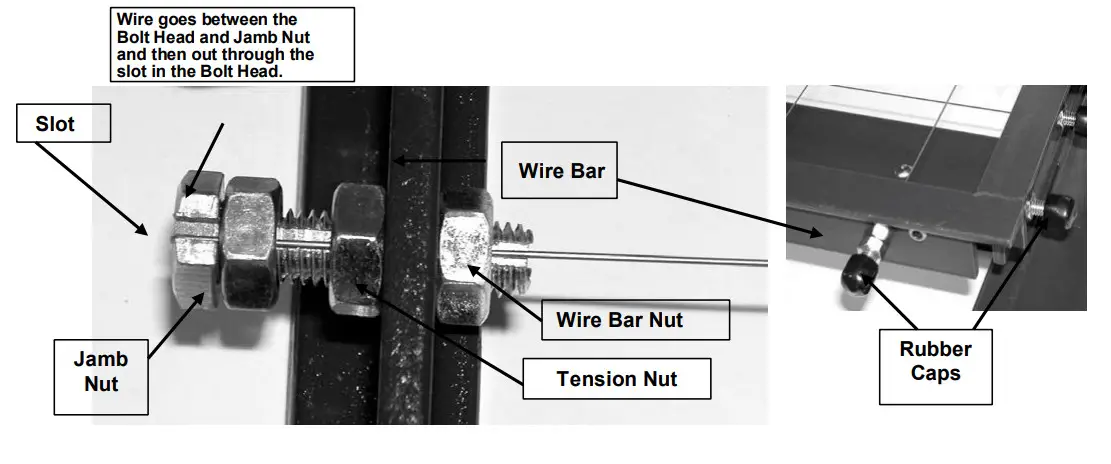
- Turn the frame upside down. Remove the old wire.Note: The Slot in the Wire Bolt is always down when cutting, up when tying!
- Run the Bolt Head and Jamb Nut down close to the Wire Bar so that when the Bolt is tightened you have plenty of thread left to tighten with.
- Leave about a 1/16 ” (2mm) space between the Bolt Head and the Jamb Nut to wrap the wire around, one turn between them.
- Tighten the two Wire Bar Nuts on each side of the Wire Bar so that the Bolt does not spin.
- Cut a length of wire at least 6” (15cm) longer than what is needed. You need this to work with the stiff wire. Wipe the wire down with your cloth dabbed in mineral oil. Insert the wire through the holes in the Wire Bar and through the Three Nuts and slot in the bolt.
- Using the vice grips, clamp the wire and pull firmly. Note: If your wire wraps around to the next bolt beside it, then skip this step until you are ready to tie the last bolt.
- Wrap the wire counterclockwise around the shaft of the bolt between the Bolt Head and the Jamb Nut, just one turn.
- Bring the wire out through the Slot in the Bolt Head. This is extremely important to hold tension. For extra insurance, cut the wire about 3/8” past the Bolt Head and tap the wire down over the Bolt Head with your pliers.
- Now, run the Jamb Nut up to the wire and snug it up with your Open-End Wrench. Using both wrenches, tighten the Jamb Nut securely.
- Slip the Rubber Protector back over the Bolt Head.
- To put tension on the wire, loosen the Wire Bar Nut that is on the inside of the Wire Bar five or six full turns, Holding the head of the bolt (keeping it from turning) slowly turn the Wire Bar Nut on the outside of the Wire Bar.
- Continue to turn the Wire Bar Nut until you have the proper tension.
- Adjust the Bolt so that the slot is straight up. Now tighten the Wire Bar Nut on the inside of the Wire Bar.
Some wires may have a Ferrule on them to anchor a single wire. Observe how they are tied. If you lose your Ferrule, you may use a small washer or nut to replace it.The wire goes through the hole, around and back over the wire itself. Take a few turns around the wire.It helps to hold the Ferrule or nut with pliers while wrapping the wire around itself.
Storage / Preserving Wires
- You can clean your tables with a clean brush or cloth.
- If your cutter will be unused for longer than a couple of days then you should wipe down the wires with a light oil such as mineral oil. Re-apply after non-use of approximately 60 days (depending upon the environment in which you store the cutter).
- Re-lubricate the cutter wires if you clean the wires. Re-lubricate using light oil such as mineral oil. Merely apply a small amount of the oil to a clean cloth and wipe each wire.
- The Essential Depot R.E.D. Soap Cutter wires are made from Spring Steel (not Stainless Steel). Spring Steel is stronger than Steel and stronger than Stainless Steel. As a result, this means there may be traces of corrosion or rust (iron oxide) on the wires, even on a new cutter. This is normal and occurs merely from the air exposure during the manufacturing and packaging processes.
- Iron Oxide can be easily removed by application of household vinegar on a dry cloth, allow to remain on the wire a minimum of 5 – 20 minutes (overnight for best results), then merely wipe off the vinegar and iron oxide with a fresh damp cloth. Repeat the process if some iron oxide remains on the wire. However, the slight iron oxide on the wire will not impact your soap. To achieve the optimal life span of your cutter wires, assure that your cutter wires are dry and do not remain exposed to moisture and air for long periods of time.
 report this ad
If you experience any difficulties with your equipment or have questions or suggestions, please call.Technical Support: 863-662-0481VISIT US AT…. http://www.essentialdepot.com…. 863-662-0481
[xyz-ips snippet=”download-snippet”]