EstesRockets.comSATURN 1B SA-206
MODEL ROCKET INSTRUCTIONSKEEP FOR FUTURE REFERENCE
IMPORTANT: Please record the date found on the decal and keep it for future reference.READ ALL INSTRUCTIONS. Make sure you have all parts and supplies. Test fit all parts before applying glue.The advent of the Space Age of the 1950s and 1960s along with President Kennedy’s ambitious goal of putting a man on the moon witnessed NASA’s development of the line of powerful Saturn rockets. Before the mighty Saturn V launched Apollo 11 to the moon, the Saturn 18. a workhorse rocket to be sure. was utilized In numerous test flights. In 1966, the first Saturn 1B lifted off from NASA’s Kennedy Space Center. Designed and developed by NASA’s Marshall Space Flight Center (MSFC) in Huntsville, Alabama, the AS-201 mission was an uncrewed suborbital flight to test the Saturn 18 and the Apollo Command and Service Modules (CSMs). A total of 14 Saturn 1 Bs were constructed: four were launched without crews.and another five were flown with astronauts aboard! Alter the completion of the Apollo program, the Saturn 1B launched three missions to the Skylab Space Station in 1973. And in 1975, the Saturn 1B was again used for the Apollo-Soyuz Test Project. From – NASA.govThis Estes scale model Is of the SA-206, the first Saturn 113 to launch a crewed command service module (CSM) to Skylab on May 25, 1973.Enjoy building your Saturn 1B and all the dreams It may Inspire!SUPPLIES: 0220, 0320, 0400 AND #600 SANDPAPER PENCIL TWEEZERS HOBBY KNIFE AND SEVERAL SHARP BLADES YELLOW GLUE TUBE-TYPE PLASTIC CEMENT LIQUID PLASTIC CEMENT PERMANENT SPRAY ADHESIVE (NOTARTISTS OR REPOSITIONABLE)CA CAACCELERATOR SANDING SEALER (OR SANDABLE AUTO PRIMER PUTTY FOR PLASTIC MODELS MASKING TAPE SMALL PAINT BRUSH FLAT BLACK PAINT FLAT WHITE PAINT SILVER PAINTDo not use lacquer-based paints! They can melt the surface of the plastic parts.
Please be extremely careful using cyanoacrylate adhesive (CA). Avoid getting In your eyes or on your skin. Safety glasses are recommended. Use adhesives and paint only in areas with adequate ventilation. Read all Instructions.
Before beginning to build with vac-formed plastic parts, read the following carefully.
Cutting Vac-Formed PartsCulling vac-funned {Aisne parts requires patience Applyuig light it pressure, make repeated passes with the blade to cut through the plastic. Be sure to keep the blade in the same cut line for each tune. too much pressure will cause the blade to move XML lot COI cleanly Sanding and Trimming Vac-Formed Parts Once the part Is free of excess plastic, sand the edges to remove airy Oast I aid to provide a smooth. flat bonding surface. Secure a sheet of #220 Cf #320 grit sandpaper to a Vat surface (You may want to use wet-or-dry sandpaper with a Mlle water to avoid clung+rigor load, on the sat paper with plastic dust ) Mow each part in a cycle against the sandpaper with pressure evenly distributed to avoid uneven sanding Applying too much pressure can cause uneven edges. ‘Mien working will i II nu edgers, be careful not to remove luu mucli plastic ur generate too much heat that may warp and destroy the pad.
NOTE: Double-sided tape may be used to hold small parts Use a file to remove excess plastic oil hard to hukl small parts
Adhesives for Vac-Formed PartsBecause vac-fumed parts are Ituruier trial, it its bun molded parts. different adhesives should be used Two basic types owe good results and you should have both on hand when building this model. First is loud plastic cement Our preferred brands are Plastic Weld Cement’ (T’lastruct*). Testors Plastic Cement #3502*. Tenax 111*, and Testors’ or Tamiya’ glue pens I quid cement work on styrene by dissolving the plastic and creating a chemically welded bond. As a result. a little be ones a long way! timid cement are usually applied with an artist’s brush The trick to using plastic cement is to take advantage of the baud flowing out from the brush by allowing cement to bleed into close-fitting parts and then squeezing the parts together to bond Work on a small area at one tune as plastic Leopold sets quickly The second adhesive to have on hand is a super glue or cyanoacrylate for plastics We recommend Plash-Zap Youll also Wifilltu use CA accelerators fur plastics for these. but use a toothpick or a pipette to apply accelerator one drop at a tune. When sprayed from their normal applicators. most regular CA accelerators will sullen arid stain plash: surfaces
Filling the SeamsThis is a necessary step pi txxistructitig vac-boiled pixels Because Mese models have seams. they need to be filed and smoothed The putties we recommend are 3M Accyl-Blue’ (Usually found at auto body supply shops – one tube will last a lot or tune ) all Squadron’ Green ur While Putty (usually found in hobby shops
When working with putty or liner use as Mlle as possible Excess putty xi a seiaii creates extra work in sanding it away. as well as the possibility of a -sinkhole (where the putty collapses the skin of the plastic and eats it away.) Use masking tape along seams 10 101111111t/ e excess putty from adhenrig to the work area Use multiple layers when building up low areas. rather than one thick layer of putty Doingso will reduce shrinkage. cracking, and the risk of sinkholes. Let the putty dry overnight before attempting to sand rt away Wet-or-dry sandpaper, used wet. works best Start with #220 ant and work your way through #320 to #400. Then polish the area with #600The marks ESTES$. the Estes rocket logo. and Porta-Pad* are marks of Estes Industries. LLC registered in the U.S. and other countries. ‘Mother product names and marks are the property of their respective owners
PARTS
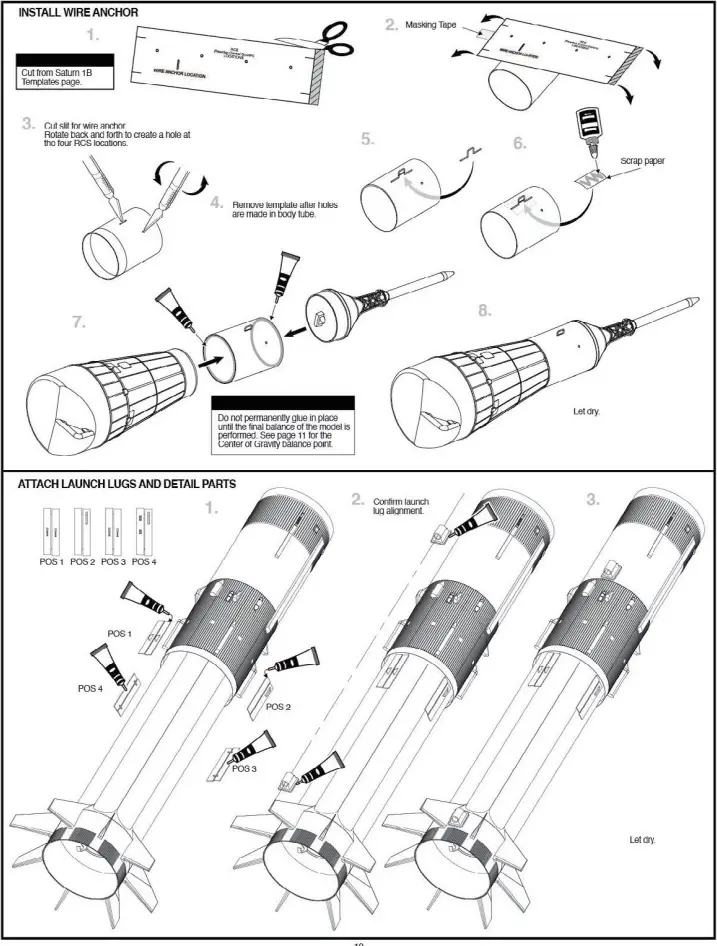
ATTACH FNS
APPLY UPPER BODY WRAPS
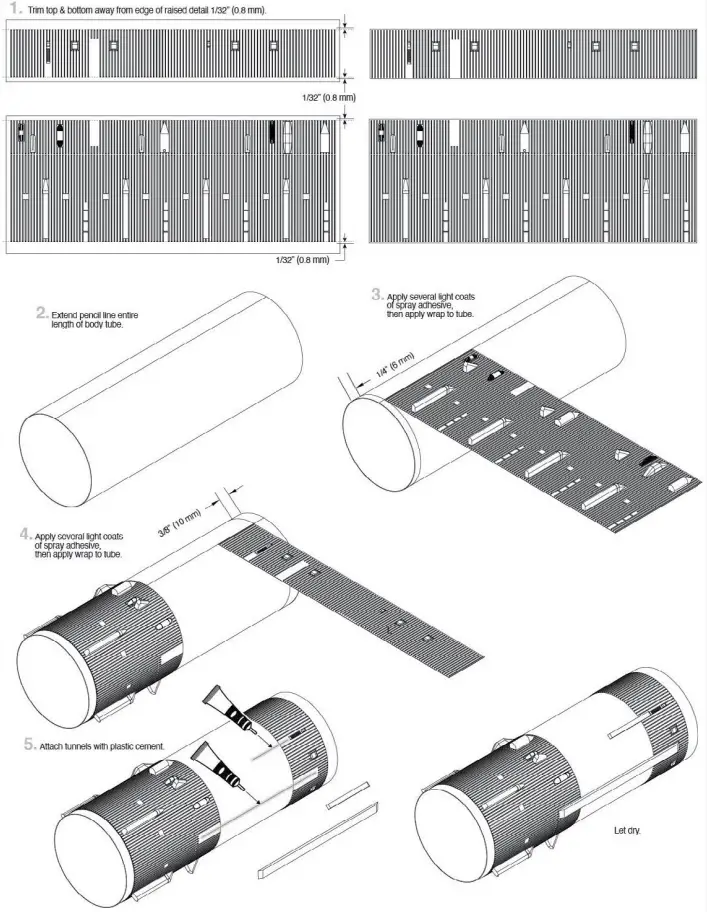
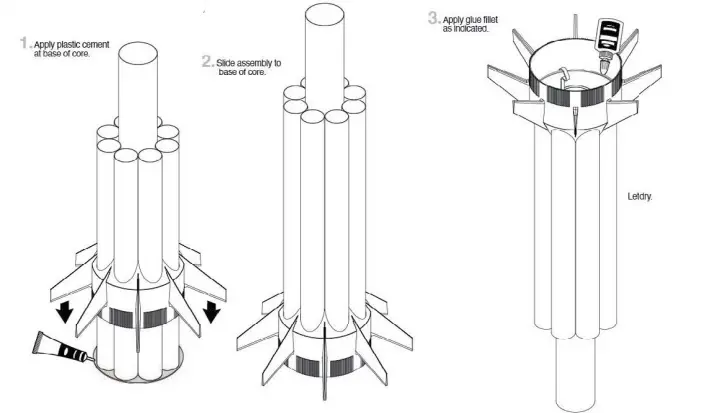
ASSEMBLE FUEL BODY TUBES
INSTALL ENGINE MOUNT
ASSEMBLE LOWER BODY SECTION
ASSEMBLE TOWER
ASSEMBLE CAPSULE
APPLY DECALS1Cut out one decal at an Iwe bemire vex Soaa re oral, coo a a Imo. n am %caw for 15-3O scars um- Otra wi so) e.L,ry nom or b-tav) Nat twain Nava to maw. alb chief xe zneexcce;c1,2W and ar oxacs we, a son am

2 The USA” and lined Stales’ maim ace centered verticality vain the paint patterns, and nonmonetary between He °tidy maps. Measure and pew Riga It IIISOLS lu help you properly (Merit details. Raised bqUclIro 011 Ile second stage and reduction wraps to provide locations for the camera and target decals.3 Finish by painting the entire model with a flat clear coat
SEE OUR ENTIRE FLEET OF SCALE KITS ATEstesRockets.com
 report this ad
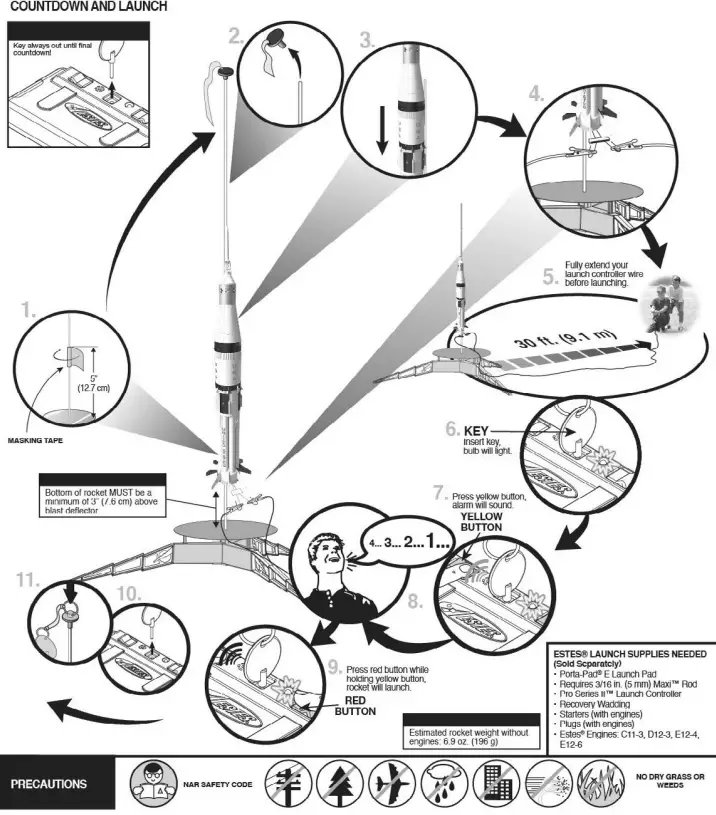
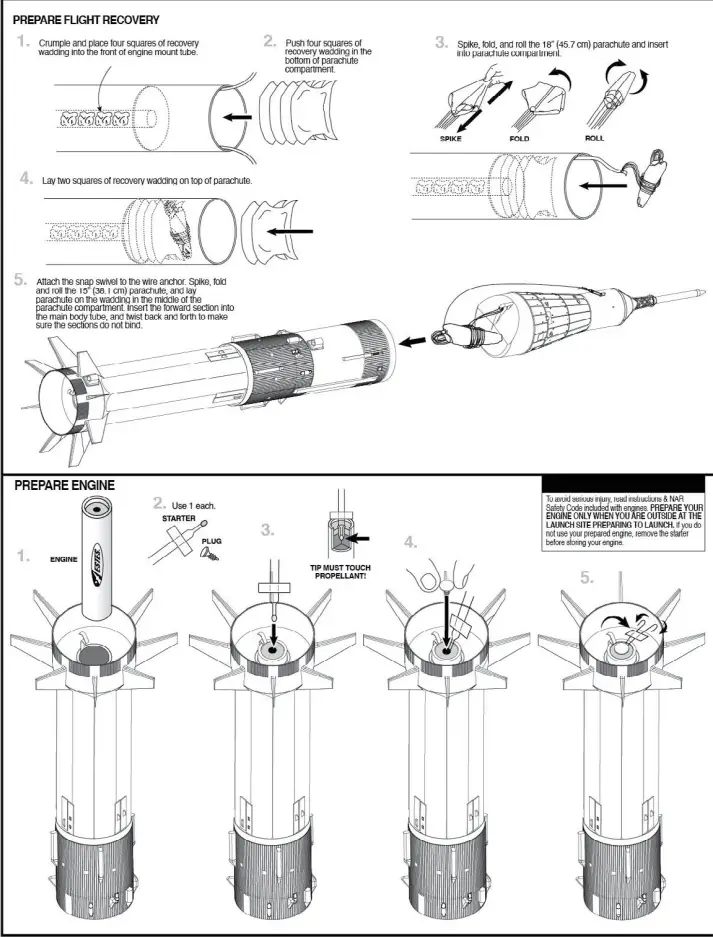
PRE-LAUNCH CHECK Fir safety never launches a damaged rnricet CFIPAC the cricket’s body, nice an and fires Also, check the engine ma int recovery system and lalinrifing(s) Repair any damage before launching the rocket. FLYING YOUR ROCKET Choose a large field (500 ftI152 m] wuare) free of dry weeds and brown grass. The larger the launch area, the better your chance of recovering your rocket. Football fields and playgrounds are great. Leach only with little or no wind and good visibility Always follow the National Association of Rocketry (NAR) SAFETY CODE. MISFIRES IAKE I HE KEY OU I U- I HEWN I HOLLER. WAI I ONE MINUI E BEI-OHE GOING NEAH I HE HOULE I. Utscornect the micro-ships and remove the engine. lake the plug and starter ad of the engine A burned starter means the starter tip was not touching engine propellant- Install a new starter: be sure the tip is touching propellant inside the engine Push the plug in place. Repeat steps under Countdown and Launch.
©2020 Fstes Ind stries.111C • All Rights Reserved Estes Industries, LLC • 1295 H Street • Penrose, CO 81240-9698 • Printed in Guangdong, Chia
 PN 068133 (8-20;
[xyz-ips snippet=”download-snippet”]