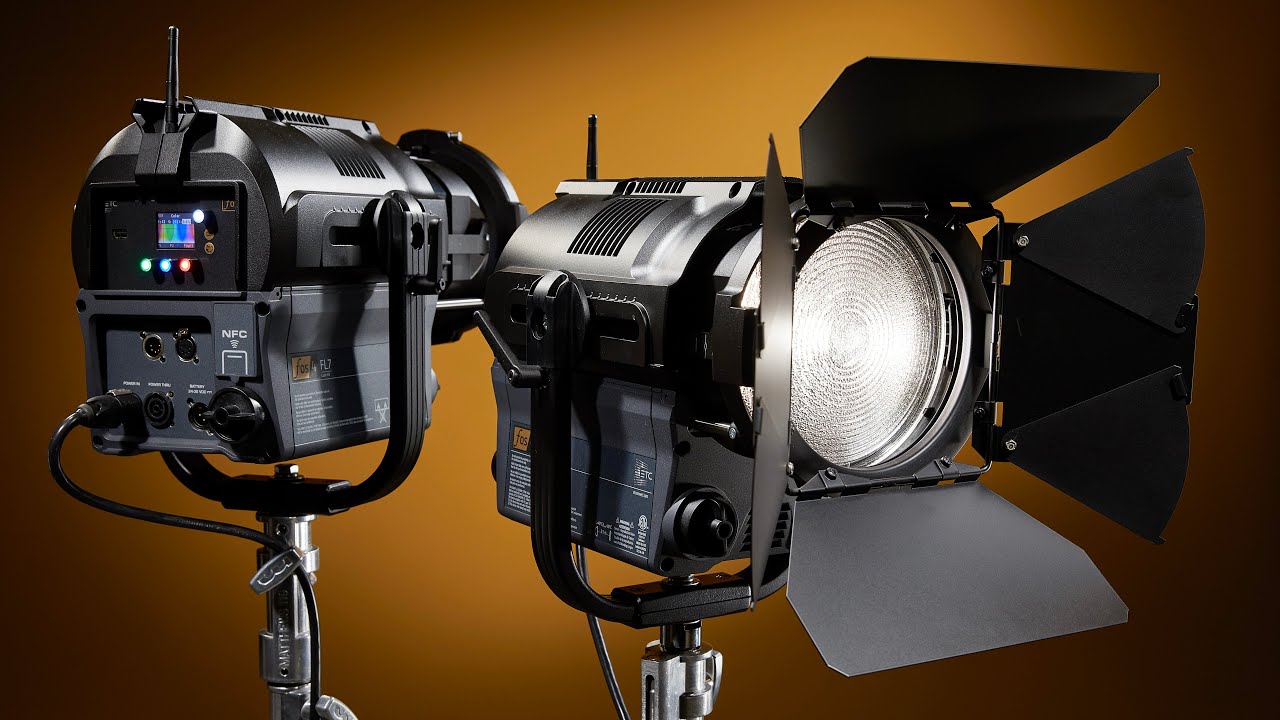
ETC fos/4 Panel
Overview
Use the images below as a guide to connect power and data and to navigate the basic features of the fixture. For complete information, download the fos/4 Panel User Manual at etcconnect.com.
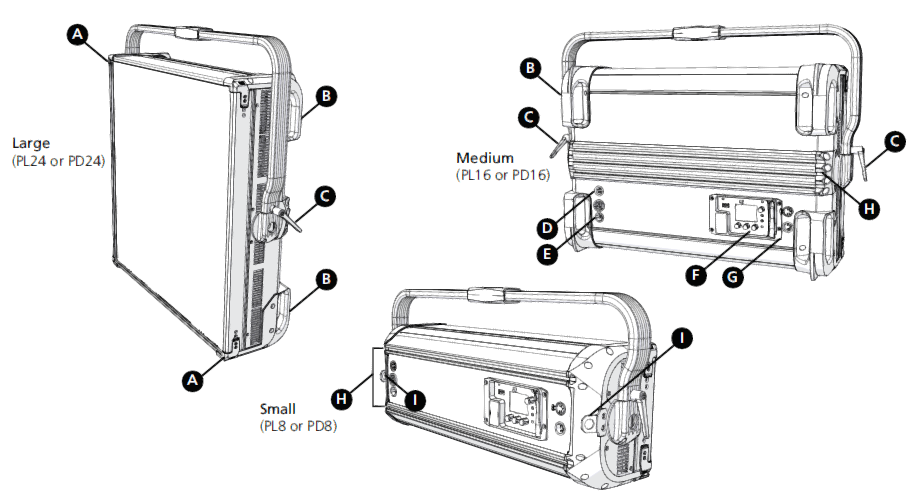
- A: Accessory holder: Insert accessories into the two available slots from either side of the holder, and then lock the holder (page 5).
- B: Handles: For medium (PL16 or PD16) and large (PL24 or PD24) fixtures, carry the fixture by the pairs of handles on the back of the fixture, and attach safety cables to handles when mounting the fixture.
- C: Yoke tilt-lock: Tilt the fixture as needed, and then turn the tilt-lock clockwise to lock the position. If necessary, press the center button on the tilt-lock to adjust the tilt-lock position.
- D: Battery connector: Four-pin XLR connector for battery power (not available on PL24 or PD24).Connect the fixture to battery power only when AC power is not available. Do not connect the fixture to a battery and to AC power at the same time.
- E: Power In and Power Thru connectors: powerCON® TRUE1 TOP connectors for power in and power thru. The large fixture (PL24 or PD24) has a connector for power in only (no power thru connector).
- F: User interface: View the fixture status, set the DMX address and mode, or set stand-alone options.
- G: DMX In and DMX Thru connectors: Five-pin XLR connectors for DMX/RDM in and DMX/RDM thru.
- H: Griprail: Attach standard accessories and mounting hardware to the back of the fixture using the hardware provided with the accessories or using M6 standard T-nuts.
- I: Safety cable attachment points: Small (PL8 or PD8) fixture only. For large and medium fixtures, attach safety cables to handles (B), either the top pair or the bottom pair (page 4).
User Interface
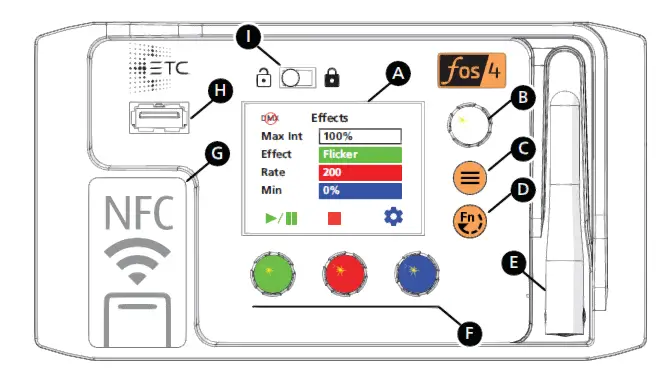
- A: Display: The colors of options on the display correspond to the colors of the encoders below the display (F) and the Intensity encoder to the right of the display (B).
- B: Intensity encoder:
- When in DMX mode, press the Intensity encoder to enter Focus mode when focusing the fixture.
- When configuring the fixture in one of the stand-alone modes, press the Intensity encoder to toggle between the current intensity and 0, or turn the Intensity encoder to modify the white fields on the display. See Use Fixture in Stand-alone Mode on page 7.
- When navigating from the Main Menu screen, turn the Intensity encoder to scroll through menu options, and then press the Intensity encoder to select a menu option.
- C: Menu button: Press to view the Main Menu screen and configure the fixture. Press the button again to return to the previous screen when you are setting configuration options.
- D: Function button: Press repeatedly to toggle through the following modes:
- Studio: Use one of three studio (white light) presets, or customize the presets.
- Color: Use one of 12 color presets, or customize the presets.
- Preset: Use one of 12 presets (color preset + fade time), or customize the presets.
- Effects: Use one of 12 effects, or customize the effects.
- DMX: View and set DMX parameters for the fixture.See Use Fixture in Stand-alone Mode on page 7 and Use Fixture in DMX Mode on page 6.
- E: Antenna: For use when controlling the fixture using wireless DMX.
- F: Encoders (Red, Green, Blue): The colors of encoders correspond to options on the display. Press to activate the options at the bottom of the display, or turn to modify the values on the display.
- G: NFC (Near Field Communication) tag: Use the Set Light app to wirelessly configure the fixture, with or without power applied to the fixture.
- H: USB port: Use for updating firmware, saving and loading fixture configuration settings, or saving error logs via a flash drive.
- I: UI lock: Set this switch to lock the UI. This prevents inadvertent changes to the UI.
IMPORTANT SAFEGUARDS
When using electrical equipment, basic safety precautions should always be followed including the following:
- Do not use outdoors.
- Do not let power supply cords touch hot surfaces.
- Do not mount near gas or electric heaters.
- Equipment should be mounted in locations and at heights where it will not readily be subjected to tampering by unauthorized personnel.
- The use of accessory equipment not recommended by the manufacturer may cause an unsafe condition.
- Do not use this equipment for other than intended use.
WARNING: Note the following safety warnings before use:
- Use the fixture in dry locations only, where humidity does not exceed 90 percent (non-condensing).
- Connect the fixture to a non-dimmable power source in order to avoid damage to the fixture’s internal power supply and other electrical components. Using a dimmable power source can damage the fixture and will void the warranty.
WARNING: Note the following safety warnings before use:
- Disconnect the fixture from power and DMX and allow it to cool before installing accessories or performing any cleaning and maintenance.
- Only use mounting hardware that is rated for the total weight of the fixture and accessories.
- In addition to primary suspension, attach a safety cable (or other approved safety device) to the fixture. Safety cables must be rated to support six times the fixture weight. See Mounting and Safety Cables on the next page.
- Check that the accessory holder is locked and that any accessory safety cables are connected before mounting the fixture.
- Do not mount the fixture on or near a flammable surface.
- Do not operate the fixture without the diffusion installed.
- Do not use this fixture with a damaged power lead. If the power lead (cord set) is damaged, it must be replaced.
- Do not use this fixture if the diffusion is deeply scratched or cracked. You must replace the diffusion when it is damaged.
Mounting and Safety Cables
You can mount the fixture using a clamp, junior (28 mm) pin (included), or appropriate mounting hardware on the yoke, or you can set the fixture on the floor or another flat surface. When suspending the fixture, make sure to secure the fixture with appropriate safety cables at the safety cable attachment points on the small (PL8 or PD8) fixture or at the handles using a looped attachment on the medium (PL16 or PD16) and large (PL24 or PD24) fixtures.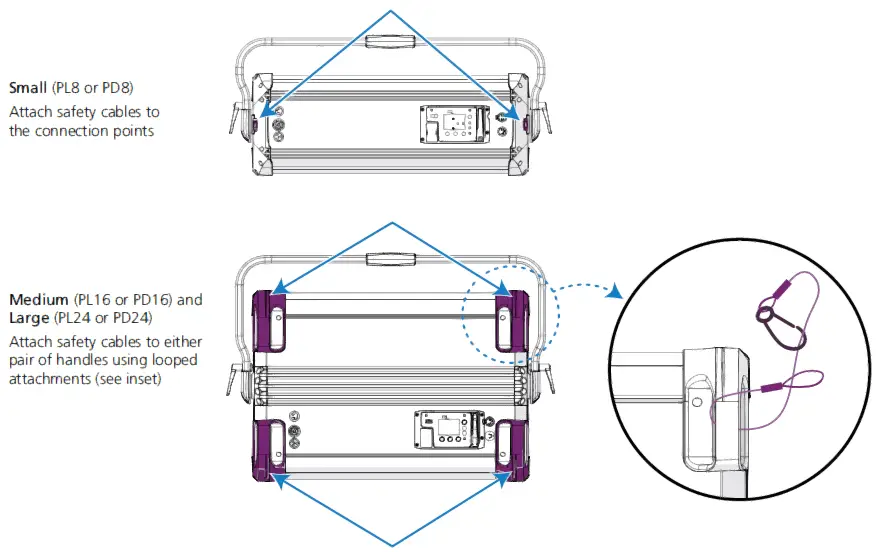
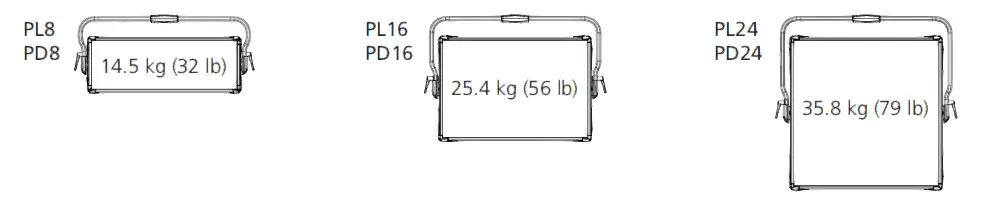
Fixture Weights
Add Accessories
You can use up to two standard accessories (one diffusion and one additional accessory, such as a barn door) in the accessory holder.
- Unlock the accessory holder on either side by pressing and sliding both accessory holder locks (A), and then rotating the accessory holder door (B).
- Slide an accessory into one of the accessory slots. You can add a second accessory in the other slot, if needed. For diffusion accessories, verify that the rough side of the diffusion faces the LEDs and that you can read the label text on the diffusion from the front of the fixture.
- Lock the accessory holder by closing the door and sliding the locks back into position.
Connect Power and Data
Power: Either powerCON TRUE1 TOP connectors for AC power (100–240 VAC, 50/60 Hz on a non-dimmable circuit) or four-pin XLR connectors for battery power (24–36 VDC) on the small (PL8 or PD8) and medium (PL16 or PD16) fixturesData: Five-pin XLR connectors for DMX In and DMX Thru
CAUTION: Do not connect the fixture to the battery when AC power is present. Maximum fixture output may be reduced when the fixture is connected to battery power.
Focus the Fixture
- Apply power to the fixture, and wait until the fixture has booted up (the ETC splash screen displays during boot up).
- Press any encoder to “wake” the display.
- What screen is currently displayed?• DMX: Press the Intensity encoder to turn on the LED array. The display shows a timeout countdown to indicate how long the LED array will remain on at 100% intensity. You can turn the Intensity encoder to reset the timeout countdown to 5 minutes.• All other screens (Studio, Preset, etc.): Press the Intensity encoder to turn on theLED array, and turn the Intensity encoder to adjust the intensity.
- Adjust the fixture to the desired position.
- Press the Intensity encoder to turn off the LED array.
Use Fixture in DMX Mode
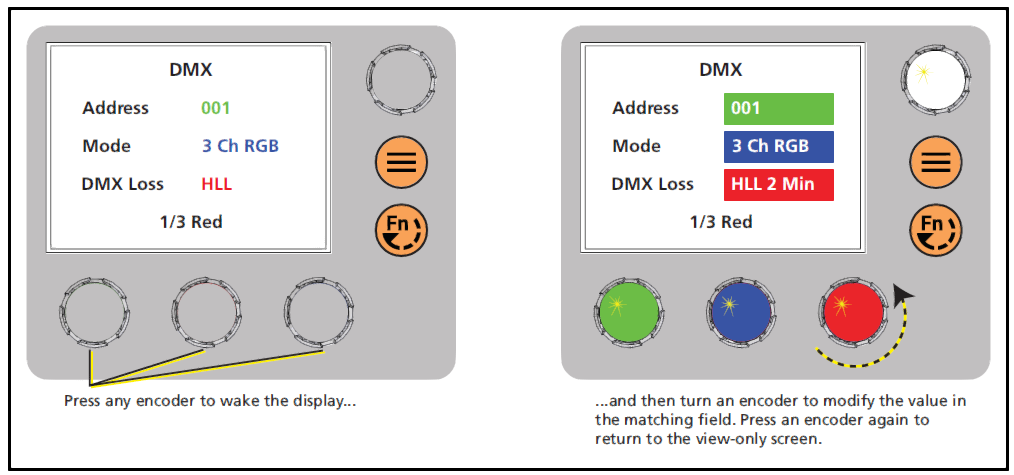
After you connect power and data to the fixture and provide DMX, press the Function button ( ) repeatedly to toggle to the DMX screen, where you can set the DMX address, DMX mode, and DMX loss behavior. (You can also set these values using RDM.)The DMX screen displays the current DMX values. Press any of the encoders to “wake” the display and edit the values. The colors of the encoders correspond to options on the display. Turn an encoder to modify the corresponding value.
DMX Modes
| Direct (Daylight HDR) | Direct (Lustr X8) | Expanded | Studio | 3 Ch RGB | 1 Channel | |
| RDM Personality ID | 1 | 1 | 2 | 3 | 4 | 5 |
| DMX Channel | ||||||
| 1 | Intensity | Intensity | Intensity | Intensity | Red | Intensity |
| 2 | Deep Red | Deep Red | CCT | CCT | Green | |
| 3 | Red | Red | Tint | Tint | Blue | |
| 4 | Mint | Amber | Tuning | Tuning | ||
| 5 | Cyan | Lime | Mix | Strobe | ||
| 6 | Blue | Green | Red | Curve | ||
| 7 | Indigo | Cyan | Green | Fan | ||
| 8 | Strobe | Blue | Blue | |||
| 9 | Curve | Indigo | Strobe | |||
| 10 | Fan | Strobe | Curve | |||
| 11 | Curve | Fan | ||||
| 12 | Fan |
Use Fixture in Stand-alone Mode
After you connect power to the fixture, press the Function button ( ) repeatedly to toggle through the following modes:
- Studio: Use one of three studio (white light) presets, or customize the presets.
- Color: Use one of 12 color presets, or customize the presets.
- Preset: Use one of 12 presets (color preset + fade time), or customize the presets.
- Effects: Use one of 12 effects, or customize the effects.
- DMX: View and set DMX parameters for the fixture.
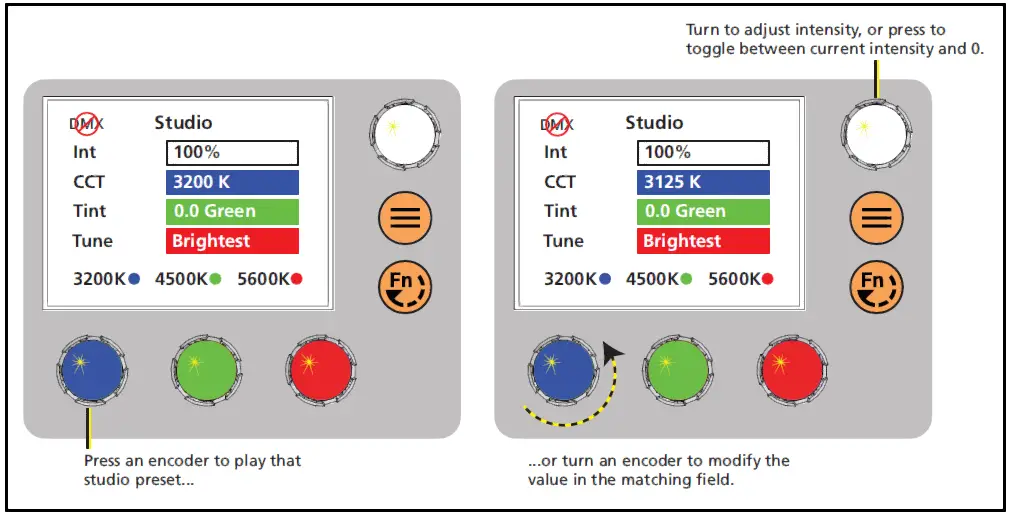
The colors of options on the display correspond to the colors of the encoders below the display and the Intensity encoder to the right of the display. Turn an encoder to modify the corresponding value on the display, or press an encoder to activate the corresponding option at the bottom of the display. Press the Intensity encoder to toggle between the current intensity and 0%.If the fixture is connected to other fos/4 Panel fixtures that are in the same stand-alone mode, the connected fixtures will play the same preset or effect.If the fixture is receiving DMX, the DMX data overrides any stand-alone mode selections. When the fixture is no longer receiving DMX, then the stand-alone selections take effect.
Select a Color Temperature
- Press the Function button ( ) until the display shows the Studio screen.
- Press the color encoder that matches the studio preset you want to use.• Blue: 3200 K• Green: 4500 K• Red: 5600 K
More Options
- Turn off the preset: Press the Intensity encoder to toggle the intensity value from the current value to 0. Press the Intensity encoder again to toggle back to the previous intensity value.
- Modify the preset: Turn the encoders to change the corresponding values. For example, turn the Intensity encoder to change the intensity value, or turn the blue encoder to change the color temperature value.
- Revert to the original preset: Press the encoder that corresponds to the preset again to restore the original values.
- Save the modified preset: Press and hold the encoder that corresponds to the preset that you want to re-record. The display shows a three-second countdown before re-recording the preset.
Select a Color
- Press the Function button ( ) until the display shows the Color screen.
- Turn the encoders to change the corresponding values. For example, turn the Intensity encoder to change the intensity value, or turn the green encoder to change the hue value. The crosshairs on the display indicate the approximate color.You can use a preset as a starting point for a color by pressing the color encoder that matches the preset. Turn the red encoder to move to another page of presets.
More Options
- Turn off the color: Press the Intensity encoder to toggle the intensity value from the current value to 0. Press the Intensity encoder again to toggle back to the previous intensity value.
- Revert to the original color of a preset: Press the encoder that corresponds to the preset again to restore the original values.
- Save the color to a preset: Press and hold the encoder that corresponds to the preset that you want to re-record. The display shows a three-second countdown before re-recording the preset. Changes that you make to presets in the Color screen also affect presets in the Effects screen and the Preset screen.
Select a Preset
- Press the Function button ( ) until the display shows the Preset screen.
- Turn the green encoder to select a preset, and then press the encoder to play the preset.
More Options
- Pause the preset: Press the green encoder to toggle between play and pause.
- Stop the preset: Press the red encoder.
- Modify the preset: Turn the Intensity encoder to change the intensity, or turn the red encoder to change the fade value.
- Capture the current DMX look: Press and hold the blue encoder (for the Snapshot icon ). The display shows a 3-second countdown before re-recording the preset.
- Modify the preset color: Press the blue encoder (for the Edit icon ). In the Edit Preset Color screen, turn the encoders to change the corresponding values. The crosshairs on the display indicate the approximate color. Press the green encoder (for the Save icon ) to save the new color to the preset.
- Push the preset to connected fixtures: Press the Menu button ( ), and then use the Intensity encoder to navigate through the menu: Local Settings > Push Presets. When the screen prompts you to confirm, press the green encoder (for the OK icon ) to continue.
 report this ad
![]()
References
[xyz-ips snippet=”download-snippet”]