![]() High-End SystemsHQ-100 Performance HazerUser ManualVersion 1.12.0
High-End SystemsHQ-100 Performance HazerUser ManualVersion 1.12.0
To view a list of ETC trademarks and patents, go to etcconnect.com/ip. All other trademarks, both marked and not marked, are the property of their respective owners.You can find complete High-End Systems terms and conditions and warranty information at etcconnect.com/Support/Warranty.aspx.ETC intends this document, whether printed or electronic, to be provided in its entirety.
Introduction
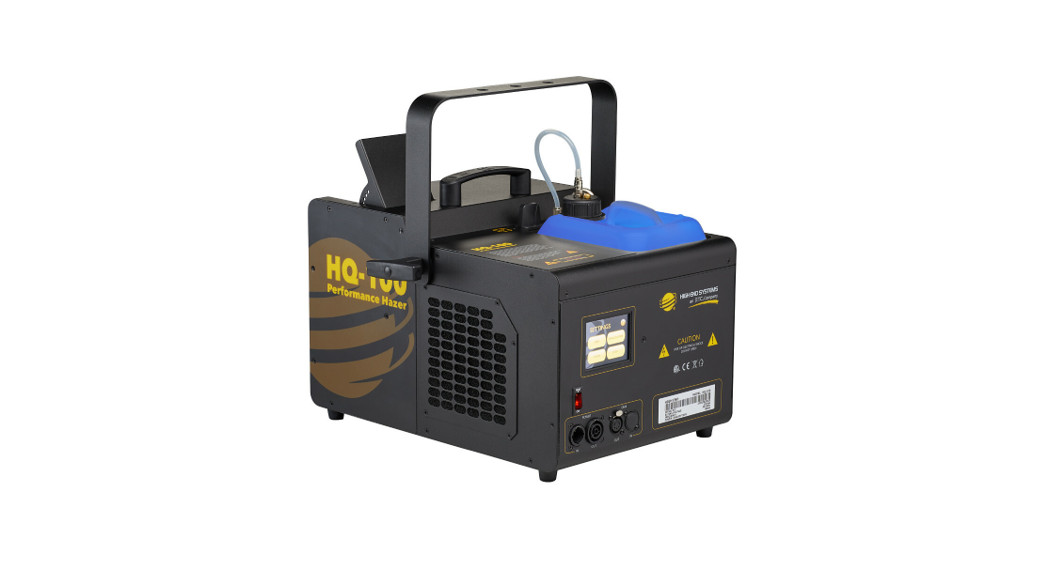
Congratulations on your purchase of the HQ-100 Performance Hazer. This manual provides important information for the safe installation, configuration, and maintenance of your hazer.
Document ConventionsThis document uses the following conventions to draw your attention to important information.
 |
Note: Notes are helpful hints and information that is supplemental to the main text. |
 |
CAUTION: A Caution statement indicates situations where there may be undefined or unwanted consequences of an action, the potential for data loss, or an equipment problem. |
 |
WARNING: A Warning statement indicates situations where damage may occur, people may be harmed, or there are serious or dangerous consequences of an action. |
 |
WARNING: RISK OF ELECTRIC SHOCK! This warning statement indicates situations where there is a risk of electric shock. |
All ETC documents are available for free download from our website: etcconnect.com.Please email comments about this manual to: [email protected].
Help from Technical Services
If you are having difficulties and your problem is not addressed by this document, try the ETC support website at support.etcconnect.com or the High-End Systems product website at etcconnect.com/Products/Live-Events. If none of these resources are sufficient, contact ETC Technical Services directly at one of the offices identified below. Emergency service is available from all offices outside of normal business hours. When calling for help, take these steps first:
- Prepare a detailed description of the problem
- Go near the equipment for troubleshooting
- Find your notification number if you have called in previously
| ETC, Inc.AmericasTechnical Services Department3031 Pleasant View RoadMiddleton, WI 53562800-775-4382 (USA, toll-free)+1-608 831-4116[email protected] | ETC GmbHGermany, Austria, Switzerland, Eastern Europe, and RussiaTechnical Services DepartmentOhmstrasse 383607 Holzkirchen, Germany+49 (80 24) 47 00-0[email protected] |
| ETC AustinHigh-End Systems ProductsTechnical Services Department2105 Gracy Farms LaneAustin, TX 78758 USA800-890-8989 (USA, toll-free)+1-512 836-2242[email protected] | ETC FranceFranceZone Urbaparc Bâtiment E6 Boulevard de la LibérationSaint-Denis, 93200+33 1 4243 3535[email protected] |
| ETC LtdEurope, the Middle East, and AfricaTechnical Services Department26-28 Victoria Industrial EstateVictoria Road,London W3 6UU England+44 (0)20 8896 1000[email protected] | ETC AsiaAsiaTechnical Services DepartmentRoom 1801, 18/FTower 1, Phase 1 Enterprise Square9 Sheung Yuet RoadKowloon Bay, Kowloon, Hong Kong+852 2799 1220[email protected] |
Unpacking Instructions
The HQ-100 Performance Hazer shipping carton includes:
- One (1) HQ-100 Performance Hazer
- One (1) empty fluid tank with tank filter cap
- One (1) yoke
- One (1) bag of accessories, which includes:• One (1) haze fluid hose with quick disconnect connector• One (1) power cord• Two (2) yoke T-handle bolts• Two (2) yoke rubber washers
Visually inspect the shipping carton for damage that may have occurred during transit. If the shipping carton shows signs of damage, document the damage fully before unpacking the contents. Documentation of any damage is helpful when reporting a claim with the carrier.Do not discard the shipping carton and packaging materials. The carton and packing materials are specifically designed to protect the hazer during transport and will be useful if you need to ship the hazer, including transporting the hazer for service.
Safety Considerations
To ensure safe operation, follow the safety instructions and warning notes in this user manual.
- The HQ-100 Performance Hazer is intended for professional use only. Not for residential use. Read the entire manual before using this equipment.
- Contact your ETC authorized dealer or Technical Services before performing any service in order to maintain warranty coverage.
Symbols used on the product are defined below:
 |
Risk of electric shock |
 |
General warning |
| This product should not be discarded as unsorted waste but must be sent to separate collection facilities for recovery and recycling. | |
 |
Caution: Hot surface |
 |
Operate indoors only, not where this product would be exposed to the weather. |
WARNING: Note the following safety warnings before use:
- This device is designed for operation by qualified personnel only.
- Replace the fuse with the specified type and rating only. See page 18.
- Make sure that the available voltage is within the stated range. See page 10.
- Do not mount on or near flammable surfaces.
- Do not operate near flammable materials or gases.
- Not for residential use.
- Use only in well-ventilated areas.
- Do not place hands, face, or other body parts near the heat exchanger or output nozzle during operation.
- Do not use if the power lead (cord set) is damaged. If the lead is damaged, it must be replaced by a qualified technician with an equivalent type before use. Contact your local authorized dealer for spare power leads.
- The device must be plugged into a grounded outlet. Follow national and local codes.
WARNING: RISK OF ELECTRIC SHOCK!
- Do not remove the covers of the hazer.
- Disconnect the device from power and DMX and allow it to cool before performing any cleaning and maintenance.
|
CAUTION: Hot Surfaces. Allow the device to cool completely before handling and servicing. | |
General Operation and Use Guidelines
- The operating temperature range for this device is -5°–50°C (23°–122°F), 5-95% non-condensing humidity. Do not operate the device outside of this range.
- Store the HQ-100 Haze Fluid in a location that maintains a temperature of 0°–40°C (32°–104°F).
- This device should only be operated with the maximum alternating current that is stated in the technical specifications label provided on the device.
- Lighting effects are not designed for permanent operation. Consistent operation breaks may extend the life of the hazer.
- When choosing the installation location, make sure the device will not be exposed to extreme heat, moisture, or dust.
- Operate the device only after having familiarized yourself with its functions. Do not permit others who are not qualified or familiar with its functions to operate the device.
- Please use the original packaging if the device is to be transported. ETC will not be responsible for damage to the device if packaging other than manufacturer-provided packaging is used.
- Do not modify the device. Any modifications will void the product warranty.
- This manual describes the proper installation and operation of the device. Using the device in any way other than the intended use may cause personal injury or equipment failure and may void the warranty.
- When the device has been stored or transported in cold temperatures, allow it to warm to room temperature for a minimum of one hour before applying power. Applying power to a cold device may cause damage to the device and void the manufacturer’s warranty.
- The HQ-100 Performance Hazer is designed to only use HQ-100 Haze Fluid. Use of other haze fluid is not allowed and will void the product warranty. The HQ-100 Haze Fluid has been approved for use in the HQ-100 Performance Hazer as specified by the Actors Equity Association.
- Never operate the hazer without haze fluid.
- The Material Safety Data Sheet for the haze fluid is available on the ETC website: etcconnect.com/Products/Live-Events/Atmospherics/HQ-100/Documentation.aspx.
- You can purchase HQ-100 Haze Fluid from the ETC Online Shop: etcconnect.com/hq100hazefluid.
Overview
For current and complete technical specifications for the HQ-100 Performance Hazer, see the technical datasheet:etcconnect.com/Products/Live- Events/Atmospherics/HQ100/Documentation.aspx.
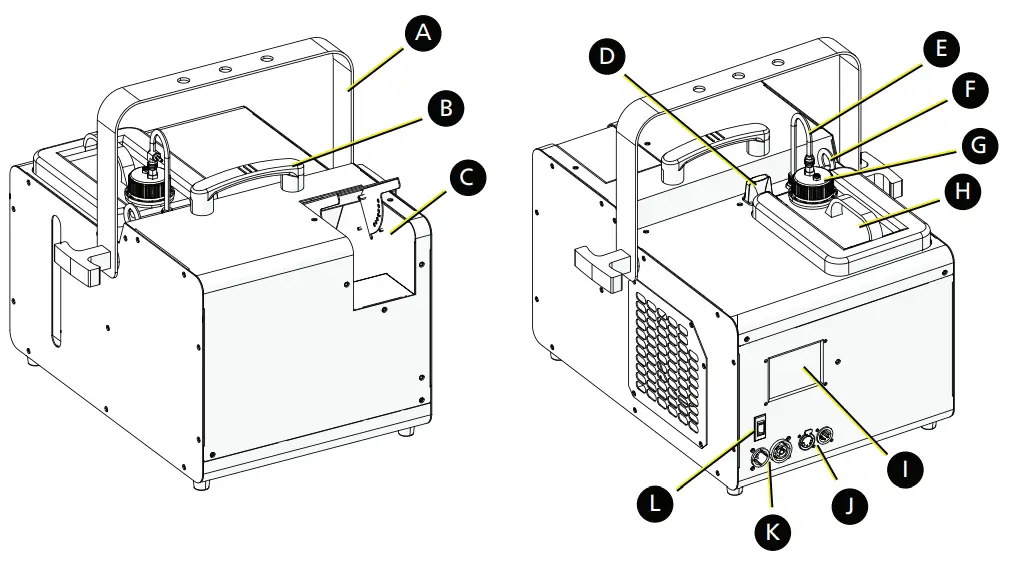
| A | Yoke: See Attach the Yoke on page 8. |
| B | Handle |
| C | Nozzle |
|
D |
Antenna: For use when controlling the HQ-100 Performance Hazer using wireless DMX. See Set Up Wireless DMX Control on page 14. |
| E | Quick disconnect haze fluid hose |
| F | Safety cable attachment point: See Mount the Hazer on page 9. |
| G | Tank filter cap |
| H | Fluid tank: See Replace the Haze Fluid Tank on page 16. |
| I | LCD touchscreen user interface: See Menus on page 13. |
| J | DMX 5-pin XLR IN and OUT connectors: See Connect DMX on page 11. |
| K | powerCON® True1® power IN and OUT connectors: See Power on page 10. |
| L | Power switch/Reset switch: Power On/Off switch. Also used to reset the hazer if the circuit breaker trips. |
Assemble the Hazer
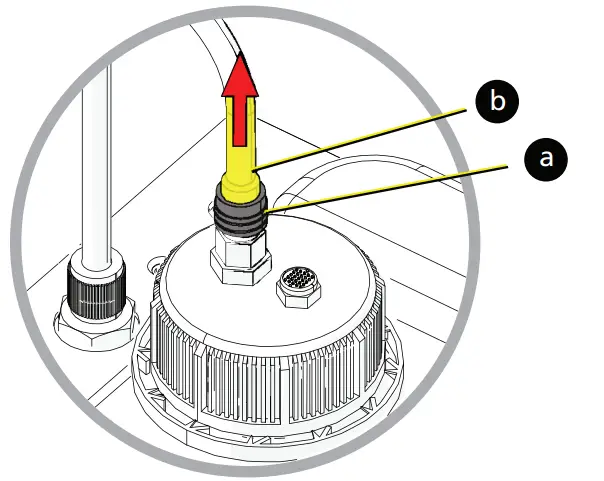
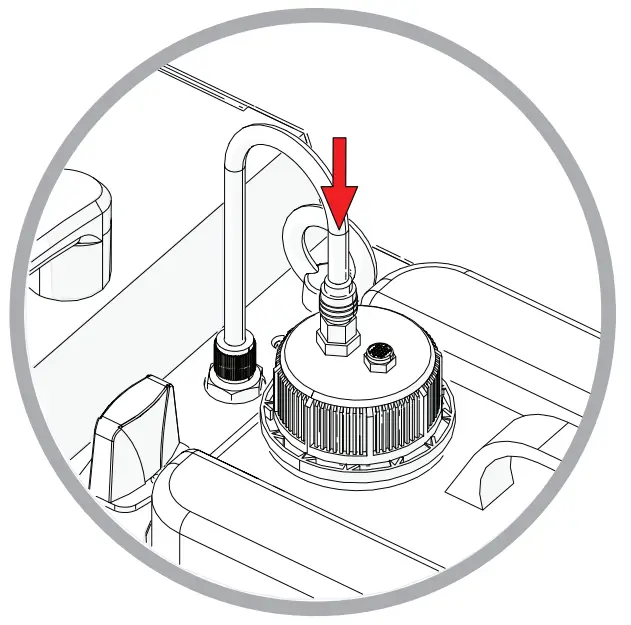
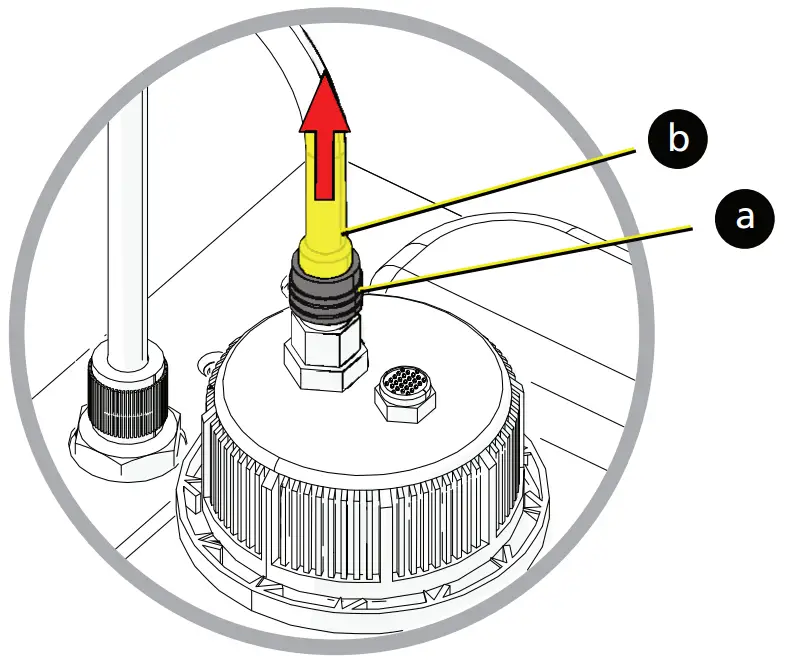
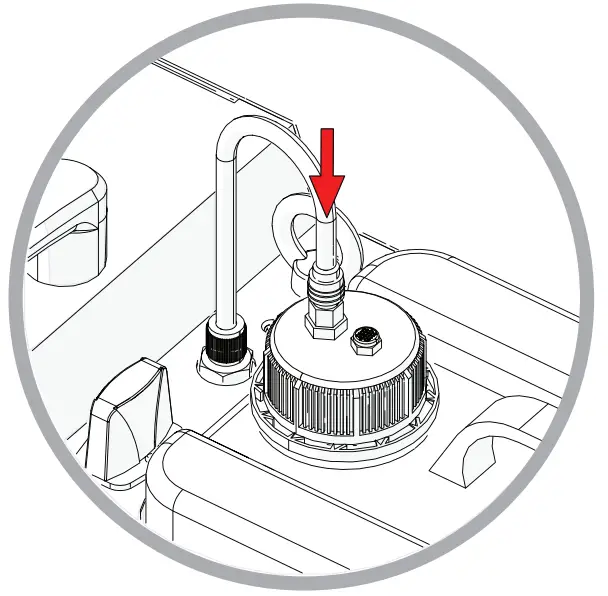
Attach the Haze Fluid HoseThe haze fluid hose is included in the accessories bag.
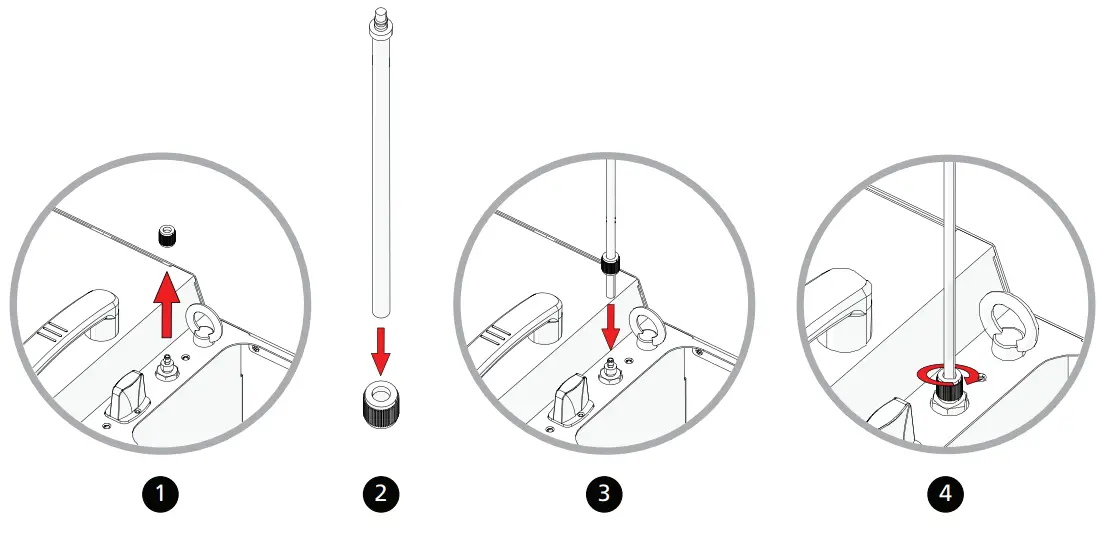
- Unscrew the round attachment nut from the hose connection point on the top of the hazer.
- Feed the open end of the haze fluid hose through the top of the attachment nut.
- Fit the open end of the hose over the nozzle on the top of the hazer.
- Slide the attachment nut down the hose to the connection point, and tighten the nut to secure the hose in place.
Connect the Fluid Tank
The HQ-100 Performance Hazer ships with an empty fluid tank installed in the hazer. Install a full fluid tank before use.
WARNING: HQ-100 Haze Fluid has been specifically designed for use in the HQ-100 Performance Hazer. The haze fluid has been tested for use by independent toxicological laboratories and found to be non-toxic. The use of other haze fluids that may not take into account the specific evaporate system, temperature, flow rate, and materials used to construct the HQ-10Performance Hazer may be construed as a health hazard and will void the product warranty.
WARNING: Do not dilute HQ-100 Haze Fluid. Diluting the haze fluid with water, scents, or other additives could damage the hazer and create health and fire hazards.
- Remove the empty fluid tank from the hazer.
- Remove the tank filter cap from the empty fluid tank.
- Verify that the two hoses are securely attached to the inside of the tank filter cap.
- Screw the tank filter cap onto a full fluid tank.
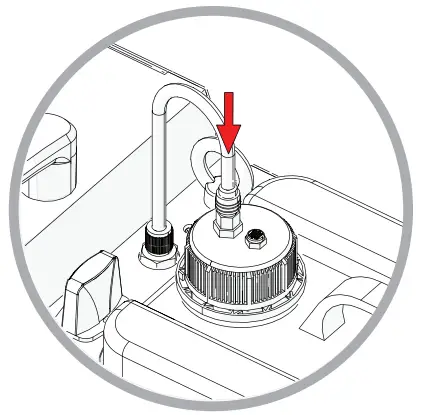
- Place the full fluid tank into the hazer. Orient the tank so that the tank filter cap is near the haze fluid hose.
- Attach the quick disconnect fitting on the haze fluid hose to the quick disconnect socket on the tank filter cap.

- Retain the empty fluid tank for use when flushing the fluid lines.
Attach the Yoke
The HQ-100 Performance Hazer ships with a yoke for use when mounting the hazer overhead.The rubber washers and T-handle bolts are included in the accessories bag.
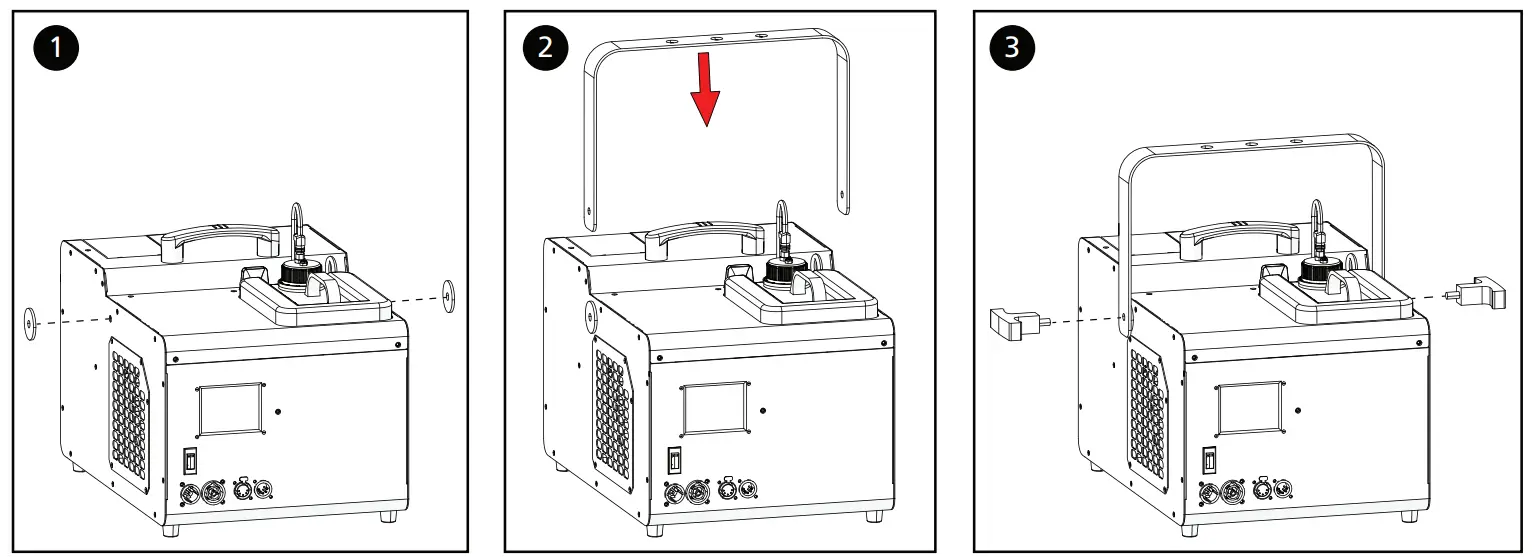
- Remove the adhesive from the back of a rubber washer, center the washer over the screw hole on one side of the hazer, and press firmly to affix the washer to the hazer. Repeat to affix the second washer to the other side of the hazer.
- Position the yoke over the hazer and align the mounting holes on the yoke with the screw holes on the sides of the hazer.
- Screw the T-handle bolts into the sides of the hazer to secure the yoke to the hazer.
Mount the Hazer
WARNING:
- Do not use outdoors. Indoor use, dry locations only. Intended for use where humidity does not exceed 95% (non-condensing).
- Do not suspend directly above an audience or performers.
- Install only in a well-ventilated area.
- Do not install on a flammable surface or near flammable materials or gases.
- The installation location must support a minimum point load of 10 times the weight of the hazer.
- The installation hardware must be capable of supporting a minimum of 10 times the weight of the hazer.
- The installation must always be secured with a secondary safety attachment. A safety cable is not supplied.
- Safety cable attachment must be rated by a safety factor of 10.
- Any clamps you use for installation should comply with, and be approved by, the Authority Having Jurisdiction (AHJ).
- Never stand directly below the installed hazer when mounting, removing, or servicing the hazer.
- All safety and technical aspects of hazer installation must be approved by qualified personnel before operation.
- Overhead rigging must be performed by qualified personnel.
CAUTION: Follow all local codes and recommended practices by the Authority Having Jurisdiction. The installation must only be carried out by qualified personnel.
When mounted, the hazer must be level and its feet must be directed downward. You can set the hazer on the floor or another supportive, stable, flat surface, or you can suspend the hazer by the yoke using appropriate mounting hardware. If you suspend the hazer, make sure to secure the hazer with an appropriate safety cable at the safety cable attachment point. The safety cable and mounting hardware are not supplied with the HQ-100 Performance Hazer.
Power
Electrical Specifications
- 100–120 VAC at 50/60 Hz
- Maximum power consumption: 800 W
Input and Power Factor
|
VAC |
Amps | Hz | Watts | VA |
PF |
|
100 |
5.40 | 50 | 536 | 540 | 0.99 |
| 120 | 6.55 | 60 | 782 | 785 |
0.99 |
CAUTION: Using the hazer below 100 V on a 15 A breaker may cause the breaker to trip. Ensure that the circuit can handle the hazer’s maximum current draw before you connect it.
Connect Power
- Connect the powerCON True1 connector on the power cord to the POWER IN reception the hazer.
- Plug the other end of the power cord into a grounded electrical outlet.
- Set the power switch to the on position. The hazer begins its warm-up process.
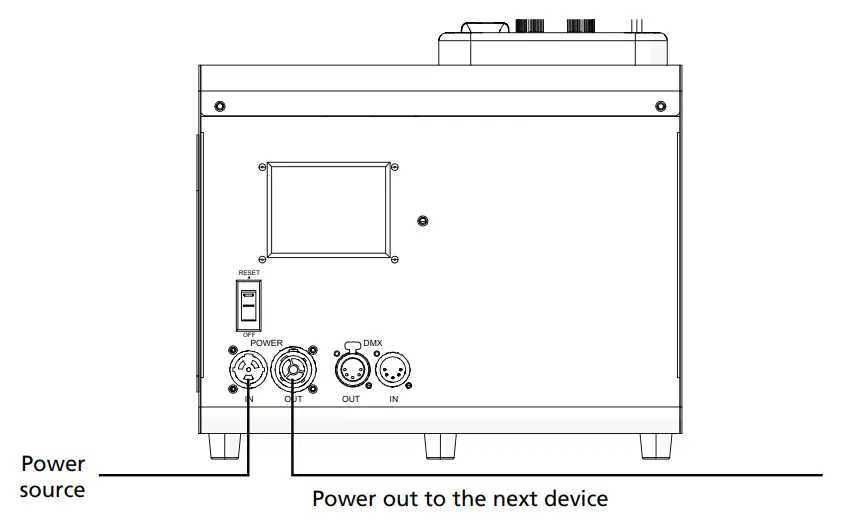
Power Multiple DevicesIf you are connecting additional devices in a power run, link the remaining devices by connecting a power cable from the POWER OUT connector on the hazer to the POWER IN receptacle of the next device in the power run.
Connect DMX
The HQ-100 Performance Hazer operates on a standard DMX-512 control bus, controlled by a DMX console, and it requires 4 channels of DMX-512.The hazer includes two 5-pin XLR connectors, one for DMX In and one for DMX Out (for use when daisy-chaining additional devices on the DMX control bus). See Overview on page 6 for the location of the XLR connectors.
DMX Connector PinoutUse the following standard pinout when preparing DMX cable with 5-pin XLR connectors. ETC recommends using Belden 9729 or equivalent cable. (See the ETC cable cross-database for equivalent alternatives: etcconnect.com/Support/Cable-Cross-Database.aspx.) The second data pair in the recommended cable type is not used but is reserved for future service.
|
DMX-512 Pinout for five-pin XLR |
Pin |
Use |
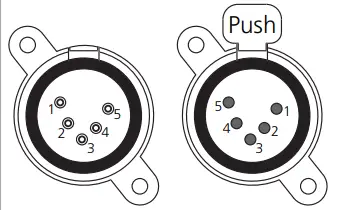 |
1 |
Common (shield) |
|
2 |
Data – | |
| 3 |
Data + |
|
|
4 |
not connected | |
| 5 |
not connected |
Connect DMX Cables
Note: The HQ-100 Performance Hazer ships with a protective plastic insert in the DMX IN plug that must be removed before you connect data to the hazer for the first time.
The following instructions are guidelines for connecting DMX to your hazer. Your installation may vary.
- Connect a DMX data cable to the DMX control source and the DMX In XLR receptacle on the hazer.
- If you are connecting additional devices in the control run, continue linking the remaining devices by connecting a DMX data cable from the DMX OUT receptacle on the hazer to the DMX IN connector of the next device on the control run.
Note: A maximum of 32 DMX devices may be connected in any one DMX data run when installed in a daisy-chain fashion.
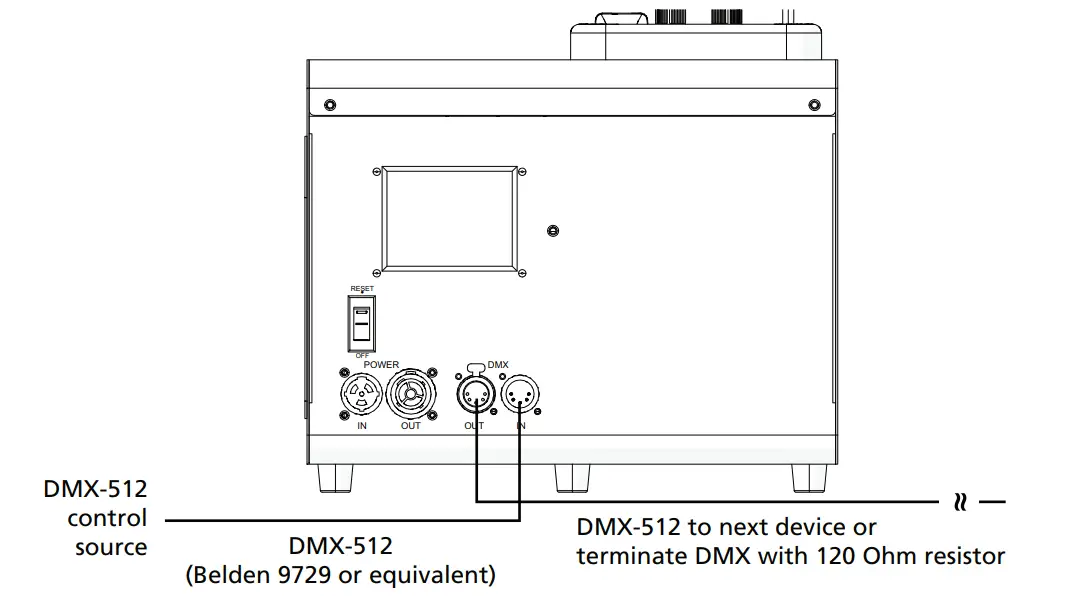
Terminate DMXUse a DMX terminator or install a resistor on the last device of the DMX control run to prevent corruption (data reflection) of the digital control signal by electrical noise.A DMX terminator is an XLR plug with a 120 Ω resistor connected between pins 2 and 3 that can be installed into the DMX OUT receptacle of the last device in the DMX control run. This plug is available and sold separately. To purchase a DMX terminator from ETC, please contact your ETC customer service representative.
Set the DMX Start AddressGive each device in a data run a unique DMX starting address so that the correct device responds to the control signals. This DMX start address is the channel number from which the device starts to “listen” to the digital control information sent out from the control source. Modify the HQ-100 Performance Hazer DMX start address in the SETTINGS menu on the LCD touchscreen user interface. See Settings Menu on page 13.
DMX ChannelsThe most current DMX channel map for the HQ-100 Performance Hazer can be found on the ETC website:etcconnect.com/Products/Live-Events/Atmospherics/HQ-100/Documentation.aspx
Operation
WARNING: Do not place hands, face, or other body parts near the heat exchanger or the output nozzle during operation.
|
CAUTION: The output nozzle remains very hot for some time after you turn off the hazer. Allow the hazer to cool completely before handling it. | |
You control the operation of the HQ-100 Performance Hazer from the LCD touchscreen user interface using the following menus:
- SETTINGS: Lets you control DMX addressing, wireless settings, and the fluid tank light. (See Settings Menu below.)
- MANUAL MODE: Let’s manually control haze output and blower speed. (See Manual Mode Menu on page 14.)
- INFO: Shows the serial number of the hazer, the installed firmware version number, and the status of the hazer.
NavigationIf the HQ-100 Performance Hazer logo is shown on the LCD touchscreen, tap the touchscreen to access the menus. The MANUAL MODE menu is shown by default.From any of the menus, tap the Return button to return to the previous menu.
Settings Menu
|
Parameter |
Value |
Description |
| DMX | 1–509 | If you are using DMX control, set the DMX address for the hazer.Tap the up and down arrows to identify the address, and then tap the SET button to set the address. |
| WIRELESS DMX | ON/OFF | If you are using wireless DMX control, configure the wireless settings. See Set Up Wireless DMX Control on page 14. |
| LIGHT | ON/OFF | Tap the ON/OFF switch to turn the light in the fluid tank compartment on or off. |
When you are not using DMX control, you must manually set the output values for the hazer.Tap the up and down arrow buttons to set the values. The settings remain active until you either manually change them or you enable DMX control.
|
Parameter |
Value |
Description |
| HAZE | 0–100 | Haze mode produces a continuous output of haze. A setting of 100 produces the maximum amount of haze the HQ-100 Performance Hazer can output continuously.Note: At a setting of 100, the hazer uses a maximum of 5 ml (0.17 oz) of haze fluid per minute. |
| BLOWER | 1–100 | Control the speed of the blower: 1 is the lowest setting. |
| HO | ON/OFF | The high output (HO) model is a non-continuous haze mode. When HO is set to “ON”, the HQ-100 Performance Hazer outputs the maximum amount of haze it is capable of producing for as long as it can. As necessary, the hazer will pause to allow the heating element to cool.Note: The HO model uses 12 ml (0.41 oz) of haze fluid per minute. |
Set Up Wireless DMX ControlThe HQ-100 Performance Hazer includes an internal 2.4 GHz City Theatrical Multiverse® DMX receiver. You can use a City Theatrical Multiverse transmitting device to wirelessly configure and control the hazer. For information about using Multiverse products, see the documentation provided with the products.
Note: For additional guidance and troubleshooting resources, download the Multiverse Wireless Setup Information Guide from etcconnect.com.
To use wireless DMX control, configure the wireless DMX settings on the hazer.
- Tap the SETTINGS button to open the SETTINGS menu.
- Tap the WIRELESS DMX button.
- Tap the ON/OFF switch to turn on the DMX receiver. The signal strength is shown.
- Tap the SETTING button.
- Tap the up and down arrow buttons to set the Universe, SHoW ID, and SHoW Key values.
These values must match the values of the Multiverse DMX transmitter with which the hazer will communicate.
Error Codes
The HQ-100 Performance Hazer will stop functioning if one of the following error messages is displayed on the LCD touchscreen.
|
Error |
Cause |
Remedy |
| Heater Fault | The heater is not functioning. | Contact Technical Services (see page 2). |
| HeaterOverheated | The temperature of the heater is too high. | Let the hazer cool before continuing use. |
| ThermocoupleFell Off | The temperature of the heater cannot be detected. | Contact Technical Services (see page 2). |
| ThermocouplePolarity Reversed | The thermocouple cannot get an accurate temperature reading for the heater, and the heater could overheat. | Contact Technical Services (see page 2). |
| Wrong Voltage | The hazer is connected to the wrong power source, which could damage the hazer. | Disconnect from power, inspect the hazer for damage, and connect to a 120 V power source. |
Maintenance
WARNING: Service and maintenance procedures should only be performed by qualified personnel. Unauthorized service will void the warranty.
CAUTION: RISK OF ELECTRIC SHOCK! Disconnect power before servicing.
There are no user-serviceable parts inside of the HQ-100 Performance Hazer. If your hazer requires service, contact Technical Services for assistance. (See page 2 for contact information.) Replacement parts are available for purchase from the ETC Online Shop: shop.etcconnect.com/repair-parts/Regular maintenance is recommended. Keep the following in mind during regular inspections:
- All installation hardware and components of the device must be tightly connected and must not be corroded.
- If the device is suspended, there must not be any deformations to the housing, rigging, or installation points (ceiling, suspension, trussing).
- The power cable must not show any damage, material fatigue, or sediment.
- If spare parts are required, order only genuine parts from your local authorized dealer.To maintain the HQ-100 Performance Hazer in good working condition:
- Do not allow the haze fluid to become contaminated.
- Always place the tank filter cap on the fluid tank as quickly as possible when you replace the fluid tank.
- Never operate the hazer without haze fluid.
- Keep the vents in the hazer free of debris.
- Clean with a dry cloth only.
- Store the hazer in a dry location when not in use.
Replace the Haze Fluid Tank
You can purchase HQ-100 Haze Fluid from the ETC Online Shop: etcconnect.com/hq100hazefluid or scan the QR code.
 https://www.etcconnect.com/hq100hazefluid
WARNING: HQ-100 Haze Fluid has been specifically designed for use in the HQ-100 Performance Hazer. The haze fluid has been tested for use by independent toxicological laboratories and found to be non-toxic. The use of other haze fluids that may not take into account the specific evaporation system, temperature, flow rate, and materials used to construct the HQ-100 Performance Hazer may be construed as a health hazard and will void the product warranty.
WARNING: Do not dilute HQ-100 Haze Fluid. Diluting the haze fluid with water, scents, or other additives could damage the hazer and create health and fire hazards.
- Set the power switch on the HQ-100 Performance Hazer to “OFF” and disconnect the hazer from power.
- Detach the haze fluid hose from the tank filter cap.a. Slide the quick disconnect collar on the tank filter cap down to release the hose.b. Pull the hose out of the quick disconnect socket.
- Remove the empty fluid tank from the hazer.
- Remove the tank filter cap from the empty fluid tank.
- Verify that the two hoses are securely attached to the inside of the tank filter cap.
- Screw the tank filter cap onto a full fluid tank.
- Place the full fluid tank into the hazer. Orient the tank so that the tank filter cap is near the haze fluid hose.
- Attach the quick disconnect fitting on the haze fluid hose to the quick disconnect socket on the tank filter cap.
- Reconnect the hazer to power.
- Set the power switch to the on position to power on the hazer.
Flush the Fluid LinesWe recommend that you periodically flush the fluid lines to help maintain the cleanliness of the hazer. Flush the lines:
- After every 10 fluid tanks of use (50 L / 13 gal).
- Prior to storing the hazer for six or more months.
- If you use haze fluid that is not the approved HQ-100 Haze Fluid.
Note: Use of haze fluid other than HQ-100 Haze Fluid is not allowed and will void the product warranty.
- Set the power switch on the HQ-100 Performance Hazer to “OFF” and disconnect the hazer from power.
- Detach the haze fluid hose from the tank filter cap.a. Slide the quick disconnect collar on the tank filter cap down to release the hose.b. Pull the hose out of the quick disconnect socket.
- Remove the haze fluid tank from the hazer.
- Remove the tank filter cap from the haze fluid tank.
- Verify that the two hoses are securely attached to the inside of the tank filter cap.
- The hazer shipped with an empty fluid tank. Fill that tank with 5 L (1.3 gal) of distilled water.
- Screw the tank filter cap onto the distilled water tank.
- Place the distilled water tank into the hazer and attach the quick disconnect fitting on the haze fluid hose to the quick disconnect socket on the tank filter cap.
- Reconnect the hazer to power and power on the hazer.
- In the MANUAL MODE menu, tap the up arrow for the HO setting to turn ON the high output haze mode. (See Manual Mode Menu on page 14 for details.) Let the hazer run until the distilled water tank is empty.
- When the tank is empty, tap the down arrow for the HO setting to turn OFF the haze output.
- Detach the haze fluid hose from the tank filter cap, and remove the distilled water tank from the hazer.
- If you preparing the hazer for storage, do not reconnect a haze fluid tank to the hazer.Otherwise, reconnect a full haze fluid tank to the hazer. See Replace the Haze Fluid Tank on page 16 for details.
Reset the HazerIf the circuit breaker trips, set the power switch to RESET the hazer.Replace the FuseThe fuse in this fixture is not user-replaceable. Contact ETC Technical Services for assistance.See Help from Technical Services on page 2 for contact information.
Compliance
For current and complete compliance information, view the HQ-100 Performance Hazer datasheet:etcconnect.com/Products/Live-Events/Atmospherics/HQ-100/Documentation.aspx.
FCC ComplianceHQ-100 Performance Hazer(For any FCC matters):
Electronic Theatre Controls, Inc.3031 Pleasant View RoadMiddleton, WI 53562+1 (608) 831-4116etcconnect.comThis device complies with Part 15 of the FCC Rules. Operation is subject to the following two conditions: (1) This device may not cause harmful interference, and (2) this device must accept any interference received, including interference that may cause undesired operation.
Note: This equipment has been tested and found to comply with the limits for a Class A digital device, pursuant to part 15 of the FCC Rules. These limits are designed to provide reasonable protection against harmful interference when the equipment is operated in a commercial environment. This equipment generates, uses, and can radiate radio frequency energy and, if not installed and used in accordance with the instruction manual, may cause harmful interference to radio communications. Any modifications or changes to this product not expressly approved by Electronic Theatre Controls, Inc. could void the user’s authority to operate the product. Operation of this equipment in a residential area is likely to cause harmful interference in which case the user will be required to correct the interference at his own expense.
ISED ComplianceThis device contains a license-exempt transmitter/receiver that complies with Innovation, Science, and Economic Development Canada’s license-exempt RSSs. Operation is subject to the following two conditions:
- This device may not cause interference.
- This device must accept any interference, including interference that may cause undesired operation of the device.
Contains IC ID: 7480A-5995
 report this ad
![]()
Corporate Headquarters n Middleton, WI, USA | +1 608 831 4116Global Offices n London, UK | Rome, IT | Holzkirchen, DE | Paris, FR | Hong Kong | Dubai, UAE | SingaporeNew York, NY | Orlando, FL | Los Angeles, CA | Austin, TXWeb etcconnect.com | Support support.etcconnect.com | Contact etcconnect.com/contactETC© 2021 Electronic Theatre Controls, Inc. | Trademark and patent info: etcconnect.com/ipProduct information and specifications are subject to change. ETC intends this document to be provided in its entirety.1501M1200-1.12.0 Rev A Released 2021-05
References
HQ-100
High End Systems
HQ-100 Haze Fluid from High End
📧[email protected]
📧[email protected]
High End Systems
📧[email protected]
Warranty
Trademarks
Cable Cross
Trademarks
ETC – Theatre, Film, Studio and Architectural Lighting
📧[email protected]
Home – Electronic Theatre Controls Inc
Home – Electronic Theatre Controls Inc
ETC – Theatre, Film, Studio and Architectural Lighting
ETC – Theatre, Film, Studio and Architectural Lighting
Warranty
Repair Parts – Page 1 – ETC, Inc. – US
📧[email protected]
Repair Parts – Page 1 – ETC, Inc. – US
HQ-100
Contact Us
Contact Us
HQ-100 Haze Fluid from High End
ETC – Theatre, Film, Studio and Architectural Lighting
📧[email protected]
Cable Cross
📧[email protected]
[xyz-ips snippet=”download-snippet”]