ETC Source Four Led Series 3 User Guide
Overview

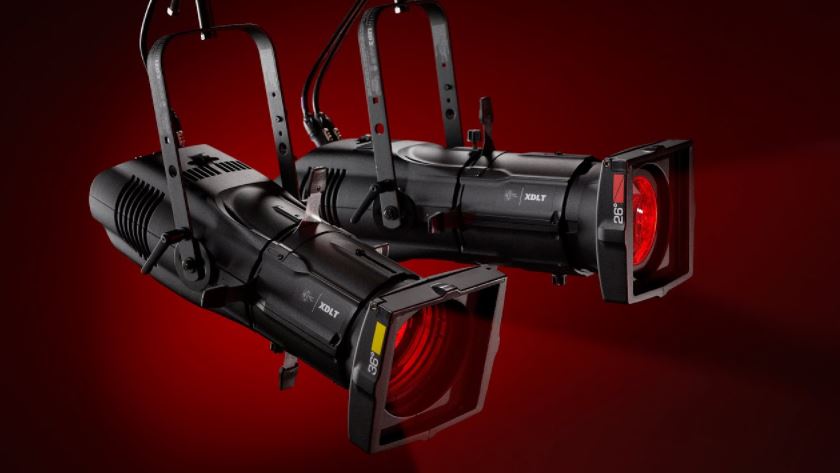
Use the images below as a guide to connect power and data and to navigate the basic features of the fixture. For complete information, download the Source Four LED Series 3 User Manual at etcconnect.com, or view online help on your smartphone or tablet by scanning this code.

A. Yoke tilt-lock: Tilt the fixture as needed, and then turn the tilt-lock clockwise to lock the position. If necessary, pull the tilt-lock away from the stem to adjust the tilt-lock position.
B. Safety cable attachment point: Attach safety cable to the fixture housing (page 5).
C. Antenna storage accessory: When transporting or storing the fixture, store the wireless antenna on the yoke to protect it.
D. Barrel rotation knob: Loosen to rotate the barrel, and then tighten to secure it.
E. Shutters: Use four framing shutters to shape the beam.
F. Pattern holder slot and accessory slot: Insert an A-size, B-size, or glass pattern holder, and insert an accessory, such as a drop-in iris or motorized pattern device.
G. Beam focus knob: Loosen to adjust the lens tube position, and then tighten to secure it (page 5).
H. Accessory holder: Insert a color frame or other accessory, and then lock the holder.
I. Power In and Power Thru connectors: powerCON® TRUE1 TOP connectors for power in and power thru (page 5).
J. DMX In and DMX Thru connectors: Five-pin XLR connectors for DMX/RDM in and thru.
K. User interface: View the fixture status, set the DMX address and mode, or set stand-alone options.
L. Antenna: For use when controlling the fixture using wireless DMX. The fixture ships with the antenna stored in the antenna storage accessory (C). Install before using the fixture (page 4).
M. NFC (Near Field Communication) tag: Use the Set Light app to wirelessly configure the fixture, with or without power applied to the fixture.
![]() Corporate Headquarters : Middleton, WI, USA | +1 608 831 4116Global Offices : London, UK | Rome, IT | Holzkirchen, DE | Paris, FR | Hong Kong | Dubai, UAE | Singapore New York, NY | Orlando, FL | Los Angeles, CA | Austin, TXWeb etcconnect.com | Support support.etcconnect.com | Contact etcconnect.com/contactETC© 2021 Electronic Theatre Controls, Inc. | Trademark and patent info: etcconnect.com/ipProduct information and specifications subject to change. ETC intends this document to be provided in its entirety.7462M1300-1.0.0 Rev A Released 2021-02
Corporate Headquarters : Middleton, WI, USA | +1 608 831 4116Global Offices : London, UK | Rome, IT | Holzkirchen, DE | Paris, FR | Hong Kong | Dubai, UAE | Singapore New York, NY | Orlando, FL | Los Angeles, CA | Austin, TXWeb etcconnect.com | Support support.etcconnect.com | Contact etcconnect.com/contactETC© 2021 Electronic Theatre Controls, Inc. | Trademark and patent info: etcconnect.com/ipProduct information and specifications subject to change. ETC intends this document to be provided in its entirety.7462M1300-1.0.0 Rev A Released 2021-02
User Interface
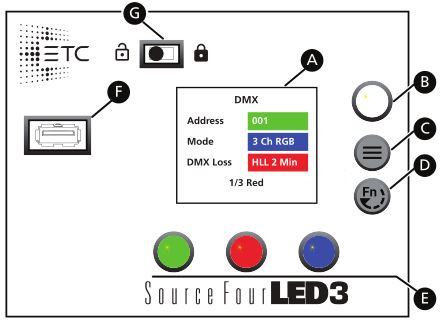 A. Display: The colors of options on the display correspond to the colors of the encoders below the display (E) and the Intensity encoder to the right of the display (B).
B. Intensity encoder:
- When in DMX mode, press the Intensity encoder to enter Focus mode when focusing the fixture.
- When configuring the fixture in one of the stand-alone modes, press the Intensity encoder to toggle between the current intensity and 0, or turn the Intensity encoder to modify the white fields on the display. See Use Fixture in Stand-alone Mode on page 6.
- When navigating from the Main Menu screen, turn the Intensity encoder to scroll through menu options, and then press the Intensity encoder to select a menu option.
C. Menu button: Press to view the Main Menu screen and configure the fixture. Press the button again to return to the previous screen when you are setting configuration options.
D. Function button: Press the button, use the Intensity encoder to navigate to one of the following modes, and then press the Intensity encoder to select it:
- DMX: View and set DMX parameters for the fixture.
- Studio: Use one of three studio (white light) presets, or customize the presets.
- Color: Use one of 12 color presets, or customize the presets.
- Effects: Use a sequence, or customize a sequence.
- Preset: Use one of 12 presets (color preset + fade time), or customize the presets.
See Use Fixture in Stand-alone Mode on page 6 and Use Fixture in DMX Mode on page 6.
E. Encoders (Red, Green, Blue): The colors of encoders correspond to options on the display. Press to activate the options at the bottom of the display, or turn to modify the values on the display.
F. USB port: Use for updating firmware, saving and loading fixture configuration settings, or saving error logs via a flash drive.
G. UI lock: Set this switch to lock the UI. This prevents inadvertent changes to the UI.
Safety
 WARNING: RISK OF ELECTRIC SHOCK! The light source in this luminaire is not user-replaceable, and must be replaced only by a qualified technician. Contact ETC Customer Support for assistance.
 WARNING: Note the following safety warnings before use:
- Use the fixture in dry locations only, where humidity does not exceed 90 percent (non-condensing).
- Connect the fixture to a non-dimmable power source in order to avoid damage to the fixture’s internal power supply and other electrical components. Using a dimmable power source can damage the fixture and will void the warranty.
- This product must be installed in accordance with the applicable installation code by a person familiar with the construction and operation of the product and the hazards involved.
- Disconnect the fixture from power and DMX and allow it to cool before installing accessories or performing any cleaning and maintenance.
- Only use mounting hardware that is rated for the total weight of the fixture and accessories.
- In addition to primary suspension, attach a safety cable (or other approved safety device) to the fixture. Safety cables must be rated to support ten times the fixture weight. Consult local standards to ensure that safety cables meet all requirements. See Mount the Fixture on page 5.
- Check that the accessory holder is locked and that any accessory safety cables are connected before mounting the fixture.
- Risk of eye injury. Do not stare directly into the light. · Do not operate the fixture without the lens installed. · Do not use this fixture with a damaged power lead. If the power lead (cord set) is damaged, it must be replaced. · Do not use this fixture if the lens is deeply scratched or cracked. You must replace the lens when it is damaged.
![]()
Install the Antenna
The fixture ships with the antenna stored in the antenna storage accessory (see image on page 1). If you will use wireless control, install the antenna before using the fixture.
- Grasp the antenna at the top and pull outward to unsnap it from the antenna storage accessory.
- Locate the antenna base next to the NFC tag on the back of the fixture (see image on page 1). Insert and twist the antenna to screw it into the base.
Install a Shutter Barrel
You can use either an XDLT shutter barrel or a legacy Source Four shutter barrel. (For legacy Source Four shutter barrels, you must use the legacy Source Four lens tubes, too.)
![]() CAUTION: When installing a legacy Source Four shutter barrel, use a1/4″-20 X 3/4″ machine screw (purchased separately or order ETC part HW5832) to secure the shutter barrel to the light engine. Do not use the screw that is provided with the Source Four LED Series 3 light engine. Securing the legacy shutter barrel with the shorter screw (1/4″-20 X 1/2″) can result in the shutter barrel separating from the light engine when rotated.
CAUTION: When installing a legacy Source Four shutter barrel, use a1/4″-20 X 3/4″ machine screw (purchased separately or order ETC part HW5832) to secure the shutter barrel to the light engine. Do not use the screw that is provided with the Source Four LED Series 3 light engine. Securing the legacy shutter barrel with the shorter screw (1/4″-20 X 1/2″) can result in the shutter barrel separating from the light engine when rotated.
Insert the shutter barrel into the light engine, and rotate clockwise 45 degrees. Secure with the provided screw and barrel rotation knob.
Install a Lens Tube
You can use either XDLT lens tubes or legacy Source Four lens tubes. (For legacy Source Four lens tubes, you must use the legacy Source Four shutter barrel, too.) For guidance on selecting lens tubes for maximum output and highest quality imaging, see the Source Four LED Series 3 datasheet at etcconnect.com.Slide the lens tube into the shutter barrel, and secure with the provided screw and beam focus knob.
Mount the Fixture
Mount the fixture using appropriate hardware. If necessary, adjust the yoke position to accommodate a low-clearance mount.
Connect Power and Data
- Attach 5-pin XLR cable to the DMX In connector if you are using external control.
- Plug the XLR cable (if using) into the DMX source or data daisy-chain.
- Use the Power Thru and DMX Thru connectors to connect other fixtures using the following guidelines:
- Link up to 5 fixtures via Power Thru connector when used with R20 Relay Module, ER15 Relay Module, or Unison Echo Relay Panel (consult breaker-trip curves when used with other equipment). When linking fixtures, do not exceed the rating of the power connectors (20 A in 120 V/60 Hz regions and 16 A in 240 V/50 Hz regions).
- Link up to 32 device loads on the DMX daisy chain.
- Supply power to the fixture by attaching the power cable to the Power In connector, and then plugging the power cable into AC power (100240 VAC, 50/60 Hz) on a non-dimmable circuit.
Focus the Fixture
- Apply power to the fixture, and wait until the fixture has booted up (the ETC splash screen displays during boot up).
- Press any encoder to “wake” the display.
- What screen is currently displayed?
- DMX: Press any encoder to leave the view-only screen, and then press the Intensity encoder to turn on the LED array. The display shows a timeout countdown to indicate how long the LED array will remain on at 100% intensity. You can turn the Intensity encoder to reset the timeout countdown to 5 minutes.
- All other screens (Studio, Preset, etc.): Press the Intensity encoder to turn on the LED array, and turn the Intensity encoder to adjust the intensity.
- Adjust the fixture to the desired position:
- a. Loosen the yoke tilt-locks, tilt the fixture as needed, and then tighten the tilt-locks.
- b. Loosen the beam focus knob, adjust the lens tube position as needed, and then tighten the knob.
- Press the Intensity encoder to turn off the LED array.
Use Fixture in DMX Mode
After you connect power and data to the fixture and provide DMX, press the Function button ( ), use the Intensity encoder to navigate to DMX Mode, and then press the Intensity encoder to select it. In the DMX screen, you can set the DMX address, DMX mode, and DMX loss behavior.
The DMX screen displays the current DMX values. Press any of the encoders to “wake” the display, and then press any of the encoders to edit the values. The colors of the encoders correspond to options on the display. Turn an encoder to modify the corresponding value, and then press the encoder to save all values on the screen.
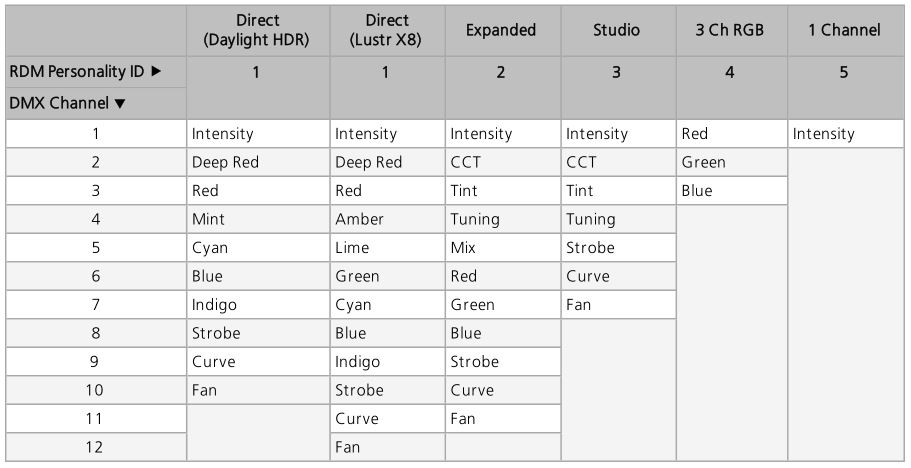
DMX Modes
Use Fixture in Stand-alone Mode
After you connect power to the fixture, press the Function button, use the Intensity encoder to navigate to one of the following stand-alone modes, and then press the Intensity encoder to select it:
- Studio: Use one of three studio (white light) presets, or customize the presets.
- Color: Use one of 12 color presets, or customize the presets.
- Effects: Use a sequence, or customize a sequence.
- Preset: Use one of 12 presets (color preset + fade time), or customize the presets.
The colors of options on the display correspond to the colors of the encoders below the display and the Intensity encoder to the right of the display. Turn an encoder to modify the corresponding value on the display, or press an encoder to activate the corresponding option at the bottom of the display. Press the Intensity encoder to toggle between the current intensity and 0%.
If the fixture is connected to other Source Four LED Series 3 fixtures that are in the same stand-alone mode, the connected fixtures will play the same preset or effect.
Select a Color Temperature
1. Press the Function button, use the Intensity encoder to navigate to Studio Mode, and then press the Intensity encoder to select it.Turn to adjust intensity, press to toggle between current intensity and 0, or press and turn to adjust by 1/4 stop.

2. Press the color encoder that matches the studio preset you want to use (Blue = 3200 K, Green= 4500 K, Red= 5600 K).
More Options
- Turn off the preset: Press the Intensity encoder to toggle the intensity value from the current value to 0. Press the Intensity encoder again to toggle back to the previous intensity value.
- Modify the preset: Turn the encoders to change the corresponding values. For example, turn the Intensity encoder to change the intensity value, or turn the blue encoder to change the color temperature value.
- Modify the intensity: Turn the Intensity encoder to adjust the intensity, or press and turn the Intensity encoder to adjust the intensity by 1/4 stop.

- Modify the tuning: Press and turn the red encoder to change the value to Metamer, and then turn the red encoder to change the Tune value (the “recipe” of the metamer). Press and turn the red encoder again to return to the Brightest or Spectral options.
- Revert to the original preset: Press the encoder that corresponds to the preset again to restore the original values.
- Save the modified preset: Press and hold the encoder that corresponds to the preset that you want to re-record. The display shows a three-second countdown before re-recording the preset.

Select a Color
1. Press the Function button, use the Intensity encoder to navigate to Color Mode, and then press the Intensity encoder to select it.2. Turn the encoders to change the corresponding values. For example, turn the Intensity encoder to change the intensity value, or turn the green encoder to change the hue value. The crosshairs on the display indicate the approximate color.
You can use a preset as a starting point for a color by pressing the color encoder that matches the preset. Turn the red encoder to move to another page of presets.
More Options
- Turn off the color: Press the Intensity encoder to toggle the intensity value from the current value to 0. Press the Intensity encoder again to toggle back to the previous intensity value.
- Revert to the original color of a preset: Press the encoder that corresponds to the preset again to restore the original values.
- Save the color to a preset: Press and hold the encoder that corresponds to the preset that you want to re-record. The display shows a three-second countdown before re-recording the preset. Changes that you make to presets in the Color screen also affect presets in the Effects screen and the Preset screen.
- Change the color selection mode: Press the red encoder (for the Settings icon ) to change between Hue/Saturation (default color selection mode) and x,y. In x,y mode, you set the x and y coordinates within the CIE 1931 chromaticity diagram.
Select a Preset
- Press the Function button, use the Intensity encoder to navigate to Preset Mode, and then press the Intensity encoder to select it.
- Turn the green encoder to select a preset, and then press the encoder to play the preset.
More Options
- Pause the preset fade: Press the green encoder to toggle between play and pause.
- Stop the preset: Press the red encoder. · Modify the preset: Turn the Intensity encoder to change the intensity, or turn the red encoderto change the fade value.
- Capture the current DMX look: Press and hold the blue encoder (for the Snapshot icon ). The display shows a 3-second countdown before re-recording the preset. Capture is limited to three DMX modes: 3 Ch RGB, Studio, and Expanded.
- Modify the preset color: Press the blue encoder (for the Edit icon ). In the Edit Preset Color screen, turn the encoders to change the corresponding values. The crosshairs on the display indicate the approximate color. Press the green encoder (for the Save icon ) to save the new color to the preset.
- Push the preset to connected fixtures: Press the Menu button, and then use the Intensity encoder to navigate through the menu: Local Settings > Push Presets. When the screen prompts you to confirm, press the green encoder (for the OK icon ) to continue.
Configure Fixtures Wirelessly Using the Set Light App
Download the Set Light app to a smartphone with NFC functionality, use the app to set fixture parameters, and then tap the smartphone to the NFC tag on the fixture to configure it wirelessly–even when the fixture is not powered on. Or, after you configure the Multiverse settings on the fixture, use the Set Light app to configure one fixture or multiple fixtures wirelessly from a smartphone or tablet. Visit etcconnect.com/Apps or scan the code to the right for more information about the Set Light app.

References
[xyz-ips snippet=”download-snippet”]