eurocHron 2-Line Timer EDT 8002
Intended Use
This product has dual countdown/up timers that can run simultaneously, three timer memories, and adjustable alarm volumes. It can be hung onto a wall, placed on a desk or attached to a magnetic surface via the built in magnets.
It is intended for indoor use only. Do not use it outdoors. Contact with moisture, e.g. in bathrooms, must be avoided under all circumstances.
For safety and approval purposes, you must not rebuild and/or modify this product. If you use the product for purposes other than those described above, the product may be damaged. In addition, improper use can result in other hazards. Read the instructions carefully and store them in a safe place. Make this product available to third parties only together with its operating instructions.
This product complies with the statutory national and European requirements. All company names and product names are trademarks of their respective owners. All rights reserved.
Delivery Content
- Timer
- Operating instructions


Up-to-date Operating Instructions
Download the latest operating instructions at www.conrad.com/downloads or scan the QR code shown. Follow the instructions on the website.
Safety Instructions
Read the operating instructions carefully and especially observe the safety information. If you do not follow the safety instructions and information on proper handling in this manual, we assume no liability for any resulting personal injury or damage to property. Such cases will invalidate the warranty/guarantee.
General Information
- The product is not a toy. Keep it out of the reach of children and pets.
- Do not leave packaging material lying around carelessly. This may become dangerous playing material for children.
- Protect the product from extreme temperatures, direct sunlight, strong jolts, high humidity, moisture, flammable gases, steam and solvents.
- Do not place the product under any mechanical stress.
- If it is no longer possible to operate the product safely, take it out of operation and protect it from any accidental use. Safe operation can no longer be guaranteed if the product:– is visibly damaged,– is no longer working properly,– has been stored for extended periods in poor ambient conditions or– has been subjected to any serious transport related stresses.
- Please handle the product carefully. Jolts, impacts or a fall even from a low height can damage the product.
- Consult an expert when in doubt about the operation, safety or connection of the product.
- Maintenance, modifications and repairs must only be completed by a technician or an authorised repair centre. If you have questions which remain unanswered by these operating instructions, contact our technical support service or other technical personnel.
Batteries
- Correct polarity must be observed while inserting the battery.
- The batteries should be removed from the product if it is not used for a long period of time to avoid damage through leaking. Leaking or damaged batteries might cause acid burns when in contact with skin, therefore use suitable protective gloves to handle corrupted batteries.
- Batteries must be kept out of reach of children. Do not leave batteries lying around, as there is risk, that children or pets swallow them.
- All batteries should be replaced at the same time.Mixing old and new batteries in the product can lead to battery leakage and product damage.
- Batteries must not be dismantled, short-circuited or thrown into fire. Never recharge non-rechargeable batteries. There is a risk of explosion!
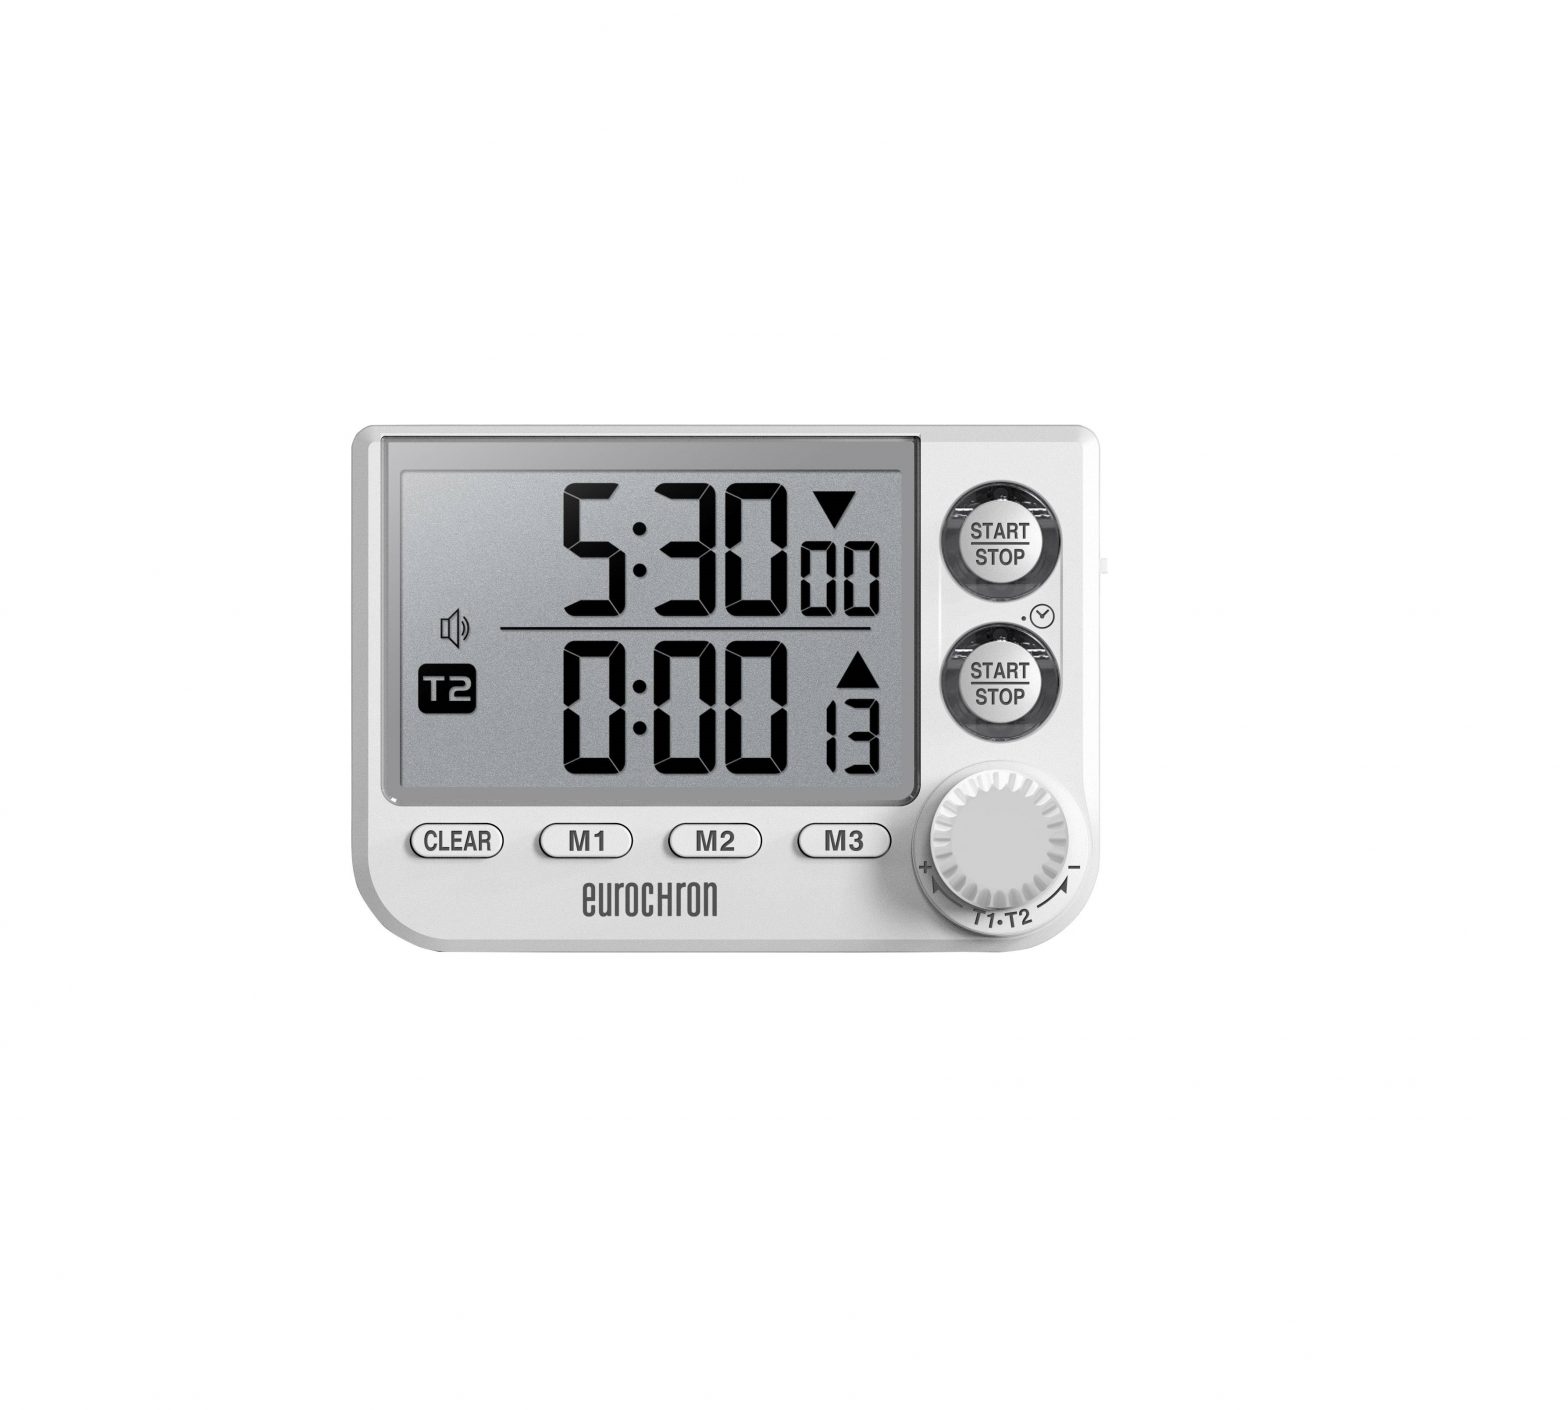
Operating Elements
- LCD display
- CLEAR button
- M1 button
- M2 button
- M3 button
- T1 START/STOP button with LED indicator
- T2 START/STOP/ button with LED indicator
- TIMER select button/dial
- Magnets
- Wall mount hole
- Table stand
- Battery compartment cover
- Volume level switch

Operation
a) Inserting / Replacing Batteries
- Remove the battery compartment cover (12).
- Insert 2x AAA batteries, matching polarity as shown inside the battery compartment.
- Replace the battery compartment cover (11).→ Replace the batteries if the LCD display (1) gets dim or goes blank.
b) Volume ControlAdjust the beeping and alarm sound level using the volume switch (13). Mute ![]() , low
, low ![]() , High
, High ![]() .
.
c) Countdown Timer
Set Timer
- If in current time display mode, press the START/ STOP (6) to enter timer mode.
- Press TIMER select button (8) to select a timer T1 or T2
- Rotate the TIMER dial (8) to set a time.– Clockwise (increase)– Anticlockwise (decrease)
- Press the corresponding T1 START/STOP (6) or T2 START/STOP (7) button to start the timer.Press again to stop the timer.
- The corresponding T1 START/STOP (6) or T2 START/STOP (7) LED will flash green during the countdown.
- When the countdown is complete:– An alarm will sound (no alarm will sound if the sound level switch (13) is set to off ).– Timer will start to count up automatically.– The corresponding T1 START/STOP (6) or T2START/STOP (7) LED will flash red for 1 minute.
- Press the corresponding T1 START/STOP (6) or T2 START/STOP (7) button to stop the alarm and return to the pre-set count down time.
Change Increments (H:MM:ss / MM:SS)
Toggle between “H:MM:ss” and “MM:SS” increments by pressing and holding the TIMER button (8) for 2 seconds
d) Countdown Timer Memory (M1, M2, M3) Save Countdown Times
- Set a desired countdown time using the TIMER dial (8).
- Press and hold M1 (3), M2 (4), or M3 (5) for 2 seconds.The LCD display (1) will flash and a beeping will sound to indicate that a countdown time has been saved.→ No beeping will be heard if the sound level switch (13) is set to off .• To overwrite the memory, repeat the above steps entering a different time interval.
Use Timer Memory
- Press TIMER select button (8) to select a timer T1 or T2.
- Press and M1 (3), M2 (4), or M3 (5) to select the select a saved time.
- Press the corresponding T1 START/STOP (6) or T2 START/STOP (7) button to start the countdown
e) Count Up Timer
- Press CLEAR (2) to reset values to zero.
- Press the corresponding T1 START/STOP (6) or T2 START/STOP (7) button to begin the timer.The LED will not flash while counting up.
- Press the corresponding T1 START/STOP (6) or T2 START/STOP (7) button to stop timing.
f) Clock Display View Time of Day
In idle mode, press and hold the ![]() (7) button for two seconds to toggle between clock and countdown / count up display.
(7) button for two seconds to toggle between clock and countdown / count up display.
Setting Clock
- If in timer mode, stop any timer in progress then press and hold the T2 START/STOP (7) button for two seconds to enter clock mode.
- In clock mode, press and hold the T2 START/ STOP (7) button for 2 seconds until the display begins to flash.
- Rotate the TIMER dial (8) to set 12/24 hour format.
- Press the T2 START/STOP (7) button to begin setting the time.
- Rotate the TIMER dial (8) to adjust the time.
- Press T2 START/STOP (7) to save the time and exit settings.
g) Timer Dial (Sensitivity Adjust)
You can adjust the TIMER dial (8) sensitivity level, so when you rotate the dial numbers change in greater increments
- If in timer mode, stop any timer in progress then press and hold the T2 START/STOP (7) button for two seconds to enter clock mode.
- Press and hold CLEAR (2) for five seconds until a number “1-3” flashes on the LCD display (1).
- Rotate the TIMER dial (8) to choose a value between 1-3 (1 is least sensitive, 3 is most sensitive).
- Press CLEAR (2) to save the setting.
h) Mounting Options
![]() The table stand (11) may leave marks on sensitive surfaces.When using the magnets (9) to attach to a magnetic surface, make sure the timer is held securely in place before letting go.The surface for installation should be dry, clean, flat, stable and free from debris.If hanging using the wall mounting hole (10), when drilling or inserting screws, make sure there are no cables, wires or pipes located underneath the surface. Inadvertently drilling through electric cables can cause life-threatening danger of an electric shock!
The table stand (11) may leave marks on sensitive surfaces.When using the magnets (9) to attach to a magnetic surface, make sure the timer is held securely in place before letting go.The surface for installation should be dry, clean, flat, stable and free from debris.If hanging using the wall mounting hole (10), when drilling or inserting screws, make sure there are no cables, wires or pipes located underneath the surface. Inadvertently drilling through electric cables can cause life-threatening danger of an electric shock!
Care and Cleaning
- Do not use any aggressive cleaning agents, rubbing alcohol or other chemical solutions as they can cause damage to the housing and malfunctioning.
- Clean the product with a dry, fibre-free cloth.
Disposal
a) Product
![]() Electronic devices are recyclable waste and must not be disposed of in the household waste. At the end of its service life, dispose of the product in accordance with applicable regulatory guidelines.
Electronic devices are recyclable waste and must not be disposed of in the household waste. At the end of its service life, dispose of the product in accordance with applicable regulatory guidelines.
Remove any inserted batteries and dispose of them separately from the product.
b) Batteries
![]() You as the end user are required by law (Battery Ordinance) to return all used (rechargeable) batteries. Disposing of them in the household waste is prohibited.
You as the end user are required by law (Battery Ordinance) to return all used (rechargeable) batteries. Disposing of them in the household waste is prohibited.
Contaminated batteries are labeled with this symbol to indicate that disposal in the domestic waste is forbidden. The designations for the heavy metals involved are: Cd = Cadmium, Hg = Mercury, Pb = Lead (name on batteries, e.g. below the trash icon on the left).
Used batteries can be returned to collection points in your municipality, our stores or wherever batteries are sold.You thus fulfill your statutory obligations and contribute to the protection of the environment.
Technical Data
| Power source | 2 x AAA-type batteries |
| Countdown timer | 99 min 59 s |
| Count up timer | 99 hr 59 min 59 s |
| Operating conditions | -5 to +50 °C, 10 – 80 % Relative humidity |
| Storage conditions | -20 to +60 °C, 10 – 80 % Relative humidity |
| Dimensions (L x W x H) | 90 x 63.5 x 29.5mm |
| Weight | 74 g |
| This is a publication by Conrad Electronic SE, Klaus-Conrad-Str. 1, D-92240 Hirschau (www.conrad.com). All rights including translation reserved. Reproduction by any method, e.g. photocopy, microfilming, or the capture in electronic data processing systems require the prior written approval by the editor. Reprinting, also in part, is prohibited. This publication represents the technical status at the time of printing.Copyright 2019 by Conrad Electronic SE. |

References
[xyz-ips snippet=”download-snippet”]