![]()
ELECTRIC COUNTERTOP CONTACT GRILLSingle & Double modelsOPERATION MANUAL
Introduction
Congratulations on your purchase on your EURODIB machine. Please take time to caref011y read through this manual to ensure the machine is operated and maintained properly, to ensure the best possible performance from the product for many years.EURODIB will not accept liability for the following:‘The instructions in this manual have not been followed correctly. `Non-authorized personnel have tampered with the machine. ‘Non-original spare parts are used.‘The machine has not been handled and cleaned correctly. ‘There is any use damage to the unit.
Packaging
EURODIB prides itself on quality and service, ensuring that at the time of packing all of its products are supplied fully functional and free of damage.Provided in this package are the following:‘Contact Grill*Griddle Scraper ‘Waste Tray‘ManualShould you find any damage as a result of freight, please contact your EURODIB dealer immediately. No claims will be accepted after 3 days of receipt.
Installation
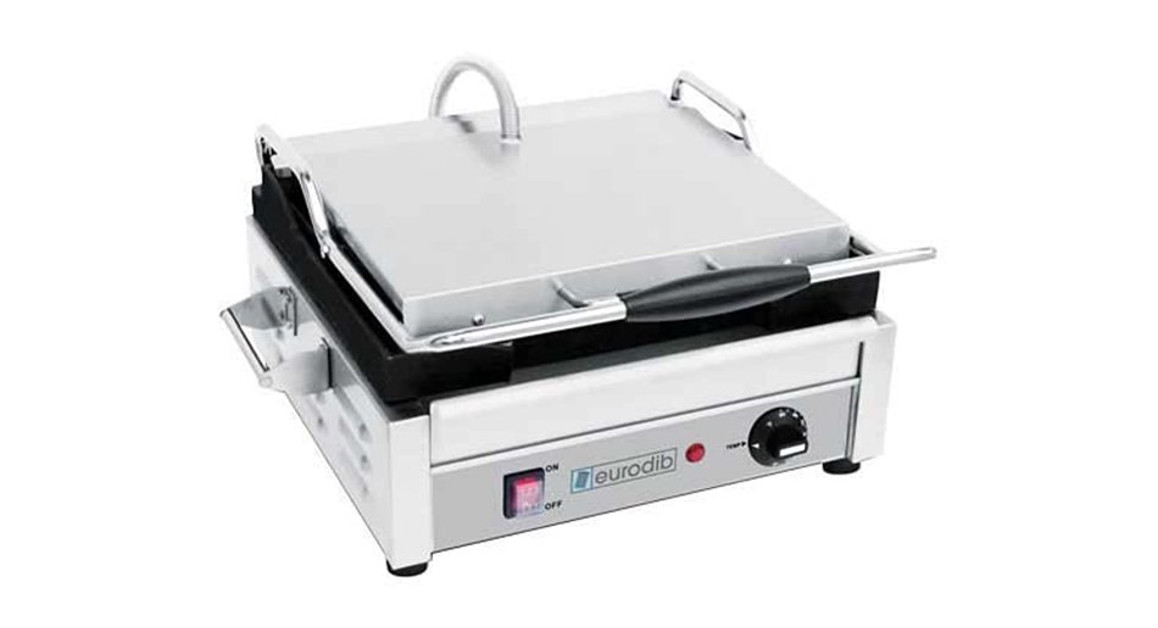
Remove your EURODIB Contact Grill from its packaging and be certain that all protective plastics and residues are thoroughly cleaned from its surface.Locate your EURODIB Contact Grill on a firm level surface, the adjustable feet can assist in leveling.International standards and regulations should be consulted in order to abide by standards set in relation to positioning, spacing, and ventilation. EURODIB recommended that you allow no less than a 100mm ventilated gap around the perimeter of this unit. Common sense and initiative should be used when choosing the position and operation of this product.Once your Contact Grill has been placed into position, be sure that the stainless steel waste tray is correctly positioned.Supply the appropriate power and connect to mains, your Contact Grill is now ready to turn on and operate. (For power supply please see technical specification sheet, page 15.)
Preparing the cooking surface:
Be sure the cooking surface is clean, then simply turn the unit on and apply a generous amount of oil to the plates, using the thermostat set the grill to 230° F, once the grill has reach temperature, switch off and with care wipe the plates clean of excess oil.Caution the grill and oil will be HOT!!!!!!
Operation
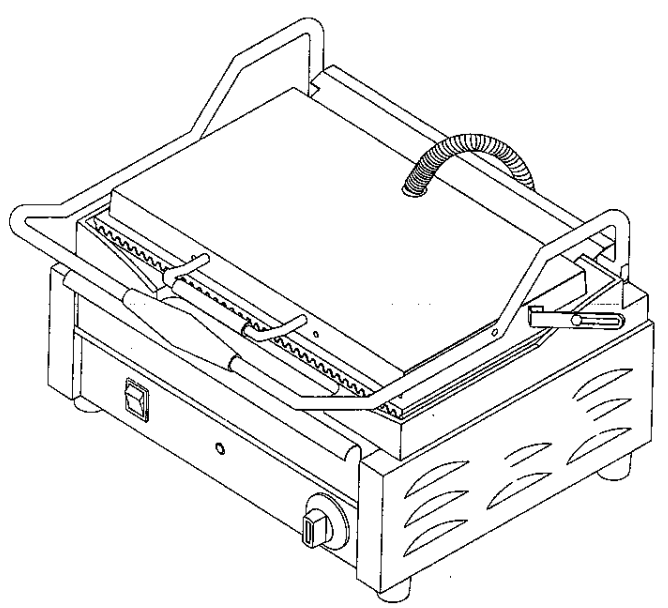
Your Contact Grill should be turned on prior to usage to allow the cooking surface to warm up, 5 minutes is sufficient for preheating.To get efficient use out of this unit while in intermittent use, it is recommended that the grill plates remain dosed and the thermostat turned down, when not cooking. This will assist in reducing power consumption and also allow for quicker heat response when needed.EURODIB recommends that the cooking surface is lightly greased, before each use.A temperature setting of between 390° F and 430° F will be sufficient for general cooking. This may vary for particular food types, individual needs, or experiences.Simply place the food products on the bottom grilling surface and lower the top plate down, and cook to your needs.
Cleaning, Care and Maintenance
- Switch the power off and disconnect from mains.
- The Contact Grill should be cleaned regularly throughout use, and thoroughly cleaned after each meal period, regular cleaning will result in easier cleaning, as the build-up will be less. Correct preparation of the cooking surface when first used will assist in keeping the plate clean, this will reduce the amount of food wastage sticking to the plate.
- For best results clean the plate while still warm using warm soapy water. A nylon cleaning cloth or scrapers can be used. Griddle stoners and brushes can are also recommended for best results. Do not use cold water on warm plates, a buckling effect may occur.
- When scrubbing the plate take care not to clean back too far, if you do you may have to prepare the cooking surface again before use.Remove waste tray from unit and discard waste, clean in hot soapy water.
- The remainder of the Contact Grill can be cleaned with a damp cloth using hot, soapy water.
- Warm soapy water is recommended for cleaning, cleaning agents after prolonged use can damage stainless steel.
- Do not immerse in water and do not use water jets to clean.
Safety
The EURODIB Contact Grill does not contain any user-serviceable pads. EURODIB Foodservice dealers or recommended qualified technicians should carry out repairs if necessary. Do not remove any components or service panels on this product.
- During operation, the contact grill reaches high temperatures on the cooking surface, in turn, heating the stainless steel surfaces. Only handle the contact grill by the black handles to eliminate accidents.
- Switch off power to and disconnect from the mains whilst cleaning.
- Allow the Contact Grill to cool down after use before dismantling for cleaning; the unit will be too hot to handle immediately after use.
- Do not immerse the unit in water or use a hose to clean.
- If the power cord is damaged, it must be replaced by a EURODIB Recommended Qualified Service Technician in order to avoid a hazard.
Trouble Shooting
| ContactGrills | SFE02320,SFE02325, SFE02330, SFE02335, SFE02340,SFE02345, SFE02350, SFE02355, SFE02360, SFE02365,SFE02370, SFE02375 | |
| Problem | Cause | Remedy |
| The unit is notworking andthe indicatorlight is not on | 1. Mains power supply | 1. Check mains powersupply |
| 2. Power switch has notbeen turned on | 2. Check the unit is correctlyplugged in and turned on | |
| 3. On/off switch is faulty | 3. Call service agent orqualified technician | |
| 4. Plug and lead aredamaged | 4.Call service agent orqualified technician | |
| 5. Internal wiring fault | 5. Call service agent orqualified technician | |
| The unit is heating but the indicator light is not on | 1. The indicator bulb hasblown | 1. Replace the indicatorlight: call a service agentor qualified technician |
| The indicator light is on but the unit is not heating | elements) 1. Faulty | 1. Call service agent orqualified technician |
| 2. Operation of thermostat | 2. Ensure that the thermostat is set correctly, also ensure the dial is not spinning on the thermostat and giving the wrong reading | |
| 3. Faulty thermostat | 3. Call service agent ofqualified technician |
Trouble Shooting Cont…
| Problem | Cause | Remedy |
| Slow heat up of thecooking surfaces | I . Carbon build-up | 1. Ensure that the plates are kept clean and free of carbon build-up |
| 2. Thermostat setting | 2. Ensure that the thermostat is set correctly, also ensure the dial is not spinning on the thermostat and giving the wrong reading | |
| 3. Faulty element(s) | 3. Call service agent or qualified technician |
Compliance
EURODIB products have undergone strict product testing in order to comply with regulatory standards and specifications set by international independent, commonwealth, and federal authorities.As testimony to such compliance EURODIB products carries the following marks/symbols:
![]()
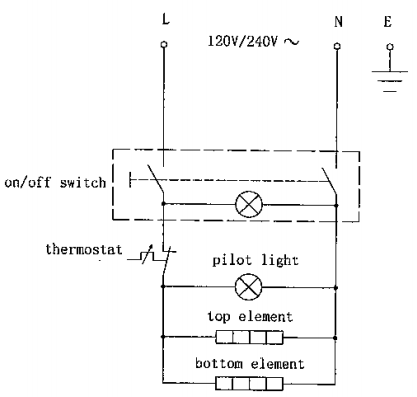
Electrical Diagram
Model:SFE02320/SFE02325//SFE02330/SFE02335/SFE02340/ SFE02345/SFE02350/SFE02355
 Model:SFE02360/SFE02365/SFE02370/SFE02375
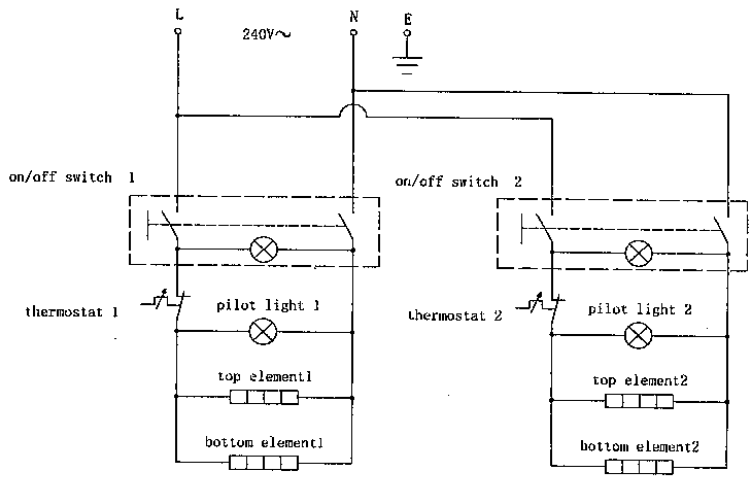 The above circuit diagram has been provided to assist qualified technicians. EURODIB agents or Recommended Qualified Technicians should carry out repairs if needed. Do not remove any components or service panels on this product.
Explosion View
SINGLE: SFE02325

MODEL: SFE02345

DOUBLE: SFEO2365
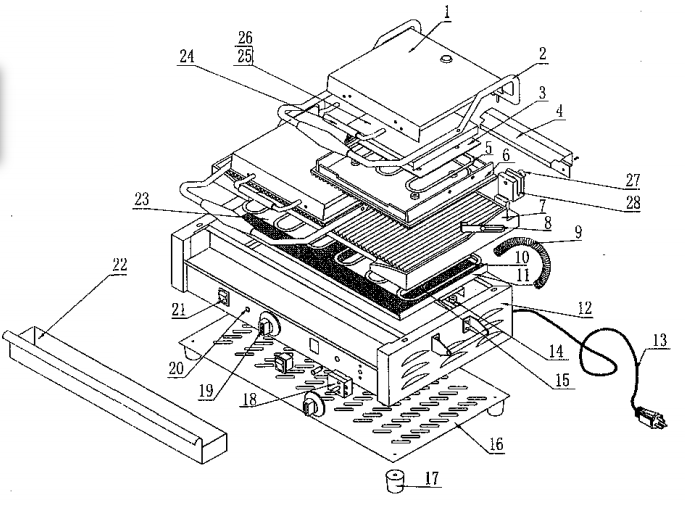
Spare Parts List
SMALL: SFE02325
| 1 | TOP COVER | L02325808 |
| 2 | MAIN HANDLE | P03030007 |
| 3 | ELEMENT FIXING PLATE (1113PFR) | 109395010 |
| 4 | REAR SPRINGER | L02q25007 |
| 5 | ELEMENT (UPPER) | P01020030 |
| 6 | CAST PLATE (UPPER) | P03010251 |
| 7 | CAST PLATE (LOWER) | PO3010254 |
| 8 | HINGE | L02325015 |
| 9 | PLATE CONNECTING SPRING | P0310002 |
| 10 | ELEMENT (LOWER) | P01020031 |
| 11 | INSULATION CLAMP (LOWER) | L02325013 |
| 12 | MAIN BODY | L02325E03 |
| 13 | LEAD + PLUG | P01110620 |
| 14 | CERAMIC TUBE | P02160001 |
| 15 | INSULATION (LOWER) | P01220012 |
| 16 | BASEPLATE | L03295011 |
| 17 | FEET | P02130002 |
| 18 | THERMOSTAT | P01045300 |
| 19 | THERMOSTAT DIAL | P02010560 |
| 20 | INDICATOR LIGHT | P01130107 |
| 21 | ON/OFF SWITCH | P01160302 |
| 22 | DRIP TRAY(GREASE TROUGH) | L02325001 |
| 23 | ELEMENT FIXING PLATE (LOWER) | L02325009 |
| 24 | SMALL HANDLE(FRONT) | P03040001 |
| 25 | INSULATION CLAMP (UPPER) | L02325014 |
| 26 | INSULATION (UPPER) | P01220011 |
| 27 | ADJUSTABLE BRACKET SCREW | MO6136025 |
| 28 | ADJUSTABLE BRACKET | P03240001 |
MODLE: SFEO2345 DOUBLE: SFEO2365Specifications
 DOUBLE: SFEO2365
 Specifications
| MODEL | VOLTAGE | POWER(W) | DIMENSIONS(in) | GRILL TYPE | |||
| WIDTH | DEPTH | HEIGHT | TOP | BOTTOM | |||
| SFE02320 | 120V- 120V60HZ | 1800 | 11. | 15. | 9. | flat | flat |
| SFE02325 | .., i__soo | 11. | 15. | 9. | rub | rib | |
| SFE02330 | 1800 | 11. | 15. | 9. | rib | flat | |
| SFE02335 | 1800 | 11. | 15. | 9. | flat | rib | |
| SFE02340 | 220-240V- /120V-60HZ | 2400/1800 | 16. | 18. | 9. | fiat | flat |
| SFE02345 | 2400/1800 | 16. | 18. | 9. | rib | rib | |
| SFE02350 | 2400/1800 | 16. | 18. | 9. | rib | flat | |
| SFE02355 | 2400/1800 | 16. | 18. | 9. | flat | rib | |
| SFE02360 | – 220-240V 60HZ | 3200 | 19. | 15. | 9. | flat/flat | flat/flat |
| SFE02365 | 3200 | 19. | 15. | 9. | rib/rib | rib/rib | |
| SFE02370 | 3200 | 19. | 15. | 9. | rib/rib | fiat/flat | |
| SFE02375 | 3200 | 19. | 15. | 9. | flat/rib | fat/rib |
[xyz-ips snippet=”download-snippet”]