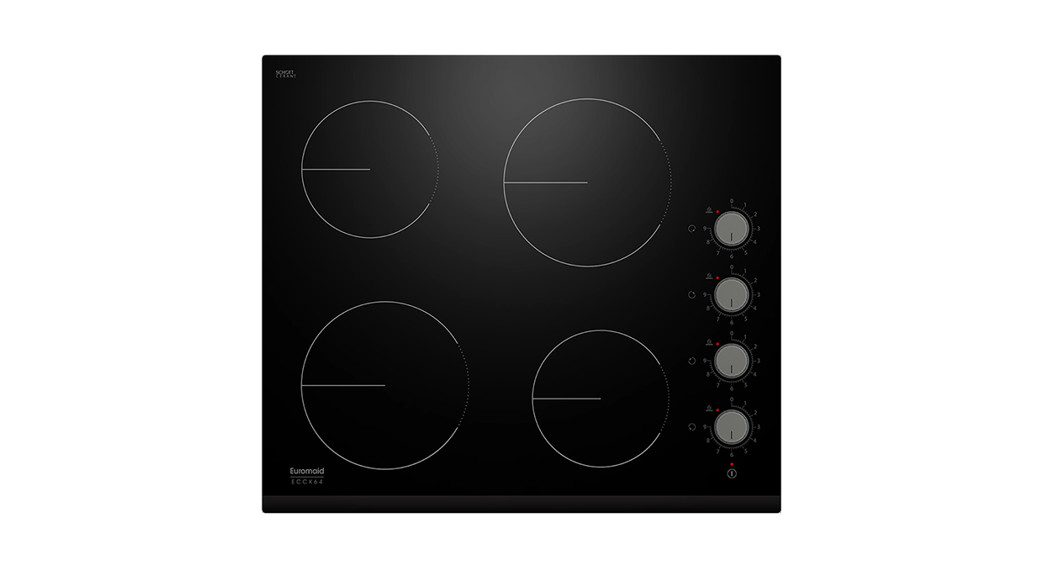
 User Manual60cm Ceramic CooktopECCK64
SAFETY WARNINGS
PLEASE READ THE FOLLOWING INSTRUCTIONS CAREFULLY BEFORE USING THE APPLIANCE.
Installation
Electrical Shock Hazard
- Disconnect the appliance from the mains electricity supply before carrying out any work or maintenance on it.
- Connection to a properly earthed wiring system is essential and mandatory.
- Means for disconnection must be incorporated in the fixed wiring in accordance with the wiring rules.
- Alterations to the domestic wiring system must only be made by a qualified electrician.
- Failure to follow this advice may result in electrical shock or death.
Cut Hazard
- Take care – panel edges are sharp.
- Failure to use caution could result in injury or cuts.
Important safety instructions
- Read these instructions carefully before installing or using this appliance.
- No combustible material or products should be placed on this appliance at any time.
- Please make this information available to the person responsible for installing the appliance as it could reduce your installation costs.
- In order to avoid a hazard, this appliance must be installed according to these instructions for installation.
- This appliance is to be properly installed and earthed only by a suitably qualified person.
- This appliance should be connected to a circuit that incorporates an isolating switch providing full disconnection from the power supply.
- WARNING: Use only hob guards designed by the manufacturer of the cooking appliance or indicated by the manufacturer of the appliance in the instructions for use as suitable or hob guards incorporated in the appliance. The use of inappropriate guards can cause accidents.
- Failure to install the appliance correctly could invalidate any warranty or liability claims.
- Regarding the details of installation, please refer to the section <Installation>.
Operation and maintenance Electrical Shock Hazard
- Do not cook on a broken or cracked cooktop. If the cooktop surface is broken or cracked switch the appliance off immediately at the mains power supply (wall switch) and contact a qualified technician.
- Switch the cooktop off at the wall before cleaning or maintenance.
- Failure to follow this advice may result in electrical shock or death.
Health HazardThis appliance complies with electromagnetic safety standards.
Hot Surface Hazard
- WARNING: Accessible parts may become hot during use. Young children should be kept away
- Do not let your body, clothing or any item other than suitable cookware contact the ceramic glass until the surface is cool.
- Metallic objects such as knives, forks, spoons and lids should not be placed on the hob surface since they can get hot
- Children shall be kept away unless continuously supervised.
- Handles of saucepans may be hot to touch. Check saucepan handles do not overhang other cooking zones that are on. Keep handles out of reach of children.
- Failure to follow this advice could result in burns and scalds.
Cut Hazard
- The razor-sharp blade of a cooktop scraper is exposed when the safety cover is retracted. Use with extreme care and always store safely and out of reach of children.
- Failure to use caution could result in injury or cuts.
Important safety instructions
- Never leave the appliance unattended when in use. Boilovers cause smoking and greasy spillovers that may ignite.
- Never use your appliance as a work or storage surface.
- Never leave any objects or utensils on the appliance.
- Never use your appliance for warming or heating the room.
- After use, always turn off the cooking zones and the cooktop as described in this manual (i.e. by using the touch controls).
- Do not allow children to play with the appliance or sit, stand, or climb on it.
- Do not store items of interest to children in cabinets above the appliance. Children climbing on the cooktop could be seriously injured.
- Do not leave children alone or unattended in the area where the appliance is in use.
- Do not repair or replace any part of the appliance unless specifically recommended in the manual. All other servicing should be done by a qualified technician.
- Do not use a steam cleaner to clean your cooktop.
- Do not place or drop heavy objects on your cooktop.
- Do not stand on your cooktop.
- Do not use pans with jagged edges or drag pans across the glass surface as this can scratch the glass.
- Do not use scourers or any other harsh abrasive cleaning agents to clean your cooktop, as these can scratch the ceramic glass which may result in shattering of the glass.
- If the supply cord is damaged, it must be replaced by the manufacturer, its service agent or similarly qualified persons in order to avoid a hazard.
- This appliance is intended to be used in a domestic household environment only! Commercial use of any kind is not covered under the manufacturer’s warranty!WARNING: The appliance and its accessible parts become hot during use.
- Care should be taken to avoid touching heating elements.
- This appliance is not intended for use by persons (including children) with reduced physical, sensory or mental capabilities, or lack of experience and knowledge unless they have been given supervision or instruction concerning use of the appliance by a person responsible for their safety.
- Children should be supervised to ensure that they do not play with the appliance.
- Cleaning and user maintenance shall not be made by children without supervision.WARNING: Unattended cooking on a hob with fat or oil can be dangerous and may result in fire. NEVER try to extinguish a fire with water, but switch off the appliance and then cover flame e.g. with a lid or a fire blanket.WARNING: Danger of fire: do not store items on the cooking surfaces.WARNING: If the surface is cracked, switch off the appliance to avoid the possibility of electric shock, for hob surfaces of glass-ceramic or similar material which protect live parts.
- A steam cleaner is not to be used.
- The appliance is not intended to be operated by means of an external timer or separate remote-control system.CAUTION: The cooking process has to be supervised. A short-term cooking process has to be supervised continuously.
- The power cord cannot be accessible after installation.
- Congratulations on the purchase of your new hob. We recommend that you spend some time to read this Instruction / Installation Manual in order to fully understand how to install correctly and operate it.
Read all the safety instructions carefully before use and keep this Instruction / Installation Manual for future reference.
Product Overview
Top View
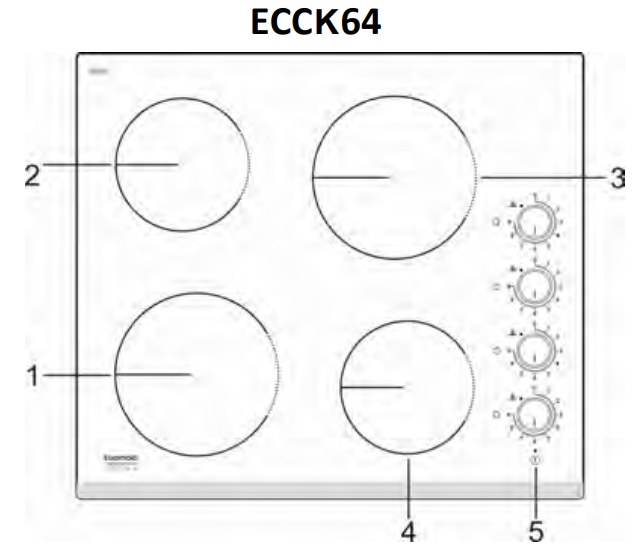

- 200mm, max. 1800 W zone
- 165mm, max. 1200 W zone
- 200mm, max. 1800 W zone
- 165mm max. 1200 W zone
- Control Panel
The Control Panel
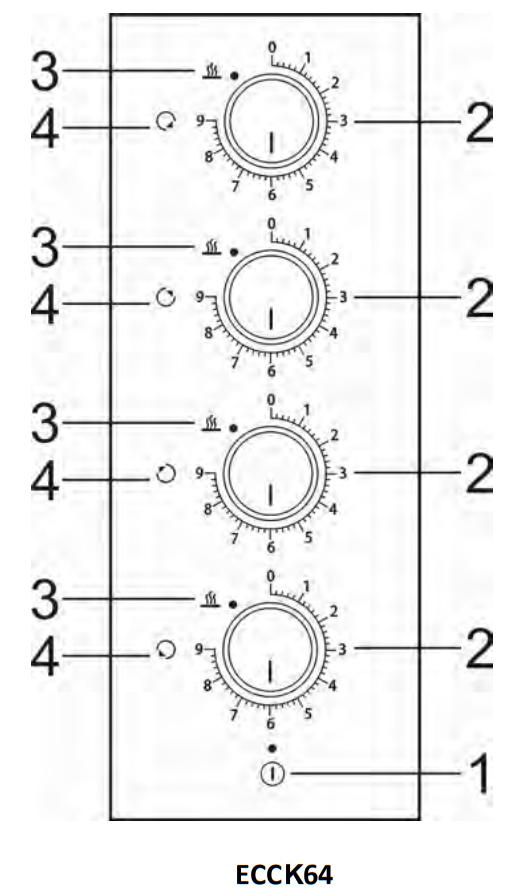

| 1. ON/OFF key | 3. Residual heat indicator |
| 2. Knob / Power level indicators | 4. Heating zone indicator |
Before using your New Hob
- Read this guide, taking special note of the ‘Safety Warnings’ section.
- Remove any protective film that may still be on your ceramic hob.
Using the Touch Controls
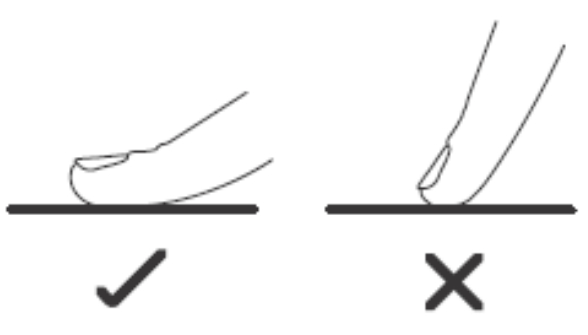
- The controls respond to touch, so you don’t need to apply any pressure.
- Use the ball of your finger, not its tip.
- You will hear a beep each time a touch is registered.
- Make sure the controls are always clean, dry, and that there is no object (e.g. a utensil or a cloth) covering them. Even a thin film of water may make the controls difficult to operate.

Choosing the right CookwareDo not use cookware with jagged edges or a curved base.


Using your Hob
To start cooking
- Touch the ON/OFF key, and the power indicator will display.Note: Each cooking zone is independent of others.
- Place a suitable pan on the cooking zone that you wish to use. Make sure the bottom of the pan and the surface of the cooking zone are clean and dry.

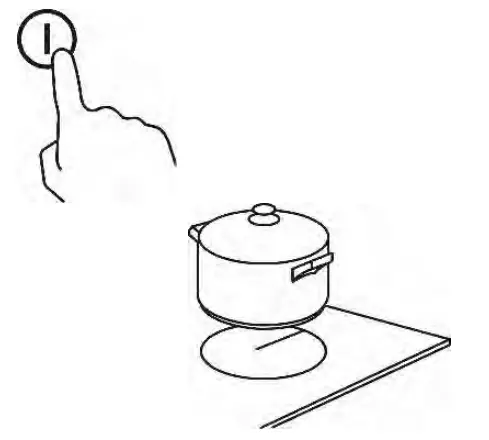
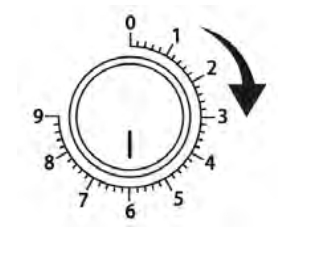
- Select the heat setting by turning the “knob” control in a clockwise direction.•If you don’t choose a heat setting within 1 minute, the Ceramic hob will automatically switch off. You will need to start again at step.•You can modify the heat setting between 1 and 9 levels at any time during cooking.
Note: Do not leave the cooking unattended.

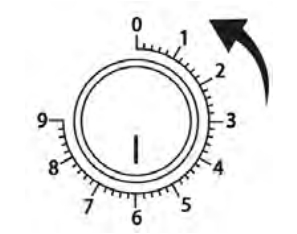
When you have finished cooking
- Turn the cooking zone off by turning the “knob” control to“OFF”. The Residual heat indicator will flash.

- Turn the whole cooktop off by touching the ON/OFF key


The residual heat indicator will flash when the cooking zone is too hot to touch. It will disappear when the surface has cooled down to a safe temperature. It can also be used as an energy-saving function if you want to heat further pans, use the hotplate that is still hot.
Residual Heat WarningWhen the hob has been operating for some time, there will be some residual heat. The indicator![]()
![]()


Auto ShutdownSafety feature of the hob is auto shut down. This occurs whenever you forget to switch off a cooking zone. The default shutdown times are shown in the table below:
| Power level | 1 | 2 | 3 | 4 | 5 | 6 | 7 | 8 | 9 |
| Default working timer (hour) | 8 | 8 | 8 | 4 | 4 | 4 | 2 | 2 | 2 |
Cooking Guidelines
Take care when frying as the oil and fat heat up very quickly. At extremely high temperatures oil and fat can ignite spontaneously and this may present a serious
Cooking Tips
- When food comes to the boil, reduce the power setting.
- Using a lid will reduce cooking times and save energy by retaining the heat.
- Minimize the amount of liquid or fat to reduce cooking times.
- Start cooking on a high setting and reduce the setting when the food has heated through.
Simmering, cooking rice
- Simmering occurs below boiling point, at around 85˚C when bubbles are just rising occasionally to the surface of the cooking liquid. It is the key to delicious soups and tender stews because the flavors develop without overcooking the food. You should also cook egg-based and flour-thickened sauces below boiling point.
- Some tasks, including cooking rice by the absorption method, may require a setting higher than the lowest setting to ensure the food is cooked properly in the time recommended.
Searing steakTo cook juicy flavorsome steaks:
- Stand the meat at room temperature for about 20 minutes before cooking.
- Heat up a heavy-based frying pan.
- Brush both sides of the steak with oil. Drizzle a small amount of oil into the hot pan and then lower the meat onto the hot pan.
- Turn the steak only once during cooking. The exact cooking time will depend on the thickness of the steak and how cooked you want it. Times may vary from about 2 – 8 minutes per side. Press the steak to gauge how cooked it is – the firmer it feels the more ‘well done’ it will be.
- Leave the steak to rest on a warm plate for a few minutes to allow it to relax and become tender before serving.
For stir-frying
- Choose a ceramic-compatible flat-based wok or a large frying pan.
- Have all the ingredients and equipment ready. Stir-frying should be quick. If cooking large quantities, cook the food in several smaller batches.
- Preheat the pan briefly and add two tablespoons of oil.
- Cook any meat first, put it aside, and keep warm.
- Stir-fry the vegetables. When they are hot but still crisp, turn the cooking zone to a lower setting, return the meat to the pan and add your sauce.
- Stir the ingredients gently to make sure they are heated through.
- Serve immediately.
Heat Settings
| Heat setting | Suitability |
| 1-2 | • delicate warming for small amounts of food• melting chocolate, butter, and foods that burn quickly• gentle simmering• slow warming |
| 3-4 | • reheating• rapid simmering• cooking rice |
| 5-6 | • pancakes |
| 7-8 | • sauteing• cooking pasta |
| 9 | • stir-frying• searing• bringing soup to the boil• boiling water |
Care and Cleaning
| What? | How? | Important! |
| Everyday soiling on glass (fingerprints, marks, stains left by food or non-sugary spillovers on the glass) | 1. Switch the power to the cooktop off.2. Apply a cooktop cleaner while the glass is still warm (but not hot!)3. Rinse and wipe dry with a clean cloth or paper towel.4. Switch the power to the cooktop back on. | • When the power to the cooktop is switched off, there will be no ‘hot surface’ indication but the cooking zone may still be hot! Take extreme care.• Heavy-duty scourers, some nylon scourers and harsh/abrasive cleaning agents may scratch the glass. Always read the label to check if your cleaner or scourer is suitable.• Never leave cleaning residue on the cooktop: the glass may become stained. |
| Boil overs, melts, and hot sugary spills on the glass | Remove these immediately with a fish slice, palette knife or razor blade scraper suitable for ceramic glass cooktops, but beware of hot cooking zone surfaces:1. Switch the power to the cooktop off at the wall.2. Hold the blade or utensil at a 30° angle and scrape the soiling or spill to a cool area of the cooktop.3. Clean the soiling or spill up with a dishcloth or paper towel.4. Follow steps 2 to 4 for ‘Everyday soiling on glass’ above. | • Remove stains left by melts and sugary food or spillovers as soon as possible. If left to cool on the glass, they may be difficult to remove or even permanently damage the glass surface.
• Cut hazard: when the safety cover is retracted, the blade in a scraper is razor-sharp. Use with extreme care and always store safely and out of reach of children. |
| Spillovers on the touch controls | 1. Switch the power to the cooktop off.2. Soak up the spill3. Wipe the touch control area with a clean damp sponge or cloth.4. Wipe the area completely dry with a paper towel.5. Switch the power to the cooktop back on. | • The cooktop may beep and turn itself off, and the touch controls may not function while there is liquid on them. Make sure you wipe the touch control area dry before turning the cooktop back on. |
Troubleshooting
| Problem | Possible causes | What to do |
| The cooktop cannot Be turned on. | No power. | Make sure the cooktop is connected to the power supply and that it is switched on. Check whether there is a power outage in your home or area. If you’ve checked everything and the problem persists, contact the Technika service
department. |
| The touch controls are difficult to operate. | There may be a slight film of water over the controls or you may be using the tip of your finger when touching the controls. | Make sure the touch control area is dry and use the ball of your finger when touching the controls. |
| The glass is being scratched. | Rough-edged cookware.Unsuitable, abrasive scourer or cleaning products being used. | Use cookware with flat and smooth bases. See ‘Choosing the right cookware’. Do not slide any cookware on the hob. See ‘Care and cleaning’. |
Technical Specification
| Ceramic Hob | ECCK64 |
| Cooking Zones | 4 Zones |
| Supply Voltage | 220-240V~ 50 Hz or 60Hz |
| Installed Electric Power | 6000W |
| Product Size D×W×H(mm) | 590×520×50 |
| Building-in Dimensions A×B (mm) | 565×495 |
Weight and Dimensions are approximate. Because we continually strive to improve our products we may change specifications and designs without prior notice.
Installation
Preparation of the work surface
- Cut out the work surface according to the sizes shown in the drawing.
- For the purpose of installation and use, a minimum of 50mm space shall be preserved around the hole.
- Be sure the thickness of the work surface is at least 30mm. and suitable for the application.


| L(mm) | W(mm) | H(mm) | D(mm) | A(mm) | B(mm) | X(mm) | |
| ECCK64 | 590 | 520 | 50 | 46 | 565 | 495 | 50 min |
Ensure the hob is well ventilated and the air inlet and outlet are not blocked. Ensure the hob is in good working order.Install Rangehoods and Exhaust Fans in accordance to the manufacturer’s instructions.No closer than 600mm above the hob for Rangehoods and 750mm for Exhaust Fans.


| A(mm) | B(mm) | C(mm) | D | E |
| 600 min | 50 min | 20 min | Air intake | Air exit 5mm |
Before you install the hob, make sure that
- The work surface is square and level, and no structural members interfere with space requirements.
- The work surface is made of a suitable material.
- If the hob is installed above an oven, the oven has a built-in cooling fan.
- Installation is completed by a suitably qualified person.
- The installation will comply with all clearance requirements and applicable local standards and regulations.
- A suitable isolating switch providing full disconnection from the mains power supply is incorporated in the permanent wiring and is mounted and positioned to comply with the local wiring rules and regulations.
- The isolating switch will be easily accessible to the customer with the hob installed.
- You consult local building authorities and by-laws if in doubt regarding installation.
- You use heat-resistant and easy-to-clean finishes (such as ceramic tiles) for the wall surfaces surrounding the hob.
When you have installed the hob, make sure that
- The power supply cable is not accessible through cupboard doors or drawers.
- There is an adequate flow of air from outside the cabinetry to the base of the hob.
- If the hob is installed above a drawer or cupboard space, a thermal protection barrier is installed below the base of the hob.
- The isolating switch is easily accessible by the customer.
Locating the fixing brackets
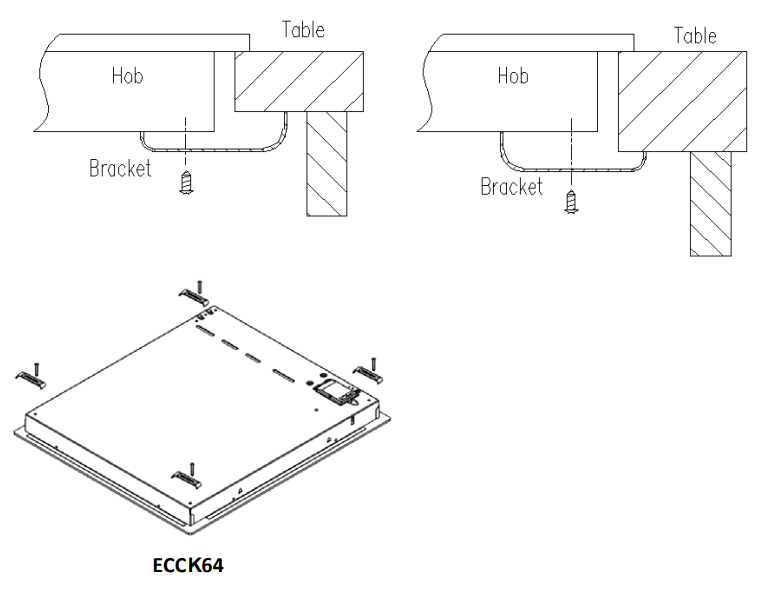
- Fix the hob on the work surface by screwing the four brackets on the bottom of the hob after installation.
- Adjust the bracket position to suit different work surface’s thicknesses.
- Ensure the hob sits flat and square to the work surface and doesn’t slide around.

- The hob must be installed by a suitably qualified person. Please never conduct the operation by yourself.
- The hob shall not be mounted to cooling equipment, dishwashers and rotary dryers.
- The hob shall be installed in a way that ensures correct ventilation and clearances.
- Any surrounding surfaces will meet requirements in regards to temperature resistance.
- A steam cleaner is not to be used.
Electrical connectionConnecting the hob to the mains power supplyIf connecting the cable directly to the mains, install a suitable isolating switch with a minimum contact opening of 3mm between the appliance and the mains. The isolating switch should be sized according to the load on the appliance rating label and should comply with current regulations (the earth wire should not be interrupted by the circuit breaker)Connection to the electricity supply must be made by an authorized person in accordance with the wiring rules AS/NZS3000. Ensure the supply cable cannot contact any hot surfaces.Immediately after installation, carry out a thorough inspection and test of the appliance. If the appliance fails to operate correctly, after checking that you have followed the user instructions correctly, disconnect the appliance and contact the Technika Service department. Never attempt to repair the appliance.


Warning!
- If the cable is damaged or needs replacing, this must be done by the manufacturer or suitably qualified person.
- The installer must ensure that the correct electrical connection has been made and that it complies with safety regulations.
- The cable must not be bent or compressed.
- The cable must not be accessible after installation
Disposal
DISPOSAL: Do notdispose of this product as unsorted municipal waste. Collection ofsuch waste separatelyfor special treatment is necessary. |
This appliance is labeled in compliance with European directive 2002/96/EC for Waste Electrical and Electronic Equipment (WEEE). By ensuring that this appliance is disposed of correctly, you will help prevent any possible damage to the environment and to human health, which might otherwise be caused if it were disposed of in the wrong way.The symbol on the product indicates that it may not be treated as normalhousehold waste. It should be taken to a collection point for the recyclingof electrical and electronic goods.This appliance requires specialist waste disposal. For further information regarding the treatment, recovery, and recycling of this product, please contact your local council, your household waste disposal service, or the shop where you purchased it.For more detailed information about the treatment, recovery, and recycling of this product, please contact your local city office, your household waste disposal service, or the shop where you purchased the product. |
NOTES
MANUFACTURER GUARANTEE
This warranty is provided in Australia by Glen Dimplex Australia Pty Limited ABN 69 118 275 460 (Phone number 1300 556 816) and in New Zealand by Glen Dimplex New Zealand Limited NZBN 9429000069823 (Phone number 09 274 8265) in respect of the Euromaid product.
Euromaid Express WarrantySubject to the exclusions below, we warrant that the product will not have any electrical or mechanical breakdowns within:
- In the case of Euromaid products used for personal, domestic or household purposes, a period of 2 years from the date the product is purchased as a brand-new product from a retailer located in Australia / New Zealand.
- In the case of Euromaid products used for purposes other than personal, domestic or household purposes (including business or commercial use), a period of 90 days from the date the product is purchased as a brand-new product from a retailer located in Australia / New Zealand. Euromaid products are designed and intended for domestic use only; and
- All warranty repairs must be carried out by Glen Dimplex or their nominated service agent
Note: warranty periods detailed above may vary in line with agreements with select retail and builder partners and may differ between Australia and New Zealand.The benefits conferred by this express warranty are in addition to the Consumer Guarantees referred to in section 3 and any other statutory rights you may have under the Australian / New Zealand Consumer Law and/or other applicable laws.
Warranty exclusionsThis express warranty does not apply where:
- The product has been installed, used or operated otherwise than in accordance with the product manual or other similar documentation provided to you with the product;
- The product requires repairs due to damage resulting from accident, misuse, incorrect installation, insect or vermin infestation, improper liquid spillage, cleaning or maintenance, unauthorized modification, use on an incorrect voltage, power surges and dips, voltage supply problems, tampering or unauthorized repairs by any persons, use of defective or incompatible accessories or exposure to abnormally corrosive conditions, events independent of human control which occurred after the goods left the control of Glen Dimplex;
- The repair relates to the replacement of consumable parts such as fuses and bulbs or any other parts of the product which require routine replacement;
- You are unable to provide us with reasonable proof of purchase for the product;
- the breakdown occurs after the expiry of the express warranty period set out in section 1 or
- the product was not purchased in Australia / New Zealand as a brand-new product.
Consumer guarantees
Our goods come with guarantees that cannot be excluded under the Australian / New Zealand Consumer Law. You are entitled to a replacement or refund for a major failure and for compensation for any other reasonably foreseeable loss or damage. You are also entitled to have the goods repaired or replaced if the goods fail to be of acceptable quality and the failure does not amount to a major failure.
How to make a claim
You may make a claim under this warranty through our website, contacting our customer care line or via email. Contact details for Glen Dimplex Australia and New Zealand can be found at the end of this documentTo make a valid claim under this warranty, you must:
- Lodge the claim with us as soon as possible and no later than 14 days after you first become aware of the breakdown;
- Provide us with the product serial number;
- Provide us with reasonable proof of purchase for the product. This can take the form of a store receipt, new home handover form or other payment receipt documentation; and
- If required by us, provide us (or any person nominated by us) with access to the premises at which the product is located at times nominated by us (so that we can inspect the product).
Warranty claimsIf you make a valid claim under this warranty and none of the exclusions set out in section 2 apply, we will, at our election, either repair the product or replace the product with a product of identical specification (or where the product is superseded or no longer in stock, with a product of as close a specification as possible).
Goods presented for repair may be replaced by refurbished goods of the same type rather than being repaired. Refurbished parts may be used to repair the goods. Products are designed and supplied for normal domestic use. We will not be liable to you under this warranty for business loss or damage of any kind whatsoever.Glen Dimplex Australia Pty Ltdwww.glendimplex.com.au
AustraliaPh: 1300 556 816[email protected]
Glen Dimplex New Zealand Ltdwww.glendimplex.co.nz
New ZealandPh: 09 274 8265[email protected]
READ THE INSTRUCTION BOOKLET BEFORE INSTALLING AND USING THE APPLIANCE.
The manufacturer will not be responsible for any damage to property or to persons caused by incorrect installation or improper use of the appliance. The manufacturer is not responsible for any inaccuracies, due to printing or transcription errors, contained in this manual. In addition, the appearance of the figures reported is also purely indicative.The manufacturer reserves the right to make changes to its products when considered necessary and useful, without affecting the essential safety and operating characteristics.Glen Dimplex constantly seeks ways to improve the specifications and designs of its products. Whilst every effort is made to produce up-to-date literature, this document should not be regarded as an infallible guide. Actual products only should be used to derive cut-out sizes.
All appliances must be installed by a qualified person/s with adherence to the relevant electrical, plumbing, and building codes, with compliance being issued as required by state or national legislation.
Additionally, all upright cookers must have the anti-tilt device installed correctly in adherence to the relevant standards by a licensed installer.
For maximum effectiveness and efficiency, all range hoods should be installed with the use of ductwork, by a licensed installer with adherence to the relevant state and national building codes and regulations.
All Glen Dimplex appliances are for Domestic use only and must be installed by a licenced installer into Domestic Applications only, without exception and to the required Authorities’ guidelines. Any installation outside of this will VOID the warranty. Alfresco areas are not a Domestic application.


Glen Dimplex Australia Pty Ltdwww.glendimplex.com.au
AustraliaPh: 1300 556 816[email protected]
Glen Dimplex New Zealand Ltdwww.glendimplex.co.nz
New ZealandPh: 09 274 8265[email protected]plex.co.nz
References
[xyz-ips snippet=”download-snippet”]

