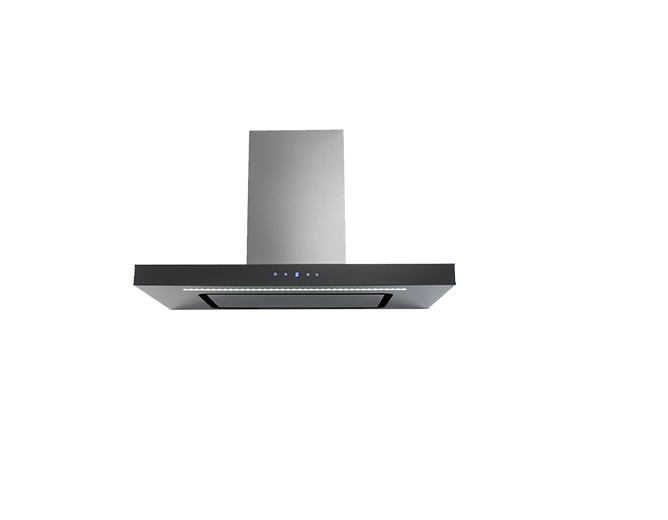
Euromaid 90cm Black Glass Canopy User Manual
SAFETY INSTRUCTIONS
This manual explains the proper installation and use of your cooker hood,please read it carefully before using even if you are familiar with the product. The manual should be kept in a safe place for future reference.
Never to do:
- Do not try to use the cooker hood without the grease filters or if the filters are excessively greasy!
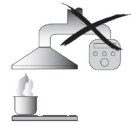
- Do not install above a cooker with a high level grill.
- Do not leave frying pans unattended during use because overheated fats or oils might catch fire.
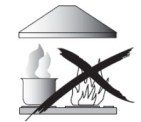
- Never leave naked flames under the cooker hood.

- If the cooker hood is damaged, do not attempt to use.
- Do not flam bé under the cooker hood.
- CAUTION: Accessible parts may become hot when used with cooking appliances.
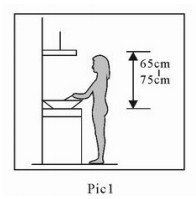
- The minimum distance between the supporting surface for the cooking vessels on the hob and the lowest part of the cooker hood. (When the cooker hood is located above a gas appliance, this distance shall be at least 65 cm)
- The air must not be discharged into a flue that is used for exhausting fumes from appliances burning gas or other fuels.
Always to do:
- Important! Always switch off the electricity supply at the mains during installation and maintenance such as light bulb replacement.
- The cooker hood must be installed in accordance with the installation instructions and all measurements followed.
- All installation work must be carried out by a competent person or qualified electrician.
- Please dispose of the packing material carefully. Children are vulnerable to it.
- Pay attention to the sharp edges inside the cooker hood especially during installation and cleaning.
- When the cooker hood is located above a gas appliance,the minimum distance between the supporting surface for the cooking vessels on the hob and the lowest part of the cooker hood that distance must be:Gas cookers: 75 cmElectric cookers: 65 cmCoal or oil cookers: 75 cm
- Make sure the ducting has no bends sharper than 90 degrees as this will reduce the efficiency of the cooker hood.
- Warning: Failure to install the screws or fixing device in accordance with these instructions may result in electrical hazards.
- Warning: Before obtaining access to terminals, all supply circuits must be disconnected.
Always to do:
- Always put lids on pots and pans when cooking on a gas cooker.
- When in extraction mode, air in the room is being removed by the cooker hood. Please make sure that proper ventilation measures are being observed. The cooker hood removes odours from room but not steam.
- Cooker hood is for domestic use only.
- If the supply cord is damaged, it must be replaced by the manufacturer, its service agent or similarly qualified persons in order to avoid a hazard.
- This appliance can be used by children aged from 8 years and above and persons with reduced physical, sensory or mental capabilities or lack of experience and knowledge if they have been given supervision or instruction concerning use of the appliance in a safe way and understand the hazards involved. Children shall not play with the appliance. Cleaning and user maintenance shall not be made by children without supervision.
- Warning: Before obtaining access to terminals, all supply circuits must be disconnected.
Always to do:
- Caution: The appliance and its accessible parts can become hot during operation. Be careful to avoid touching the heating elements. Children younger than 8 years old should stay away unless they are under permanent supervision.
- There shall be adequate ventilation of the room when the cooker hood is used at the same time as appliances burning gas or other fuels.
- There is a fire risk if cleaning is not carried out in accordance with the instructions
- Regulations concerning the discharge of air have to be fulfilled.
- Clean your appliance periodically by following the method given in the chapterMAINTENANCE.
- For safety reason, please use only the same size of fixing or mounting screw which are recommended in this instruction manual.
- Regarding the details about the method and frequency of cleaning, please refer to maintenance and cleaning section in the instruction manual.
- Cleaning and user maintenance shall not be made by children without supervision.
- When the cooker hood and appliances supplied with energy other than electricity are simultaneously in operation, the negative pressure in the room must not exceed 4 Pa (4 x 10⁻⁵ bar).
- WARNING: Danger of fire: do not store items on the cooking surfaces.
- A steam cleaner is not to be used.
- NEVER try to extinguish a fire with water, but switch off the appliance and then cover flame e.g. with a lid or a fire blanket.
INSTALLATION (VENT OUTSIDE)
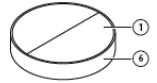
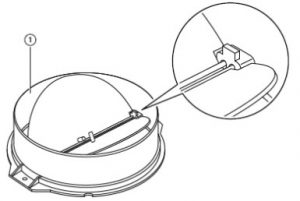
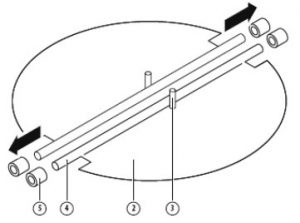
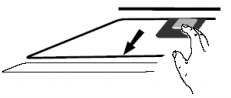
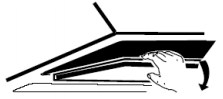
MOUNTING OF THE V-FLAPIf the cooker hood does not have an assembled V-flap 1, you should mount the halfparts to its body. The images only show an example of how to mount the V-flap,the outlet may be various according to different models and configuration. To mount the V-flap 1 you should:
- Mount two half-parts 2 into the body 6
- A pin 3 should be top oriented;
- The axis 4 should be inserted in the holes 5 on body;
- Repeat all the operations for the 2nd half-part
INSTALLATIONIf you have an outlet to the outside, your cooker hood can be connected as below picture by means of an extraction duct (enamel, aluminum, flexible pipe or nonflammable material with an interior diameter of 150mm).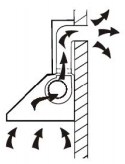
- Before installation, turn the unit off and unplug it from the outlet.
- The cooker hood should be placed at a distance of 65~75cm above the cooking surface for best effect.
- Install the hook on a suitable place once the installation height is fixed, and keep it in line. The fixed position of the inside chimney bracket is the place of chimney. See pic 2.
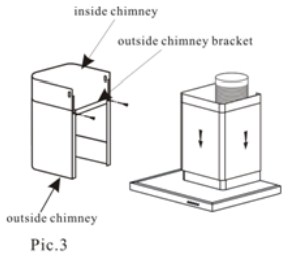
- Fasten the outlet with 4 pcs ST4*8mm, and fix the expansion pipe. Fix the outside chimney bracket on the outside chimney, and be sure that the inside chimney can be adjusted the height in it freely. Afterwards, install the expansion pipe and chimney on the cooker hood. Lay the expansion pipe to the wall outlet. Fix the expansion pipe with the cable tie.See Pic 3.
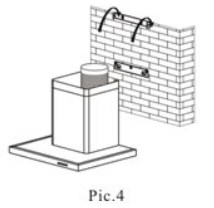
- Put the cooker hood on the hook. See Pic 4.
- Adjust the height of the inside chimney to the position of the inside chimney bracket and fix on it by screw, after adjusting the position, fix the body with safety screw. See Pic 5.


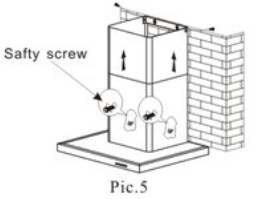
Note: The two safety vents are positioned on the back housing, with diameter of 6mm.HINTS FOR EXHAUST DUCT INSTALLATIONThe following rules must be strictly followed to obtain optimal air extraction:
- Keep expansion pipe short and straight.
- Do not reduce the size or restrict expansion pipe.
- When using expansion pipe always install the pipe pulled taut to minimize pressure loss.
- Failure to observe these basic instructions will reduce the performance and increase noise levels of the cooker hood.
- Any installation work must be carried out by a qualified electrician or competent person.
- Do not connect the ducting system of the hood to any existing ventilation system which is being used for any other appliance ,such as warmer tube, gas tube , hot wind tube.
- The angle of the bend of the expansion pipe should not be less than 120º; you must direct the pipe horizontally, or, alternatively, the pipe should go up from the initial point and should be led to an outer wall.
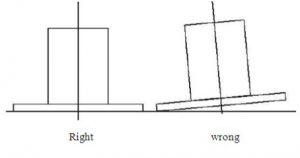
- After the installation ,make sure that the cooker hood is level to avoid grease collection at on end.
- Ensure the expansion pipe selected for installation complies with relevant standards and is fire retardant.
 WARNING:
- For safety reason, please use only the same size of fixing or mounting screw which are recommended in this instruction manual.
- Failure to install the screws or fixing device in accordance with these instructions may result in electrical hazards.
Start Using Your Cooker Hood
LED Touch Control
- Press the “Power” button, the button control the “on” & “off ” of the hood.
- Press the button “Speed” time after time, the motor runs as low / mid / high / low /mid…, the speed runs circularly; and the LED display will indicate as 1-2-3-1-2… circularly.
- Press “Light” button, the light is on, press this button again, the light is off.Please note the Lamp is not under control of the on/off button. When the hood is working, if press the “Timer” button, the hood will go into the status of acquiescent working (acquiescent time is 9mins), and then, LED display will be shown 9.8.7.6 …decreasing by 1,when time is up, the hood will be off automatically and the lamp will extinguish. If pressing “Timer” button, the hood will go in or go out “Timer” function.


TROUBLESHOOTING
|
Fault |
Possible Cause |
Solution |
| Light on, but motor does not work | Fan switch turned off | Select a fan switch position |
| Fan switch failed | Contact service center. | |
| Motor failed | Contact service center. | |
| Light does not work, motor does not work | House fuses blown | Reset/Replace fuses. |
| Power cord loose or disconnected | Refit cord to power outlet. Switch power outlet on. | |
| Oil leakage | One way valve and the outlet are not tightly sealed | Take down the one way valve and seal with sealant. |
| Leakage from the connection of chimney and cover | Take chimney down and seal. | |
| Lights not working | Broken/Faulty globes | Replace globes as per this instruction. |
| Insufficient suction | The distance between the cooker hood and the gas top is too far | Refit the cooker hood to the correct distance. |
| The Cooker hood inclines | The fixing screw not tight enough | Tighten the hanging screw and make it horizontal. |
NOTE:Any electrical repairs to this appliance must conform to your local, state and federal laws.Please contact the service centre if in any doubt before undertaking any of the above.Always disconnect the unit from the power source when opening the unit.
MAINTENANCE AND CLEANING
Caution:
- Before maintenance or cleaning is carried out, the cooker hood should be disconnected from the main power supply. Ensure that the cooker hood is switched off at the wall socket and the plug removed.
- External surfaces are susceptible to scratches and abrasions, so please follow thecleaning instructions to ensure the best possible result is achieved without damage.
GENERALCleaning and maintenance should be carried out with the appliance cold especially when cleaning.Avoid leaving alkaline or acid substances (lemon juice, vinegar etc.) on the surfaces.STAINLESS STEELThe stainless steel must be cleaned regularly (e.g.weekly) to ensure long life expectancy.Dry with a clean soft cloth. A specialized stainless steel cleaning fluid may be used.NOTE:Ensure that wiping is done along with the grain of the stainless steel to prevent any unsightly crisscross scratching patterns from appearing.CONTROL PANEL SURFACEThe inlay control panel can be cleaned using warm soapy water. Ensure the cloth is clean and well wrung before cleaning. Use a dry soft cloth to remove any excess moisture left after cleaning.ImportantUsing neutral detergents and avoid using harsh cleaning chemicals, strong household detergents or products containing abrasives,as this will affect the appliance appearance and potentially remove any printing of artwork on the control panel and will void manufactures warrantee.GREASE MESH FILTERSThe mesh filters can be cleaned by hand. Soak them for about 3 minute in water with a grease-loosening detergent then brush it gently with a soft brush. Please do not apply too much pressure, avoid to damage it . (Leave to dry naturally out of direct sun light)Filters should be washed separately to crockery and kitchen utensils. it is advisable not to use rinse aid.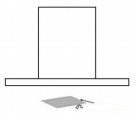 INSTALLING GREASE MESH FILTERS
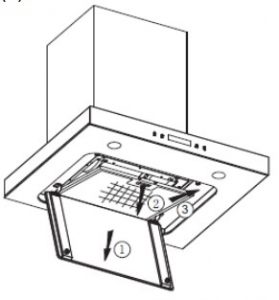
- To install filters for the following four steps.
- Angle the filter into slots at the back of the hood.
- Push the button on handle of the filter.
- Release the handle once the filter fits into a resting position.
- Repeat to install all filters.
CARBON FILTER-not suppliedActivated carbon filter can be used to trap odors. Normally the activated carbon filter should be changed at three or six months according to your cooking habit. The installation procedure of activated carbon filter is as below.
- The aluminum filter should be detached first. Press the lock and pull it downward.
- Take out the carbon filter and change it with a new one.
- Apply reverse procedure to install the charcoal filter CF260.
- Put the aluminum filter back.

NOTE:
- Make sure the filter is securely locked. Otherwise, it would loosen and cause dangerous.
- When activated carbon filter attached, the suction power will be lowered.
BULB REPLACEMENT![]() Important :
Important :
- The bulb must be replaced by the manufacturer, its service agent or similarly qualified persons.
- Always switch off the electricity supply before carrying out any operations on the appliance.
- When handling bulb, make sure it is completely cool down before any direct contact to hands.When handling globes hold with a cloth or gloves to ensure perspiration does not come in contact with the globe as this can reduce the life of the globe.
Change the LED lightNote:
- Before changing the lights, make sure that the appliance is plugged off.
- Protect against danger when changing lights, such as wearing gloves.
- Light replacement should carried out by qualified service personnel only.
- Switch the unit off and pull out the plug first.
- Loose the 4 pcs 4X10MM screws at the back of case, and then take out the outter glass.
- Loose the 2 pcs screws on the lamp bracket, and then change the LED light. See pic below. Remove the grease filter.
- Unscrew the 4pcs screws on the LED light strip bracket by cross screwdriver, dismantle the LED light strip and pull out the terminal of the light connecting wire. See pic 1.(Note: It will need to dismantle the front panel first for models cannot directly take down the light strip.)
- Apply the reverse procedure to install the light strip back.
- ILCOS D code for this lamp is:DSL-7-S-650
- Max wattage: 7 W
- Voltage range: DC 12V

ENVIRONMENTAL PROTECTION:
 This product is marked with the symbol on the selective sorting of waste electronic equipment. This means that this product must not be disposed of with household waste but must be supported by a system of selective collection in accordance with Directive 2012/19/EU. It will then be recycled or dismantled to minimize impacts on the environment, electrical and electronic products are potentially dangerous for the environment and human health due to the presence of hazardous substances.For more information, please contact your local or regional authorities.NOTE:The following shows how to reduce total environmental impact (e.g. energy use) of the cooking process).
- Install the cooker hood in a proper place where there is efficient ventilation.
- Clean the cooker hood regularly so as not to block the airway.
- Remember to switch off the cooker hood light after cooking.
- Remember to switch off the cooker hood after cooking.
INFORMATION FOR DISMANTLINGDo not dismantle the appliance in a way which is not shown in the user manual. The appliance could not be dismantled by user. At the end of life, the appliance should not be disposed of with household waste. Check with you Local Authority or retainer for recycling advice.MANUFACTURER GUARANTEEThis warranty is provided in Australia by Glen Dimplex Australia Pty Limited ABN 69 118 275 460 (Phone number 1300 556 816) and in New Zealand by Glen Dimplex New Zealand Limited NZBN 9429000069823 (Phone number 09 274 8265) in respect of the Euromaid product.
- Euromaid Express WarrantySubject to the exclusions below, we warrant that the product will not have any electrical or mechanical breakdowns within:a) In the case of Euromaid products used for personal, domestic or household purposes, a period of 2 years (AU) / 2 years (NZ) from the date the product is purchased as a brandnew product from a retailer located in Australia / New Zealand.b) In the case of Euromaid products used for purposes other than personal, domestic or household purposes (including business or commercial use), a period of 90 days from the date the product is purchased as a brand-new product from a retailer located in Australia / New Zealand. Euromaid products are designed and intended for domestic use only; andc) All warranty repairs must be carried out by Glen Dimplex or their nominated service agentNote: Warranty periods detailed above may vary in line with agreements with select retail and builder partners and may differ between Australia and New Zealand.The benefits conferred by this express warranty are in addition to the Consumer Guarantees referred to in section 3 and any other statutory rights you may have under the Australian / New Zealand Consumer Law and/or other applicable laws.
- Warranty exclusionsThis express warranty does not apply where:a) The product has been installed, used or operated otherwise than in accordance with the product manual or other similar documentation provided to you with the product;b) The product requires repairs due to damage resulting from accident, misuse, incorrect installation, insect or vermin infestation, improper liquid spillage, cleaning or maintenance, unauthorised modification, use on an incorrect voltage, power surges and dips, voltage supply problems, tampering or unauthorised repairs by any persons, use of defective or incompatible accessories or exposure to abnormally corrosive conditions, events independent of human control which occurred after the goods left the control of Glen Dimplex;c) The repair relates to the replacement of consumable parts such as fuses and bulbs or any other parts of the product which require routine replacement;d) You are unable to provide us with reasonable proof of purchase for the product;e) the breakdown occurs after the expiry of the express warranty period set out in section 1 orf) the product was not purchased in Australia / New Zealand as a brand-new product.
- Consumer guaranteesOur goods come with guarantees that cannot be excluded under the Australian / New Zealand Consumer Law. You are entitled to a replacement or refund for a major failure and for compensation for any other reasonably foreseeable loss or damage. You are also entitled to have the goods repaired or replaced if the goods fail to be of acceptable quality and the failure does not amount to a major failure.
- How to make a claimYou may make a claim under this warranty through our website, contacting our customer care line or via email. Contact details for Glen Dimplex Australia and New Zealand can be found at the end of this document To make a valid claim under this warranty, you must:a) Lodge the claim with us as soon as possible and no later than 14 days after you first become aware of the breakdown;b) Provide us with the product serial number;c) Provide us with reasonable proof of purchase for the product. This can take the form of a store receipt, new home handover form or other payment receipt documentation; andd) If required by us, provide us (or any person nominated by us) with access to the premises at which the product is located at times nominated by us (so that we can inspect the product).
- Warranty claimsIf you make a valid claim under this warranty and none of the exclusions set out in section 2 apply, we will, at our election, either repair the product or replace the product with a product of identical specification (or where the product is superseded or no longer in stock, with a product of as close a specification as possible). Goods presented for repair may be replaced by refurbished goods of the same type rather than being repaired. Refurbished parts may be used to repair the goods. Products are designed and supplied for normal domestic use. We will not be liable to you under this warranty for business loss or damage of any kind whatsoever.
Glen Dimplex Australia Pty Ltdwww.glendimplex.com.auAustraliaPh: 1300 556 816[email protected]
Glen Dimplex New Zealand Ltdwww.glendimplex.co.nzNew ZealandPh: 09 274 8265[email protected]
READ THE INSTRUCTION BOOKLET BEFORE INSTALLING AND USING THE APPLIANCE.
The manufacturer will not be responsible for any damage to property or to persons caused by incorrect installation or improper use of the appliance. The manufacturer is not responsible for any inaccuracies, due to printing or transcription errors, contained in this manual. In addition, the appearance of the figures reported is also purely indicative.The manufacturer reserves the right to make changes to its products when considered necessary and useful, without affecting the essential safety and operating characteristics. Glen Dimplex constantly seeks ways to improve the specifications and designs of their products. Whilst every effort is made to produce up to date literature, this document should not be regarded as an infallible guide. Actual product only should be used to derive cut out sizes. All appliances must be installed by a qualified person/s with adherence to the relevant electrical, plumbing and building codes, with compliance being issued as required by state or national legislation. Additionally, all upright cookers must have the anti-tilt device installed correctly in adherence to the relevant standards by a licenced installer. For maximum effectiveness and efficiency all rangehoods should be installed with the use of ductwork, by a licenced installer with adherence to the relevant state and national building codes and regulations. All Glen Dimplex appliances are for Domestic use only, and must be installed by a licence installer into Domestic Applications only, without exception and to the required Authorities guidelines. Any installation outside of this will VOID warranty. Alfresco areas are not a Domestic application.
Distributed by:Glen Dimplex Australia Pty LtdGlen Dimplex New Zealand Ltdwww.glendimplex.com.auwww.glendimplex.co.nz
For service advice, please contact the Customer Care Centre by phone or email below.
AustraliaPh: 1300 556 816[email protected]
New ZealandPh: 09 274 8265[email protected]
References
[xyz-ips snippet=”download-snippet”]