Euromaid ESBS563S 563L Side By Side Fridge/Freezer
 Safety information
In the interest of your safety and to ensure the correct use, before installing and first using the appliance, read this user manual carefully, including its hints and warnings. To avoid unnecessary mistakes and accidents, it is important to ensure that all people using the appliance are thoroughly familiar with its operation and safety features. Save these instructions and make sure that they remain with the appliance if it is moved or sold, so that everyone using it through its life will be properly informed on appliance use and safety.For the safety of life and property keep the precautions of these user’s instructions as the manufacturer is not responsible for damages caused by omission.
Children and vulnerable people safety
- This appliance is not intended for use by persons (including children) with reduced physical, sensory or mental capabilities, or lack of experience and knowledge, unless they have been given supervision or instruction concerning use of the appliance by a person responsible for their safety.
- Children should be supervised to ensure that they do not play with the appliance.
- Cleaning and user maintenance shall not be made by children.
- Keep all packaging well away from children. There is risk of suffocation.
- If you are discarding the appliance pull the plug out of the socket, cut the connection cable (as close to the appliance as you can) and remove the door to prevent playing children to suffer electric shock or to close themselves into it.
- If this appliance featuring magnetic door seals is to replace an older appliance having a spring lock (latch) on the door or lid, be sure to make that spring lack unusable before you discard the old appliance. This will prevent it from becoming a death trap for a child.
General safety
![]() WARNING! Keep ventilation openings, in the appliance enclosure or in the built-in structure, clear of obstruction.
WARNING! Keep ventilation openings, in the appliance enclosure or in the built-in structure, clear of obstruction.![]() WARNING! Do not use mechanical devices or other means to accelerate the defrosting process, other than those recommended by the manufacturer.
WARNING! Do not use mechanical devices or other means to accelerate the defrosting process, other than those recommended by the manufacturer.![]() WARNING! Do not damage the refrigerant circuit.
WARNING! Do not damage the refrigerant circuit.![]() WARNING! Do not use other electrical appliances (such as ice cream makers) inside of refrigerating appliances, unless they are approved for this purpose by the manufacture.
WARNING! Do not use other electrical appliances (such as ice cream makers) inside of refrigerating appliances, unless they are approved for this purpose by the manufacture.![]() WARNING! Do not touch the light bulb if it has been on for a long period of time because it could be very hot.
WARNING! Do not touch the light bulb if it has been on for a long period of time because it could be very hot.
- Do not store explosive substances such as aerosol cans with aflammable propellant in this appliance.
- The refrigerant isobutane (R600a) is contained within the refrigerant circuit of the appliance, a natural gas with a high level of environmental compatibility, which is nevertheless flammable.
- During transportation and installation of the appliance, be certain that none of the components of the refrigerant circuit become damaged.– avoid open flames and sources of ignit ion– thoroughly ventilate the room in which the appliance is situated
- It is dangerous to alter the specifications or modify this product in any way. Any damage to the cord may cause a short circuit, fire and/or electric shock.
- This appliance is intended to be used in household and similar applications such as– staff kitchen areas in shops, offices and other working environments;– farm houses and by clients in hotels, motels and other residential type environments;– bed and breakfast type environments;– catering and similar non-retail applications.
![]() WARNING! Any electrical components (plug, power cord , compressor and etc.) must be replaced by a certified service agent or qualified service personnel.
WARNING! Any electrical components (plug, power cord , compressor and etc.) must be replaced by a certified service agent or qualified service personnel.![]() WARNING! The light bulb supplied with this appliance is a “specialuse lamp bulb” usable only with the appliance supplied. This “special use lamp” is not usable for domestic lighting.
WARNING! The light bulb supplied with this appliance is a “specialuse lamp bulb” usable only with the appliance supplied. This “special use lamp” is not usable for domestic lighting.
- Power cord must not be lengthened.
- Make sure that the power plug is not squashed or damaged by the back of the appliance. A squashed or damaged power plug may overheat and cause a fi re.
- Make sure that you can come to the mains plug of the appliance.
- Do not pull the mains cable.
- If the power plug socket is loose, do not insert the power plug. There is a risk of electric shock or fire.
- You must not operate the appliance without the lamp.
- This appliance is heavy. Care should be taken when moving it.
- Do not remove nor touch items from the freezer compartment if you hands are damp/wet, as this could cause skin abrasions or frost/freezer burns.
- Avoid prolonged exposure of the appliance to direct sunlight.
Daily use
- Do not put hot on the plastic parts in the appliance.
- Do not place food products directly against the rear wall.
- Frozen food must not be re-frozen once it has been thawed out.’ ‘
- Store pre-packed frozen food in accordance with the frozen food manufactures instructions.
- Appliances manufactures storage recommendations should be strictly adhered to. Refer to relevant instructions.
- Do not place carbonated of fizzy drinks in the freezer compartment as it creates pressure on the container, which may cause it to explode, resulting in damage to the appliance.
- Ice lollies can cause frost burns if consumed straight from the appliance.
Care and cleaning
- Before maintenance, switch off the appliance and disconnect the mains plug from the mains socket.
- Do not clean the appliance with metal objects.
- Do not use sharp objects to remove frost from the appliance. Use a plastic scraper.”
- Regularly examine the drain in the refrigerator for defrosted water. If necessary, clean the drain. If the drain is blocked, water will collect in the bottom of the appliance.
Installation
Important! For electrical connection carefully follow the instructions given in specific paragraphs.
- Unpack the appliance and check if there are damages on it. Do not connect the appliance if it is damaged. Report possible damages immediately to the place you bought it. In that case retain packing.
- It is advisable to wait at least four hours before connecting the appliance to allow the oil to flow back in the compressor.
- Adequate air circulation should be around the appliance, lacking this leads to overheating. To achieve sufficient ventilation follow the instructions relevant to installation.
- Wherever possible the spacers of the product should be against a wall to avoid touching or catching warm parts (compressor, condenser) to prevent possible burn.
- The appliance must not be located close to radiators or cookers.
- Make sure that the mains plug is accessible after the installation of the appliance.
Service
- Any electrical work required to do the servicing of the appliance should be carried out by a qualified electrician or competent person.
- This product must be serviced by an authorized Service Center, and only genuine spare parts must be used.
- WARNING! – It is hazardous for anyone other than an Authorised Service Person to service this appliance. In Queensland, the authorised Service Person MUST hold a Gas Work Authorisation for hydrocarbon refrigerants, to carry out Servicing or repairs where the gas system is being opened or charged.
- This appliance contains R600a refrigerant which is flammable.
Energy saving
- Don’t put hot food in the appliance;
- Don’t pack food close together as this prevents air circulating;
- Make sure food don’t touch the back of the compartment(s);
- If electricity goes off, don’t open the door(s);
- Don’t open the door(s) frequently;
- Don’t keep the door(s) open for too long time;
- Don’t set the thermostat on exceeding cold temperatures;
- Some accessories, such as drawers, can be removed to get larger storage volume and lower energy consumption.
Environment Protection
![]() This appliance does not contain gasses which could damage the ozone layer, in either its refrigerant circuit or insulation materials. The appliance shall not be discarded together with the urban refuse and rubbish. The insulation foam contains flammable gases: the appliance shall be disposed according to the appliance regulations to obtain from your local authorities. Avoid damaging the cooling unit , especially the heat exchanger. The materials used on this appliance marked by the symbol 6 are recyclable.
This appliance does not contain gasses which could damage the ozone layer, in either its refrigerant circuit or insulation materials. The appliance shall not be discarded together with the urban refuse and rubbish. The insulation foam contains flammable gases: the appliance shall be disposed according to the appliance regulations to obtain from your local authorities. Avoid damaging the cooling unit , especially the heat exchanger. The materials used on this appliance marked by the symbol 6 are recyclable.
![]() The symbol on the product o r on its packaging indicates that this product may not be treated as household waste. Instead it should be taken to the appropriate collection point for the recycling of electrical and electronic equipment. By ensuring this product is disposed of correctly, you will help prevent potential negative consequences for the environment and human health, which could otherwise be caused by inappropriate waste handling of this product. For more detailed information about recycling of this product, please contact your local council, your household waste disposal service or the shop where you purchased the product.
The symbol on the product o r on its packaging indicates that this product may not be treated as household waste. Instead it should be taken to the appropriate collection point for the recycling of electrical and electronic equipment. By ensuring this product is disposed of correctly, you will help prevent potential negative consequences for the environment and human health, which could otherwise be caused by inappropriate waste handling of this product. For more detailed information about recycling of this product, please contact your local council, your household waste disposal service or the shop where you purchased the product.
Packaging materials
The materials with the symbol are recyclable. Dispose the packaging in a suitable col lection containers to recycle it.
Disposal of the appliance
- Disconnect the mains plug from the mains socket.
- Cut off the mains cable and discard it.
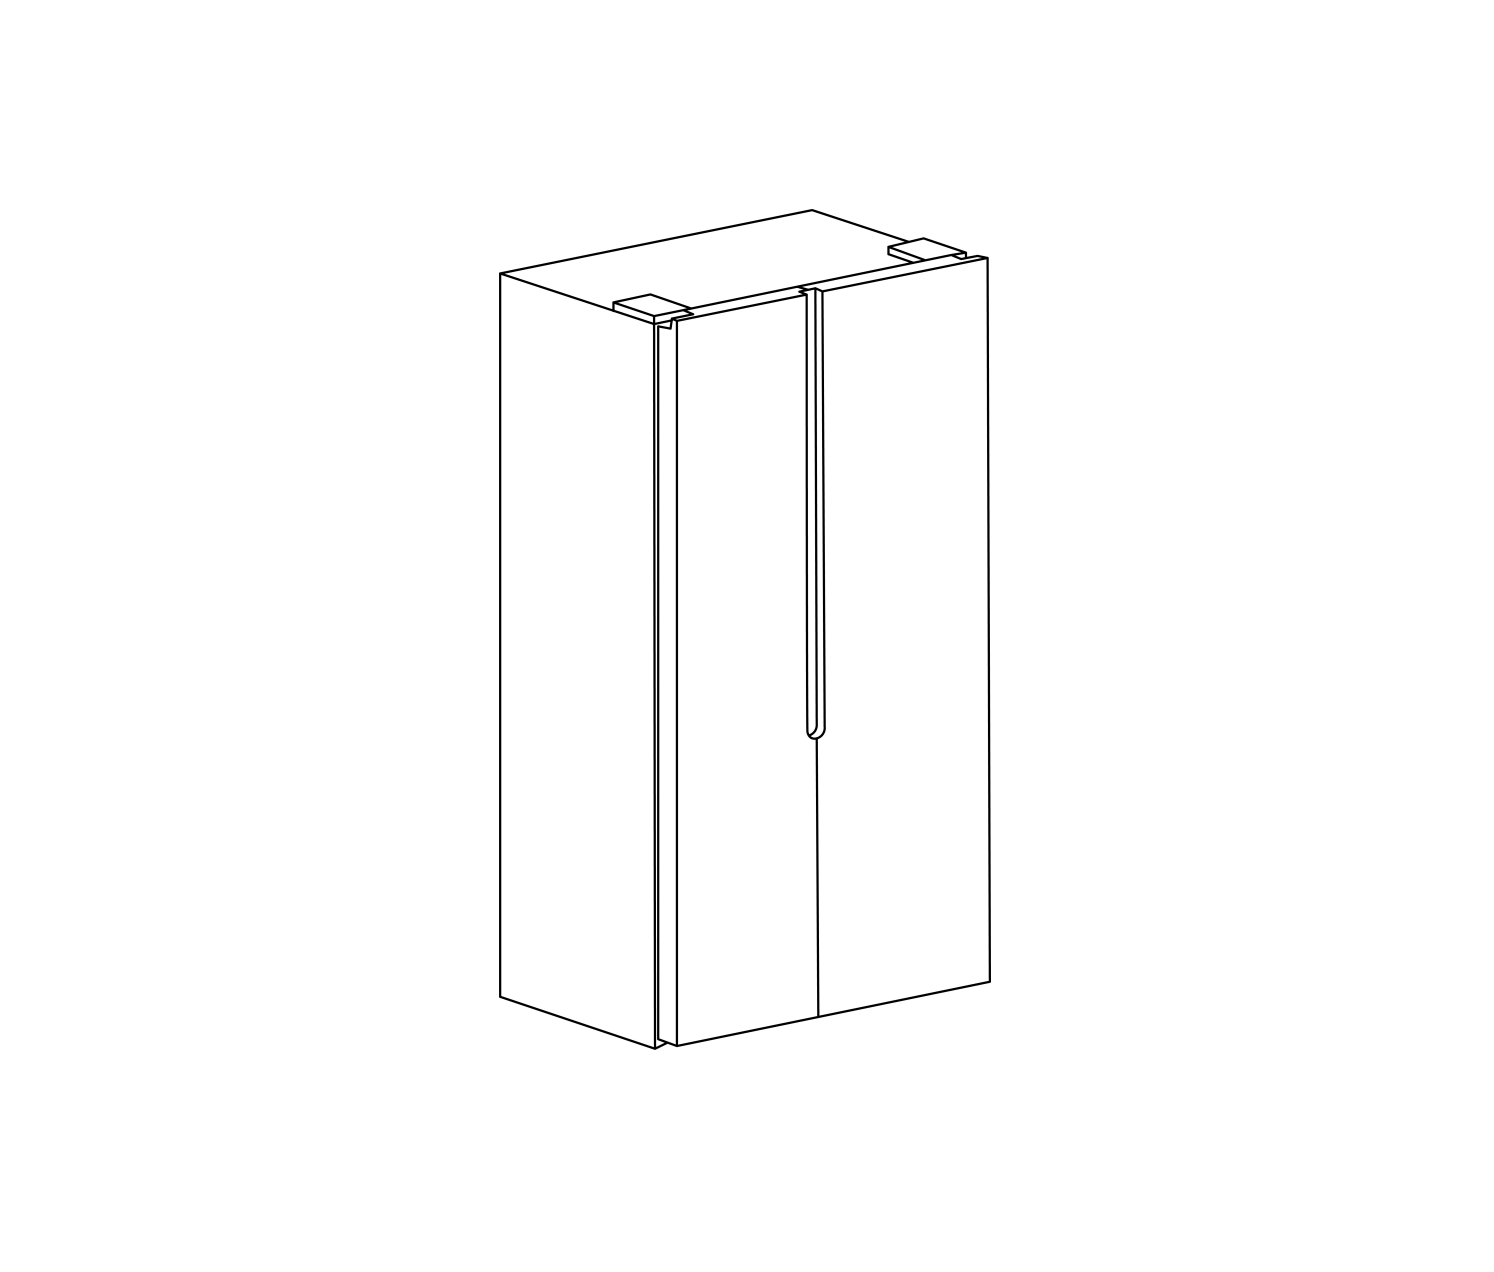
Overview
Note: Above picture is for reference only. Real appliance may be different.
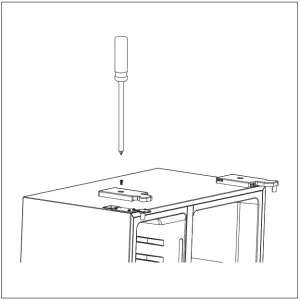
Remove the doors
Tool required: Philips screwdriver, Flat bladed screwdriver.
- Ensure the unit is unplugged and empty.
- To take the door off, it is necessary to tilt the unit backwards. You should rest the unit on something solid so that it will not slip during the door removing process.
- All parts removed must be saved to do the reinstallation of the door.
- Do not lay the unit flat as this may damage the coolant system.
- It’s better that 2 people handle the unit during assembly.
- Unscrew hinge cover by Philips screwdriver.
- Disconnect the harness.
- Unscrew top hinge.
- Lift the door and place it on a soft pad. Then remove another door as same process.
- Unscrew bottom hinges.
- After the appliance is positioned, install the doors as reversed process.


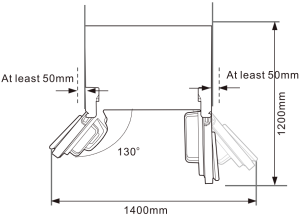
Space Requirement
- Select a location without direct exposure to sunlight;
- Select a location with enough space for the refrigerator doors to open easily;
- Select a location with level (or nearly level) flooring;
- Allow sufficient space to install the refrigerator on a flat surface;
- Allow clearance to the right, left, back and top when installing. This will help reduce power consumption and keep your energy bills lower.

Positioning
Install this appliance at a location where the ambient temperature corresponds to the climate class indicated on the rating plate of the appliance:
|
Climate Class |
Ambient temperature |
| SN | +1O’ C to +32′ C |
| N | +16′ C to +32′ C |
| ST | +16′ C to +38′ C |
| T | +16′ C to +43′ C |
LocationThe appliance should be installed well away from sources of heat such as radiators, boilers, direct sunlight etc. Ensure that air can circulate freely around the back of the cabinet. To ensure best performance, if the appliance is positioned below an overhanging wall unit, the minimum distance between the top of the cabinet and the wall unit must be at least 100 mm. Ideally, however, the appliance should not be positioned below overhanging wall units. Accurate leveling is ensured by one or more adjustable feet at the base of the cabinet.
![]() Warning! It must be possible to disconnect the appliance from the mains power supply; the plug must therefore be easily accessible after installation.
Warning! It must be possible to disconnect the appliance from the mains power supply; the plug must therefore be easily accessible after installation.
Electrical connectionBefore plugging in, ensure that the voltage and frequency shown on the rating plate correspond to your domestic power supply. The appliance must be earthed. The power supply cable plug is provided with a contact for this purpose.
Levelling the refrigerator

Daily Use
Using the Control Panel
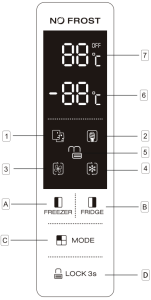
Buttons
![]() Press to adjust temperature of freezer compartment (left side) from -14 ‘C to -22’C.
Press to adjust temperature of freezer compartment (left side) from -14 ‘C to -22’C.![]() Press to adjust temperature of fridge compartment (right side) from 2’C to and off cooling.
Press to adjust temperature of fridge compartment (right side) from 2’C to and off cooling.![]() Press to select running mode from SMART, ECO, SUPER COOLING, SUPER FREEZING and US SETTING (no symbol in display).
Press to select running mode from SMART, ECO, SUPER COOLING, SUPER FREEZING and US SETTING (no symbol in display).![]() Press 3 SEC. button and hold for 3 seconds to lock other three battens.Press ii and hold for 1 second to unlock other three battens.
Press 3 SEC. button and hold for 3 seconds to lock other three battens.Press ii and hold for 1 second to unlock other three battens.
Display
![]() SMART mode, the refrigerator sets the temperature of two compartments automatically according to internal temperature and ambient temperature.
SMART mode, the refrigerator sets the temperature of two compartments automatically according to internal temperature and ambient temperature.![]() ECO mode, the refrigerator runs in lowest energy consumption setting.
ECO mode, the refrigerator runs in lowest energy consumption setting.![]() SUPER COOLING cools the fridge compartment to the lowest temperature as designed. After approx. 2.5 hours, the temperature setting would be restored to the previous user setting mode.
SUPER COOLING cools the fridge compartment to the lowest temperature as designed. After approx. 2.5 hours, the temperature setting would be restored to the previous user setting mode.![]() SUPER FREEZING cools the fridge compartment to the lowest temperature as designed. After approx. 50 hours, the temperature setting would be restored to the previous user setting mode.Hips: it’s better to switch on SUPER FREEZING mode 24 hours ahead before large amount of food is placed in freezer compartment.
SUPER FREEZING cools the fridge compartment to the lowest temperature as designed. After approx. 50 hours, the temperature setting would be restored to the previous user setting mode.Hips: it’s better to switch on SUPER FREEZING mode 24 hours ahead before large amount of food is placed in freezer compartment.![]() LOCK, the symbol will light on if buttons are locked.
LOCK, the symbol will light on if buttons are locked.![]() Display the setting temperature of freezer compartment.
Display the setting temperature of freezer compartment.![]() Display the setting temperature of fridge compartment.
Display the setting temperature of fridge compartment.![]() Child lock would be failed since power failure. Child lock would be valid automatically after 25 seconds since last operation. Display panel would get turn off automatically after 2 minutes since last operation.
Child lock would be failed since power failure. Child lock would be valid automatically after 25 seconds since last operation. Display panel would get turn off automatically after 2 minutes since last operation.![]() Some features may not be applicable with this model.
Some features may not be applicable with this model.
| Mode | Indicator light | Freezer temperature display | Fridge temperature display |
| Smart |  |
The temperature display for freezer and fridge will changebased on ambient temperature (see the table below). | |
| ECO |  |
-15ºC | +8ºC |
| Super cooling |  |
No change | +2ºC |
| Super freezing |  |
-25ºC | No change |
NOTES:ECO mode: Select this mode when you want to save power.
Super cooling mode: This mode allows you to cool foods quickly and will be automatically deactivated after 2.5 hours of operation.
Super freezing mode: This mode allows you to freeze foods quickly and will be automatically deactivated after 5 hours of operation.
Door open alarmWhen any door is left open or not closed completely for about 90 seconds, the appliance will sound an alarm. Close the fridge door then the alarm will stop.If the door is not well closed, then the alarm will sound every 35 seconds until the doors are well closed.If doors are open for 10 continuous minutes without closing, the internal LED light would be turned off automatically.
Child safety lockThis function is designed to prevent children from operating the appliance.
- To activate the function, press and hold LOCK 3s for about 3 seconds. The lock indicator light will Illuminate indicating the safety lock function is activated.
- To deactivate the function, press and hold LOCK3s for about 1 second. The unlock indicator light will illuminate indicating the safety lock function is deactivated.
First use
Cleaning the interiorBefore using the appliance for the first time, wash the interior and all internal accessories with lukewarm water and some neutral soap so as to remove the typical smell of a brand new product, then dry thoroughly.
Important! Do not use detergents or abrasive powders, as these will damage the finish.
Daily use
Freezing fresh food
- The freezer compartment is suitable for freezing fresh food and storing frozen and deep-frozen food for a long time.
- Place the fresh food to be frozen in the bottom compartment.
- The maximum amount of food that can be frozen in 24 hours is specified on the rating plate.
- The freezing process lasts 24 hours: during this period do not add other food to be frozen.
Storing frozen foodWhen first starting-up or after a period out of use. Before putting the product in the compartment let the appliance run at least 2 hours on the higher settings.
Important! In the event of accidental defrosting, for example the power has been off for longer than the value shown in the technical characteristics chart under “rising time”, the defrosted food must be consumed quickly or cooked immediately and then re-frozen (after cooked).
ThawingDeep-frozen or frozen food, prior to be used, can be thawed in the freezer compartment or at room temperature, depending on the time available for this operation.Small pieces may even be cooked still frozen, directly from the freezer. In this case, cooking will take longer.
Ice-cubeThis appliance may be equipped with one or more ice-cube to produce ice.
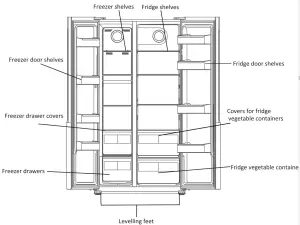
Accessories
Movable shelvesThe walls of the refrigerator are equipped with a series of runners so that the shelves can be positioned as desired.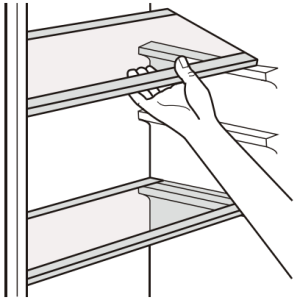
Positioning the door balconiesTo permit storage of food packages of various sizes, the door balconies can be placed at different heights. To make these adjustments proceed as follows: gradually pull the balcony in the direction of the arrows until it comes free, then reposition as required.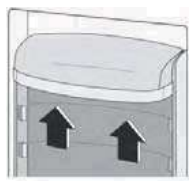
Helpful hints and tips
Hints for freezingTo help you make the most of the freezing process, here are some important hints:
- the maximum quantity of food which can be frozen in 24 hrs. is shown on the rating plate;
- the freezing process takes 24 hours. No further food to be frozen should be added during this period; only freeze top quality, fresh and thoroughly cleaned, foodstuffs;
- prepare food in small portions to enable it to be rapidly and completely frozen and to make it possible subsequently to thaw only the quantity required;
- wrap up the food in aluminum foil or polythene and make sure that the packages are airtight;
- do not allow fresh, unfrozen food to touch food which is already frozen, thus avoiding a rise in temperature of the latter;
- lean foods store better and longer than fatty ones; salt reduces the storage life of food;
- water ices, if consumed immediately after removal from the freezer compartment, can possibly cause the skin to be freeze burnt;
- it is advisable to show the freezing in date on each individual pack to enable you removal from the freezer compartment, can possibly cause the skin to be freeze burnt;
- it is advisable to show the freezing in date on each individual pack to enable you to keep tab of the storage time.
Hints for storage of frozen foodTo obtain the best performance from this appliance, you should:
- Make sure that the commercially frozen foodstuffs were adequately stored by the retailer;
- Be sure that frozen foodstuffs are transferred from the food store to the freezer in the shortest possible time;
- Do not open the door frequently or leave it open longer than absolutely necessary;
- Once defrosted, food deteriorates rapidly and cannot be refrozen;
- Do not exceed the storage period indicated by the food manufacture.
Hints for fresh food refrigerationTo obtain the best performance:
- Do not store warm food or evaporating liquids in the refrigerator
- Do cover or wrap the food, particularly if it has a strong flavor.
Hints for refrigerationUseful hints:
- Make (all types): wrap in polythene bags and place on the glass shelves above the vegetable drawer.
- For safety, store in this way only one or two days at the most.
- Cooked foods, cold dishes, etc these should be covered and may be placed on any shelf.
- Fruit and vegetables: these should be thoroughly cleaned and placed in the special drawer(s) provided. butter and cheese: these should be placed in special airtight containers or wrapped in aluminum foil or polythene bags to exclude as much air as possible.
- Milk bottle: these should have a cap and should be stored in the balconies on the door.
- Bananas, potatoes, onions and garlic, if not packed, must not be kept in the fridge.
Cleaning
For hygienic reasons the appliance interior, including interior accessories, should be cleaned regularly.
![]() Caution! The appliance may not be connected to the mains during cleaning. Danger of electrical shock! Before cleaning switch the appliance off and remove the plug from the mains, or switch off or turn out the circuit breaker or fuse. Never clean the appliance with a steam cleaner. Moisture could accumulate in electrical components, danger of electrical shock! Hot vapors can lead to the damage of plastic parts. The appliance must be dry before it is placed back into service.
Caution! The appliance may not be connected to the mains during cleaning. Danger of electrical shock! Before cleaning switch the appliance off and remove the plug from the mains, or switch off or turn out the circuit breaker or fuse. Never clean the appliance with a steam cleaner. Moisture could accumulate in electrical components, danger of electrical shock! Hot vapors can lead to the damage of plastic parts. The appliance must be dry before it is placed back into service.
Important! Ethereal oils and organic solvents can attack plastic parts, e.g. lemon juice or the juice form orange peel, bulyric acid, cleanser that contain acetic acid.
- Do not allow such substances to come into contact the appliance parts.
- Do not use any abrasive cleaners
- Remove the food from the freezer. Store them in a cool place, well covered.
- Switch the appliance off and remove the plug from the mains, or switch off or turn out the circuit breaker of fuse.
- Clean the appliance and the interior accessories with a cloth and lukewarm water. After cleaning wipe with fresh water and rub dry.
- After everything is dry place appliance back into service.
Troubleshooting
![]() Caution! Before troubleshooting, disconnect the power supply. Only a qualified electrician of competent person must do the troubleshooting that is not in this manual.
Caution! Before troubleshooting, disconnect the power supply. Only a qualified electrician of competent person must do the troubleshooting that is not in this manual.
Important! There are some sounds during normal use (compressor, refrigerant circulation).
| Problem | Possible cause | Solution |
| Appliance dose not work | Mains plug is not plug1ged in or is loose | Insert mains plug . |
| Fuse has blown or is defective | Check fuse, replace if necessary. | |
| Socket is defective | Mains malfunctions are to becorrected by an electrician. | |
| Appliance freezes or cools too much | Temperature is set too cold or the appliance runs at SUPER modes. | Turn the temperature regulator to a warmer setting temporarily. |
| The food is not frozen enough. | Temperature is not properly adjusted. | Please look in the initial Temperature Selling section. |
| Door was open for an extended period. | Open the door only as long as necessary. | |
| A large quantity of warm food was placed in the appliance within the last 24 hours. | Turn the temperature regulation to a colder setting temporarily. | |
| The appliance is near a heat source. | Please look in the installation location section. | |
| Heavy build up of frost on the door seal. | Door seal is not air tight. | Carefully warm the leaking sections of the door seal with a hair dryer (on a cool setting). At the same time shape the warmed door seal by hand such that it sits correctly. |
| Unusual noises | Appliance is not level. | Re-adjust the feet. |
| The appliance is touching the wall or other objects. | Move the appliance slightly. | |
| A component, e.g. a pipe, on the rear of the appliance is touching another part of the appliance or the wall. | If necessary, carefully bend the component out of the way. | |
| Side panels are hot | It’s normal. Heat exchange is in the side panels. | Take gloves to touch side panels if need. |
If the malfunction shows again, contact the Service Center.These data are necessary to help you quickly and correctly. Write the necessary data here, refer to the rating plate.
Product Information
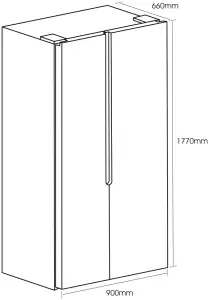
Model No.: ESBS563SProduct dimension: W900 × D660 × H1770 mmTotal gross volume: 563 litersTotal storage volume: 521 litersClimate class: T220 – 240V ~ 50HzRated current:1.4ADefrost power:240WEnergy consumption:1.578kW.h/24hRefrigerant: R600a(75g)Insulation blowing gas: CyclopentaneRefrigeration group number: 5S
NOTES
___________________________________________________________________________________________________________________________________________________________________________________________________________________________________________________________________________________________________________________________________________________________________________________________________________________________________________
MANUFACTURER GUARANTEE
This warranty is provided in Australia by Glen Dimplex Australia Pty Limited ABN 69 118 275 460 (Phone number 1300 556 816) and in New Zealand by Glen Dimplex New Zealand Limited NZBN 9429000069823 (Phone number 09 274 8265) in respect of the Euromaid product.
- Euromaid Express WarrantySubject to the exclusions below, we warrant that the product will not have any electrical or mechanical breakdowns within:a) In the case of Euromaid products used for personal, domestic or household purposes, a period of 2 years from the date the product is purchased as a brand-new product from a retailer located in Australia/ New Zealand.b) In the case of Euromaid products used for purposes other than personal, domestic or household purposes (including business or commercial use), a period of 90 days from the date the product is purchased as a brand-new product from a retailer located in Australia/ New Zealand. Euromaid products are designed and intended for domestic use only; andc) All warranty repairs must be carried out by Glen Dimplex or their nominated service agentNote: warranty periods detailed above may vary in line with agreements with select retail and builder partners and may differ between Australia and New Zealand.The benefits conferred by this express warranty are in addition to the Consumer Guarantees referred to in section 3 and any other statutory rights you may have under the Australian / New Zealand Consumer Law and/or other applicable laws.
- Warranty exclusionsThis express warranty does not apply where:a) The product has been installed, used or operated otherwise than in accordance with the product manual or other similar documentation provided to you with the product;b) The product requires repairs due to damage resulting from accident, misuse, incorrect installation, insect or vermin infestation, improper liquid spillage, cleaning or maintenance, unauthorised modification, use on an incorrect voltage, power surges and dips, voltage supply problems, tampering or unauthorised repairs by any persons, use of defective or incompatible accessories or exposure to abnormally corrosive conditions, events independent of human control which occurred after the goods left the control of Glen Dimplex;c) The repair relates to the replacement of consumable parts such as fuses and bulbs or any other parts of the product which require routine replacement;d) You are unable to provide us with reasonable proof of purchase for the product;e) the breakdown occurs after the expiry of the express warranty period set out in section 1 orf) the product was not purchased in Australia / New Zealand as a brand new product.
- Consumer guaranteesOur goods come with guarantees that cannot be excluded under the Australian / New Zealand Consumer Law. You are entitled to a replacement or refund for a major failure and for compensation for any other reasonably foreseeable loss or damage. You are also entitled to have the goods repaired or replaced if the goods fail to be of acceptable quality and the failure does not amount to a major failure.
- How to make a claimYou may make a claim under this warranty through our website, contacting our customer care line or via email. Contact details for Glen Dimplex Australia and New Zealand can be found at the end of this documentTo make a valid claim under this warranty, you must:a) Lodge the claim with us as soon as possible and no later than 14 days after you first become aware of the breakdown;b) Provide us with the product serial number;c) Provide us with reasonable proof of purchase for the product. This can take the form of a store receipt, new home handover form or other payment receipt documentation; andd) If required by us, provide us (or any person nominated by us) with access to the premises at which the product is located at times nominated by us (so that we can inspect the product).
- Warranty claimsIf you make a valid claim under this warranty and none of the exclusions set out In section 2 apply, we will, at our election, either repair the product or replace the product with a product of Identical specification {or where the product is superseded or no longer in stock, with a product of as close a specification as possible).Goods presented for repair may be replaced by refurbished goods of the same Type rather than being repaired. Refurbished parts may be used to repair the goods.Products are designed and supplied for normal domestic use. We will not be liable to you under this warranty for business loss or damage or any kind whatsoever.
Glen Dimplex Australia Pty Ltdwww.glendimple:X.com.auAustraliaPh: 1300 556 816[email protected]
Glen Oimplex New Zealand Ltdwww.glendlmplex.oo.nzNew ZealandPh: 09 274 8265[email protected]
 report this ad
References
[xyz-ips snippet=”download-snippet”]