Customer GuideKaraoke machine Singing for life
Please remember, we provide 7 days no question ask refund warranty, 30 days free replacement, 365 days free maintenance. So if there is any problem when you use our products, please feel free to contact the seller via the buyer-seller message system on the platform where you purchase the item.
Warnings CAUTION:TO REDUCE THE RISK OF ELECTRIC SHOCK, DO NOT REMOVE COVER (OR BACK). NO USER-SERVICEABLE PARTS INSIDE. REFER SERVICING TO QUALIFIED SERVICE PERSONNEL. The Caution marking is located on the bottom panel.
![]() DANGEROUS VOLTAGE: The lightning flash with arrowhead symbol within an equilateral triangle is intended to alert the user to the presence of uninsulated dangerous voltage within the product’s enclosure that may be of sufficient magnitude to constitute a risk of electric shock to persons.
DANGEROUS VOLTAGE: The lightning flash with arrowhead symbol within an equilateral triangle is intended to alert the user to the presence of uninsulated dangerous voltage within the product’s enclosure that may be of sufficient magnitude to constitute a risk of electric shock to persons.![]() ATTENTION: The exclamation point within an equilateral triangle is intended to alert the user to the presence of important operating and maintenance (servicing) instructions in the literature accompanying this product.
ATTENTION: The exclamation point within an equilateral triangle is intended to alert the user to the presence of important operating and maintenance (servicing) instructions in the literature accompanying this product.
DRIPPING WARNING: This product shall not be exposed to dripping or splashing, and no objects filled with liquids, such as vases, shall be placed on the product.VENTILATION WARNING: The normal ventilation of the product shall not be impeded for intended use.SAFETY VERIFICATION: This device is made and tested to meet safety standards of the FCC, requirements and compliance with safety performance of the U.S. Department of Health and Human Services and also with FDA Radiation Performance Standards 21 CFR Subchapter.
Warnings:
- This CD player employs a laser light beam. Only a qualified service person should remove the cover or attempt to service this device, due to possible eye injury.
- The use of controls, adjustments, or procedures other than those specified herein might result in hazardous radiation exposure.
- The apparatus shall be used in an open area.CAUTION!Invisible laser radiation when open and interlocks defeated. Avoid exposure to beam.
WARNING: TO PREVENT FIRE OR SHOCK HAZARD, DO NOT EXPOSE THIS UNIT TO RAIN OR MOISTURE.
FCC WARNING: This equipment may generate or use radiofrequency energy. Changes or modifications to this equipment may cause harmful interference unless the modifications are expressly approved in the instruction manual. The user could lose the authority to operate this equipment if an unauthorized change or modification is made.This device complies with part 15 of the FCC Rules. Operation is subject to the following two conditions: (1) This device may not cause harmful interference, and (2) this device must accept any interference received, including interference that may cause undesired operation.
NOTE: This equipment has been tested and found to comply with the limits for a Class B digital device, pursuant to part 15 of the FCC Rules. These limits are designed to provide reasonable protection against harmful interference in a residential installation. This equipment generates, uses and can radiate radio frequency energy and, if not installed and used in accordance with the instructions, may cause harmful interference to radio communications. However, there is no guarantee that interference will not occur in a particular installation. If this equipment does cause harmful interference to radio or television reception, which can be determined by turning the equipment off and on, the user is encouraged to try to correct the interference by one or more of the following measures:
- Reorient or relocate the receiving antenna.
- Increase the separation between the equipment and receiver.
- Connect the equipment into an outlet on a circuit different from that to which the receiver is connected.
- Consult the dealer or an experienced radio/TV technician for help.The rating information is located at the rear of the unit.
INDUSTRY CANADA NOTICE:This device complies with Industry Canada Iicense-exempt RSS standard(s). Operation is subject to the following two conditions:
- This device may not cause interference, and
- This device must accept any interference, including interference that may cause undesired operation of the device.CAN ICES-3(B)/NMB-3(B)Class II equipment symbol. This symbol indicates that the unit has a double insulation system.

Important Safety Information
- Read these Instructions.
- Keep these Instructions.
- Heed all Warnings.
- Follow all Instructions.
- Do not use this apparatus near water.
- Clean only with a dry cloth.
- Do not block any of the ventilation openings. Install in accordance with the Manufacturer’s instructions.
- Do not install near any heat sources such as radiators, heat 14. Refer all servicing to qualified service personnel. Servicing is registers, stoves, or other apparatus (including amplifiers) that required when the apparatus has been damaged in any way, produce heat. such as power-supply cord or plug is damaged, liquid has been
- Do not defeat the safety purpose of the polarized or grounding- spilled or objects have fallen into the apparatus, the apparatus type plug. A polarized plug has two blades with one wider than has been exposed to rain or moisture, does not operate the other. A grounding type plug has two blades and a third normally, or has been dropped. grounding prong. The wide blade or the third prong are provided
- Protect the power cord from being walked on or pinched and it should remain readily accessible and operable during particularly at plugs, convenience receptacles, and the point intended use. In order to completely disconnect the apparatus where they exit from the apparatus. from power, the mains plug should be completely removed
- Only use attachments/accessories specified by the from the AC outlet socket. manufacturer.
- Use only with a cart, stand, tripod, bracket, or table specified by the manufacturer, or sold with the apparatus. When a cart is used, use caution when moving the cart/ apparatus combination to avoid injury from tip-over.
- Unplug this apparatus during lightning storms or when unused for long periods of time.
- Refer all servicing to qualified service personnel. Servicing is required when the apparatus has been damaged in any way, such as power-supply cord or plug is damaged, liquid has been spilled or objects have fallen into the apparatus, the apparatus has been exposed to rain or moisture, does not operate normally, or has been dropped.
- WARNING: To reduce the risk of fire or electric shock, do not expose this apparatus to rain or moisture. Do not place objects filled with water, such as a vase, on the apparatus.
- The AC mains plug is used as the power disconnect device and it should remain readily accessible and operable during intended use. In order to completely disconnect the apparatus from power, the mains plug should be completely removed from the AC outlet socket.
- CAUTION: To reduce the risk of fire or explosion, do not expose batteries to excessive heat such as sunshine, fire or other heat sources.
PLAY PANELS
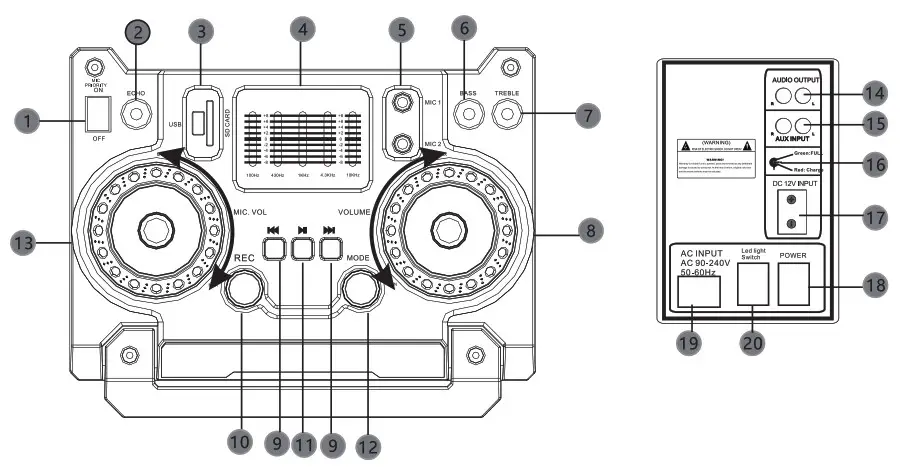
- MIC Priority switch on /off
- Microphone ECHO control
- USB/ SD input
- Music balance adjustment
- MIC 1 and MIC 2 input
- Music bass adjustment
- Music treble adjustment
- Music volume adjustment
- Press to skip back or forward to the next track/chapter
- Record button, insert the storage tray, open the microphone and began to record the contents to be stored
- Press to start/pause the playback
- Press to switch to another mode of operationBLUE: Ready to connect to other devices with bluetooth functionFM: Displays and plays the first stored Fm stationUSB: This mode is available only when a USB device inserted with contenide (S)of musicSD: This modalidd is available only when a SD/MMC card is inserted with content(s) of musicLINE: Ready to connect with another device and reproduce and reproduce for audio input stereo
- MIC Volume adjustment
- Output
- AUX input
- Led right,Full charge is green ,Charging is red
- DC 12V power input
- Power switch
- AC input
- LED power switch
REMOTE CONTROLLER
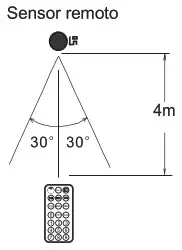
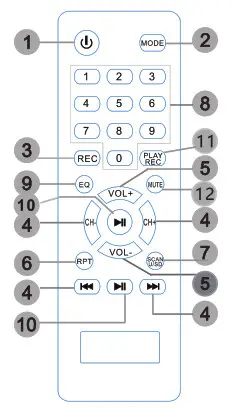 Remote controllerThe best way to use the remote controller is to keep the remote sensor and the front panel at an angle of up to 60 degrees. The remote control has a range of up to 4 meters of sensors.
- POWER SHUTDOWNPress to turn on or activate the “standby”mode when the switch of ignition in the rear panel is in the “on position”
- MODEPress this button repeatedly to select your desired mode operation between: bluetooth,Fm,USB,SD and online entry
- RECRecording press this key, please insert the media to be stored before recording, microphone to start recording,
- Press to skip back/adelante to following content of music,or station in FM mode
- VOL-VOL+Press repeatedly to lower/raise the volume
- RPT (Repeat)Press to select different mode to play the music repeatedly,’one’to repeat the current track or “all’to repeat all the stored content
- scanIn FM mode,press to start the Auto search and store the available stations
- Numeric keysPress to select the desired music content by its sequence number in which is stored in the USB dispositive or card SD/MMC to be this playing
- EQPress repeatedly to select your desired equalizer mode
- Press to start playing/pausar, In FM mode, press to tune with jumps of 0.1 MHz
- RECPLAYPress this button to play the recorded audio
- MUTEPress to mute aduio output, and press again to resume
QUICK STARTTHREE MODE- LINE/BLUETOOTH/FM
Full charge is recommended for the first use.Open the POWER & LED button on – Adjust the VOLUME button
![]() The system will default to LINE mode – Use USD or SD card then insert – Automatically play the songs in the file – Press the,
The system will default to LINE mode – Use USD or SD card then insert – Automatically play the songs in the file – Press the, ![]() to adjust the next/pause/previous songs
to adjust the next/pause/previous songs![]() Press the Mode button to Bluetooth mode – Search the Bluetooth name “Euterpy” on your phone and connect Click the play button to play the songs
Press the Mode button to Bluetooth mode – Search the Bluetooth name “Euterpy” on your phone and connect Click the play button to play the songs![]() Press the Mode button to FM mode – Press the ,
Press the Mode button to FM mode – Press the , ![]() to adjust the different channel
to adjust the different channel
Family/Party KaraokeACCOMPANY-CANCEL THE VOICE OF THE SONGPower / LED on – Press the mode to Bluetooth mode – Connect the Bluetooth name “Euterpy”– Insert the wired microphone – Install the battery of the wireless microphone to connect – Adjust the volume of the microphone and the effect of the voice![]() You can adjust these buttons according to the type of music to achieve the best effect you want. BASS/TREBLE: Increase/decrease bass or treble ECHO: Increase/decrease the echo of the microphone
You can adjust these buttons according to the type of music to achieve the best effect you want. BASS/TREBLE: Increase/decrease bass or treble ECHO: Increase/decrease the echo of the microphone
Meeting/LectureREC- RECORD THROUGH THE MICROPHONELINE MODE - Insert the storage media PressREC - Start to record through the microphone
Electric guitarCONNECT TO KARAOKELINE MODE - Insert the cord and connect Adjust the volume
TV/DVD/CD CONNECTAUDIO INPUT/OUTPUTLINE MODE - Use cable (not included) to connect to TV/DVD/CD
Charging mode
Insert the charge cord into the AC input / DC 12v power socket – Start to charge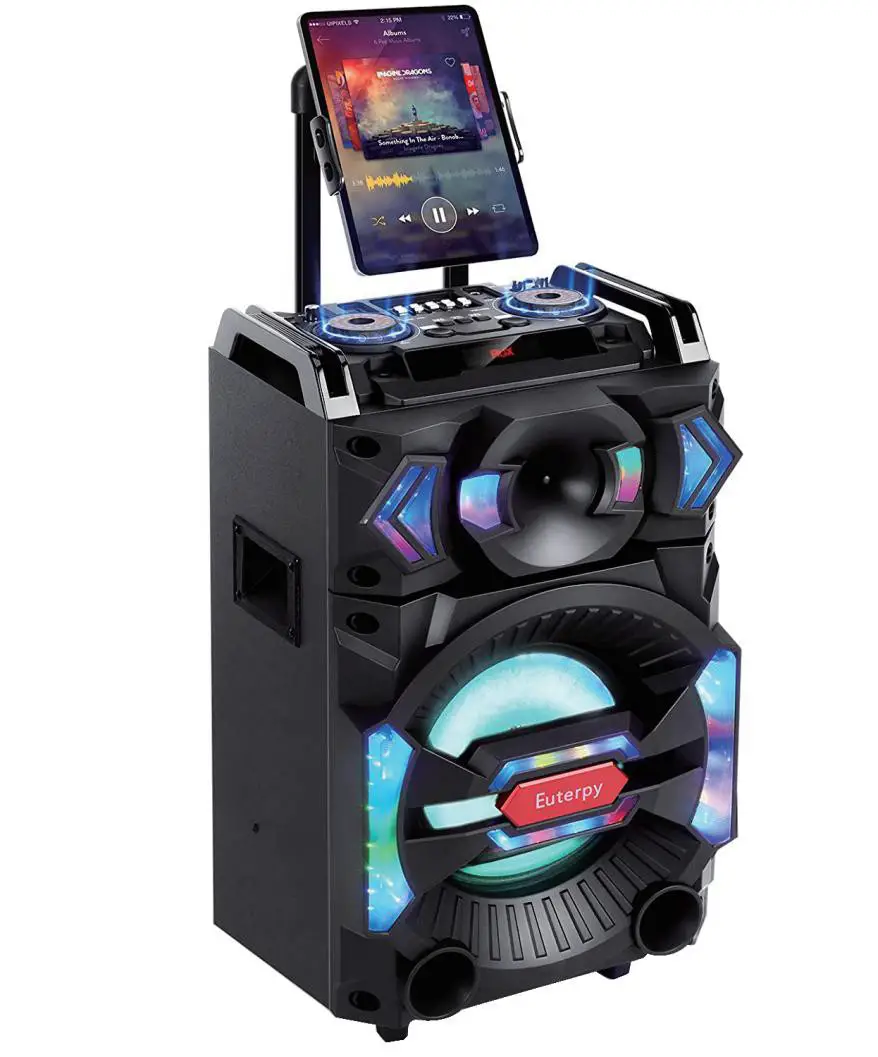
TROUBLESHOOTING
| problem | Cause | Remedy |
| Can not power on | Battery too low or completely discharges | Connecting the charging cable to charge the unit |
| No response when USB/Micro SD is inserted | The Bluetooth still connected/use the usb or sd at the same time | Disconnect the Bluetooth and reinsert the SD or USB (cannot support two modes at the same time) |
| Can not pair Bluetooth device | Bluetooth didn’t turn on | Make sure you turn on the Bluetooth on your device |
| Didn’t pair the right Bluetooth name | Make sure you choose the right Bluetooth name | |
| Your device is too far from the speaker | Keep the distance of your device and speaker within 10M | |
| Accompaniment function does not work | Song format does not match | Try to change another song or other platforms |
| REC function does not work | Did not use microphone | Use microphone to record |
| Connect the SD and USB at the same time | Pls choose one device to insert | |
| The sound is too small | Didn’t adjust the volume button or the volume of your phone is too small | Make sure adjust the volume button and the volume of your phone to maximum |
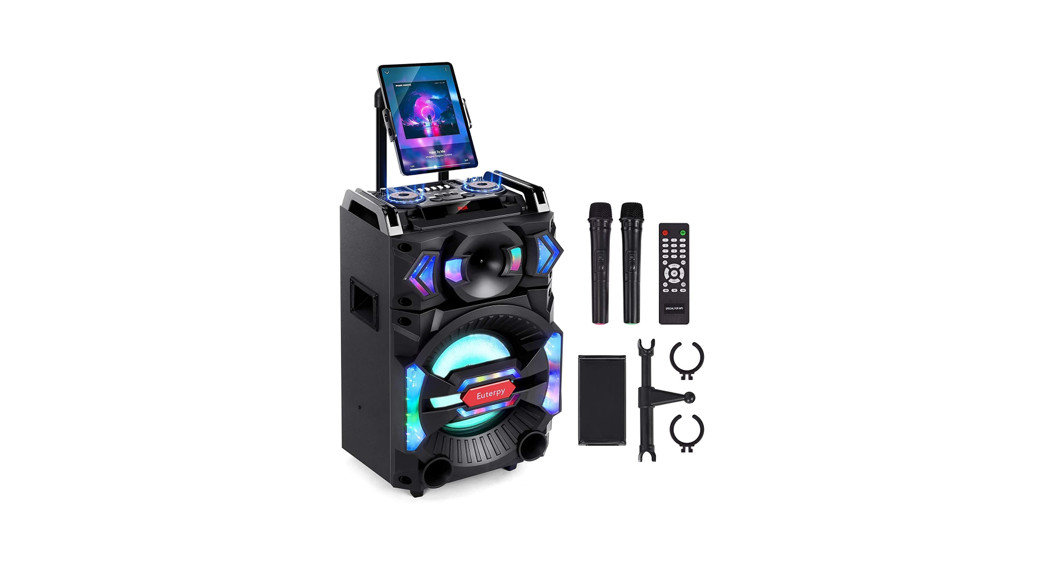
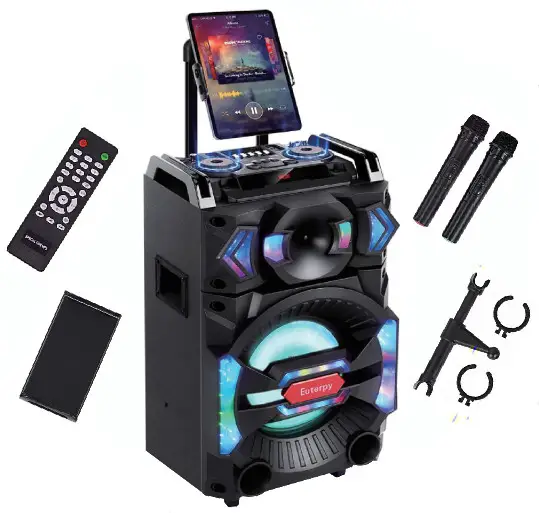
Contents of package
The following materials are included![]() 1 x Karaoke Machine
1 x Karaoke Machine![]() 1 x Remote
1 x Remote![]() 1 x User Manual
1 x User Manual![]() 1 x 12V external power line
1 x 12V external power line![]() 1 x AC charging line Free Gifts in Package:
1 x AC charging line Free Gifts in Package:![]() 2 x Wireless microphone (with holder)
2 x Wireless microphone (with holder)![]() 1 x iPad/tablet stand
1 x iPad/tablet stand
Bluetooth Connect Steps
- Turn on the power of the Karaoke speaker and the Bluetooth setting of your Phone.
- Press the “Mode” button to the “Bluetooth Connection” Mode.
- Choose the Bluetooth which named “Euterpy” on your phone to connect.
- Connect Successfully.
 report this ad
NOTE
- After the first connect successfully, two devices will be matched connected automatically when the Karaoke speaker Bluetooth function is turned on.
- If the speaker cannot play sounds after connecting with the phone successfully. First, please check the volume of the machine or the volume on the source is it off. Second,please restart the phone and the speaker.
- The SD card and the USB device only can be inserted in accordance with the card slot, do not force, or it could be damaged.
- The speaker only supports to play with files which are AT/FAT 32, insert the SD card max is 32GB.
- If the music formats cannot be changed to a compatible format, would not able to play via the speaker. The default is MP3 format.
- Turn off the speaker before removing the SD card, or it could be damaged.
- The USB working mode will not be available if you don’t have inserted an SD or USB to the Speaker. The USB mode only supports one device at a time. If you want to work with a USB, please remove the SD card first.
- Suggest charger the speaker once every 3 months if you don’t use the Speaker for a long time, to avoid the internal rechargeable battery failure.
[xyz-ips snippet=”download-snippet”]