All enclosed information is current as of the date of production. Please consult www.eva-last.com for further assistance or for continually updated information before installing any Eva-Last® product.
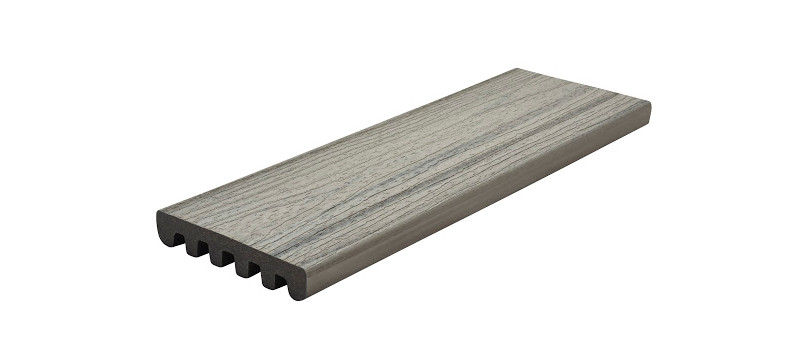
The all-new I-Series™ board
Thank you for choosing Eva-Last® I-Series™ decking. These guidelines are designed to assist you with I-Series™ installation and advise you on the unique installation requirements for this board.
Please note the limitations of this guide: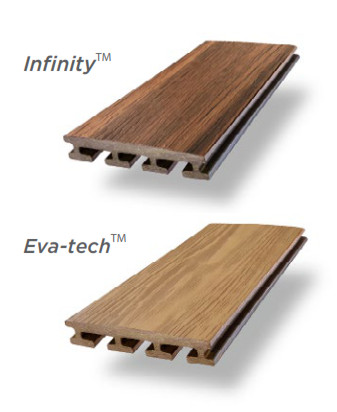
• This guide is intended only for Eva-Last® I-Series™ single-level square decks.• The person using these guidelines should already have a basic understanding of deck-building practices.• Decks must be built in accordance with all relevant bylaws and building codes.
For the full installation guide, or for installation queries, please visit www.eva-last.com before beginning installation.The I-Series™ board offers installation, durability, cost, and low-maintenance advantages over many other decking products. However, the specialized shape of the profiles requires certain installation considerations. Please read this guide in its entirety before beginning installation.
Benefits of I-Series™
 |
Quicker installationThe I-Series™ board has one of the greatest joist span capacities in the composite industry, and a lighter weight. This translates into a simpler substructure that is quicker to construct, and decking boards which are easier to carry and position than many other composite or timber decking options. |
 |
Less substructure materialThe impressive joist span and light weight of the I-Series™ board saves you time and money when it comes to installation. A greater joist span means I-Series™ boards require less substructure material than many other decking options. |
 |
Fewer fixings and fastenersOnce again, the industry-leading joist span of the I-Series™ boards saves you money, this time by requiring fewer fixings and other fasteners. I-Series™ boards are designed with side grooves to allow the use of HULK hidden fastener clips, which create a screw-free finish.Top fixing screws are recommended for perimeter boards and fascia boards where necessary. |
 |
Reduced transportation costsThe I-Series™ board is a lighter weight decking profile than many other composite or timber options on the market. This helps reduce the cost and environmental burden of transportation. Furthermore, by reducing the amount of substructure required for installation, choosing I-Series™ boards lessens the total amount of material requiring any transportation at all. |
 |
Does not trap moistureThe unique arched design of I-Series™ releases any water or moisture which comes into contact with the board, unlike hollow composite boards or traditional timber. This shape also gives the board excellent ventilation to further offset any moisture-related issues. |
 |
A cleaner ripI-Series™ boards are engineered to bow and warp less than traditional timber profiles, particularly when ripped – or cut lengthwise. This is especially helpful for most installations which require partial boards to fit the exact installation size and specifications. |
Installation points
I-Series™ profiles are designed to make installation efficient and straightforward. Please adhere to all guidelines to ensure the long-lasting integrity of your deck. Top fixing may be used in conjunction with the HULK fasteners™ hidden clip system (S9 & S6 clips).
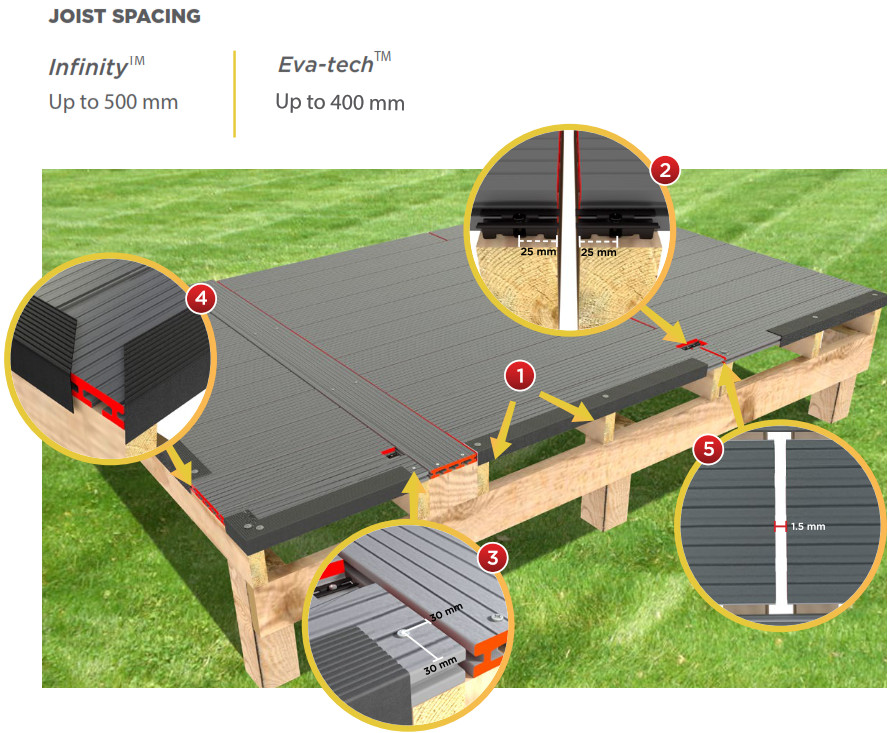
- Joist Spacing for I-Series™ Infinity profiles can be up to 500 mm (400 mm for Eva-tech™ profile) in most residential applications. Exceeding this length can jeopardise the performance of your deck.
- Double joists should be used at all butt joins. Ensure that hidden fasteners are installed within 25 mm of the end of the I-Series™ decking board.
- Breaker-boards running perpendicular to other decking planks should be used at butt joins to assist with controlling the expansion and contraction of I-Series™ decking. Top-fixed boards should be fastened at exactly 30 mm from any edge of the board.
- Cover angles create a clean finish for your deck and provide safety from sharp edges. These should be firmly secured onto your I-Series™ decking. Fix, or screw, them every 300 mm. Ensure these screws are 30 mm from the outer edge of the I-Series™ decking board to which the cover angle is attached.Expansion gaps are needed at both ends of each board to allow for the material to naturally expand and contract without any issue. Composite decking will thermally expand and contract at a rate of 1 mm per linear metre of decking material under normal circumstances. The size of the expansion gap will depend on:• The linear thermal expansion coefficient of the decking material.• The length of the board.• The expected temperature range of the site.• The ambient temperature at the time of installation.
Typical expansion (or contraction) per meter of board per degree of temperature change is: For Infinity™ products, equal to 0.040 m-1°C-1, For Eva-tech™ products, equal to 0.045 m-1°C-1.’ Please contact an I-Series™ decking representative ahead of installation for specific expansion gap queries.
Accounting for expansion and contraction during installationOne must consider the ambient temperature of the site at the time of installation. The homogeneous movement of the composite is easily accounted for during installation. The anticipated change in length can be accommodated for using expansion gaps at either end, or at both ends depending on the intended design, by employing the intelligent HULK fasteners™ system.
Site temperatures exampleIn cooler climates, some composite boards expand at approximately 0.75 mm/m of a composite deck board. When leaving an expansion gap for each board, compare the current installation temperature (ambient) to what is common maximum or minimum temperature for that site. If you are installing in the early morning in the middle of winter, it will be closest to the minimum temperature and the board will be closer to its ‘shortest’ length. As the temperature rises the board will expand. When it gets to the peak temperature in the middle of summer the board will be at its ‘longest’ length.
AcclimatisationInstallation can take place over a few days, resulting in varying installation temperatures. Depending on the project site, the boards may experience differing heating and cooling rates. Therefore, the boards may expand and contract at varying rates. Allow boards to acclimatise onsite for 24 hours before beginning installation. Once the installation is complete, wait to cut the ends of the installed boards to the desired length in order to allow the boards to fully acclimatise to the site.
Summarised expansion and contraction points– For best practice, allow boards to acclimatise on site for at least 24 hours before beginning installation.– Try to avoid installing boards at temperature extremes, like the hottest or coldest time of day.– If you must install boards at peak temperatures, allow for smaller installation gaps as boards will shrink when temperature drops.– If you must install boards at coolest temperature, allow for larger installation gaps as boards will expand when temperature increases.
Fastening points
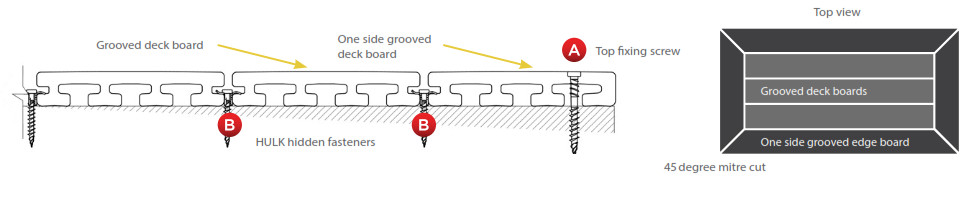
A Top-fixing screws should be located at exactly 30 mm from any edge of the I-Series™ decking. This ensures the screws conveniently line up with a cavity of the I-Series™ profile, and are an adequate distance away from the end of the board so as to prevent cracking.
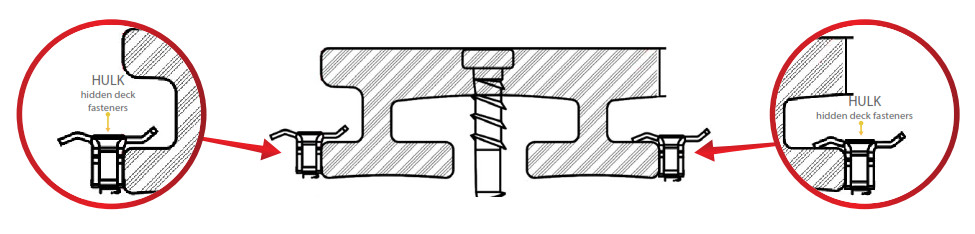
B HULK hidden fasteners Infinity™ uses S9 clip | Eva-tech™ uses S6 clip
C Use HULK S9 and S6 hidden decking fasteners to create sufficient expansion gaps of approximately 5 to 6 mm. These screws are specifically designed towork with the expansion and contraction of I-Series™ decking. Be sure to use the correct hidden clip as Infinity™ (S9) and Eva-tech™ (S6) I-Series™ havedifferent clip groove heights.
Fastening points using a single groove edge board

A The I-Series™ edge profile can be used to frame your deck. It is only grooved on one side and eliminates the need for cover angles. This perimeter board should be top-fixed using colour matching HULK composite deck screws. The screws should be located 30 mm away from any edge of the I-Series™ profile. This ensures the screws conveniently line up with a cavity of the I-Series™ profile, and are an adequate distance away from the end of the board so as to prevent cracking.
B HULK hidden fasteners Infinity™ uses S9 clip | Eva-tech™ uses S6 clip
Use HULK S9 and S6 hidden fasteners between decking profiles. This creates sufficient expansion gaps of approximately 5 to 6 mm. These clips arespecifically designed to work with the expansion and contraction of I-Series™ decking.
Note: Do not overdrive the screw.
Be careful not to overdrive the screw into the decking surface.I-Series™ decking is not solid and has cavities that can be compromised if your drill torque setting is too high. Always try to achieve a flat and neat surface finish.
Board ripping guidelines
Ideally your deck installation area will perfectly accommodate full sized I-Series™ boards and their expansion gaps. However, oftentimes it is necessary to rip, or cut lengthwise, the last deck board to fit the size of the installation area. If this is the case, avoid cutting any I-Series™ board too thin, or to less than half of its original width. It is better to rip both the first and last I-Series™ boards to fit your installation space than to rip either board too thin. Plan ahead for this.
If it is absolutely necessary to rip an I-Series™ board to less than half of its original width, the integrity of the material may be compromised. At minimum, the board must be wide enough to allow for top-fixing 30 mm from each edge. Please note that the board must be fixed on both sides using HULK (S9 or S6) clips to ensure an adequately stable fixing to the substructure; a single, longitudinal line of fasteners is susceptible to pivoting and may become a hazard.
Ripping guides:I-Series™ boards can be ripped. However, these rips or lengthwise cuts should avoid the web or “feet” of the board. The diagram below illustrates various ways a board can be ripped and securely fastened so as to preserve the integrity of your deck.
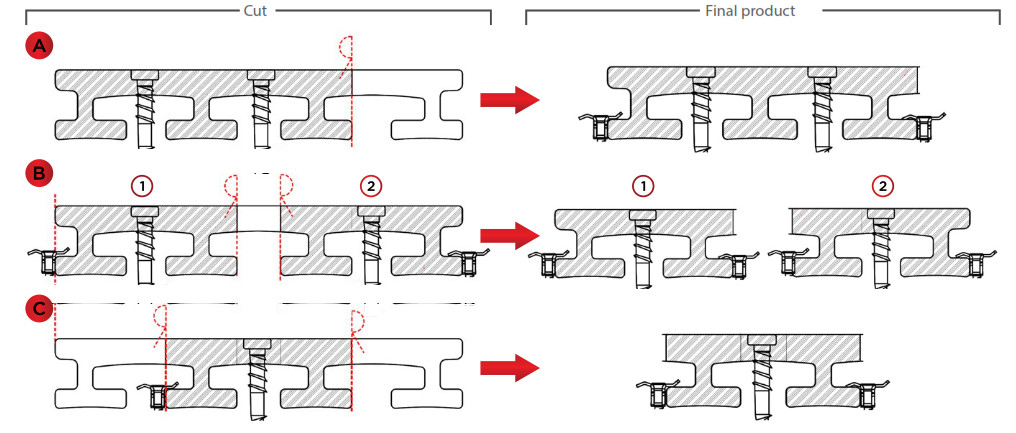
Wherever possible, if an I-Series™ board has been ripped, face the ripped edge inwards towards the other decking boards and allow the non-ripped edge to act as the end of the deck.
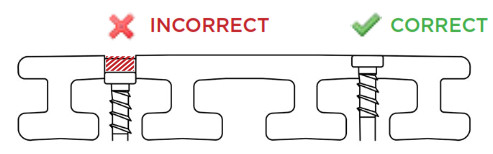
*Never fasten through the web or “feet” of the I-Series™ profile in order to avoid cracking the I-Series™ board.

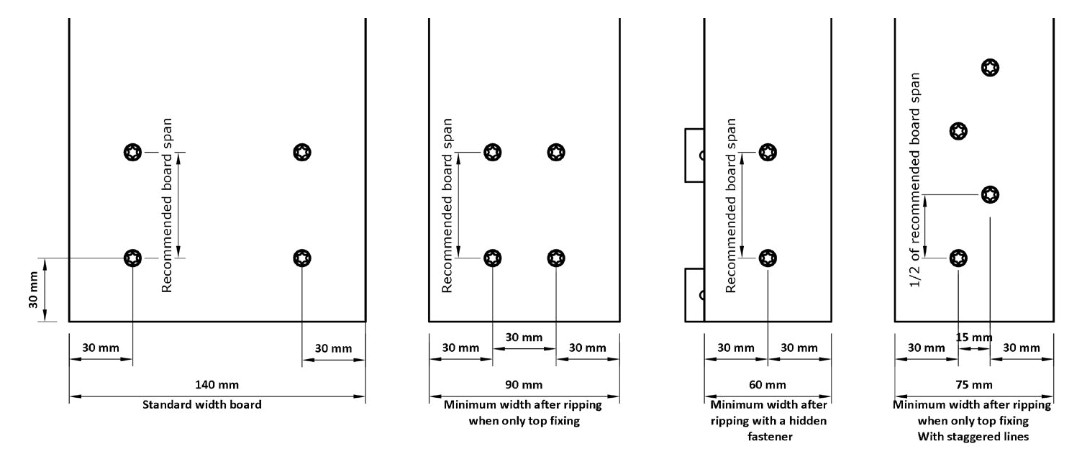
Top fixing guidelines for ripped boards
I-Series™ boards can be fastened using top fixing in certain circumstances, particularly if the board has been ripped. However, all boards require fixing on both sides, rather than a single row of screws, and all top fixing screws should be positioned 30 mm from the edge of the board. HULK fasteners™ are best suited for securing I-Series™ boards wherever possible to accommodate the natural expansion and contraction of the decking material.
Alternating zig-zag top fixing
In certain situations, using zig-zag top fixing may allow you to rip an I-Series™ board to a thinner width than possible when using traditional straight-line top fixing. By using zig-zag top fixing, an I-Series™ board can be ripped to a width of 60 mm, but only if absolutely necessary, and if adequate assessment of the over-all stability of the deck is first conducted. In this case, substructure modifications may need to be made to accommodate the thin board.
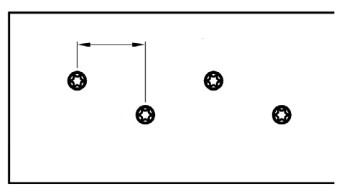
Alternating zig-zag top-flixing
The diagram below illustrates various top fixing methods for I-Series™ boards which have been ripped to different widths.
Thank you, again, for choosing I-Series™ decking. Please contact an I-Series™ professional at www.eva-last.com with any questions you have before beginning your installation.
Email: [email protected]www.eva-last.co.uk
References
[xyz-ips snippet=”download-snippet”]