EVA LOGIK Z-Wave Smart Plug Instruction Manual
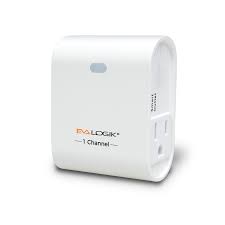
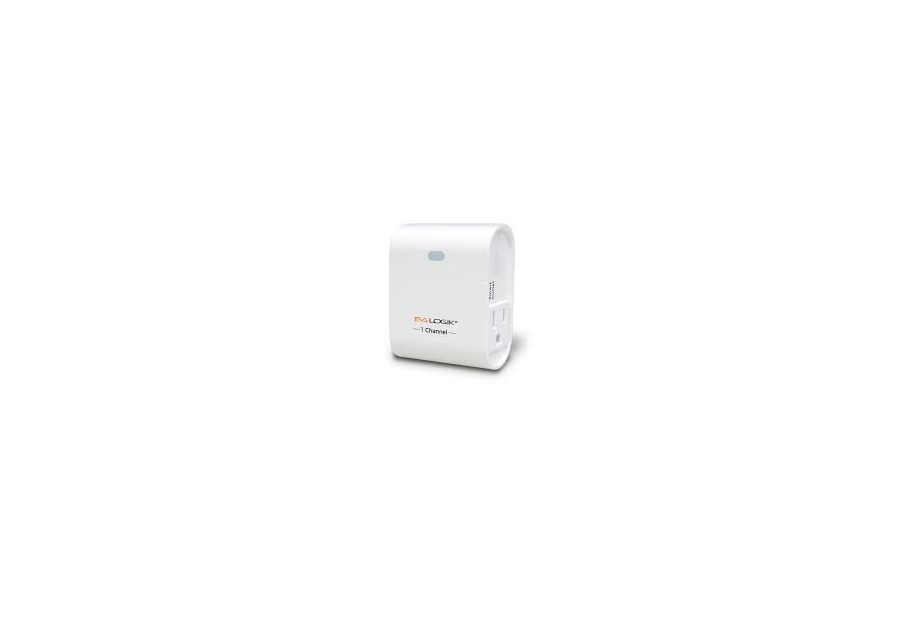
Product Overview
Specifications:
Power: 120VAC, 60HzLoading: 500WFrequency: 908.42MHzFCC ID: OXGZW36IC: 10460A-ZW36
INTRODUCTIONThe EVA LOGIK ZW39 is a Z-Wave enabled 500W receptacle designed for most residential lighting and applications. It’s compatible with LED,halogen, incandescent.The ZW39 fully works with the Fibaro, Smart things, Wink hub as well as all other certified Z-Wave controllers.
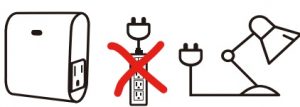
Plug the light you want to control into the Z-Wave Smart plug controlled outlet .NOTE: Plug directly into outlet, do not use with extension cords.
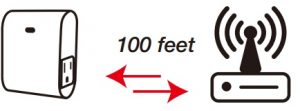
Note:Your device may need to be within 100 feet of the controller to be included. If so, include the device to the network within 10 feet of the controller and relocate it to the desired position in your home. Be sure to refresh the network if the device is included in this manner.
Min / Max brightness level setting
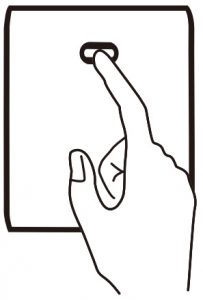
- Press the button 5 times quickly, the blue indicator flashes slowly. At the same time, the lamp will adjust to the min brightness automatically.
- Hold the button to adjust the brightness of the bulb, select the appropriate brightness level to set the min brightness.
- Quickly press the button 5 times to confirm (the min brightness is set completed). Then the device will move to Max Brightness setting automatically.
- Hold the button to adjust the brightness of the bulb, select the appropriate brightness level to set the max brightness.
- Press the button 5 times to confirm.
- After confirmation, the bulb will bright up from the min brightness to the max brightness, then dim from the max brightness to the min brightness to calibrate the device automatically. The blue indicator stops flashing.
- Min / Max brightness level settings are completed.
Note: If you do not confirm at Step 3/Step 5, the setting mode will be exited after 10s, and the adjusted brightness value will not be saved.
Adding Device To Z-Wave Network
- Follow the instructions for your Z-Wave certified controller to add a device to the Z-Wave network.
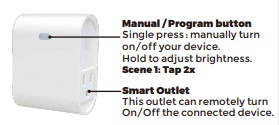
- Once the controller is ready to add your device,press the manual/ program button(A) on the smart dimmer 3 times quickly. The white LED will blink quickly. Auto-add mode: LED will blink within 30 seconds after first plugged in.
Now, you have complete control to turn your fixture ON/OFF or set dim levels according to groups, scenes, schedules and interactive automation programmed by your controller. If your Z-Wave certified controller features remote access, you can control your fixture from your mobile devices.
Again:If you have issues with pairing/including, please move the device as close as possible to the huband try again–you can move to your final location when completed.Note:If the manual button(A)doesn’t light up after pressed 3 times, please reset the device: click the button 2 times quickly then hold for at least 10 seconds. This operation could be done when manual control is functional–single press can turn on/off the lamp.
To Remove The Device
- Follow the instructions for your Z-Wave certified controller to remove a device from the Z-Wave network.
- Once the controller is ready to remove your device, press the manual/program button(A) on the smart dimmer 3 times quickly.
To Return The Device To Factory Defaults:
(LED flashes 2 times when the configuration parameter changed.) Support 2 groups, each group max support 2 devices Group 1 lifeline Group 2 send basic set
Parameter Settings
LED indicator:
This parameter can access you to choose the led indicator to be on when the switch(light) is on/off, or LED indicator remains on/off all times. Operation: quickly press 6 times to change this parameter . (LED flashes 2 times when the configuration parameter changed.) — Parameter=1, Size=1, Default =0 Value=0 Load Off, Indicator LED On Value=1 Load On, Indicator LED Off Value=2 Always Off Value=3 Always On
Auto Turn-OFF TimerThis parameter can access you to set a timer to make the switch turn off automatically after the switch turned on.Thenumberentered as value corresponds to number of minutes. Operation: Set up on the hub. (LED flashes 2 times when the configuration parameter changed.) — Parameter =2, Size=4, Values: 0 – 65535 (Min); Defualt V=0 Turn off outlet
Auto Turn-ON Timer:This parameter can access you to set a timer to make the switch turn on automatically after the switch turned off.The number entered as value corresponds to number of minutes. Operation: Set up on the hub. (LED flashes 2 times when the configuration parameter changed.) Parameter =4, Size=4, Values: 0 – 65535 (Min); Defualt V=0 Turn on outlet
Restores state after power failure:This parameter can access you to set the switch to be on/off after power failure. Operation: quickly press 10 times to change this parameter . (LED flashes 2 times when the configuration parameter changed.) — Parameter=6, Size=1, Value=0 Output off Value= 1 Output on Value= 2 Restores state after power failure
Dimming speed:This parameter can access you to set the time from maximum brightness to minimum brightness or minimum brightness to maximum brightness (Only when turn ON/OFF the light ) Operation: Set up on the hub. (LED flashes 2 times when the configuration parameter changed.) — Parameter=7, S=1, V=XX(0x01—0x63) Defualt V=1
Multilevel minimum value can be set (ALL):This parameter can access you to set Quick press the switch button 5 times Min / Max brightness level setting. Operation: quickly press 5x to change this parameter . (LED flashes 2 times when the configuration parameter changed.) — Parameter=8, Size=1, Value=0 Disable Value=1 Value=99 Default = 10
Multilevel maximum value can be set (ALL): This parameter can access you to set Quick press the switch button 5 times Min / Max brightness level setting. Operation: quickly press 5x to change this parameter . (LED flashes 2 times when the configuration parameter changed.) — Parameter=9, Size=1, Value=0 Disable Value=1 . Value=99 Default = 99
On or off dimmer speed control by parameter 7: This parameter can access you to set the dimmer speed iscontrolled by parameter 7 or turn on/off instantly without any dim. (Only when turn ON/OFF the light) Operation: Set up on the hub. (LED flashes 2 times when the configuration parameter changed.)— Parameter=10, Size=1, Value=0 Control by parameter 7Value=1 On/off instantlyDefault = 0
Dimmer speedThis parameter can access you to set the time from maximum brightness to minimum brightness or minimum brightness to maximum brightness. (Only when hold to change the brightness or control from HUB). Operation: Set up on the hub. (LED flashes 2 times when the configuration parameter changed.) — Parameter=11, Size=1, Value=1 from 0x63 to 0x00 or from 0x00 to 0x63 need 1s Value=2 from 0x63 to 0x00 or from 0x00 to 0x63 need 2s .Value=10 from 0x63 to 0x00 or from 0x00 to 0x63 need 99s Default = 4
Scene function— scene 1: Tap 2x
COMMANDCLASGENERIC DEVICE CLASS:11 – GENERIC_TYPE_SWITCH_MULTILEVEL SPECIFIC DEVICE CLASS: 01 – SPECIFIC_TYPE_POWER_SWITCH_MULTILEVEL
COMMANDCLASS:5E – COMMAND_CLASS_ZWAVEPLUS_INFO26 – COMMAND_CLASS_SWITCH_MULTILEVEL27 – COMMAND_CLASS_SWITCH_ALL70 – COMMAND_CLASS_CONFIGURATION85 – COMMAND_CLASS_ASSOCIATION8E – COMMAND_CLASS_MULTI_CHANNEL_ASSOCIATION59 – COMMAND_CLASS_ASSOCIATION_GRP_INFO55 – COMMAND_CLASS_TRANSPORT_SERVICE86 – COMMAND_CLASS_VERSION72 – COMMAND_CLASS_MANUFACTURER_SPECIFIC5A – COMMAND_CLASS_DEVICE_RESET_LOCALLY73 – COMMAND_CLASS_POWERLEVEL9F – COMMAND_CLASS_SECURITY_26C – COMMAND_CLASS_SUPERVISION7A – COMMAND_CLASS_FIRMWARE_UPDATE_MD
FCC / ICThis device complies with part 15 of the FCC and Industry Canada license-exempt RSS standard(s). Operation is subjected to thefollowing two conditions: (1) this device may not cause harmful interference, and (2) this device must accept any interference received, including interference that may cause undesired operation.
FCC NOTE: The manufacturer is not responsible for any radio or TVinterference caused by unauthorized modifications to this equipment. Such modifications could void the user’s authority to operate the equipment— Reorient or relocate the receiving antenna.— Increase the separation between the equipment and receiver.— Connect the equipment into an outlet on a circuit different from that to which the receiver is connected.— Consult the dealer or an experienced radio/TV technician for help
NOTEThis equipment has been tested and found to comply with the limits for a Class B digital device, pursuant to Part 15 of the FCC Rules. These limits are designed to provide reasonable protection against harmful interference in a residential installation. This equipment generates, uses and can radiate radio frequency energy and, if not installed and used in accordance with the instructions may cause harmful interference to radio communications. However, there is noguarantee that interference will not occur in a particular installation. If this equipment does cause harmful interference to radio or televisionreception, which can be determined by turning the equipment off and on, the user is encouraged to try to correct the interference by one ormore of the following measures:
Important noteTo comply with the FCC RF exposure compliance requirements, no change to the antenna or the device is permitted.Any change to the antenna or the device could result in the device exceeding the RF exposure requirements and void user’s authority to operate the device.
CAUTION – PLEASE READ!This device (ZW39) is intended for installation in accordance with the National Electric Code and local regulations in the United States, or the Canadian Electrical Code and local regulations in Canada. If you are unsure or uncomfortable about performingthis installation consult a qualified electrician.
WARNING – SHOCK HAZARD
TURN OFF THE POWER to the circuit for the switch and lighting fixture at the service panel (circuit breaker) prior to installation. ALL WIRING CONNECTIONS MUST BE MADE WITH THE POWER OFF to avoid personal injury and/or damage to the switch.
OTHER WARNINGSRisk of Fire Risk of Electrical Shock Risk of Burns
MEDICAL EQUIPMENTPlease DO NOT use this switch to control Medical or Life Support equipment. Z-Wave devices should never be used to control theOn/Off status of Medical and/or Life Support equipment.
CONTROLLING APPLIANCESPlease exercise EXTREME CAUTION when using Z-Wave devices to control appliances. Reason being is because the appliance youwant to control may be in a separate room and if unintentional behavior occurs (such as adevice turning on or off – either intentionally via schedules, or unintentionally via network error) this event may lead to a hazardous condition. For these reasons, please note the following suggestions:
- Do not include Z-Wave devices in Groups or Scenes if they control appliances.
- Do not use Z-Wave devices to control electric heaters or any other appliances which may present a hazardous condition dueto unattended, unintentional, or automatic power control
References
[xyz-ips snippet=”download-snippet”]