EVERKITCHUSER’S MANUALRange Hoods EVK1901
1. SAFETY INSTRUCTIONS
This manual explains the proper installation and use of your cooker hood, please read it carefully before using even if you are familiar with the product. The manual should be kept in a safe place for future reference.
Never to do:● Do not try to use the cooker hood without the grease filters or if the filters are excessively greasy!●Do not install above a cooker with a high level grill.● Do not leave frying pans unattended during use because overheated fats or oils might catch fire.●Never leave naked flames under the cooker hood. ●If the cooker hood is damaged, do not attempt to use.●Do not flambe under the cooker hood.●CAUTION: Accessible parts may become hot when used with cooking appliances.●The minimum distance between the supporting surface for the cooking vessels on the hob and the lowest part of the cooker hood. (When the cooker hood is located above a gas appliance, this distance shall be at least 65 cm) Always to do:
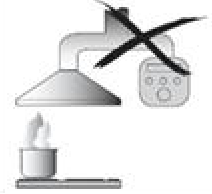 ● Important! Always switch off the electricity supply at the mains during installation and maintenance such as light bulb replacement.● The cooker hood must be installed in accordance with the installation instructions and all measurements followed.● All installation work must be carried out by a competent person or qualified electrician.●Please dispose of the packing material carefully. Children are vulnerable to it.● Pay attention to the sharp edges inside the cooker hood especially during installation and cleaning.● Make sure the ducting has no bends sharper than 90 degrees as this will reduce the efficiency of the cooker hood.● Warning: Failure to install the screws or fixing device in accordance with these instructions may result in electrical hazards.● Warning: Before obtaining access to terminals, all supply circuits must be disconnected. for exhausting fumes from appliances burning gas or other fuels.●The air must not be discharged into a flue that is used
2. Installation Instruction

2.1 Mounting Ways
2.1.1 Wall-mounted
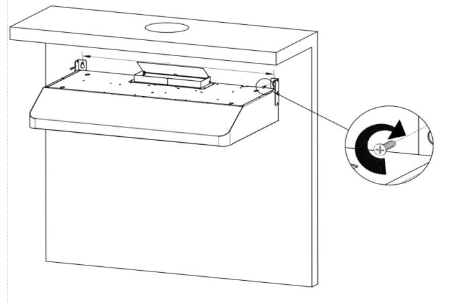
1. Step 1. Fix the two pieces of hangings by using the screws where are already screwed on the two sides of the range hood.2. Step 2. Drill 2 holes on the wall, use two iron expansions to fix the range hood onto the wall.

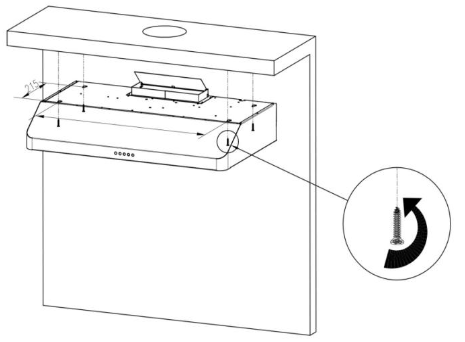
Step 3.Use screws and plastic expansion to strengthen the stability of the range hood.
2.1.2 under cabinet
Step 1.Drill 4 holes on the bottom of the cabinetStep 2. Use four iron expansions to fix the range hood under the cabinet.
2.2 Venting
2.2.1 Rear ventingStep 1. Remove the covering plate at the rear side of the range hood to leave a hole for venting. Step 2. Use screws
![]() to install the rear square air outlet onto the rear venting hole
to install the rear square air outlet onto the rear venting hole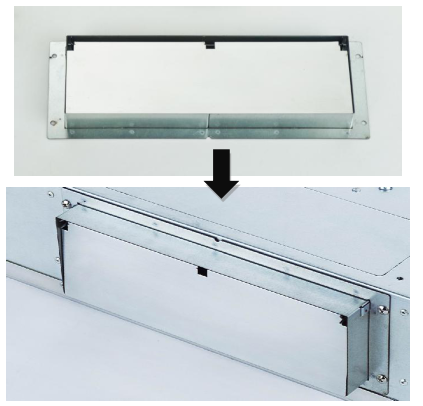 2.2.2 Top venting
Step 1. Remove the covering plate at the top of the range hood to leave a hole for venting.
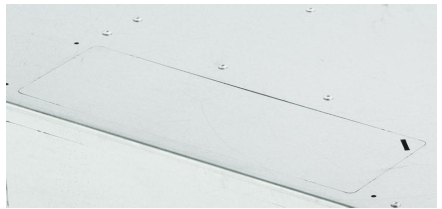
Step 2. According to your kitchen venting way, choose either square or round air outlet, which are both available, to install on the top the range hood, and screw![]() to fix it.
to fix it.

2.3 Installation guidance
Notice: this installation guide is for reference only, please consult licensed electrician for professional installation instruction before proceeding.1) Before installation, please locate the electricity circuit box. Turn the power OFF by flipping the individual circuits to the off position or unscrewing the fuses and finally flip the main breaker to the off position.2) Before installation, please remove the two half-circle or one whole circle windshield(s), which are located on the top of range hood, if there is any pre-installed. This will make sure better performance of range hoodex auction in the future.3) Compare the size of your current exhaustion pipe (diameter) with the size of exhaustion hole on top of the range hood. If they are the same size, please proceed to step 4. If they are not the same size, for example, your at-home exhaustion pipe diameter is 5 inches, and your range hood exhaustion diameter is 6 inches, you need to obtain a 6 inch to 5-inch reducer from hardware store to connect these two together.4) For under cabinet installation, measure the position of your existing under cabinet hole and compare it with your range hood exhaustion hole. If they do not match, you need to alter yours under cabinet exhaustion hole position to match your range hood exhaustion hole position.5) Mark the position of the screw holes on top of range hood, which need to be drilled or screwed on in order to mount the range hood.6) Remove grease filter panels from the bottom of the range hood.7) Position the range hood against to cooking stove wall. WARNING: when lifting, hanging or positioning the range hood, please DO NOT TOUCH the fan wind wheels or motors with your hands or tools. More importantly, please DO NOT squeeze, bump or grab the fan wind wheels. This may cause the fan wind wheels become unbalanced, resulting abnormal noise or malfunction when turning on range hood.8) For best results, the mounting height, distance from bottom of range hood to top surface of range/stove should be 65cm to 75cm (25 inch to 30 inch).

9) Connect wires of the range hood with your at-home electric wires. Or connect the range hood plug into the range hood outlet at home.10) For wall mounted installation: according to marks, drill two holes appropriate for heavy-duty wall anchors and screws (not included). Mount the range hood onto the wall with the two screws and anchors, and tighten. For under cabinet installation, drill 4 holes on the bottom of cabinet with four iron expansion fixed on the cabinet board, OR use heavy duty screws to mount range hood onto the cabinet board.11) IMPORTANT: Range hood mounting must be fully leveled. If the cabinet itself is not leveled, you need to adjust it to a perfect level point before hanging the range hood. If cabinet cannot be leveled further, please fine-tune the level of range hood by adjusting the screws up or down. If range hood is unevenly installed or leveled, it may cause abnormal noise and damage to the machine.12) Use heavy-duty tape (Metal tape that can endure heat and grease is recommended) to seal your at-home exhaustion pipe with an exhaustion hole of range hood. Make sure no air leaks through the gaps of tape.13) For wall mounted installation only: Affix the decorative cover with two M4 tapping screws on the hood body.
3. Technical Parameters
|
ITEM |
Unit |
Parameter |
| Rated Voltage | V | 110 |
| Rated frequency | Hz | 60 |
| Lamp power | W | ≤2X1.5 |
| Air volume | CFM | 400 |
| Air pressure | Pa | >160 |
| Noise level | dB(A) | <68 |
| Air output diameter | MM | 150 |
4. Switch Operation

①:Turn off②:Low speed setting③:Medium speed setting④:High speed setting⑤:Turn on/off the lamp
5.Maintenance
- For your safety, please make sure to pull out range hood electric plug and shut off power before maintenance.
- Clean the inside and outside of the range hood with warm water containing neutral detergent, and dry the surface with a piece of dry cloth. To avoid potential damages to the surface, DO NOT scrub the surface with rough materials, such as cleansing balls. Gloves are recommended to use when cleaning inside of range hood, to avoid possible injury to your hands. Depending on the usage of range hood, cleaning can be conducted every three months or longer.
- IMPORTANT: DO NOT use your hands to tools to touch the wind wheel when cleaning inside of range hood. This will prevent deformation or malfunction of the wind wheel.
- When cleaning the grease filter panel, first press the spring on the edge of the filter to dismantle the filter OR grab the handle of the filter, and lift it off the range hood. You can either wash these filters in the dishwasher or wash them by hand. When washing filters by hand, use either commercial grade detergent with a soft brush or apply baking soda on the surface of the filter and pour white vinegar to gently brush grease off. And then clean the filters thoroughly with clean warm water. Please make sure the filters are fully dried before installing them back on. Depending on the usage of the range hood, cleaning can be conducted every month or longer.
- NOTE: DO NOT clean grease filters with combustible detergents such as banana oil and gasoline.
6.Caution
- DO NOT attempt to install this range hood by yourself without appropriate electrical and technical background.
- The minimum distance between the surface of GAS stove/range and the lowest part of the range hood should be at least 27.6 inch (70cm). If installation instructions of the gas stove specify a greater distance, please take that distance into account.
- There should be adequate ventilation in the room where the range hood is used if gas or other fuels are burning.
- The venting air from this range hood must not be discharged into a flue that is used for exhausting fumes from appliances burning gas and other fuels.
- Regulations concerning the discharge of air have to be fulfilled.
- DO NOT flame under the range hood.
- This range hood is not intended for use by young children and infirm persons unless they have been supervised by a responsible person to ensure that they can use the machine safely.
- When conducting maintenance of this range hood and/or changing the hood light bulb, please make sure that all power switches are in the off position.
- To avoid leaking of electricity, make sure detergent DO NOT flow into the electric box and switches when cleaning inside of the range hood.
- There is a fire risk if cleaning is not carried out according to the instructions.
Troubleshooting
| Fault | Possible Cause |
Solution |
| Light on, but motor does not work | Fan switch turned off | Select a fan switch position. |
| Fan switch failed | Contact service center. | |
| Motor failed | Contact service center. | |
| Light does not work, motor does not work | House fuses blown | Reset/Replace fuses. |
| Mains power cable is loose or disconnected | Refit mains power cable to power outlet. Switch power outlet on. | |
| Lights not working | Broken or faulty bulbs | Replace bulbs as per this instruction. |
| Insufficient suction | The distance between the cooker hood and the gas top is too far | Refit the cooker hood to the correct distance. |
| The Cooker hood Inclines | The fixing screw is not tight enough | Tighten the hanging screw and make it horizontal. |
[xyz-ips snippet=”download-snippet”]