
EVIDA Digital Voice Recorder

EVIDA Digital Voice Recorder
Thank you for choosing EVIDA voice recorder. If you have any question, please be free to contact us. Happy recording!
Packing
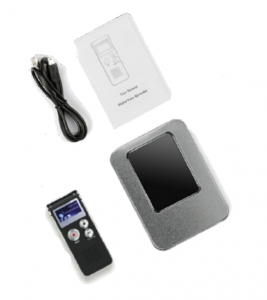
Package include 1x digital voice recorder, 1x instruction, 1x charging cable, a EVIDA card and 18-month after-sales service were pledged.Please be confirm when you open package.
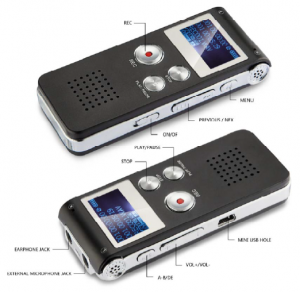
2. Product Appearance
3. Charging for your recorder
Connect it to your computer with USB cable, it will charge. Charge time between 3 to 4 hours, turn on voice recorder before charging.You could also connect to your cell phone adaptor for charging.
4. On/Off/Standby
On/off slide switch is located on the right side of the voice recorder. Slide the switch turn on or turn off the voice recorder.The voice recorder includes a standby mode. To enter or exit standby, hold the “PLAY” button for 2 seconds.
5. Record option
5.1 How to RECORD and SAVE.Keep your recorder on, press “REC” to record, press “stop” to save the recording.
5.2 How to PAUSE and RESUME your recording.During recording, press PLAY/PAUSE, pause the recording. If you want resume it, just press PLAY/PAUSE again, it resume the recording
5.3 How to playback recordings.
- If you want to listen immediately after recording, you can only press “PLAY”.
- You can also find your all recording files in the “Record Mode”. Keep your recorder on, press “M” to enter “Record Mode”, and then you can see all recording files.
Press the “PREVIOUS/NEX” button in the right side to select files you want to play. Then press “PLAY/PAUSE”, start to playback your recordings.Note:1.Pressing the REC button during any status or modes (beside while playing a file) will enter record mode.2.While recording, the LED will long on red. The LED will flash when the recording is paused.
6. How to Upload MP3 Music files
While on, connect the Voice recorder to a computer’s USB socket using the provided USB cable. The voice recorder will confirm connection when the following imageappears on the LCD:
The voice recorder will come up as a Removable Disk or a Mass Storage Device on My Computer. Access the voice recorder then open the Record folder then the DVRfolder. The DVR folder contains recorded files which you can save on to your computers hard drive.– To upload MP3 music files on to the Voice Record, access the voice recorder using My Computer and transfer music MP3’s in to the main location. There is no folder tosave MP3’s in or a need to create one.
7. How to delete files
7.1 How to delete recordingPress “PREVIOUS/NEX” button to select “Record Mode”.Press the “M” button to enter it.Press “PREVIOUS/NEX” button to select the recording you want to delete. After finding the file, press “DEL/A-B” button.There are there choice: “Delete file”, “Delete all”, “Exit”. Press “M” button to delete it.
Note:
- Please be careful when you choose “Delete all”.
- If you want to leave the “Delete” page and to go for the menu page, just press “M” button for 2 seconds.
7.2 How to delete music.
Press “PREVIOUS/NEX” button to select “Music Mode”.Press the “M” button to enter it.Press “PREVIOUS/NEX” button to select the recording you want to delete. After finding the file, press “DEL/A-B” button.There are there choice: “Delete file”, “Delete all”, “Exit”. Press “M” button to delete it.
Note:
- Please be careful when you choose “Delete all”.
- If you want to leave the “Delete” page and to go for the menu page, just press “M” button for 2 seconds.
8. How to enter the A-B repeat function.
During playback, press the DEL/A-B button to enter the A-B repeat function.– Once pressed, the ‘A’ mark will be selected. Press the button again to select the ‘B’ mark.– Then the file will repeat from the ‘A’ mark to the ‘B’ mark.– To restart the marks, press the DEL/A-B button and repeat above process.– To resume normal playback, Press the “M” button to enter “setting”
Select “Repeat” into “music mode”press “Normal”.Note: Only during playback, press the “DEL/A-B” enter this function.
9. How to set the system time.
Press the “PLAY/PAUSE” button for two seconds, open the device.Press the “PREVIOUS/NEX” button to select the “Setting Mode”.You can see the “System Time” is in the first placePress “M” button to select it.Press Vol- and Vol+ button to choose the year/month/day, hour/minute/ second. Take setting the year for example.Press “Vol-” or “Vol+”, choose the year and the data will flash.Press the “PREVIOUS/NEX” button to reset the year. And press “Vol+”, continue to set the month/day, hour/minute/second throughrepeating above steps.Note: 1.Only when the data flash, you can reset it by press the “PREVIOUS/NEX”.2. When you complete all setting operation, the device will auto-jump into the previous page by pressing “M” button.
10. How to set the language.
Like the steps of setting the system time, enter the “Setting Mode”.Press the “PREVIOUS/NEX” button to find the “Language”.Press “M” button, enter setting.Press the “PREVIOUS/NEX” button to find the language you want to set.Finally, Press “M” button.Note: When you complete all setting operation, the device will auto-jump into theprevious page by pressing “M” button.
11. Other options in the “Setting Mode”
Press “M” button enter the “Setting Mode”11.1 Record TypePress “PREVIOUS/NEX” to choose “Recorder Type”Press “M” button to enter it.There are 6 options. Press the “PREVIOUS/NEX” to choose the type you want.6type:Middle-recordingMiddle-vorLong-recordingLong VORHigh-fidelity recordingHigh VORPress “M” button when you have a choice. And the device will auto-jump into the previous page
11.2 Record Form
Press “M” button to enter it.There are 3 choices. You still choose them by pressing the “PREVIOUS/NEX”button.3choices:MicrophoneAudio InputExitStill press the “M” button when you have a choice. Page will automatically jump into the previous one.
11.3 Backlight
Press “M” to enter “Backlight” for adjusting the backlight brightness for the LCD. Press the “PREVIOUS/NEX” button to increase or decrease brightness. Adjust in 3steps from 2 to 29.
11.4 Power off
Press “M”, enter it. There are two functions under this option:– ‘Off time’ is the idle off time function. Adjust in 10 minute steps between 10 to 60 minutes by pressing the Up or Down button. Press the Mode button to selectan Off time. 0 minute is to turn off this function. Once the unit is idle for the selected Off time, the voice recorder will enter standby. Hold the Play button for 2 seconds to exit standby.– ‘Sleep time’ will turn off the unit within the selected minutes even while the voice recorder is in use, i.e. recording or playback. Adjust in 10 minute steps between 10 to 120 minutes by pressing the Up or Down button. Press the Menu button to select a sleep time. 0 minute is to turn off this function. Once the selected sleep time lapses, the voice recorder will enter standby. Hold the Play button for 2 seconds to exit standby. Complete all setting operation, press “M” will auto-jump into the previous page.
11.5 Contrast: Adjust the contrast for the LCD
Press “M” button to enter “contrast”.Press the “PREVIOUS/NEX” button to increase or decrease the contrast.
11.6 Memory info
Shows the amount of available memory left in a percentage.Press the “M” button to exit
11.7 Firmware version
Show the current Firmware Version.Press the Mode button to exit
Exit
Press the Mode button to exit settings mode and to go back to the main menu.
DOWNLOAD RESOURCES
- [pdf] Digital Voice Recorder
- Read more:
FAQ’S
Yes, it has a voice recorder.
Yes, it has a built-in microphone.
Yes, it has a built-in speaker.
It is built-in 1800mAh battery capacity.
Yes, there is one LED indicator on the right side of the voice recorder. It will show you when recording or charging. It will be red when charging and green when recording or charging.
Connect to your computer with USB cable, it will charge. Charge time between 3 to 4 hours, turn on voice recorder before charging. Or you could also connect to your cell phone adaptor for charging.
Sound quality: Sound quality is one of the best traits of the smartphone ‘voice recorder’ but it was not designed to record simulated 3D sound. Digital dictaphones are essentially miniature recording studios that ensure minimal background noise and give you quality experience.
Insert the USB cable into the USB port on the side of the voice recorder.Connect the opposite end of the USB cable to one of the USB ports on the computer system.Click “Start” and “Computer” (or “My Computer”), and then double-click the removable device icon.
With the Voice Memos app (located in the Utilities folder), you can use iPhone as a portable recording device to record personal notes, classroom lectures, musical ideas, and more. You can fine-tune your recordings with editing tools like trim, replace, and resume.
“You can back up your recordings to your Google Account at recorder.google.com. Turn backup on or off anytime in Settings,” the web app explains. A backup and sync option is now available in Google Recorder version 2.2. Version 2.2 of the Google Recorder app is rolling out now to the Google Play Store.
There are digital voice recorders that can handle over 1,000 hours of recording time. However, general recording time numbers for digital voice recorders always has to be taken with a grain of salt. The higher the quality of the recording, the fewer recording hours will be available.
Which button is used to record sound?
Sound Card is used to recording and produce sound.
VIDEO
References
[xyz-ips snippet=”download-snippet”]