
Tyco G-Series PoE Network Video Recorder
G-Series PoE Quick Start GuideProduct overview
The exacqVision G-Series Power over Ethernet (PoE) systems are part of exacqVision’s series of network video recorders (NVR). Depending on the model, the G-Series PoE has 4 or 8 PoE camera ports. The exacqVision G-Series PoE is an easy-to-use video recording solution, offering the full sophistication of exacqVision VMS on an purpose built NVR, without the hassle of wiring cameras to a power supply.
Installation
Before you turn on the exacqVision G-Series PoE server, ensure that the installation environment meets the following requirements: Mounting and operating requirements
- Mount the exacqVision server in a dust-free, and climate controlled location, where the temperature is between 40°F to 95°F (4.5°C to 35°C), and the humidity level is less than 80% non-condensing. CAUTION: Dust may cause components of the server to overheat, and elevated temperatures can contribute to premature hard drive failures.
- If the hard drives dispatch separately to the system, insert each drive into the hard drive slots. If the drives are numbered, ensure that you insert the correct drive into the appropriate slot.
- If you use an outdoor camera, the server must connect permanently to the ground wire. Ensure that you use an 18 AWG wire or larger to make the connection, and that you connect the grounding screw to the ground port on the back panel. See Figure 1.Electrical requirements
- For maximum reliability, connect the exacqVision server to an online uninterrupted power supply (UPS). An online UPS, filters power surges and dips that can damage the server.
- Connect a keyboard, a monitor, and a mouse to the server.
- Connect the exacqVision server network interface cards (NIC) to the appropriate network switch ports.
- Use cables with a ferrite core for connecting to monitors. If the cable does not have a ferrite core, the unit performs as expected, but may not meet CE safety regulation standards.
Initial startup
When you start the exacqVision G-Series PoE server for the first time, create a user name and password for the operating system, then create a user name and password for the exacqVision Server.
- Turn on the exacqVision server.
- Create a user name and password for the operating system when the logon dialog box appears.
- Log back on to the operating system with the user name and password you just created.
- When you log back on, an exacqVision dialog box appears. Create the exacqVision admin user name and password. Use these credentials to log on to the exacqVision Server, either from a local client or from a remote client.
- When the local client is launched for the first time, enter the exacqVision user name and password so the local client can connect to theserver on the exacqVision G-Series PoE system.
Configuring the server network
To configure the exacqVision G-Series PoE server network, complete the following steps:
- Start the exacqVision client and click Config (Setup) page on the toolbar.
- From the navigation tree, expand the exacqVision server.
- Select Configure System, and then click the Network tab.
- In the Network window, complete one of the following options:– If the network uses static IP addressing, select Static and enter the servers IP address.– If the network uses Dynamic Host Configuration Protocol (DHCP), select Dynamic. If the system does not automatically configure, contact your network administrator.
- Click Apply.What to do next: Repeat this procedure for any additional network ports. For more information on configuring the server, refer to the exacqVision Start User Manual.Rev A2020-01-27
Configuring the client
Before you begin: If you are configuring the server from a remote client computer, you must download and install exacqVision client version 7.4 or later.To configure the exacqVision client, complete the following steps:
- Start the exacqVision client.
- Click Config (Setup) page on the toolbar.
- From the navigation tree, select Add Systems.
- In the Add Systems window, click New, and enter the IP address or hostname of the exacqVision server.
- Enter the following username and password: – Username: admin – Password: admin256
- Select a connection speed.
- Click Apply.
- Verify that the server appears in the Systems list and that the status is Connected.Note: If the server does not connect, but you can confirm the server’s connectivity, check for antivirus software on the remote client machine. Antivirus software can block the communication between the server IP addresses and ports. What to do next: To prevent unauthorized access or modifications to the system, change the default system administration and user accounts passwords. For more information, refer to the exacqVision Start User Manual, and www.exacq.com/kb.
Connecting cameras with EasyConnect
The EasyConnect feature automatically discovers, and configures most DHCP cameras.Before you begin: Before you use the PoE ports, review the following information:
- Each port has a unique interface, and is not a network switch or hub.
- Each port can connect to one IP camera only.
- Each port provides a DHCP addressing service to connect cameras.
- Each port has an assigned IP address with a subset mask of 255.255.255.0. For example, 192.168.2.1, or 172.16.5.61, or 10.16.2.21. The system administrator can modify the third and fourth octet to assign a local address to a device.
To connect cameras to the system, complete the following steps:
- Ensure that the cameras are in their factory default states.
- Start the exacqVision client, and click Config (Setup) page on the toolbar.
- From the navigation tree, expand the server and then select the Configure System node.
- Expand Add IP Cameras, and then select PoE Ports.
- On the back panel of the server, plug the cameras into the PoE ports.
- Monitor the PoE Ports window to ensure that the cameras configure and connect. The connection may take up to six minutes. The PoE Ports window shows a graphical representation of the back panel. The icons show the status of the ports. See Table 1.
Table1: Port Status
|
Port status |
Description |
|
Grey |
The camera is not connected to the port. |
|
Orange |
The camera discovery and configuration is continuing. |
|
Green |
The camera is connected and streaming. |
|
Red |
There are errors with the camera. Possible problems include an invalid username or password. See Troubleshooting for details. |
Troubleshooting
Use the status column in the PoE Ports window to identify and resolve the problem. Place the cursor over the status message to view suggestions on how to resolve the issue.
The following sections contain information about the status message and possible solutions.
Status: Camera connection unsuccessful
ProblemWhen an EasyConnect camera connects to the system, the status column in the PoE Ports window does not display Connected.
SolutionTo delete and reconnect a camera, complete the following steps:
- Open the Add IP Cameras window.
- Select the camera that you want to delete, and then click Delete.
- Click Rescan Network to reconnect the camera.
Status: Invalid username or password
ProblemThe camera’s default credentials have changed. Solution Complete one of the following steps:
- Press the Factory Reset button on the camera, to restore the camera’s default settings.
- Open the Add IP Cameras window and add the camera using the new credentials. For more information, refer to the exacqVision Start User Manual.
- Use an administration account and open the browser (Firefox). Navigate to the camera’s web page and reset the camera’s
- credentials to its default values.
Status: Manual intervention required
ProblemEither the camera has no default credentials, DHCP is not enabled on the camera, or both. SolutionComplete one of the following steps:
- Try factory resetting the camera, to restore the cameras default settings. In some cases, this can make the camera discoverable.
- After factory resetting the camera, plug it into one of the PoE ports. Start the exacqVision client and complete the following steps:a. Expand the server, select Configure System, and then click the Network tab.b. Select the Show individual PoE adapters check box, and then select the PoE adapter port to which the camera has been plugged in.c. In the Network Configuration pane, note the original IP Address and subnet mask, as you will require this information in the last step.d. Change the IP Address to an IP address in the same subnet as the camera’s IP address, and click Apply.e. Open the browser (Firefox). Navigate to the camera’s web page and change the camera’s IP address to a DHCP address.f. Change the PoE port IP address back to its original IP address.
Status: No camera detected
ProblemThe camera may not be supported.SolutionComplete one of the following steps:
- Ensure that the camera is on the supported camera list. See: https://exacq.com/integration/ipcams.
- Unplug the camera and then reconnect the camera into the port.
- Open the Add IP Cameras window, and click Rescan Network.
Status: Not PresentProblemNo device is connected, or there is a problem with the power supply.SolutionDelete and reconnect the cameras to the system. See Camera connection unsuccessful.
G-Series PoE Quick Start Guide
Connections
For information on the exacqVision G-Series PoE server’s back panel, depending on the model, see Figure 1, or Figure 2. Table 2 describes the connections for both configurations.
Figure 1:Back panel connectors 4 Port G-Series PoE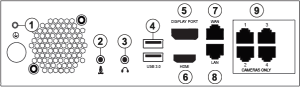 Figure 2:Back panel connectors 8 Port G-Series PoE
WARNING: Do not connect switches, routers, computers, printers, encoders, or non-camera device to the PoE camera ports.
Table2: G-Series PoE System 4 and 8 back panel port configurations
|
Item |
Component |
No. of ports |
Description |
|
1 |
Grounding screw |
1 |
Used for grounding the NVR. |
|
2 |
Audio in |
1 |
Port to connect a microphone. |
|
3 |
Audio out |
1 |
Port to connect a speaker or other audio output device. |
|
4 |
USB 3.0 |
2 |
Port to connect a USB keyboard, mouse, memory device, or DVD burner. |
|
5 |
Video out |
1 |
Display port. |
|
6 |
Video out |
1 |
HDMI port. |
|
7 |
10/100/1000 Ethernet |
1 |
Dual on board NIC port. |
|
8 |
10/100/1000 Ethernet |
1 |
Dual on board NIC port. |
|
9 |
10/100 PoE camera port |
4 or 8 |
Four or eight ports to connect IP PoE cameras. The number of ports depends on the model. |
 report this ad
© 2019 Johnson Controls. All rights reserved. JOHNSON CONTROLS, TYCO and Exacq are trademarks and/or registered trademarks. Unauthorized use is strictly prohibited.
References
[xyz-ips snippet=”download-snippet”]