
Installation And Operating Manual


Product Features:Extra thick LED lightTouch switch with memoryTouch switch dim function
LED Mirror
For easy and safe installation, please refer to the following:Read all instructions thoroughly before installing the enclosed product.Read and take note of all safety, care and maintenance information.PLEASE KEEP THIS INSTRUCTION MANUAL FOR FUTURE REFERENCE DURING PRODUCT OPERATION AND MAINTENANCE.
 WARNING AND SAFETY INSTRUCTIONSBefore assembling your LED Lighted Mirror fixture, please make sure that you carefully read through this instruction sheet, refer back to them during installation to ensure your product is fitted safely and correctly. Keep these instructions for future use.
WARNING Risk of Fire and Electric Shock
- All fittings must be installed in accordance with current IEE wiring regulations. If in doubt, consult a qualified electrician.
- Switch off the electrical supply at the main circuit board BEFORE installation and maintenance.
- Suitable for indoor use only. This product should be positioned well away from curtains and fabrics. Never cover the mirror.
- Regularly check the cord, the transformer, and all other parts for damage, if any part is damaged the product should not be used.
INSTALLATION SAFETY
- Inspect the product immediately upon receipt for transit damage or missing parts. Handle the product with care and protect against knocks to all sides and edges of the glass.
- Ensure there are no hidden pipes or cables in the wall before drilling.
- Wear suitable eye protection when drilling. Take care if drilling on tiled surfaces in case the drill slips.
CAUTIONThe light source of this product is non-changeable light diodes (LED). Do not disassemble the product, as the light diodes can cause damage to the eyes.NOTE: The important safeguards and instructions that appear in this manual are not meant to cover all possible conditions and situations that may occur. It must be understood that common sense, caution, and care are factors that can’t be built into any product. These factors must be supplied by the person(s) caring for and operating the fixture. Do not install this fixture in hazardous locations.
PRODUCT DESCRIPTION & INFORMATION
CHECK PRODUCT LIST AFTER AFTER OPENING THE PACKAGE
| LED Lighted Mirror | – -1pcs |
| Installation Manual | – -1pcs |
| Z-bar | – -1pcs |
| Wall Mount Screw | – -4pcs(One as a spare part) |
| Drywall Anchor | – -4pcs(One as a spare part) |

(TOOLS YOU MAY NEED)
Model:19010-R-GD
Model:19010-R-SL
Model:19010-R-BL
INSTALLATION PROCESS
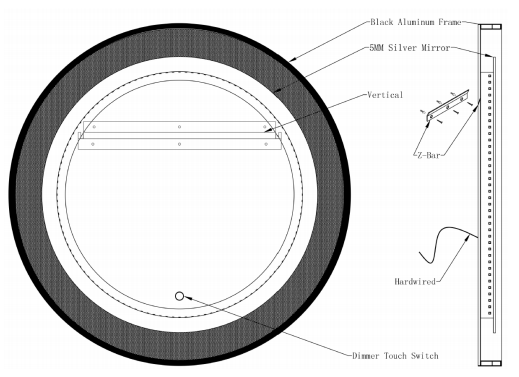
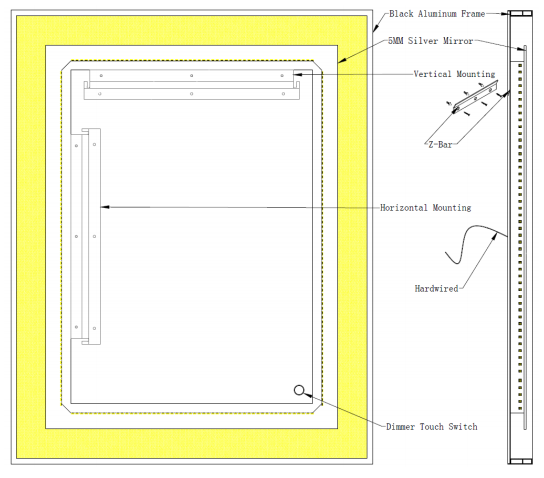
Step 1: Use an I-Beam level to mount the included mounting bracket with 3 screws (Use anchor when it’s installed on drywall, concrete, or tile surface).Step 2: Make sure the circuit breaker for the power source of the mirror is off. Then connect the neutral (white), hot (black), and ground (copper wire or Green) wire between the mirror and the junction box.Step 3: Hang the mirror with desired placement by mirror Z-bar onto the mounting bracket.
Warning: Always switch off the electrical supply at the mains during installation and maintenance.Do not switch on the electrical supply at the mains until the end of the installation.
CHECK PRODUCT LIST AFTER OPENING THE PACKAGE
| LED Lighted Mirror | – -1pcs |
| Installation Manual | – -1pcs |
| Z-bar | – -1pcs |
| Wall Mount Screw | – -4pcs(One as a spare part) |
| Drywall Anchor | – -4pcs(One as a spare part) |
(TOOLS YOU MAY NEED)
Model:19010-RT-SL
Model:19010-RT-GD
All diagrams are for reference only. All model dimensions and proportions positions will vary.
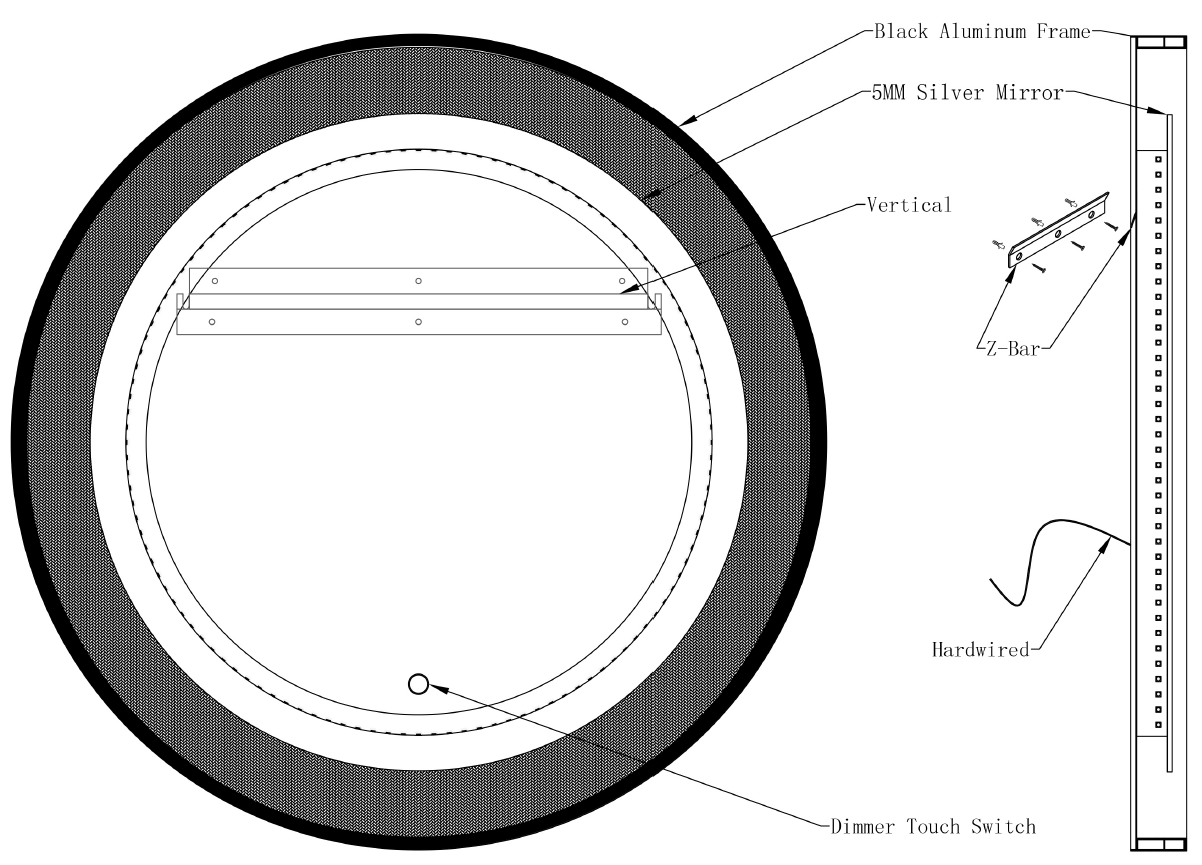
Warning: Always switch off the electrical supply at the mains during installation and maintenance.
Do not switch on the electrical supply at the mains until the end of the installation.
Step 1:Use an I-Beam level to mount the included mounting bracket with 3 screws (Use anchor when it’s installed on drywall, concrete, or tile surface).Step 2:Make sure the circuit breaker for the power source of the mirror is off. Then connect the neutral (White), hot (black), and ground (copper wire or Green) wire between the mirror and the junction box.Step 3:Hang the mirror with desired placement by mirror Z-bar onto the mounting bracket.
CHECK PRODUCT LIST AFTER OPENING THE PACKAGE
| LED Lighted Mirror | – -1pcs |
| Installation Manual | – -1pcs |
| Z-bar | – -1pcs |
| Wall Mount Screw | – -4pcs(One as a spare part) |
| Drywall Anchor | – -4pcs(One as a spare part) |
Model:LDJSFM6028FGDKXXX
Model:LDJSFM7026CRDKXXX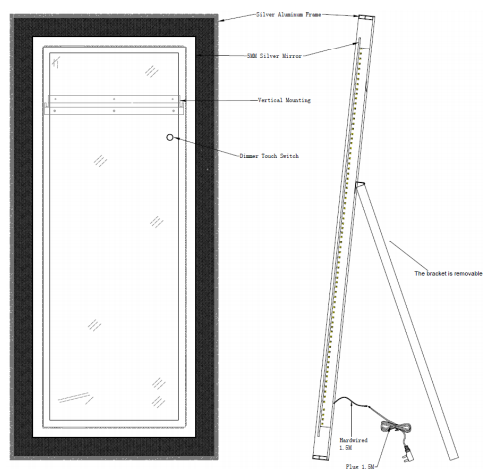
Model:LDJSFM7026CRDKXXX
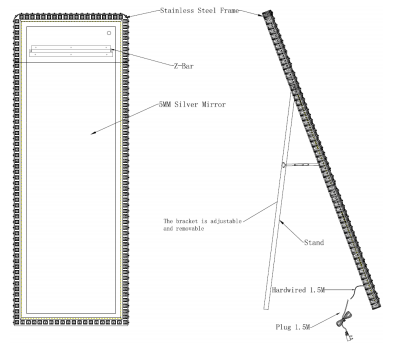
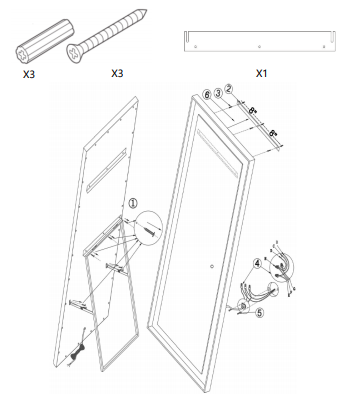
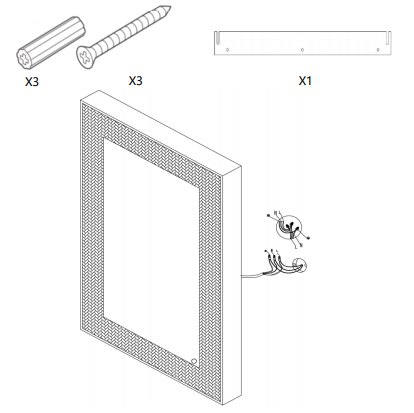
Wall-mounted installationStep 1: Mark the position of the hanging screw.Step 2: Fix the screw.Step 3: Hang up the LED mirror on the wall.
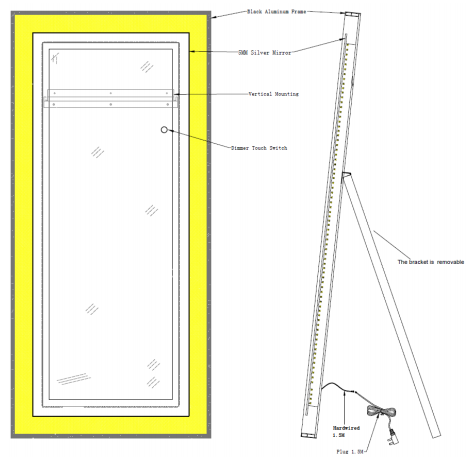
Floor-type installationStep 1: Open the floor stand.Step 2: Connect the plug wire to the hard wire.
Warning: Always switch off the electrical supply at the mains during installation and maintenance.Do not switch on the electrical supply at the mains until the end of the installation.
OPERATION PROCESS

 Press to turn on/off the light as well as change color temperature.Long press the sensor to achieve dimming.
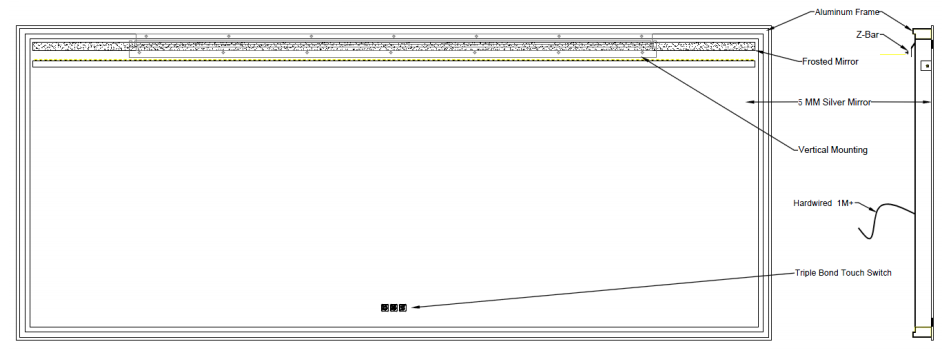
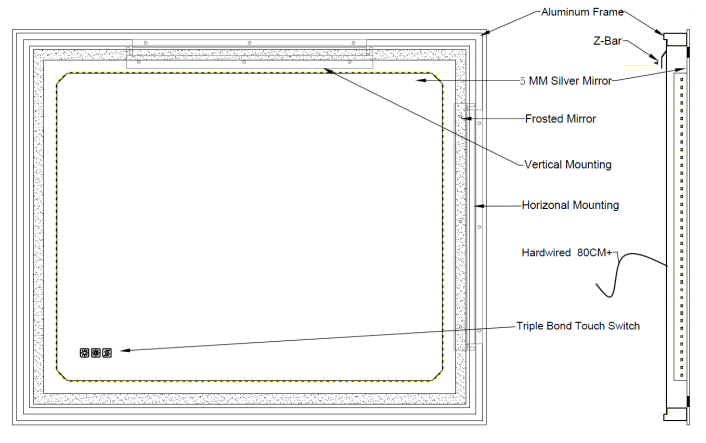
PRODUCT DESCRIPTION
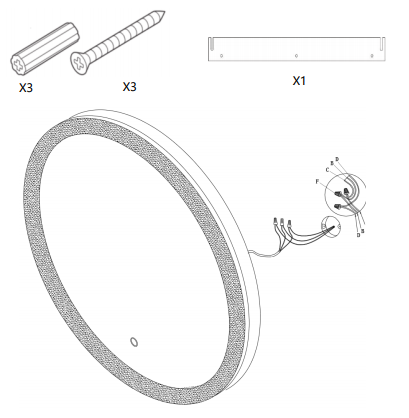
| LED Lighted Mirror | – -1pcs |
| Installation Manual | – -1pcs |
| Z-bar | – -1pcs |
| Wall Mount Screw | – -7pcs(One as a spare part) |
| Drywall Anchor | – -7pcs(One as a spare part) |
Model:LDJSBM6036DKSXFLX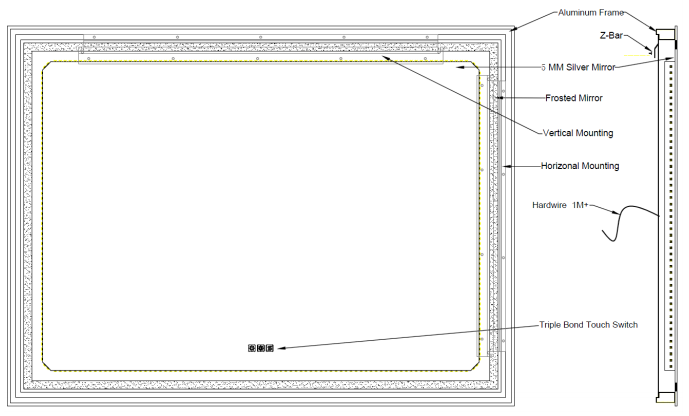
Model:LDJSBM7230DKSXFLX
Model:LDJSBM3036DKSXFLX
Model:LDJSBM3648DKSXFLX
Model:LDJSBM7236DKSXFLX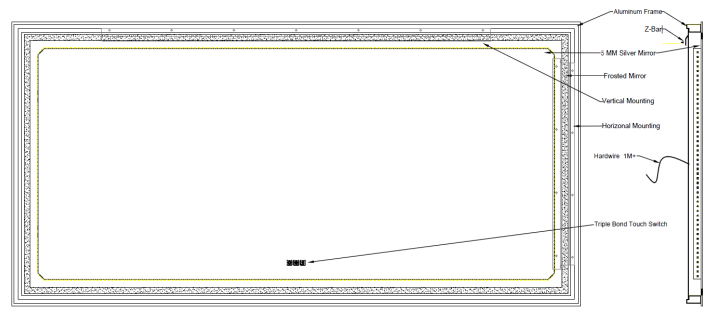
Model:LDJSBM4836DKSXBLX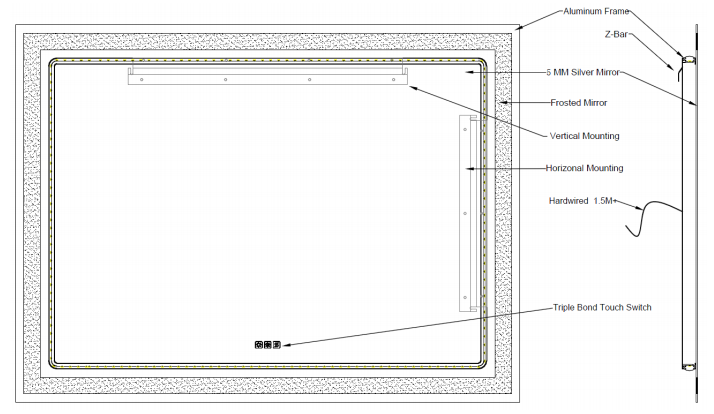
Model:LDJSBM6036DKSXBLX
Model:LDJSBM7238DKSXBLX
* All diagrams are for reference only. All model dimensions and proportions positions will vary.
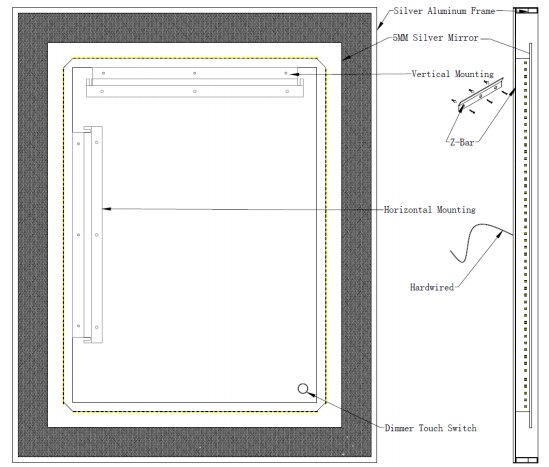
Step 1:Use an I-Beam level to mount the included mounting bracket with 3 screws (Use anchor when it’s installed on drywall, concrete, or tile surface).Step 2:Make sure the circuit breaker for the power source of the mirror is off. Then connect the neutral (white), hot (black), and ground (copper wire or Green) wire between the mirror and the junction box.Step 3:Hang the mirror with desired placement by mirror Z-bar onto the mounting bracket.
Warning: Always switch off the electrical supply at the mains during installation and maintenance.Do not switch on the electrical supply at the mains until the end of the installation.
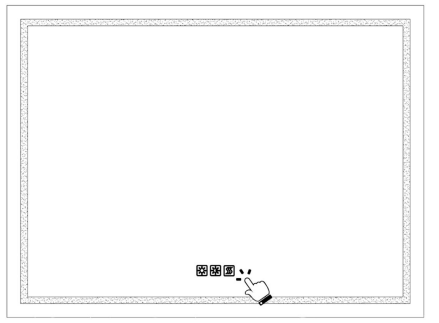
 Button 1: Press to turn on/off the light as well as change color temperature.These two operations loop in turn.
 Button 2: Press the ON/OFF button and hold on for 3-5seconds to active the dimmer function.The first long press, light from light to dark; the Second long press, light from press to light. These two operations loop in turn.
 Button 3: First short press, the anti-fog function works. Second short press, the anti-fog function stops.The two operations loop in turn.
* All diagrams are for reference only. All model dimensions and proportions positions will vary.
LED Mirror Power Source FAQ
Scenario 1![]() (Direct Wired)This is the most common way to connect the mirror. The LED light & anti-fog pad are both controlled by the built-in touch switch on the mirror.*The LED light is dimmable.
(Direct Wired)This is the most common way to connect the mirror. The LED light & anti-fog pad are both controlled by the built-in touch switch on the mirror.*The LED light is dimmable.
Scenario 2![]() (Wall Switch)By doing so, the mirror is now bridged to the wall switch. In order to turn on the mirror, the wall switch needs to be on. The touch switch can be used to turn on the LED mirror and anti-fog pad. The mirror shuts down once the wall switch is flipped to OFF.
(Wall Switch)By doing so, the mirror is now bridged to the wall switch. In order to turn on the mirror, the wall switch needs to be on. The touch switch can be used to turn on the LED mirror and anti-fog pad. The mirror shuts down once the wall switch is flipped to OFF.
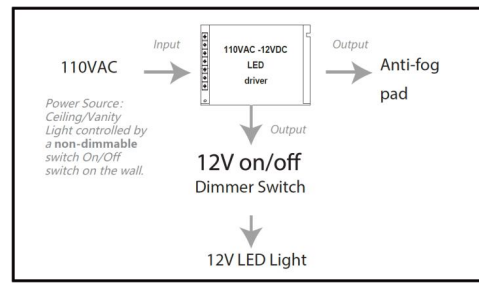
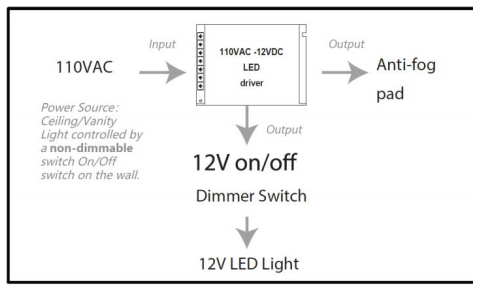
Scenario 3 ![]() (Wall Dimmer Switch – Not Accepted) This is a scenario that is not acceptable.There is no workaround for our mirror.Do not try this way as it will damage the LED driver.
(Wall Dimmer Switch – Not Accepted) This is a scenario that is not acceptable.There is no workaround for our mirror.Do not try this way as it will damage the LED driver.
THANK YOU FOR CHOOSING US.
We wish you have a wonderful experience with our product. If you have any queries, please feel free to contact us by email:[email protected].For more ESDIY products, please scan the following QR code.

[xyz-ips snippet=”download-snippet”]