
Excelair Ceramic Infrared Outdoor Heater
EOHA22GR Instruction Manual

IMPORTANT:Please carefully read the Operation Manual before using the infrared heater.This Operation Manual contains the important information on your safety, as well as some recommendations on proper use of the appliance and its maintenance.
CONTENTS INCLUDED
- Heater fitted with flexible cord and plug.
- Operating and Installation Instructions.
- One small box contains 2 sets of Brackets.
- One remote controller
SAFETY INSTRUCTIONS
- During use of the infrared heater, it is necessary to observe some precautions. Improper operation with disregard of precautions may result in infliction of harm to health of the user and other people, as well as in infliction of damage to their property.
- Use only the voltage specified on the rating plate of the heater.
- ONLY connect the appliance to a properly installed socket-outlet with earth contact.
- The heater should be connected to the electric mains equipped with an automatic circuit breaker.
- The unit must be handled with care, and avoid vibration or hitting.
- WARNING: FIRE RISK EXISTS IF THE HEATER IS COVERED BY OR POSITIONED CLOSE TO CURTAINS OR OTHER COMBUSTIBLE MATERIALS.
- Do not use the appliance areas where gasoline, paint or other flammable liquids are used or stored.
- Do not use the appliance where explosives are stored.
- Do not use the appliance in a building site, green house, barn or in animal stables.
- Do not use the appliance as a sauna heater.
- Do not use this unit in the place of animal propagating and rising.
- WARNING: DO NOT TOUCH THE RADIATING PLATE. TEMPERATURE OF RADIATING BOARDS DURING OPERATION OF THE HEATER MAY REACH 380 °C.
- To avoid burns, do not touch the appliance surface by hand and other body parts. It is also necessary to avoid touching the heater whilst the appliance is switched on, as severe burns may result. The appliance can take up to 1 hour to cool down after switching it off.
- Do not place any items of clothing, hand towels or similar over the heater to dry. Risk of overheating and fire hazard.
- Do not leave the heater unattended whilst in use.
- Do not use this heater on a wet surface, or where it can fall or be pushed into water.
- Do not reach for an appliance that has fallen into water. Switch off at supply and unplug immediately.
- If the heater is defective, it must be returned to the place of purchase.
- Do not operate appliance with wet hands.
- Use this appliance only as described in this manual. Any other use is not recommended by the manufacturer and may cause fire, electric shock or injury.
- Do not use abrasive cleaning products on this appliance. If the body becomes dirty, wipe off dust with a cloth, and the radiating boards should be wiped when they are cold with a damp soft cloth. Always remove plug from the mains supply before cleaning.
- The heater must be installed at least 2.2 m above the floor.
- The heater must not be located immediately below a socket-outlet. The heater must not be located in front of a socket-outlet. They should be located outside the physical footprint of the units to minimize heat build-up behind the heater.
- The installation must be equipped with a standard electrical power point with a break contact distance of at least 3mm. The standard power point must be installed by a licensed electrician.
- If the heater is to be mounted on an incline ensure the electrical connection is located at that lowest point of the heater.
- Do not connect the appliance to the mains source until it has been installed in its final location and adjusted to the position it will be used in.
- Do not operate with the cord coiled up as this could cause a build-up of heat, which could pose a hazard.
- The use of an extension cord with this appliance is not recommended.
- Do not allow cord to come in contact with heated surfaces during operation.
- Do not run cord under carpeting, throw rugs or runners etc. Arrange cord away from areas where it is likely to be tripped over.
- This appliance is not intended for use by persons (including children) with reduced physical, sensory or mental capabilities, or lack of experience and knowledge, unless they have been given supervision or instruction concerning use of the appliance by a person responsible for their safety.
- Children should be supervised to ensure that they do not play with the appliance.
- The appliance is only intended for the purpose described in user manual.
- Do not use appliance or any part of the appliance out of the intended use to avoid risk.
- The use of attachments which are not recommended or sold by the appliance manufacturer may cause a risk of injury to persons.
- CAUTION — some parts of this product can become very hot and cause burns. Particular attention has to be given where children and vulnerable people are present.
- WARNING: This heater is not equipped with a device to control the room temperature. This heater is to be used in open, alfresco environment or large areas with high ceilings. The heater must not be within reach from the floor, as severe burns may occur due to high surface temperatures. Do not use this heater in small rooms or where the room or area is occupied by persons not capable of leaving the room on their own, persons who are unable to operate the heater safely and with the guidelines of the use manual, unless constant supervision is provided.
- WARNING: THE HEATER MUST NOT BE USED IF THE GLASS PANELS ARE DAMAGED.
- When the appliance is not in use and before cleaning, unplug the appliance from the outlet.
- To protect against the risk of electrical shock, do not immerse the unit, cord or plug in water or other liquid.
- The appliance is only intended for the purpose described in user manual. Do not use appliance or any part of the appliance out of the intended use to avoid risk.
- The use of attachments which are not recommended or sold by the appliance manufacturer may cause a risk of injury.
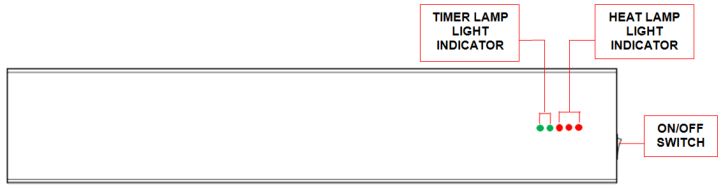
HEATER COMPONENETS
- Ceramic Glass Panel
- ON/OFF main power switch
- Power cord and plug
- Bracket for wall mounting
- Remote control

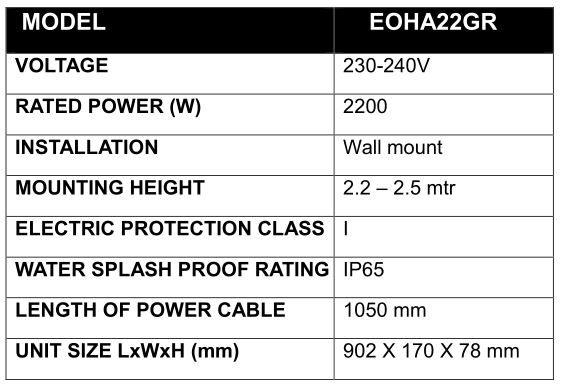
TECHNICAL SPECIFICATIONS
OPERATING THE HEATER
WARNING! Slight crackles may be heard during the heating or cooling period. This is normal operational noise.NOTE:
- After switching on the appliance for the first time and following extended periods on non-use, the appliance may expel a slight odour for a short time. It will not affect the use of the heater.
- To exclude unpleasant burnt odour, it is recommended to keep the heater clean preventing accumulation of dust on it
- The distance between the heater and the remote control should be less than 3 metres, and the remote control must be directly pointed at the receiver on the front panel during the operation.
Connect the unit to the main power, press the switch to the position of I : ON, the red operation indicator will light to indicate the heater is on and the heater will begin to radiate infrared heat.
OPERATION INSTRUCTIONS :
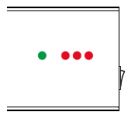
- Plug in the device, and then press the switch to the positon of I (refer to picture 1). The device will sound 1beep, one of the heat lamp indicators will flash (picture 1), the device is in standby mode and the unit won’t radiate any heat.

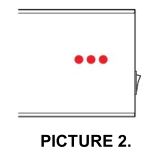
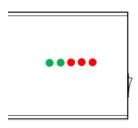
- Point the remote control directly to the receiver, press the “ON” button on remote, the device will sound 1 beep and the unit will start to heat in high power mode (100% of the rated power) and all three heat lamp indicators will turn red. Refer to the (picture 2)
- To return the heater to STANDBY MODE, press the “Standby” button on remote, the device will sound 1 beep and one of the heat lamp indicator lights will flash. This indicates the heater is in standby mode and the unit won’t radiate any heat.
- To change the heater from STANDY MODE to LOW HEAT, point the remote directly to the heater and press the LOW button on the remote. The device will sound 1 beep, one of the heat lamp indicators will turn red and the heater will start to heat in low power mode ( 33% of the rated power) refer to Picture 3.
- To change the heater from STANDY MODE to MEDIUM HEAT, point the remote directly to the heater and press the MED button on the remote. The device will sound 1 beep, two of the heat lamp indicators will turn red and the heater will start to heat in medium power mode ( 66% of the rated power) refer to ( Picture 4)
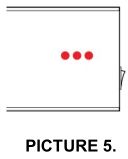
- To change the heater from STANDY MODE to HIGH HEAT, point the remote directly to the heater and press the HIGH button on the remote. The device will sound 1 beep, three of the heat lamp indicators will turn red and the heater will start to heat in high power mode ( 100% of the rated power) refer to ( Picture 5)


TIMER FUNCTION:
- To activate the AUTOMATIC SHUT OFF TIMER for 1 HOUR, point the remote control directly to the receiver and press the“1hr” button, the 1st of the timer lamp indicators will turn green in color. The device will be powered off after 1 hour, returning to standby mode and the heat lamp indicator light will turn red and flash.
- To activate the AUTOMATIC SHUT OFF TIMER for 2 HOURS, point the remote control directly to the receiver and press the “2hr” button, the 2nd of the timer lamp indicators will turn green in color. The device will be powered off after 2 hours, returning to standby mode and the heat lamp indicator light will turn red and flash.
- To activate the AUTOMATIC SHUT OFF TIMER for 3 HOURS, point the remote control directly to the receiver and press the “1hr & 2hr” button, both of the timer lamp indicators will turn green in color. The device will be powered off after 3 hours, returning to standby mode and the heat lamp indicator light will turn red and flash.

BEFORE INSTALLATION
Before installation, read the manual carefully.The heater must be installed in accordance with the manufacturer’s installation instructions. This heater comes with a pair of stainless steel adjustable angle mounting brackets. The adjustable angle enables the heater to be installed on vertical, horizontal and inclined surfaces.
WALL CLEARANCES
![]()
WARNING! Mounting of the infrared heater and its connection to the electric mains should be carried out only by qualified specialists according to the Electrical Installation Regulations and Power System Safety Standards
Minimum clearances when mounting the heater on A VERTICAL WALL
![]()
INSTALLATION
- Open the box and carefully take the heater out.
- Take out the packing paper sheet from the end of heater
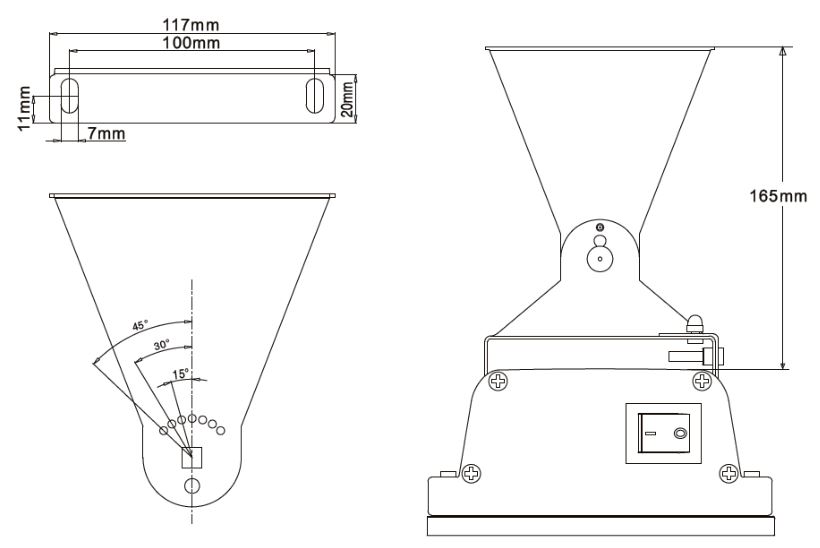
- Take out one pair of mounting Brackets. These adjustable brackets allow the product to be mounted to a wall and come with preset angle options of parallel, 15°, 30°, 45° and height 170mm.
- For the correct installation process, use the diagram above for requirements. Select the heater location on the wall by locating the stud or structural beams to ensure secure fastening of the heater, whilst observing the minimum clearances from the floor and other objects.
- Install two brackets on the wall with the following minimum recommended bracket distance “B” 500±50 mm.
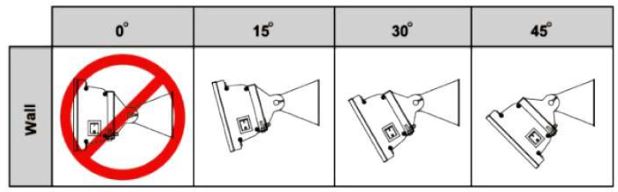
- Set the adjustable angle mounting brackets to desired angle and fasten brackets by spanner .For wall mounted installation, the available mount angles are restricted to 15°, 30° and 45° only.
- Hang the heater on the brackets and firmly secure in place with the mounting bracket locking plates by tightening bolts. labelled A

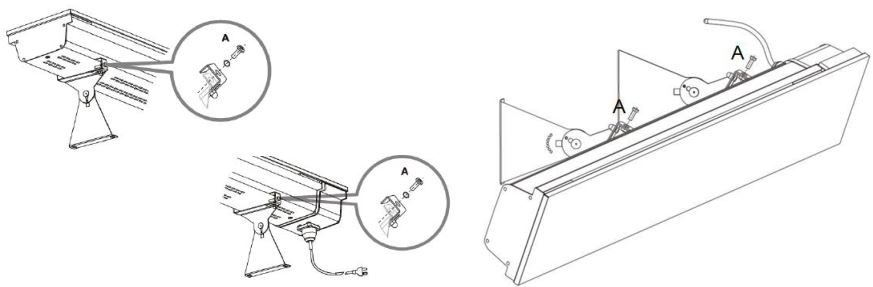
NOTE:
- Depending on material and design of wall structural elements, the heater must be secured with the correct fasteners. The weight of the heater is up to 5.3Kg, the installation location must be able to hold 5 times the weight of the heater.
CONNECTION TO ELECTRIC MAINS
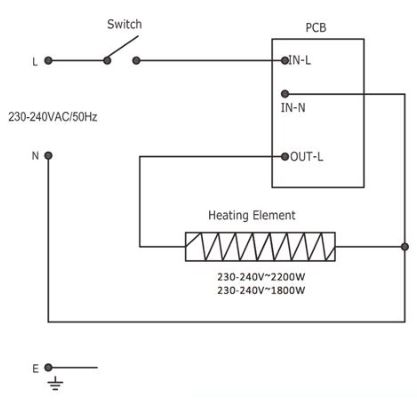
- The heater is designed for connection to the single-phase 230-240V~ 50HZ electric mains equipped with a earth.
- Before connection, make sure that specifications of the electric mains at the connection point meet the single-phase 230-240V~ 50Hz voltage.
- The electric mains should be equipped with an automatic circuit breaker with rated current not less than 16A.
- The heater must not be located immediately below a power point. Power point should not be located at the back of the heater. The power point needs to be located outside the physical footprint of the heater to minimize heat build-up behind the heater.
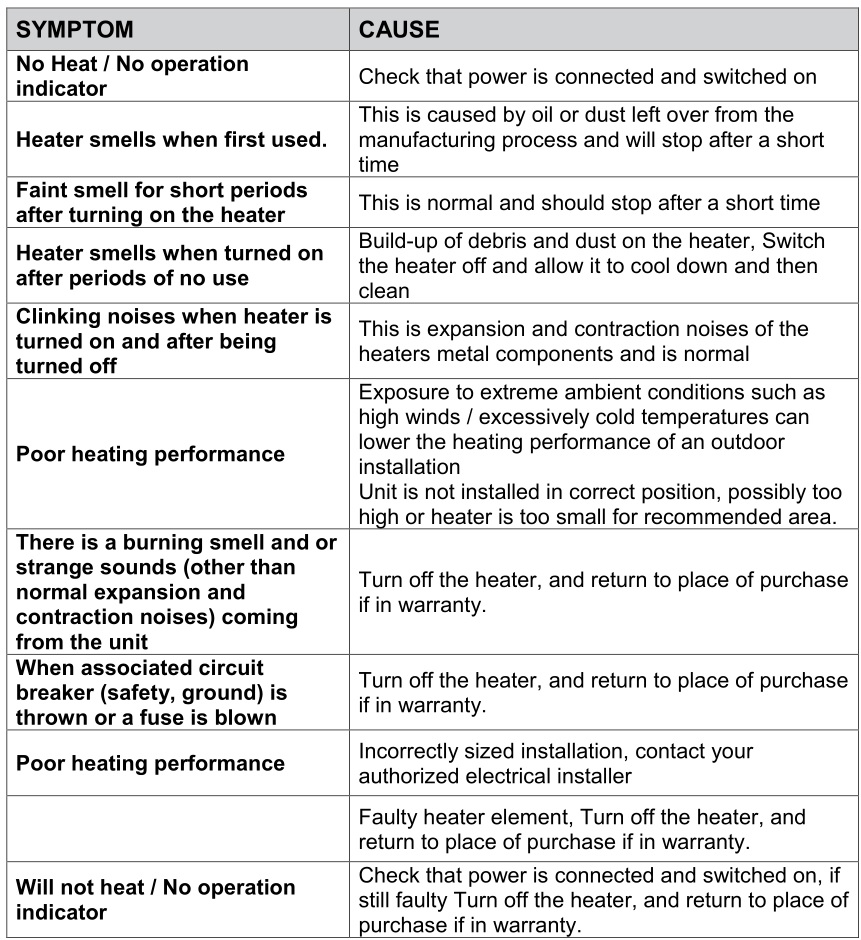
TROUBLESHOOTING
MAINTENANCE
- Any maintenance should only be carried out by a qualified electrician.
- During operation, it is necessary to periodically (once a year) check the electric cable contacts and terminal connectors for good tightening.
- If the body becomes dirty, wipe off dust with a towel, and the radiating boards should be wiped in cold condition with a damp soft rag.
WARNING!
- Never immerse the appliance in water! Danger to life!
WIRING SCHEMATIC DIAGRAM
WARRANTY
This appliance is guaranteed for a period of 24 months. If during this period the appliance fails to work due to parts or manufacture fault, please return to place of purchase for a replacement.
For warranty enquiries please contact, GBI Sales Pty Ltd
P | 1300 710 860 E | [email protected]
Excelair Ceramic Infrared Outdoor Heater EOHA22GR Instruction Manual – Excelair Ceramic Infrared Outdoor Heater EOHA22GR Instruction Manual –
[xyz-ips snippet=”download-snippet”]