
ExquizOn S1 DLP Mini Portable Projector User Manual

Due to continuous improvement, actual product may different from the manual, manual is for reference only.
Safety Notice:
- Please read Manual carefully before you use the projector.
- To ensure stable power supply, please use national standard power cable and power cord with grounding.
- Please use the same power voltage as the projector marked.
- Please do not open the projector, otherwise the supplier will not afford warranty service.
- Do not look directly at the projector lens while the machine is working to avoid damage your eyes.
- To avoid clog of the projector vent, please do not cover with cloth, carpet and other materials.
- This projector does not have waterproof function, please keep it away from rain, moisture and other items containing liquid such as vase, cup, etc.
- To prevent power breakdown, please keep the projector away from rain or water or moisture.
- Turn off and cut off the power supply if do not use this project for a long time.
- Use the originally foam or other unit-shock material to protect projector, if you need transport this projector.
- If you find the projector have problems, please contact with the supplier, do not repair by yourself.
Maintain Indication:1-year warranty from factory, for more warranty information, please contact with supplier (warranty service is not including the frame, manual, package, and some subjective idea about the video, sound, image aspects).
Interface introduction
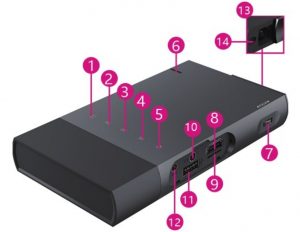
- Signal Source
- Left
- OK
- Right
- Return
- Light on
- Manual focus
- HDMI input slot
- TF input slot
- Earphone slot
- USB input slot
- Power input
- Lens
- IR receiver
Remote Control Introduction
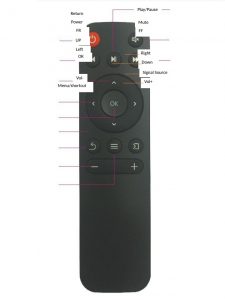
- Notice:To avoid power shortage, please don’t mixed use the old and new battery. If do not use remote control for a long time, please take the batteries out, to avoid batteries leakage corrosion. When using the remote control, please align the remote control signal transmitter to the projector’s infrared signal reception window.
Operating instructions
Preparation before turning on.As following picture, connect the ![]() AC power cord to port .
AC power cord to port .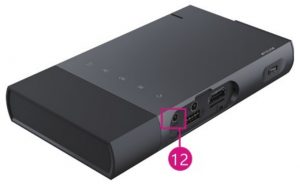 As following picture, the projector body will have an indicate light on after connecting the AC power cord, and the machine enters standby mode.
Power on/Power off Rotate the baffle of lens, or press’ ![]() ‘of remote control, and then projector turn on.
‘of remote control, and then projector turn on.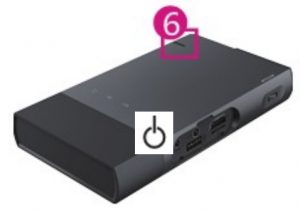
Projector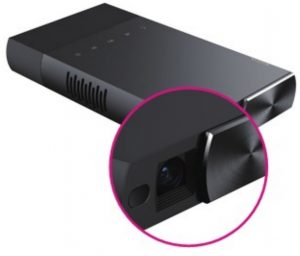 Remote Control
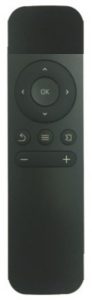
Boot screen
As the projector start working, after screen display 2 to 5 seconds of boot screen, then come into the multimedia screen.
Multi-screen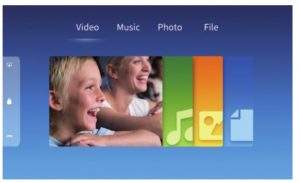 Press’ ‘on remote control and select
  ‘Multi-screen’ (See below picture).
Device connection
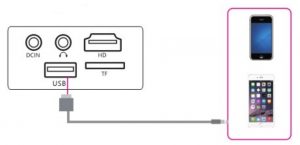 Smartphone connected with projector①Please follow as below Installation step for Mirascreen Wire Wire+:
Step 1: Please connect IOS devices and projector by IOS USB cable as picture ①NOTE: Support iOS 9+devices.Step 2: Please press‘’ on remote control switch to Multi-screen mode as picture ②.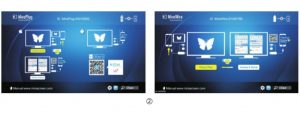 For iOS (iPhone/iPad) devices Airplay MirroringIf the connection is right, iOS device popups a ‘Trust This Computer’ message please select ‘Trust’. Please wait for a few seconds, your iOS device screen will mirror to the screen, as picture③.NOTE: Some iOS devices may popup ‘This accessory may not be supported’.Please feel at ease to use, as this is a normal notification.
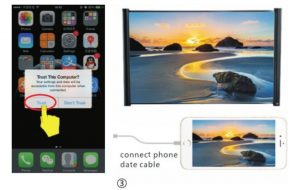
EZCast software installation and Firmware upgrade EZCast software installation:Search ‘EZCast’ in the Apple App Store or scan QR code from screen to download the software.Firmware upgrade step1: Please make sure that the projector is in Multi-screen mode, as picture②. Then please press ‘OK’ key, the screen of projector will be switched to OTA upgrade mode as picture④.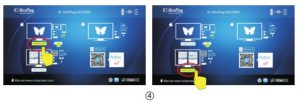 Step2: Please turn on the ‘Personal Hotspot’on iPhone for connection, as picture⑤.
Step 3: Please connect your phone to projector ![]() (refer to picture①(, you will see a message (refer to picture⑥). If it connects successfully, you will see the picture ‘ ‘ shown on your screen. If it shows an icon ‘ ‘, it means the connection failed. Please re-check from step 1 to step 3.
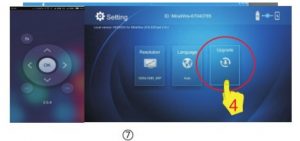
(refer to picture①(, you will see a message (refer to picture⑥). If it connects successfully, you will see the picture ‘ ‘ shown on your screen. If it shows an icon ‘ ‘, it means the connection failed. Please re-check from step 1 to step 3.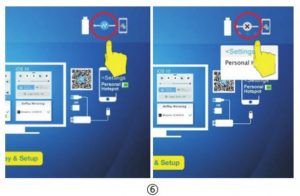 Step 4: Turn on EZCast app, then click the ‘firmware Upgrade’button on the menu page (refer to picture⑦) and wait for the update(refer to picture⑧).
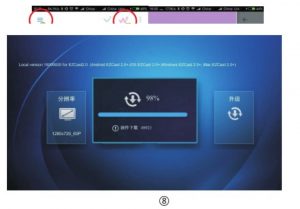
NOTE: Please DO NOT power off or unplug your Mirascreen Wire+ power cable during upgrade and make sure your cellular data (3G/4G) is available.
 Step 5: After the upgrade, click the ‘OK’ key on remote control switch to ‘Plug and Play’ mode, try the mirror function after the upgrade.
NOTE: If the MiraScreen Wire+ is abnormal due to mobile phones or tabsoftware upgrade, please try as above step (1 to 5)
For Android functional operation (only for MiraScreen Wire+). Please confirm if your android device supports the phone mirror function.Step 1: Connect Android phones or pads to MiraScreen Wire+ Please refer to picture ① and follow the ‘hardware installation’ steps (1 to 2) in this manual.
NOTE: Please do not use iOS lightning cable instead of Android USB cable.
Android USB cable is needed.
- EZCast software installation for android Please download’ EZCast’ from Google play store(Android). You may also scan the QR code on projector screen for downloading.
NOTE: Supports Android 4.4 and aboveNOTE: Not all Android 4.4 devices support USB Mirror.
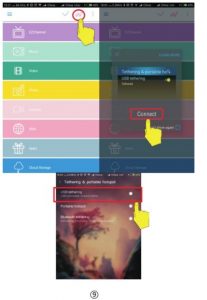
- Android Mirror function: method 1 (USB tethering) (refer to picture ⑨):
Please launch the ‘EZCast’app, and ![]() click the ‘‘ button. After that please click the ‘Connect’ button, and then enable ‘USB tethering’. Then you may start mirroring your Android screen.NOTE: Supports Android 5.0 and above and the audio stay on your phone.After mirroring, please do not turn off EZCast app.
click the ‘‘ button. After that please click the ‘Connect’ button, and then enable ‘USB tethering’. Then you may start mirroring your Android screen.NOTE: Supports Android 5.0 and above and the audio stay on your phone.After mirroring, please do not turn off EZCast app.
 NOTE: If the MiraScreen Wire+ is abnormal due to mobile phones or tab software upgrade, please use EZCast app/Upgrade to do firmware upgrade online.Step 2: Android Mirror function: method 2 (turn on USB debug mode):USB Mirror mode is an alternative for
 ![]() supporting more Android devices (4.4 and above). Please launch the ‘EZCast’ app,—>Click the icon ‘’ —->Click the ‘Connect’ button—>open ‘USB tethering’ Click the ‘USB Mirror’ button on menu page (refer to picture⑩). Wait a second, you may start mirroring your Android screen. If ‘USB Mirror’ failed to enable, please unplug USB cable from your Android device, and then re-plug in for retry.
supporting more Android devices (4.4 and above). Please launch the ‘EZCast’ app,—>Click the icon ‘’ —->Click the ‘Connect’ button—>open ‘USB tethering’ Click the ‘USB Mirror’ button on menu page (refer to picture⑩). Wait a second, you may start mirroring your Android screen. If ‘USB Mirror’ failed to enable, please unplug USB cable from your Android device, and then re-plug in for retry.
- NOTE: Supports Android 4.4 and above
- NOTE: USB debugging should be turned on for activating USB Mirror.
- NOTE: Not all Android 4.4 devices support USB Mirror.
- NOTE: Not all smartphone supports USB audio, and consequently the sound may come from the smartphone instead of TV/Projector.
- NOTE: Due to the EZCast app will update time to time to compatible with upto-date devices. More information about EZCast app, please refer to www.iezvu.com for reference.Technical Support: [email protected]
Focus & keystone correctionImage focus Put the projector vertical to the projector screen or white wall, adjust the focus ‘⑦’ ![]() until the image is clearly enough, then the focus is finished. During focusing, you could display video the menu to check the focus adjust.
until the image is clearly enough, then the focus is finished. During focusing, you could display video the menu to check the focus adjust.
Projector connection introduce
Connection introduce
Could connect multi-device and applications.
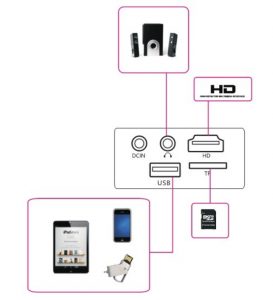
Multi-media connectionInsert the USB/TF card into the accordingly slot. (refer to picture below)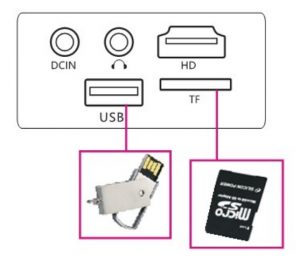 Choose multimedia signal source (factory setting USB/SD card outlet).
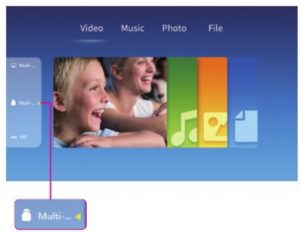
Multimedia Supported format
Audio file: MP3/WMA/OGG/AAC/FLAC/APE/WAVMulti-media:Audio file: JPEG/BMP/PNGVideo file: 3GP (H.263, MPEG 4)/AVI (XVID, DIVX, H.264)/MKV (XVID, H.264, DIVX) /FLV(FLV)/MOV (H.234)/MP4(MPEG4, AVC)/MPG(MPEG1)/VOB (MPEG2)/MPG (MPGPS) /RMVB(RV40)/RMText file: TXTChoose the content which you need display: Video, Music, Photo Text.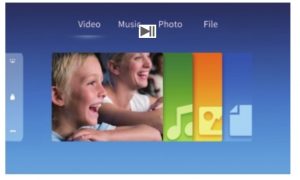
Choose the file which you want to display, press ‘‘ display or stop.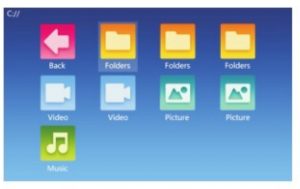
HDMI Equipment Connect
HDMI slot could connect to computer and all the device with HDMI slot. As connected, choose the signal source HDMI.
Support files:576P, 480P, 720P, 1080P, 640*480, 800*600, 1024*768, 1280*1024, 1280*720, 1440*900, 1920*1080, 1366*768, 1280*800, 1440*960, 1600*1200, 1680*1050Our projector support HDMI slot and MHL cable and, connect your mobile and tablet to projector.
- Please consult your mobile’s factory or agency for this function.
- This function may be affected by device and cable.
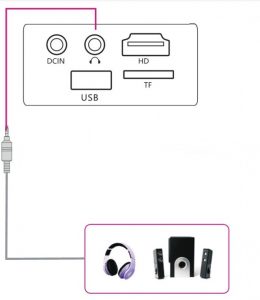
3.5mm Audio Device ConnectCould connect 3.5mm earphone and speaker equipment’s
Notice: Due to Dolby copyright, this projector not support Dolby related decode.
6.1 Menu setImage menuRemote control use guide: press ‘‘ ![]() key, then the main menu come out, press ‘‘ key, choose to come into the image sub-menu, press ‘‘ key, choose the key program which you want to adjust, then press ‘OK’ key into setting.
key, then the main menu come out, press ‘‘ key, choose to come into the image sub-menu, press ‘‘ key, choose the key program which you want to adjust, then press ‘OK’ key into setting.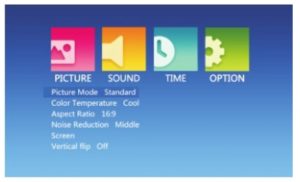 In the image, you could set the following models, such as image mode (text, video, picture, user defined), color temperature (cold hot, user defined), zoom mode (auto, 4:3, 16:9, point-to-point, panoramic, zoom1, zoom2, just scan), denoise (close, low, middle, high, tacitly approve).Audio Sub-menuPress ‘‘ key, and then get the main menu, press ‘‘
 ![]() key, choose audio submenu, press ‘‘ key, choose the items which you want to adjust, then press ‘OK’ key into setting.
key, choose audio submenu, press ‘‘ key, choose the items which you want to adjust, then press ‘OK’ key into setting.
In the audio, you could set the sound mode (music, power, sport, user, balance (-50- +50), auto volume (open, off) surround (close, surround, SRS), balance (120Hz, 500Hz, 1.5Hz, 5kHz, 10kHz).Time Sub-menuPress ‘‘ ![]() key on the remote control, and get the main menu, then press ‘‘ key, choose time sub-menu, press ‘‘ key, choose the items which you want to adjust, then press ‘OK’ key into setting.
key on the remote control, and get the main menu, then press ‘‘ key, choose time sub-menu, press ‘‘ key, choose the items which you want to adjust, then press ‘OK’ key into setting.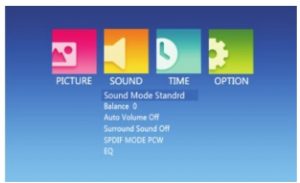
key, choose time sub-menu, press ‘‘ key, choose the items which you want to adjust, then press ‘OK’ key into setting.In the setting, set the language in menu language set, back to factory set and software upgrade.Set Sub-menuPress ‘‘ key on the remote control, then press ‘‘ key to set sub-menu, press ‘‘ key, choose the program which need adjust, then press ‘OK’ key into setting. Set the projector language, back to factory set and software upgrade.
Display Menu Use Guide
You could control the content by the display menu.

Technology Features
Basic parameters
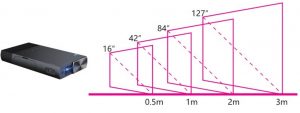
Resolution: 854*480(Support 1080P)Display system: 0.3’’DLPIlluminant: R, G, B—LEDProjector Size: 15—-100 inchesProjection Ratio: 1.4Projection Distance: 0.5M—-3MSupport: Airplay DLNA MiracastCompatible Storage Device: USB/TF cardHD: Standard HD interface (input & output)Headphone port: 3.5mm Stereo JackSpeaker: 1.5WPower Input: 12V 1.5APower Output: 5V 0.5ABattery: 5200mAhPower Consumption: 20WWorking Temperature: Sea level time 0°C—-35°Size: 147*82*24mmWeight: 271g
Projector distance & size
ExquizOn S1 DLP Mini Portable Projector User Manual – ExquizOn S1 DLP Mini Portable Projector User Manual –
[xyz-ips snippet=”download-snippet”]