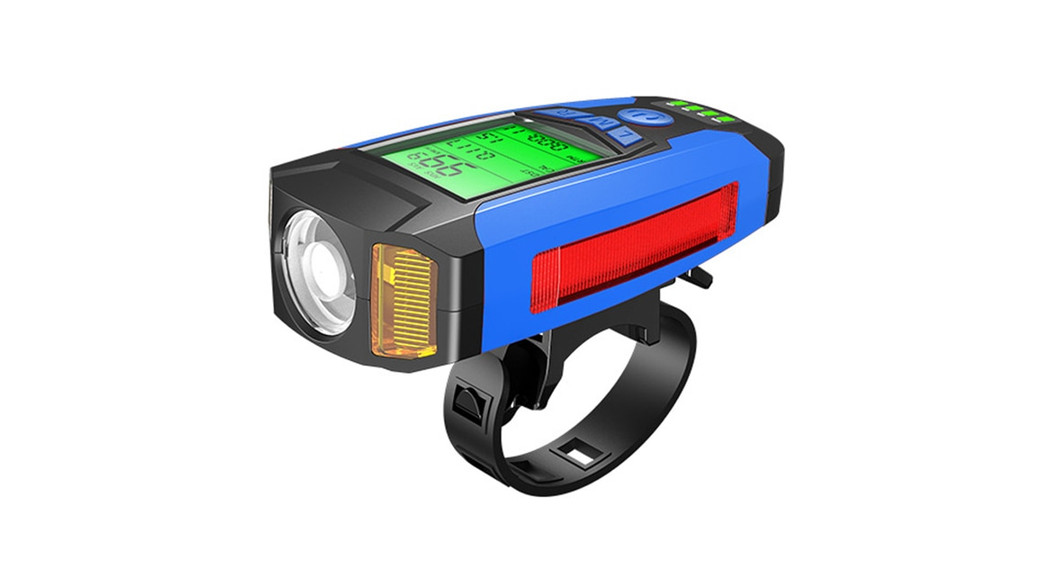
AS0808 User manualProduct description
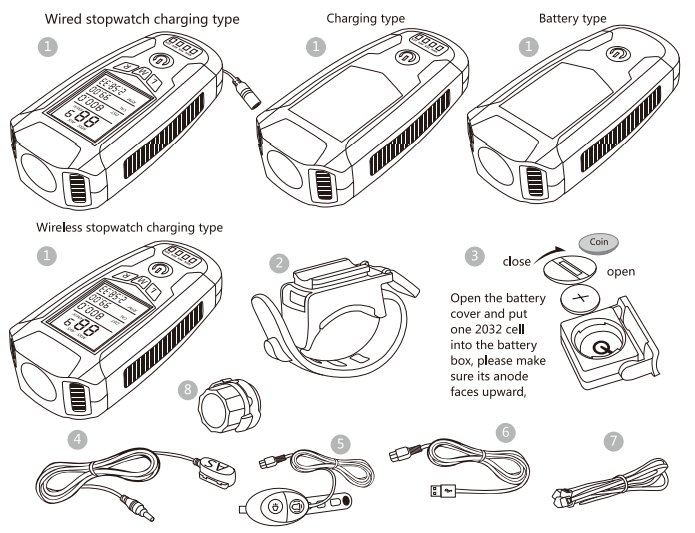
Part list/For optional types
- Light body
- Bottom base
- Bottom base
- Sensor
- Speaker controller
- Charging wire
- Fastening ribbon
- Magnetic emitter
Wired stopwatch charging typeLight + bottom base + speaker controller + wired sensor + magnetic emitter + fastening ribbon + charging wireWireless stopwatch charging typeLight + bottom base + speaker controller + wireless sensor + magnetic emitter + fastening ribbon + charging wireCharging typeLight + bottom base + speaker controller + charging wireBattery type Light + bottom base + speaker controller
Installation Instructions
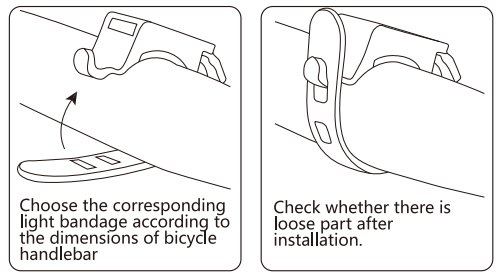
Clip installation figure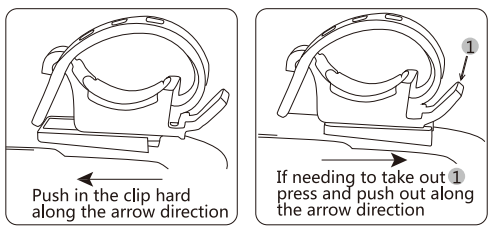 Light bandage installation figure
Wired stopwatch signal interface connection scheme
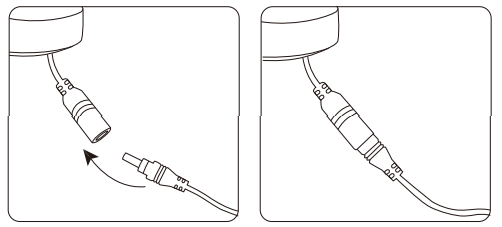 Cable fixation: arrange cable along the front fork, then use some fastening ribbons to fasten, the cable for the handlebar must be entwined onto it and fixed with fastening ribbons so as not to hinder the handlebar movement.
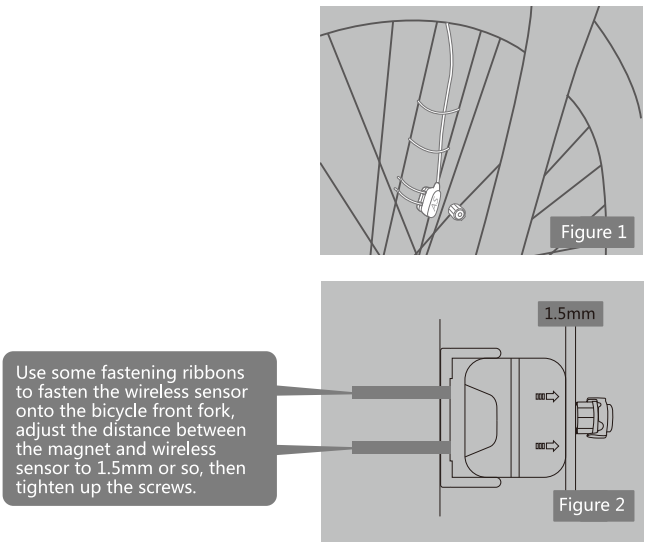
 Choose the corresponding magnetic mounting hole according to the diameter of the beam inside the wheel, install the emitter and make it on the same side with the mounting hole, rotate and tighten up, then adjust the distance between the magnet and sensor to 1.5mm, refer to Figure 1 and 2 for details.
Magnet and wired stopwatch sensor installation figure
 Product Characteristics
 Product Characteristics
Utilize German quality standard and anti-dazzle convex lens similar to automobile dipped headlight, thereby not causing dazzling effect for road passengers and drivers and ensuring personal security.Match with 2 highlight amber fog lights, having strong penetrability, being able to light up the front roads even on foggy or rainy days.10 COB red light beads on both sides, enabling high visibility of drivers and passengers around, making the passengers and coming bicycle can see each other from a long distance, thereby having the warning effect. Built-in 1200mA battery with fender function, anti overcharging and discharging, having high safety performance and long life cycle up to 3.5-6.5 hours.Split switch design, upper part controlling light modes, bottom part controlling speaker volume, enabling more convenient operation.4 battery indicator lights, having high accuracy, making you get to know the real-time battery and enjoy a carefree trip.Smart anti-theft alarming mode, being triggered by vibration, being able to prevent and intimidate stealer. 130 high decibel deafening sound, 5 speaker modes optional and suitable surely for you; 5 lighting modes, 300 lumens output, lighting up the road to your home.
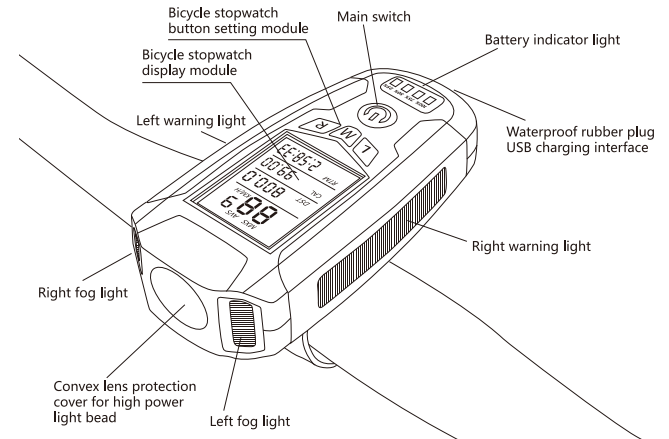
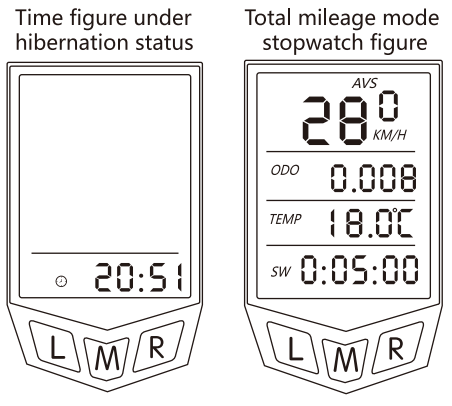
Stopwatch function descriptions
| Max speed(Max riding speed)Average speed (Average riding speed 0.0-99.9) Speed (current riding speed)Single trip mileage (single riding mileage) Riding time (single riding time)Total mileage (total mileage 0.000-99999 kilos/miles) Calories (heat consumed 0.0-99999)LCD night light (long press M button for 3 seconds to let it on always, press again to turn it off)Fat (fat consumed)Temperature (ambient temperature) Stopwatch | Time mode (12H/24H)Hibernation mode (hibernation initiated if no signal for 5 minutes, only time and time symbol displayed) Km/Mile (kilometer/mile setting)Maintenance reminder function |
How to reset the parameters
Press L and R buttons at the same time for more than 3 seconds to set various parameters (mileage, unit, wheel radius, weight, maintenance value) Setting procedures:
- Enter mileage unit setting, the unit is kilometer by default, use R button to switch between kilometer and mile, use M button to confirm.
- Enter tire circumference setting, the value being 2060 by default (2060mm is the tire circumference), the numbers are in flashing status, then set from left to right, use R button to change the numbers and M button to confirm.
- Enter weight setting, confirm its unit first, the value being 065 by default, the character K becomes flashing (K is unit for kilogram), press R button to switch to L (L stands for pound, 65 kilograms equal to 143.3 pounds), press M button to set from left to right, use R button to change the numbers and M button to confirm.
- Enter maintenance setting, the value being 200 by default, press R button to switch among 4 values 200, 400, 600, and 800, use M button to confirm, the initial setting is already finished.If intending to restore to resetting, long-press L and R buttons for 3 seconds to enter resetting, the operation procedures same as the aforementioned.
Mode Descriptions
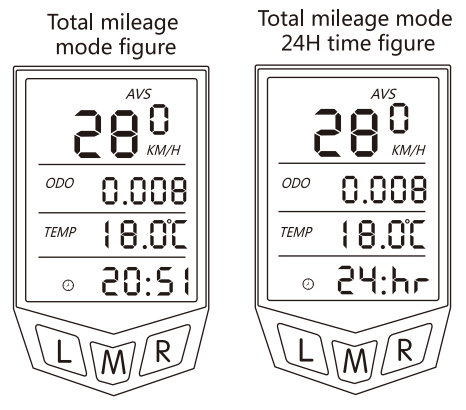
Total mileage mode
This mode displays average speed, total mileage, temperature, time, stopwatch.
- How to set total mileage zero clearingPress the L button to make the total mileage character flash, long-press the R button for more than 3 seconds, then set from left to right, use the R button to set and the L button to confirm. The setting range is 0.000 to 99999, zero clearing will happen automatically if exceeding the range.
- How to set temperature unitPress the L button to make the total mileage character flash, then press the L button once again to trigger temperature flashing, long-press the R button for more than 3 seconds to make the “degree centigrade” character flash, then press the R button again to change the unit from Centigrade to Fahrenheit, use M button to confirm.
- How to set timePress the L button to make the time symbol flash, then long-press R button to switch between 24H and 12H, press the R button again to confirm; press the L button to set time, then press the R button again to change time numbers, use the L button to switch among the hour, minute and second, use R button to set and M button to confirm.
- How to switch to a stopwatchIn the total mileage mode, press the R button to switch to the stopwatch, press the L button to initiate. Press the L button to pause, press L again for zero clearing, and restart; press the R button to switch from stopwatch to time mode.
Single trip mode
This mode displays max speed, single trip, calories, riding time.How to switch calories and fatPress the R button, calorie or fat functions will switch to each other automatically.How to zero clear all dataLong press the L button for more than 3 seconds, max speed, single trip, calories, riding time will zero clear automatically.
Speed (current riding speed)Speed can only be shown when riding, the topmost speed character flashes with the accuracy of 0.1 kilometers per hour, the speed range is 0.00-99.9 kilometers per hour or 0.00-99.9 miles per hours; if not in riding status, the screen shows the max speed or average speed.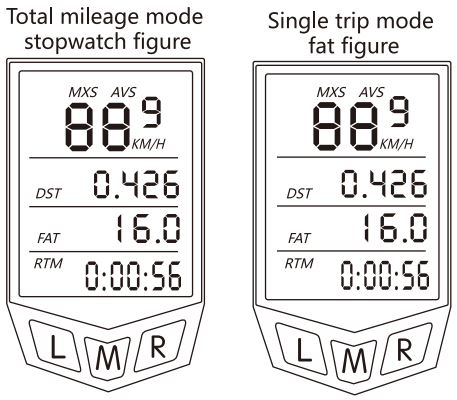 LCD nightlightIn 24H time mode, set with 17:00-07:00, press any button, the backlight will be on for 4 seconds; long press M button for more than 3 seconds under any time setting, the backlight will be on always; also long-press M button for more than 3 seconds to turn off the backlight.
Cancellation of maintenance symbolWhen the riding distance exceeds the set maintenance mileage value, the maintenance mileage character ![]() will flash, long-press the R button for more than 3 seconds under any mode to cancel the reminder.
will flash, long-press the R button for more than 3 seconds under any mode to cancel the reminder. ![]()
Power-saving modeIf there is no input signal or button pressing after 5 seconds, the hibernation mode will start, only time and time symbols are displayed.Low-battery reminder functionWhen the battery voltage is lower than 2.5V, the battery symbol will flash to remind that the battery needs to be replaced or charged.

| Wheel specification | Circumference (mm) |
| 16 ” x1.5 “ | 1206 |
| 16 ” x1.95 “ | 1253 |
| 16 ” x2.0 “ | 1257 |
| 20 ” x1.25 “ | 1450 |
| 20 ” x1.35 “ | 1460 |
| 20 ” x1.5 “ | 1490 |
| 20 ” x1.75 “ | 1515 |
| 20 ” x1.95 “ | 1565 |
| 20 ” x1-1/8 “ | 1545 |
| 20 ” x1-3/8 “ | 1615 |
| 20 ” x1-1/4 “ | 1618 |
| 22 ” x1-3/8 “ | 1770 |
| 22 ” x1-1/2 “ | 1785 |
| 24 ” x1(520) “ | 1753 |
| 24′ x3/4′ tubular | 1785 |
| 24 ” x1-1/8 “ | 1795 |
| 24 ” x1.75 “ | 1890 |
| 24 ” x1-1/4 “ | 1905 |
| 24 ” x19 ” /195 ‘ | 1916 |
| 24 ” x2.00 “ | 1925 |
| 24 ” x2.125 “ | 1965 |
| 26 ” x1.0 “ | 1913 |
| 26 ” x1.25 “ | 1953 |
| 26 ” x1.5 “ | 1985 |
| 26 ” x1.75 “ | 2035 |
| 26″ x19″ /195″ | 2055 |
| 26 ” x2.0 “ | 2074 |
| 26 ” x2.1 “ | 2095 |
| 26 ” x2.25 “ | 2115 |
| 26 ” x2.3 “ | 2135 |
| 27 ” x1-1/8 “ | 2155 |
| 27 ” x1-1/4 “ | 2161 |
| 29 ” x2.1 “ | 2288 |
| 29 ” x2.2 “ | 2298 |
| 29 ” x2.3 “ | 2326 |
| 650cx2Omm | 1945 |
| 650cx23mm | 1990 |
| 700c tubular | 2130 |
| 700cx2Omm | 2074 |
| 700cx23mm | 2105 |
| 700cx25mm | 2124 |
| 700cx28mm | 2136 |
| 700cx3Omm | 2145 |
| 700cx32mm | 2155 |
| 700cx35mm | 2168 |
| 700cx38mm | 2180 |
Wired stopwatch/wireless stopwatch parametersModel:AS0808Size:101.5(L)X49.5(W)X24.5(H)Led: XPG+COB+2835X2 PCSMain light/Fog light: 300 lumen/30 lumenBattery: 1200mA polymer lithium battery (with fender)Charging cycles: 500+ timesSound mode: 5 typesSound decibel:130dbMaterial: ABS+GPPSCharging time: about 2.5 hoursWaterproofing grade: 4 (anti-drizzle)Battery indicator light brightness: 100%-75%-50%-25%
| Mode | Lumen | Battery time | Mode |
| Gear one | 300 | 4.5h | 2.5h |
| Gear two | 30 | 6.5h | |
| Gear three | 100 | 6h | |
| Gear four | 300 | 3.5h | |
| Gear five | 100 | 5.5h |
Speaker with 5 sounds

How to install speaker wireThere is a USB charging hole and a speaker wire connector hole at the tail part of the bicycle light.How to switch among speaker sound modesLong press the speaker switch for over 2 seconds.How to initiate smart anti-theft alarming mode
How to initiate smart anti-theft alarming mode
Long press the main button for over 3 seconds, you will hear the didi sound 4 times, 5 seconds later, if the bicycle is subject to some extent of vibration, it will initiate the alarming sound for 15 seconds, if being vibrated again, it will sound with the second kind of alarming sound; long-press the main switch to turn off the alarming sound function.
Charging description
Micro USB charging is applied, it also supports cell phone power supply adapter, vehicle-mounted USB interface, computer USB interface, and portable power bank. You only need to open the waterproof rubber plug at its tail, connect it with the charging wire, the charging is fully done if all the 4 battery indicator lights are on.
Notes for light usage
 report this ad
Please don’t irradiate eyes.Don’t soak it in water.Avoid hard impactIt is recommended to charge once a month if not using for a long time.Keep off children’s contact.Please don’t place this product near fire or high heat sources.Please shut down the power supply if not using. Please don’t disassemble if not being professionals.Please don’t disassemble if not being professionals.
Please don’t disassemble if not being professionals.
| Failure | Failure causes |
| Speed indicatoralways being zerowhen riding | Incorrect distance or angle between magnetic emitter and sensor |
| Speed indicatoralways being zerowhen riding | Incorrect parameter setting (bicycle wheel circumference) |
| Screen blackout | Too long exposure to strong sunlight it will restore to normal if put in a shadowy or dark area for a period. |
[xyz-ips snippet=”download-snippet”]