ezviz Mobile Application Quick Start Guide
About this Manual
This manual includes instructions for using and managing the product. Pictures, charts, images, and all other information hereinafter are for description and explanation only. The information contained in this manual is subject to change, without notice, due to firmware updates or other reasons. Please find the latest version in the ™ website (http://www.ezvizlife.com).
Any and all information, including, among others, wordings, pictures, graphs are the properties of EZVIZ Inc. or its subsidiaries (hereinafter referred to be “EZVIZ”). This user manual (hereinafter referred to be “the Manual”) cannot be reproduced, changed, translated, or distributed, partially or wholly, by any means, without the prior written permission of EZVIZ. Unless otherwise stipulated, EZVIZ does not make any warranties, guarantees, or representations, express or implied, regarding to the Manual.
Trademarks Acknowledgement
™, ™ and other EZVIZ’s trademarks and logos are the properties of EZVIZ in various jurisdictions. Other trademarks and logos mentioned below are the properties of their respective owners. Legal DisclaimerTO THE MAXIMUM EXTENT PERMITTED BY APPLICABLE LAW, THE PRODUCT DESCRIBED, WITH ITS HARDWARE, SOFTWARE, AND FIRMWARE, IS PROVIDED “AS IS,” WITH ALL FAULTS AND ERRORS, AND EZVIZ MAKES NO WARRANTIES, EXPRESS OR IMPLIED, INCLUDING WITHOUT LIMITATION, MERCHANTABILITY, SATISFACTORY QUALITY, FITNESS FOR A PARTICULAR PURPOSE, AND NON-INFRINGEMENT OF THIRD PARTY. IN NO EVENT WILL EZVIZ, ITS DIRECTORS, OFFICERS, EMPLOYEES, OR AGENTS BE LIABLE TO YOU FOR ANY SPECIAL, CONSEQUENTIAL, INCIDENTAL, OR INDIRECT DAMAGES, INCLUDING,AMONG OTHERS, DAMAGES FOR LOSS OF BUSINESS PROFITS, BUSINESS INTERRUPTION, OR LOSS OF DATA OR DOCUMENTATION, IN CONNECTION WITH THE USE OF THIS PRODUCT, EVEN IF EZVIZ HAS BEEN ADVISED OF THE POSSIBILITY OF SUCH DAMAGES.
TO THE MAXIMUM EXTENT PERMITTED BY APPLICABLE LAW, IN NO EVENT SHALL EZVIZ’S TOTAL LIABILITY FOR ALL DAMAGES EXCEED THE PURCHASE PRICE OF THE PRODUCT.EZVIZ does not undertake any liability for personal injury or property damage, as the result of product interruption or service termination cause by: a) improper installation or usage other than as requested; b) the protection of national or public interests; c) Force Majeure; d) yourself or the third party, including without limitation, using any third party’s products, software,applications, and among others.REGARDING TO THE PRODUCT WITH INTERNET ACCESS, THE USE OF PRODUCT SHALL BE WHOLLY AT YOUR OWN RISKS. EZVIZ SHALL NOT TAKE ANY RESPONSIBILITES FOR ABNORMAL OPERATION, PRIVACY LEAKAGE, OR OTHER DAMAGES RESULTING FROM CYBER ATTACK, HACKER ATTACK, VIRUS INSPECTION, OR OTHER INTERNET SECURITY RISKS; HOWEVER, EZVIZ WILL PROVIDE TIMELY TECHNICAL SUPPORT IF REQUIRED.The purpose of the Products is to provide an adequate warning in the event of illegal encroachment in certain area(s); however, the proper installation of the Products will not eliminate, but only reduce, accidents, personal injury, or property loss. You are highly recommended to raise your vigilance and strengthen the safety awareness in daily life. SURVEILLANCE LAWS VARY BY JURISDICTION. PLEASE CHECK ALL RELEVANT LAWS IN YOUR JURISDICTION BEFORE USING THIS PRODUCT IN ORDER TO ENSURE THAT YOUR USE CONFORMS TO THE APPLICABLE LAWS. YOU FUTHER AGREE THAT THIS PRODUCT IS ONLY FOR CIVIL USE, AND EZVIZ SHALL NOT BE LIABLE IN THE EVENT THAT THIS PRODUCT IS USED FOR ILLEGITIMATE PURPOSES SUCH AS THIRD PARTY RIGHTS INFRINGEMENT, MEDICAL TREATMENT, SAFETYEQUIPMENT, OR OTHER SITUATIONS WHERE THE PRODUCT FAILURE COULD LEAD TO DEATH OR PERSONAL INJURY, OR USE IN A WEAPON OF MASS DESTRUCTION, CHEMICAL AND BIOLOGICAL WEAPON, NUCLEAR EXPLOSION, AND/OR ANY UNSAFE NUCLEAR ENERGY USES OR ANTI-HUMANITY USAGES. YOU SHOULD UNDERTAKE ALL RESPONSIBILITIES FOR LOSSES OR DAMAGES RESULTING FROM THE ABOVE USAGES WHATSOEVER. IN THE EVENT OF ANY CONFLICTS BETWEEN THE ABOVE AND THE APPLICABLE LAW, THE LATER PREVAILS.
Regulatory Information
FCC InformationFCC compliance: This equipment has been tested and found to comply with the limits for a digital device, pursuant to part 15 of the FCC Rules. These limits are designed to provide reasonable protection against harmful interference when the equipment is operated in a commercial environment. This equipment generates, uses, and can radiate radio frequency energy and, if not installed and used in accordance with the instruction manual, may cause harmful interference to radio communications. Operation of this equipment in a residential area is likely to cause harmful interference in which case the user will be required to correct the interference at his own expense.
FCC ConditionsThis device complies with part 15 of the FCC Rules. Operation is subject to the following two conditions:
- This device may not cause harmful interference.
- This device must accept any interference received, including interference that may cause undesired operation.
EU Conformity Statement
 This product and, if applicable, the supplied accessories are marked with “CE” and comply therefore with the applicable harmonized European standards listed under the Radio Equipment Directive 2014/53/EU, the EMC Directive 2014/30/EU, the RoHS Directive 2011/65/EU.
 2012/19/EU (WEEE directive): Products marked with this symbol cannot be disposed of as unsorted municipal waste in the European Union. For proper recycling, return this product to your local supplier upon the purchase of equivalent new equipment, or dispose of it at designated collection points. For more information see: www.recyclethis.info.
 2006/66/EC (battery directive): This product contains a battery that cannot be disposed of as unsorted municipal waste in the European Union. See the product documentation for specific battery information. The battery is marked with this symbol, which may include lettering to indicate cadmium (Cd), lead (Pb), ormercury (Hg). For proper recycling, return the battery to your supplier or to a designated collection point. Formore information see: www.recyclethis.info.
Industry Canada ICES-003 ComplianceThis device meets the CAN ICES-3 (A)/NMB-3(A) standards requirements.CALIFORNIA PROP. 65 WARNINGThis product may contain one or more chemicals known to the State of California to cause cancer, or birth defects or other reproductive harm.
Preventive and Cautionary Tips
Before connecting and operating your device, please be advised of the following:
- Ensure unit is installed in a well-ventilated, dust-free environment.
- Unit is designed for indoor use only.
- Keep all liquids away from the device.
- Ensure environmental conditions meet factory specifications.
- Ensure unit is properly secured to a rack or shelf. Major shocks or jolts to the unit as a result of dropping it may cause damage to the sensitive electronics within the unit.
- Use the device in conjunction with an uninterruptible power supply (UPS) if possible.
- Power down the unit before connecting and disconnecting accessories and peripherals.
- Use only a factory recommended HDD for this device.
- Improper use or replacement of the battery may result in explosion hazard. Replace with the same or equivalent type only. Dispose of used batteries according to the instructions provided by the manufacturer.
 USE A STRONG PASSWORD
For your privacy, we strongly recommend changing the password to something of your own choosing (using a minimum of 8 characters, including uppercase letters, lowercase letters, numbers, and special characters) in order to increase the security of your product. Proper configuration of all passwords and other security settings is the responsibility of the installer and/or end-user.
Trademarks and Registered Trademarks
- Windows and the Windows mark are trademarks or registered trademarks of Microsoft Corporation in the United States and/or other countries.
1 Introduction
Thank you for purchasing the EZVIZ Mobile Application (EZVIZ APP). If there are any questions or requests, please do not hesitate to contact your dealer.The figures in the manual are for reference only.
1.1 Overview
The Ezviz mobile client software is designed for iPhone based on the iOS7.0 or above/Android4.0 or above, which can generally manage Ezviz products. Byadopting the Ezviz function, it is easy for you to remotely monitor from NVRs, DVRs, and Network Cameras. With this application installed in your phone, you are able to log onto the front-end device via Wi-Fi, 3G or 4G.
Notes:
- Wi-Fi, 3G or 4G access service must be supported by the phone (iOS/Android).
- Network traffic charges may be produced when using the mobile software. Please refer to the local ISP.
1.2 System Requirement
iOS7.0 or above (since iPhone 5)Android 4.0 or above.
1.3 Conventions
In order to simplify the description, we define the “Ezviz Mobile Application (iPhone/Android)” as “APP” and “DVR, NVR, encoder, network camera, andnetwork speed dome” as “device” in the following chapters. Here we describe the operations with iOS system interface. The actual interface may vary according to different models.
2 Getting Started
2.1 Downloading EZVIZ Mobile APPTask 1: Downloading EZVIZ Mobile App for IPhone Users
Steps:
- Log onto the App Store.
- Enter “Ezviz International” to search the Ezviz mobile application.
- Download and install it to your iPhone.
- After installing, tap to run the software.
Task 2: Downloading EZVIZ Mobile App for IPad Users
Steps:
- Log onto the App Store.
- Switch the category to “IPhone Only” app.
- Repeat the steps 2 to 4 of 2.1.1 to run the software.
Task 3: Downloading EZVIZ Mobile App for Android UsersSteps:
- Enter Google Play Store or any other app download software.
- Search for Ezviz App.
- Download and install it on your phone.
2.2 Registering the Application
When you use the software for the first time, you should register an Ezviz Mobile APP account.
Steps:
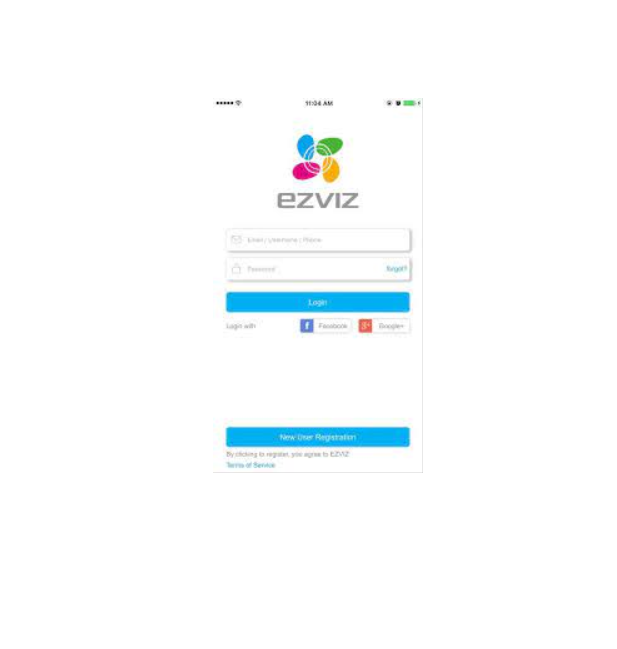
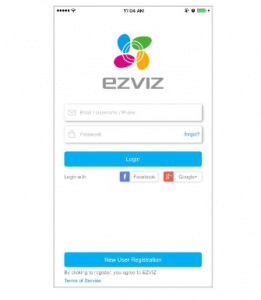
- Tap the icon to run the software.
- Tap Terms of Service to read the agreement.
- Tap New User Registration in the login interface.Note: By taping on New User Registration, you agree to Ezviz terms of service.
- Tap Register using Mobile Phone Number.
- Select a target region in the Region interface.Notes:• The region cannot be changed once you have selected.• You should select an accurate region. Or it may affect some functions of the software.
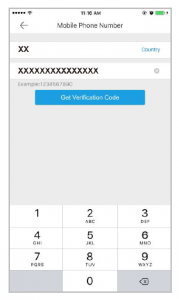
- Tap Finish at the upper-right corner of the interface.• Input your mobile phone number in the Mobile Phone Number interface and tap GetVerification Code. The verification code will be sent to your mobile phone.Note: You can also tap Region in the Mobile Phone Number interface to change the region.
- Input the received verification code in the box and tap Next.Note: The SMS may be delayed. If no messages received, tap Get Again to receive the verification code again.
- Input a user name and password and confirm password in the next interface. Tap Finish to complete registering.
- (Optional) Or tap the icon at the upper-left corner of the interfaceand tap OK in the pop-up window to cancel the registering.
 to run the software.
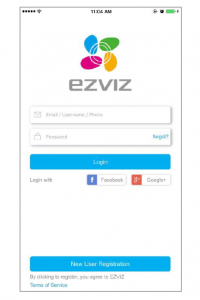
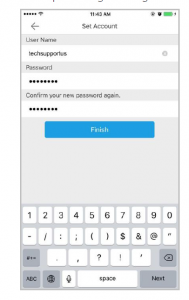
- A user name cannot contain any of the following characters: / \ : * ? “ < > |. And the length of the password cannot be less than 6characters.
- For your privacy, we strongly recommend setting the password to something of your own choosing (using a minimum of 8 characters, including upper case letters, lower case letters, numbers, and special characters) in order to increase the security of your product.
- Proper configuration of all passwords and other security settings is the responsibility of the installer and/or end-user.
2.3 Login
Steps:
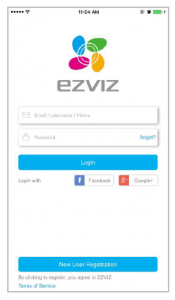
- Tap the icon to run the software.
- Input the registered user name, E-mail address, or phone number. And inputthe password. OrTap at the bottom of the interface to login to yourEzviz account by linking to Facebook and/or Google+ accounts.3. Tap Login to enter the main interface.
If you forget your password, you can
- Tap “forgot?” to show the Verify Account interface.
- Enter your user name.
- Tap Next. A verification code will be sent to your registered phone or the E-mail address.

4) Input the verification code in the next interface and tap Next.Or tap Previous ![]() to go back to the previous step.Or tap the icon
to go back to the previous step.Or tap the icon ![]() to cancel the operation.5) Enter a new password and confirm the new password in the Reset Password interface.6) Tap Submit to complete password reset. Or tap the icon at the upper-left corner of the interface to cancel the operation.
to cancel the operation.5) Enter a new password and confirm the new password in the Reset Password interface.6) Tap Submit to complete password reset. Or tap the icon at the upper-left corner of the interface to cancel the operation.
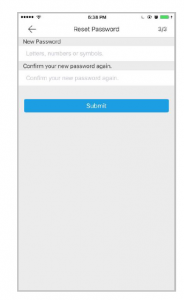

- For your privacy, we strongly recommend setting the password to something of your own choosing (using a minimum of 8 characters, including upper caseletters, lower case letters, numbers, and special characters) in order to increase the security of your product.
- Proper configuration of all passwords and other security settings is the responsibility of the installer and/or end-user.
2.4 (Optional) Logout
Before you start:You should login to the software.Steps:
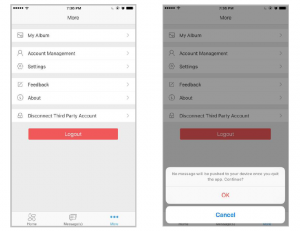
- In the main interface, tap the icon
- Tap the button in the More interface.
- Tap OK in the pop-up message box to logout.

3 Device Management
You need to add a device firstly that all operations such as live view, playback and device management can be accessible. Here we take Mini and DVR asexamples.
3.1 Adding a Device
Task 1: Adding a CameraBefore you start:
Power on your camera (mini) and wait for Red & Blue lights to flash on the camera (This may take about 1 minute).Steps:
- Tap the home icon at the bottom of the interface.
- In the Home interface, tap the icon at the upper-right corner.
- Tap Scan QR Code to scan the device QR code.Note: Normally, the QR code is on the back of the device.Or

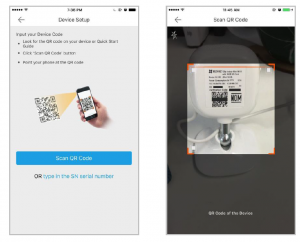 Or
Or
- Tap type in the SN serial number of the interface and input the device serial No. manually.
- Tap the OK to search.Note: The detectors cannot be added by manually inputting.If the device is offline,
- Tap Connect to a Network and select a connecting type2) Type in your Wi-Fi Password and then tap Next.3) Configure the Time Zone and tap on Finish.
- In the Results interface, tap Add.
- Enter the device verification code and tap OK.Notes:• You can find the device verification code on the device label•If you scan the device QR code to add, the verification code entering interface will not be popped up. The QR code includes the verification code information.
- Tap Finish to finish the operation.
 If the device is offline,
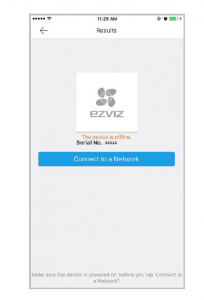 2) Type in your Wi-Fi Password and then tap Next.3) Configure the Time Zone and tap on Finish.
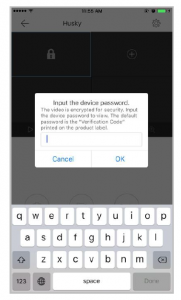
Task 2: Adding a DVR/NVR
Before you start:Power on your DVR/NVR and make sure it is connected to the router.Steps:
- Tap the home icon at the bottom of the interface.
- In the Home interface, tap the icon at the upper-right corner.
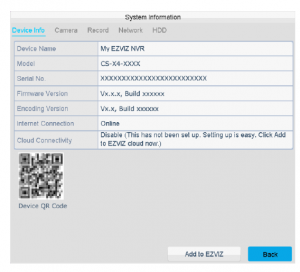
- Tap Scan QR Code to scan the device QR code.Note: Normally, the QR code is on the back of the device, or you can scan the QR code of the device System Information interface.Or1) Tap type in the SN serial number of the interface and input the deviceserial No. manually.2) Tap the OK to search.Note: Refer to
- In the Results interface, tap Add.
- Enter the device verification code and tap OK.

 Or1) Tap type in the SN serial number of the interface and input the deviceserial No. manually.2) Tap the OK to search.Note: Refer to
Notes:
- You can find the device verification code on the device label.
- If you scan the device QR code to add, the verification code entering interface will not be popped up. The QR code includes the verification code information.

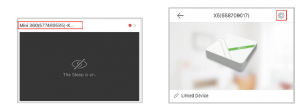
6. Tap Finish to finish the operation.3.2 Configuring the Device
You can check the device version, edit the device name and delete the device bytapping the device name in the Home interface to enter the device configuration interface.
4 Live View
4.1 Live View IntroductionAfter the device is successfully added, you can live view the videos from the added devices, control PTZ movement, audio, capture, record and any other operations.
4.2 Live View InterfaceAfter the device is successfully added, you can live view the videos from the added devices, control PTZ movement, audio, capture, record and any other operations.Tap the home icon ![]() and tap the target device picture on the home interface to enter the Live View interface. The screen will be displayed in 4-division modeby default.
and tap the target device picture on the home interface to enter the Live View interface. The screen will be displayed in 4-division modeby default.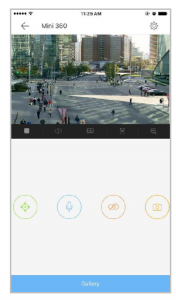
Start/Stop Live View:
Tap ![]() to stop playing live video or tap
to stop playing live video or tap ![]() to start playing live video.Enable/Disable Audio:Tap
to start playing live video.Enable/Disable Audio:Tap ![]() to disable the audio of live video or tap
to disable the audio of live video or tap ![]() to enable the audio.Division ModeTap
to enable the audio.Division ModeTap ![]() to display the live view in single screen or tap
to display the live view in single screen or tap ![]() to display the liveview in 4-division mode.MirrorTap
to display the liveview in 4-division mode.MirrorTap ![]() to display live video in flip image.Digital ZoomTap
to display live video in flip image.Digital ZoomTap ![]() to digital zoom the live video.Pan and TiltFor cameras that supports PTZ function, tap to show the PTZ and you can pan and tilt the camera.
to digital zoom the live video.Pan and TiltFor cameras that supports PTZ function, tap to show the PTZ and you can pan and tilt the camera.
Pan and Tilt
For cameras that supports PTZ function, tap![]() to show the PTZ and you can pan and tilt the camera.MicrophoneTap
to show the PTZ and you can pan and tilt the camera.MicrophoneTap ![]() to enable two-way audio with the device.Sleep ModeTap
to enable two-way audio with the device.Sleep ModeTap ![]() to switch the device to sleep mode.CaptureTap
to switch the device to sleep mode.CaptureTap ![]() to capture the current live video scene.Video RecordingTap
to capture the current live video scene.Video RecordingTap ![]() to start/stop recording.Video QualityTap
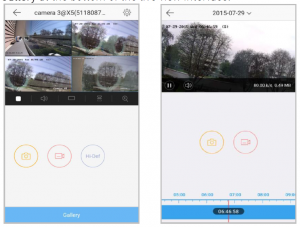
to start/stop recording.Video QualityTap ![]() to show
to show ![]() and switch the video quality from Basic, Standard, andHi-Def. Basic stands for 518×288, Standard stands for 768×432, and Hi-Def stands for 1280×720.
and switch the video quality from Basic, Standard, andHi-Def. Basic stands for 518×288, Standard stands for 768×432, and Hi-Def stands for 1280×720.
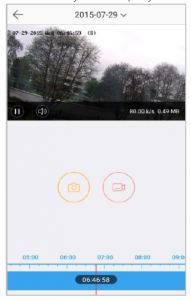
5 Playback
5.1 Playback IntroductionPurpose:You can check the recorded videos stored in the added device for playback.Steps:
- Tap the home icon and tap the target device picture on the home interface to enter the Live View interface.
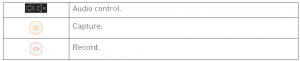
- Tap Gallery at the bottom of the live view interface.The following table displays the icons on the Playback interface:
 The following table displays the icons on the Playback interface:
5.2 Starting and Stopping Playback
Steps:
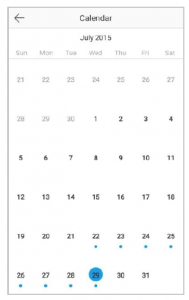
- Tap the date on the upper side of the interface to enter the Calendar interface.
- Select a date in the Calendar interface.
- Slide the timeline bar to adjust the playback time.
- 4. Tap the icon to start playback. Or tap the icon to stop playback.
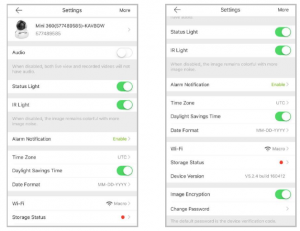
6 Alarm Notifications Configuration
Purpose:You can configure the alarm notifications in Alarm Notification interface. The device will push the alarm notification to your phone. You can also read and delete the alarm notifications in the Message interface.
6.1 Enabling/Disabling Alarm NotificationSteps:
- Tap the device name in the Home interface to enter the Settings interface if there is only one channel under the device.
If there is more than one channel under the selected device, tap the device name and tap the icon
at the upper-right corner to enter the Settings interface. - Tap Alarm Notification to enter the Alarm Notification interface.
- Tap the icon to enable Alarm Notification.
You can also
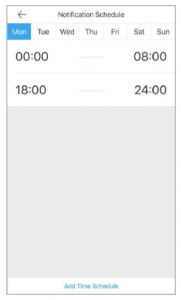
- Tap the icon on the right of Notification Schedule to enable the Notification Schedule.
- Tap Notification Schedule to enter the Notification Schedule interface.
- Tap the time period to enter the Edit Time Segment interface.
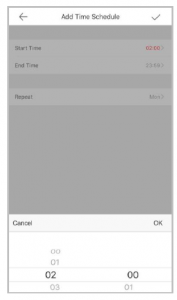
- Tap Add Time Schedule.
- Tap Start Time and End Time to set the time period.Optionally, tap Repeat and select the day you want to repeat.6) Tap the icon to go back to the Notification Schedule interface andtap the icon to confirm the settings.
 6) Tap the icon
 You can also slide the target item from right to left in the Notification Schedule interface to display the delete button. And tap Delete to delete theschedule.Or slide the item from left to right to hide the delete button.Or tap the schedule to enter the Notification Schedule interface to edit theschedule.You can
- Tap Start Time or End Time to edit the start time and the end time.
- Tap the icon to go back to the Notification Schedule interface and tap the icon to confirm the settings.
Note:If enable Alarm Notification, the device will push the alarm messages according to configured notification schedule. For details about setting event (except forthe video intercom device), see the device user manual.
6.2 Reading the Alarm Message
Steps:
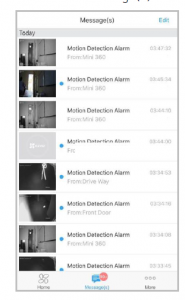
- Tap the icon to enter the Message(s) interface.
- Tap the unread messages to view the message.Or1) Tap Edit at the upper-right corner of the interface.2) Tap Mark All as Read to mark all unread messages as read.


Notes:
- The message with a blue point is the unread message.
- The calling messages of the video intercom device cannot be displayed in the Messages interface
6.3 Deleting the Alarm Message
Steps:
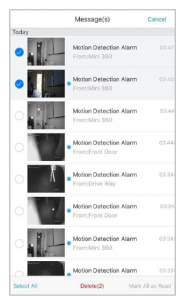
- Tap the icon to enter the Message(s) interface.
- 2Tap Edit at the upper-right corner of the interface.
- Select multiple messages or tap Select All.
- Tap Delete to the selected messages. Or tap Cancel to cancel the operation.
Read More About This Manual & Download PDF:
ezviz Mobile Application Quick Start Guide – ezviz Mobile Application Quick Start Guide –
[xyz-ips snippet=”download-snippet”]